Bring information together with Virtual Fabrics
A Virtual Fabric gives a shared business view over prepared information sources. For example, a Leave overview could connect leave requests with the employee information needed to understand them. It describes the view and its relationships; it does not automatically approve leave or give everyone access to every source.
A type is one kind of information, such as Leave request. A field is a value on it, such as Requested days. A relationship describes how one kind connects to another. A draft is your working design; a published version is a saved release that supported rules and data controls can use.
Before you start
Use the intended workspace and a source prepared for your role. Ask the data owner which teaching source to use. Keep the first lesson small: one fictional leave-request source is enough. If you cannot create or change a Fabric, ask the owner to provide a prepared example you may inspect.
Example 1: explore a prepared Leave overview
- Open the workspace's Virtual Fabrics page and choose the prepared Leave overview.
- In Diagram, select the Leave request type. Read its business fields and any relationship lines.
- Switch to Grid to inspect the structured view of the design.
- Switch to Data and select an available type to inspect the supported data view.
- Compare one fictional row with what the business needs: employee, requested dates, requested days and current status.
You should understand what information this Fabric is intended to provide and which parts are available to your role. A diagram alone does not prove a source has returned business data. An empty successful result differs from a message saying the source cannot be loaded.
If something is unavailable: check the selected workspace/type and ask the source owner. Do not interpret unavailable rows as “nobody has requested leave.”
Choose the view that answers your question
The editor's three views describe different things:
| View | What it helps you inspect | What it does not prove |
|---|---|---|
| Diagram | Types, their visible fields, source origin, and the relationships between types | That a source returned rows or that the relationship matches the business rule |
| Grid | The selected type's field names, keys, types, classifications and source origin, with relationships listed in business language | That editing a displayed field will change the source; Fabric fields are read-only projections |
| Data | A bounded result preview starting from a root type, with fields from related types when the declared relationships join them | That the shown sample is the complete source, that every caller can read it, or that every source operation is supported |
In Data, first choose the Root type that matches the question. For “which employees have leave requests?”, start from Leave request. For “which requests belong to this employee?”, start from Employee. The editor may select a root automatically, but check it instead of assuming the first table is always right. Choose which available fields to display, then inspect the reported relationship hops. The Rows choice limits this preview to 10, 25, 50 or 100 rows; it is not a total-record count. Smart fields returns the view to the editor's suggested field selection, and Refresh requests a new preview.
For example, if the Data view shows Mohammad's Leave request joined to his employee row, check the displayed join fields and values against the intended association. If an unrelated employee appears, stop before using the Fabric in a screen or report: the relationship may connect the wrong business keys even though the diagram is valid. Ask the source owner which stable field should match and correct the relationship in the draft.
If the preview is empty, verify the chosen root, field selection and selected workspace, then refresh once. An empty preview is not proof that no leave requests exist. If the page reports an error or unavailable state, treat it as a failed read and ask the source owner; do not convert that state to “zero requests.”
Example 2: reuse a Fabric before adding a local type
Start by checking whether the intended Fabric and source type already exist. This prevents a second design or a duplicate-looking type from being mistaken for reuse.
- Open the workspace's Virtual Fabrics page. Use Search fabrics... with Leave overview, then compare the row's name, key, status, source count and relationship count with the design the owner intended.
- Open the matching row and inspect Diagram and Grid. Check whether the required type is already present and whether its source and fields match the published data model the owner named. If the intended type is already there, continue with that Fabric; do not add another copy.
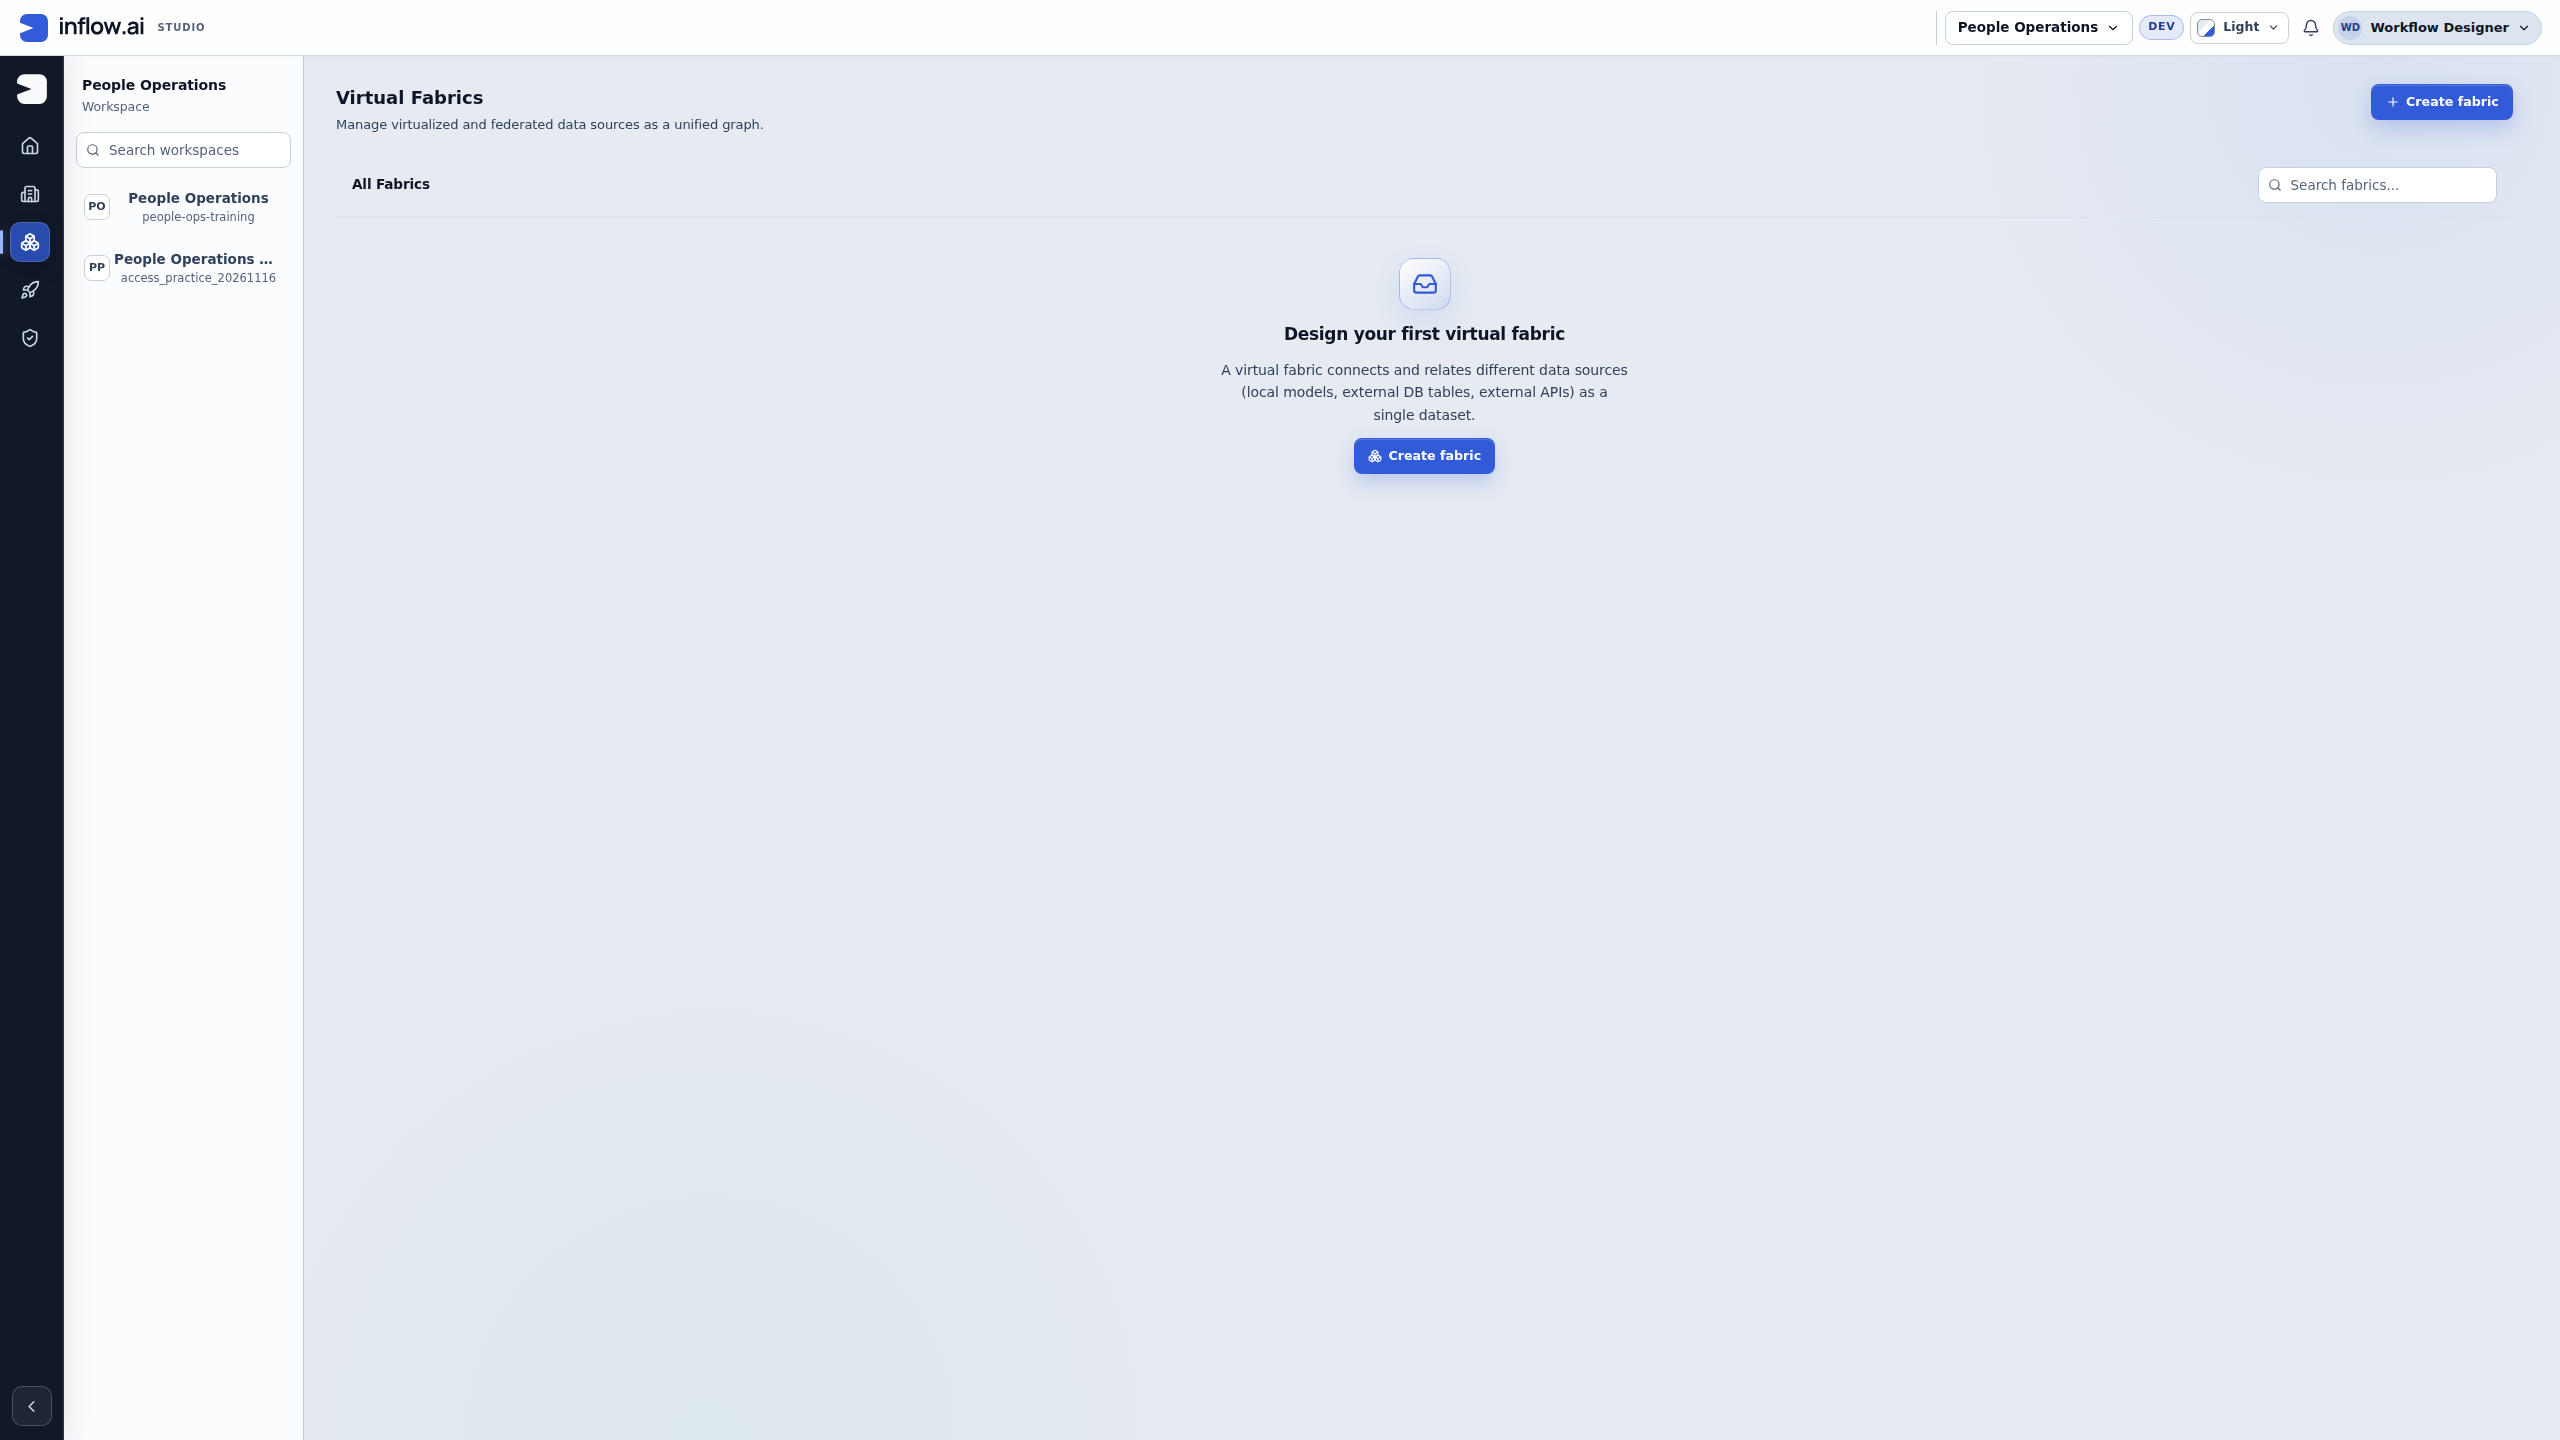
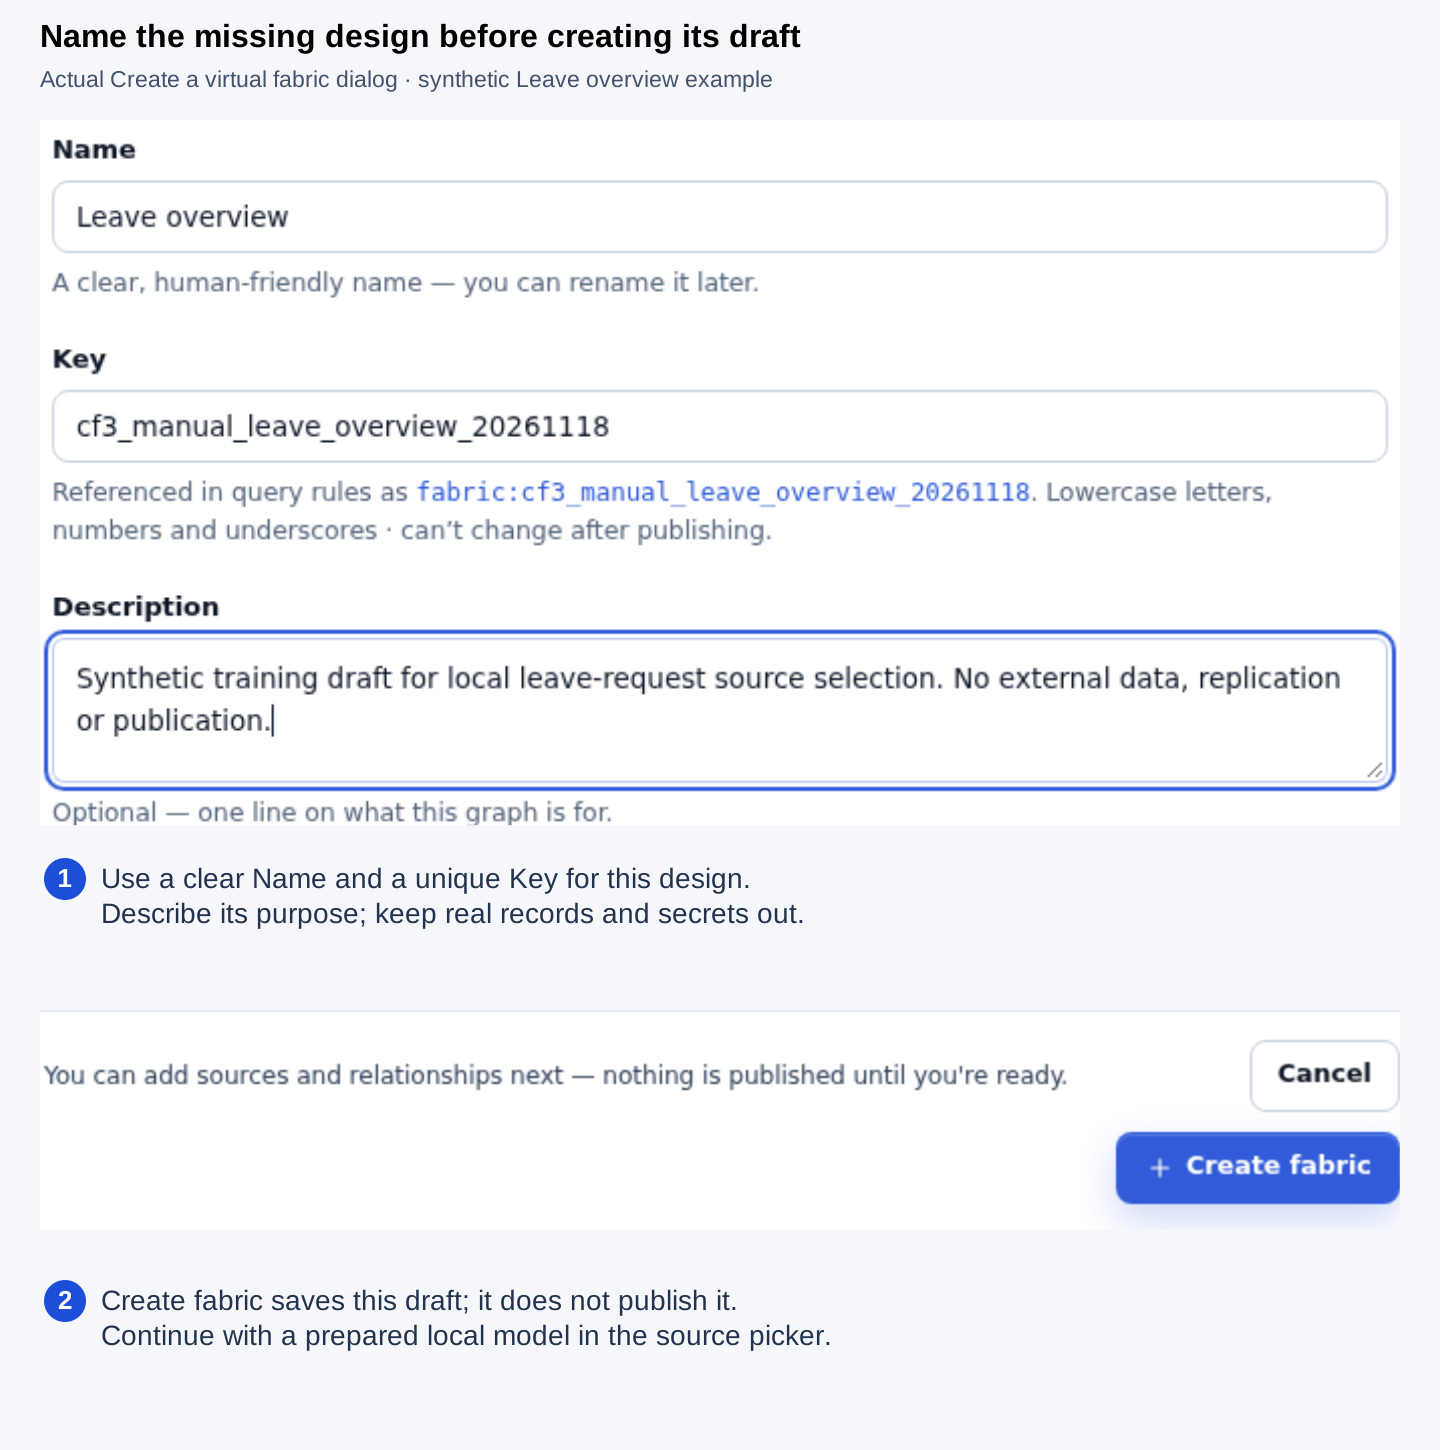
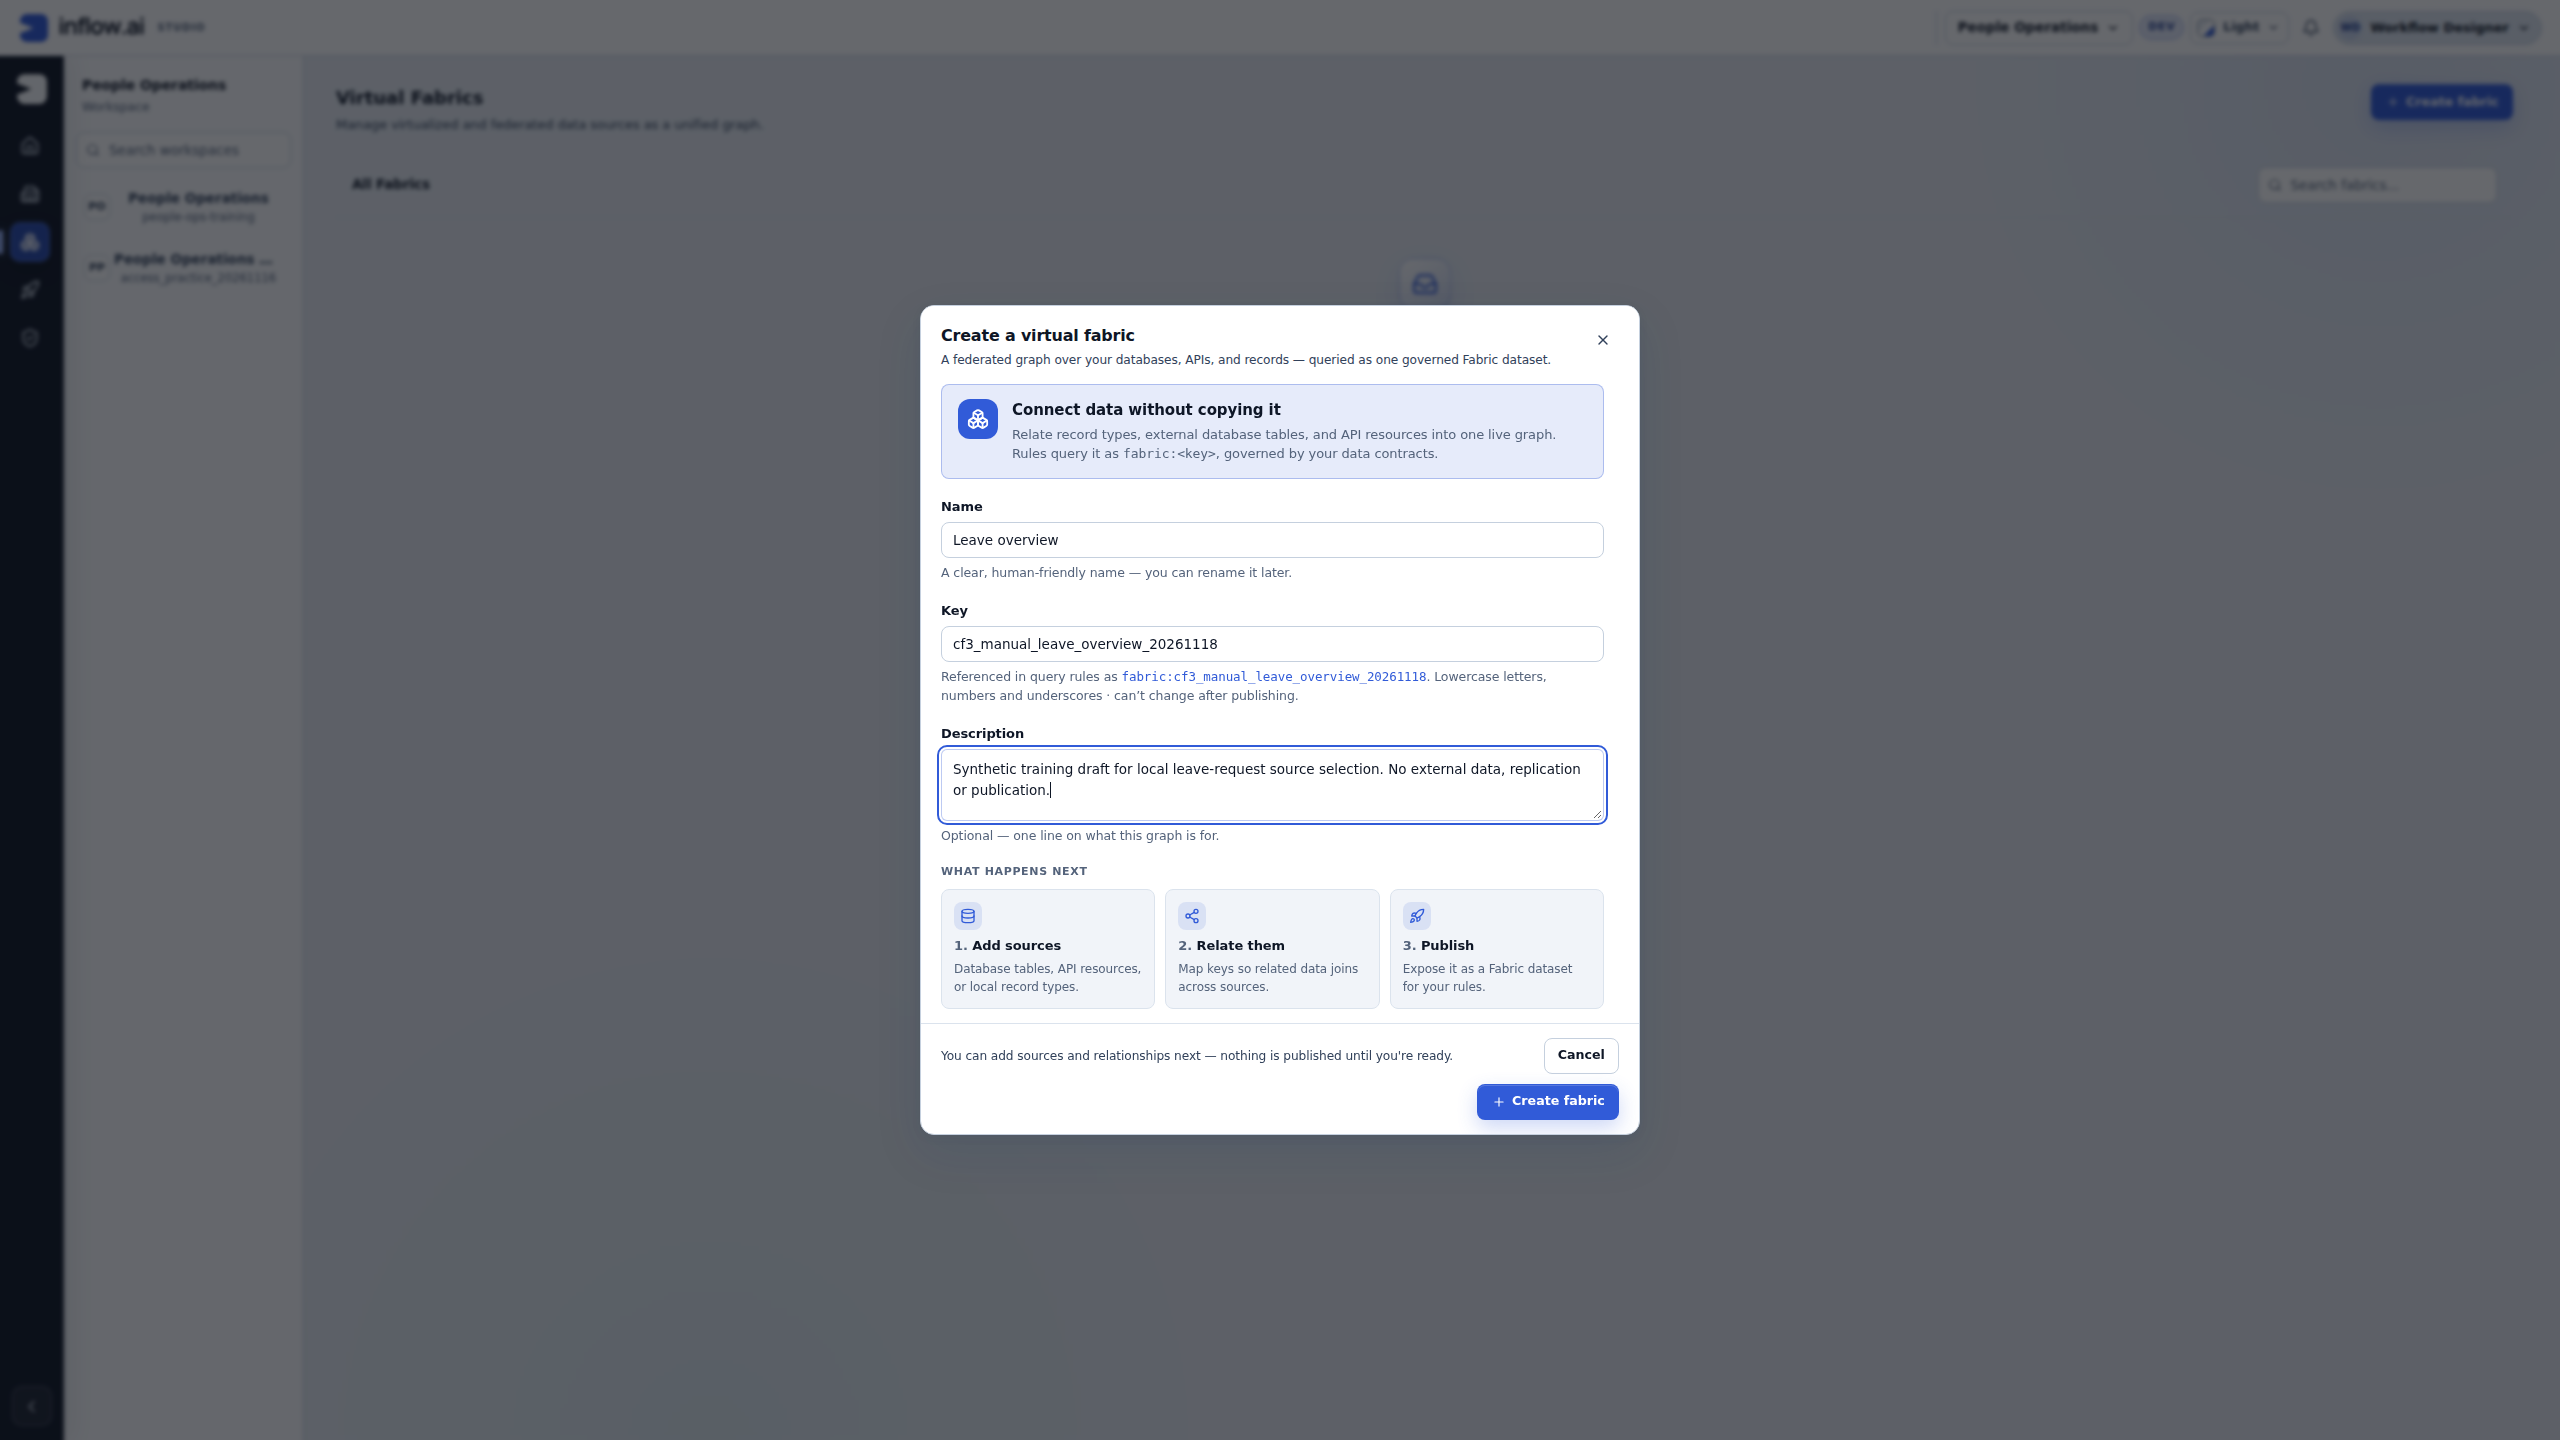
- If no intended Fabric exists, choose Create fabric. Enter Leave overview as its Name, review the suggested Key, add a description, then choose Create fabric. Creating the draft does not publish it. If a matching but incomplete Fabric exists, open its draft instead of creating a new one.
- In the intended draft, choose Add source and the Data model source kind. Select the owner-approved data model from Data model, then select the exact approved Record type. The list represents the data model's latest published version. A model that has no published version has no record types to add; ask its owner to publish the intended version rather than choosing an unrelated model.
- Before adding anything, read the information callout for the selected type and field count. A local source uses the published record type's name and key; this picker does not rename it to an alternate business label. If the same type already exists, close the dialog without adding it.
- Choose Add source only when that type is missing from the intended Fabric. Adding it creates a new Fabric type. If its key collides with an existing type, the editor assigns a unique key; that is not a merge, refresh or reuse. Stop and ask the owner if the two types could represent the same business information. After the dialog closes, inspect the added type's name, source and projected fields in Diagram or Grid, including any platform-generated identity/join fields.
- Save the draft and wait for All changes saved, then choose Validate and read the result. Diagram/Grid and a successful validation describe the saved design; they do not prove that a source returned rows, that a relationship is correct, or that every reader can access it.
For example, if Leave overview already contains the owner-approved Leave request type, use it as-is. If the Employee type is the only missing type, add that exact published Employee record type and review its fields; then confirm any relationship key with the data owner in Example 3. A plausible field name alone does not justify a join. Before publishing, follow Check and publish the view and verify whether any external type is REPLICATED, since publication activates its sync and starts initial replication.
If the model or type is missing or unavailable: distinguish an empty picker caused by no published version from a failed model/schema read. Ask the model owner to confirm the intended workspace, published model version and record type. Do not create a replacement model, switch to another source, or interpret a failed read as proof that the type does not exist.
Follow the local-source setup visually
Use these numbered guides with Steps 1–5 above. They follow Nadia's synthetic Leave overview setup in People Operations. First confirm the workspace and search for the intended Fabric. If a matching design is already present, open it and inspect its types before creating or adding anything.
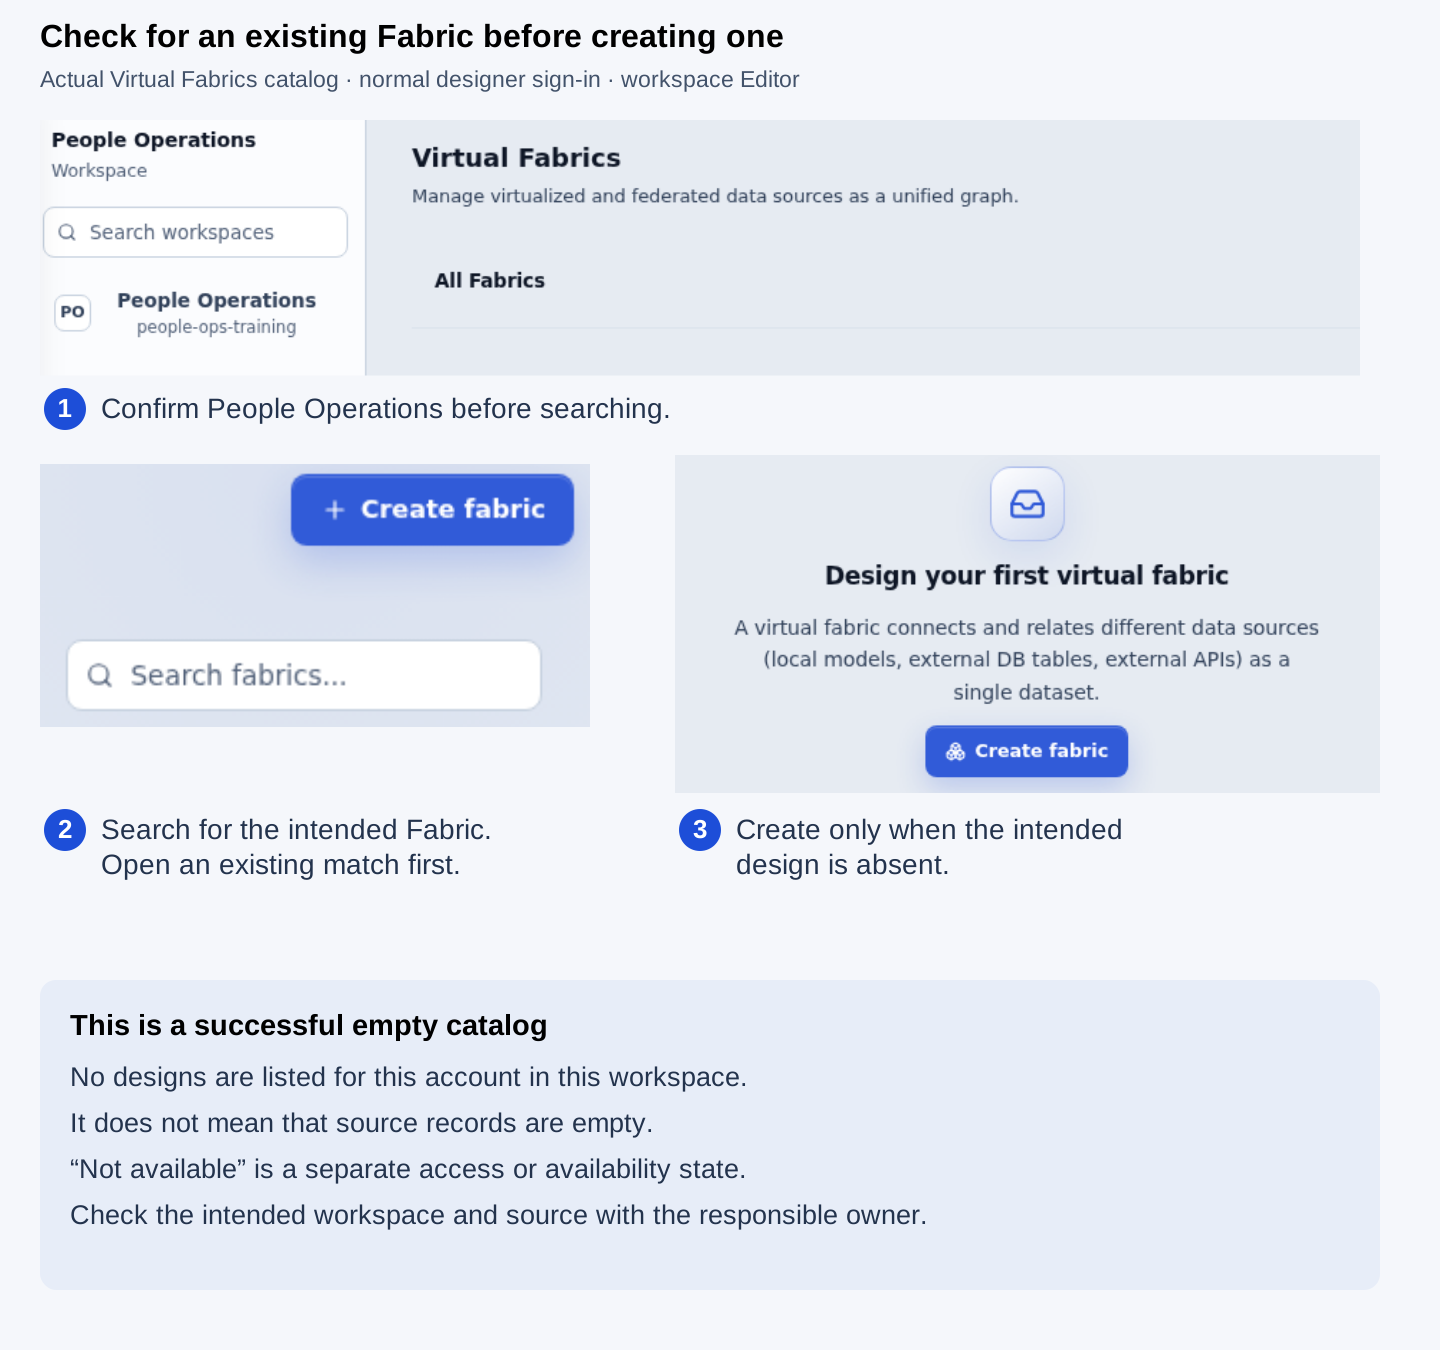
The practice catalog above loaded successfully and was empty for this account. It is a list of Fabric designs, not a count of leave records. A Not available state needs a separate owner/access check; it does not establish an empty source. Open the unmarked catalog screenshot.
When the intended design is absent, enter a clear Name, review the Key, and describe the purpose. The screenshot uses a unique training key; choose the appropriate unique key for your own design. Review the key before choosing Create fabric; it identifies this design. Do not assume it can be changed later.
Nadia created one new empty draft after checking that this design did not already exist. Its sources and relationships were still empty, and it had no published version. The choices labelled Add sources, Relate them and Publish in the creation dialog describe later work; creating the draft does not complete those steps. Open the unmarked creation screenshot.
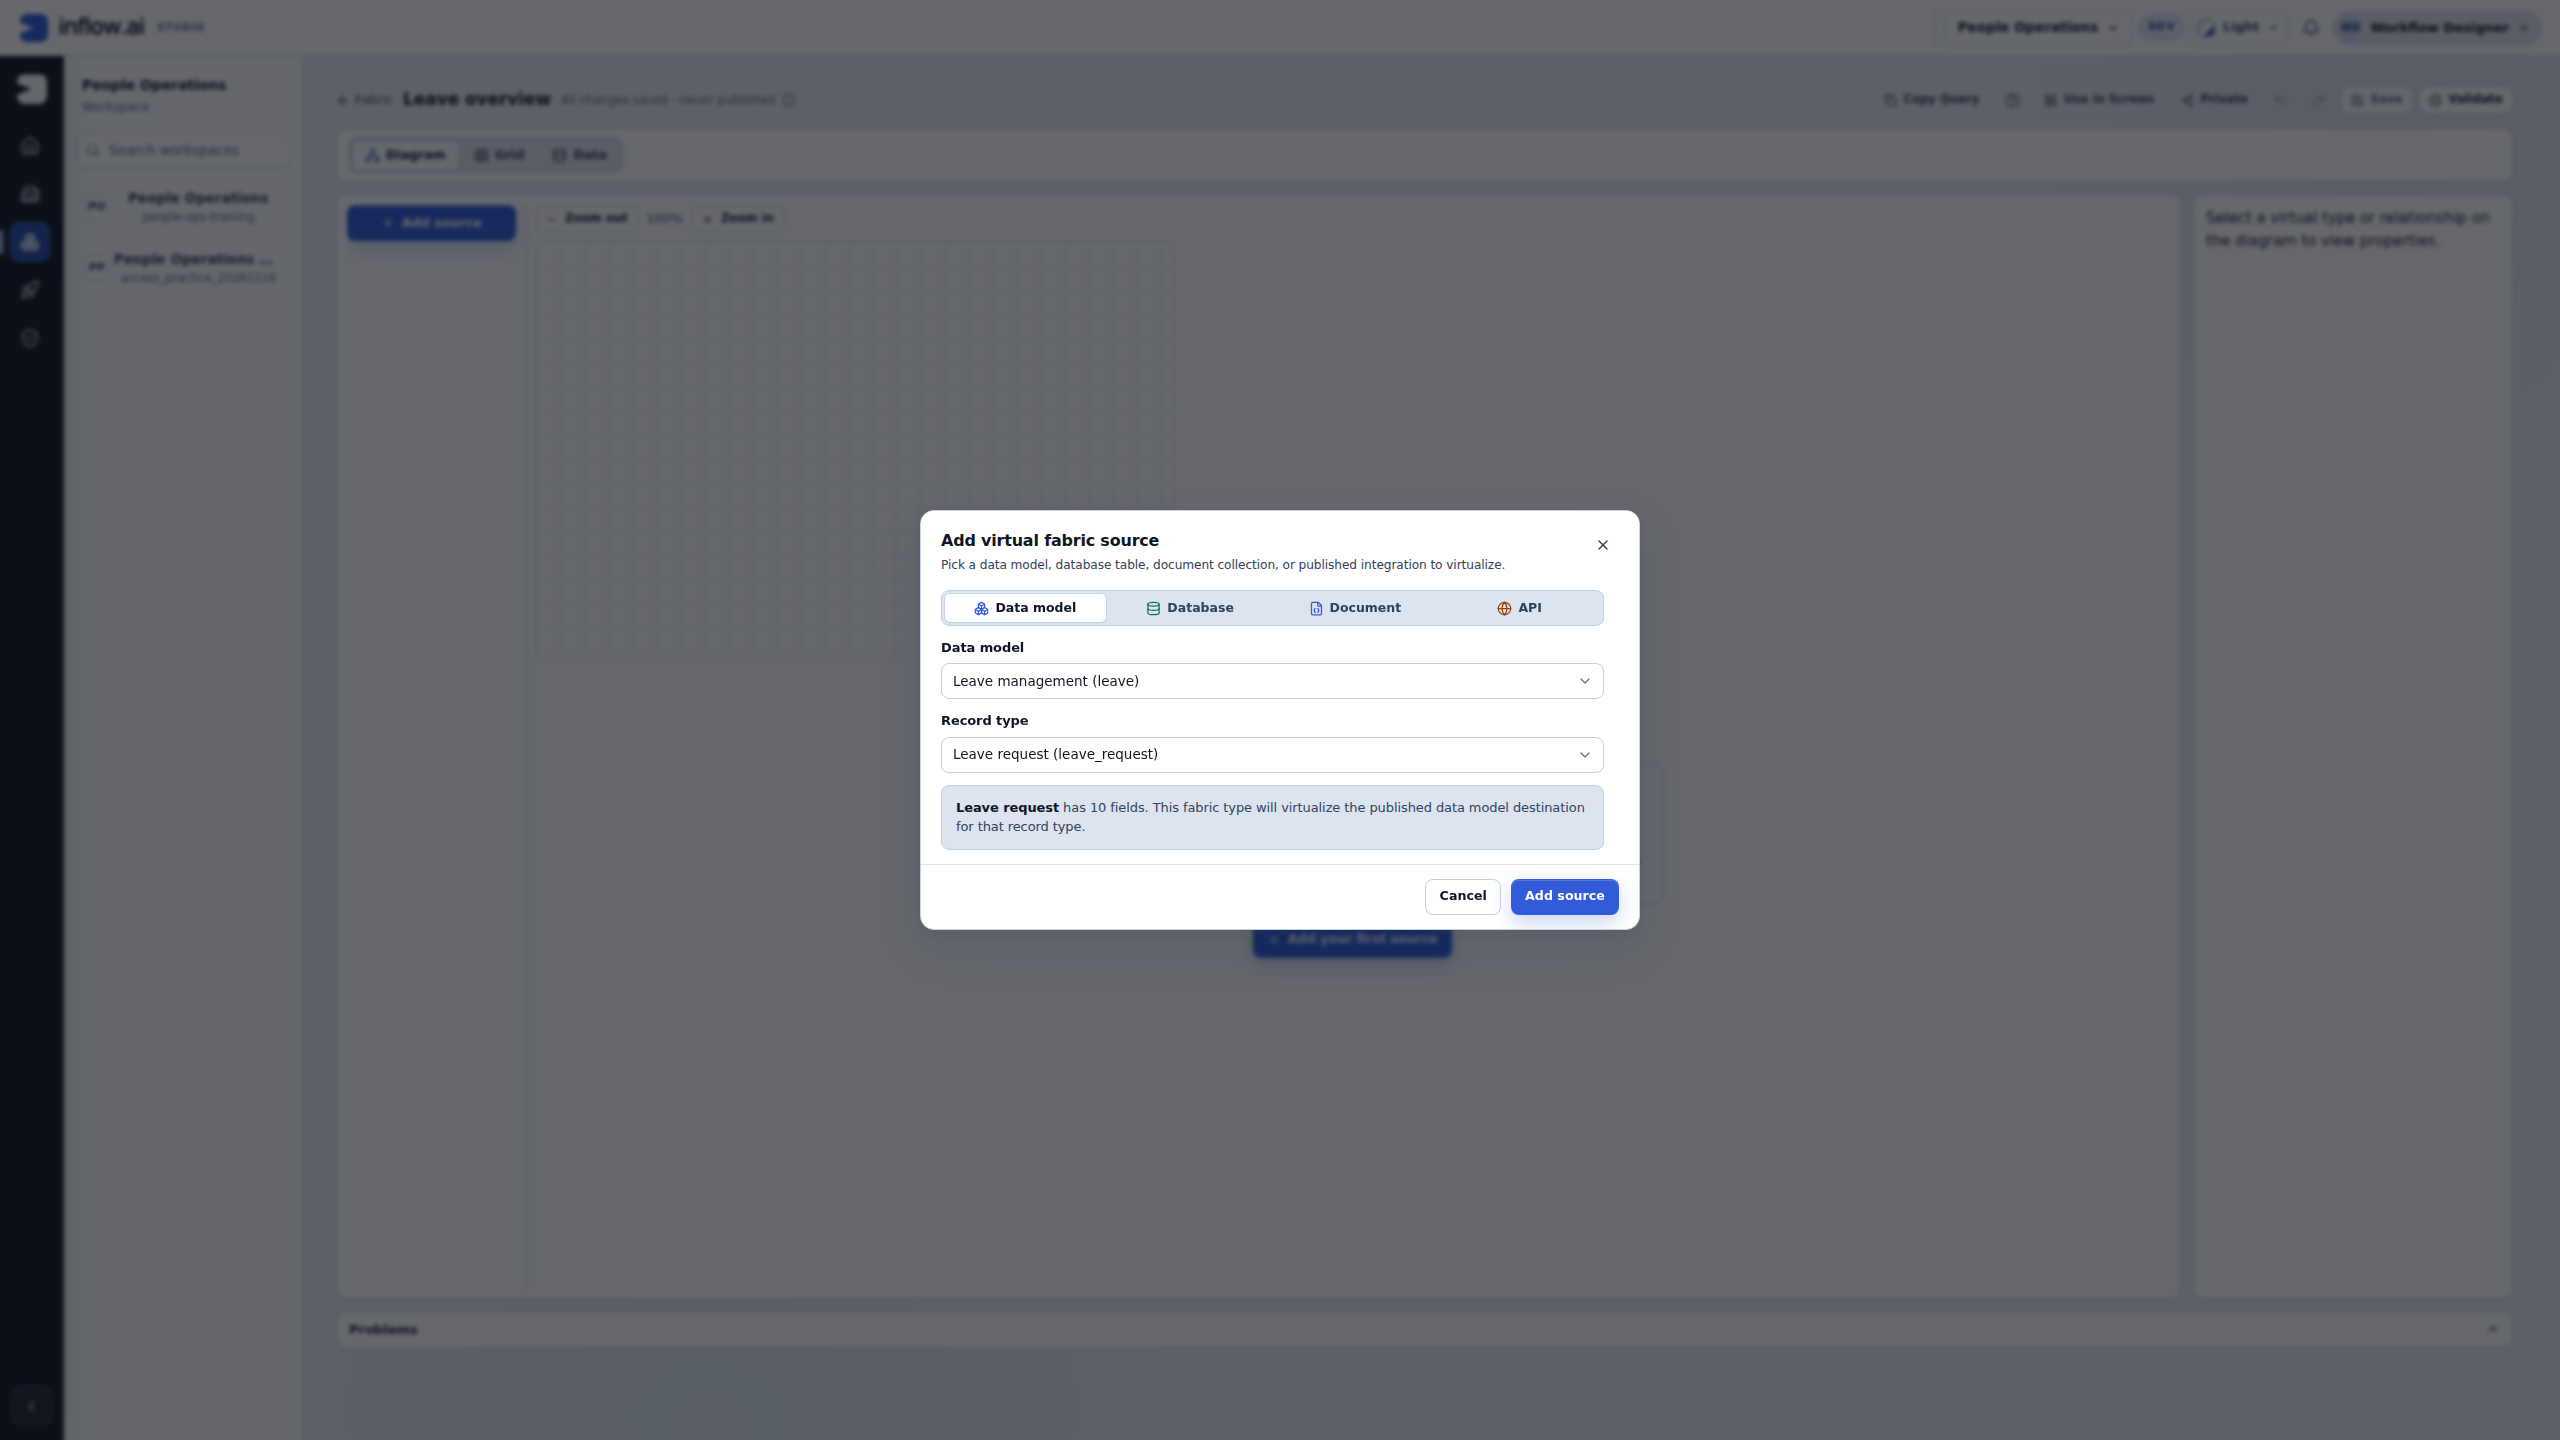
In that draft, open Add source → Data model. Compare both selectors with the source owner’s prepared model: here, Leave management (leave) contains the published Leave request (leave_request) type. A similarly named model can be a different design, so check the names and keys together.
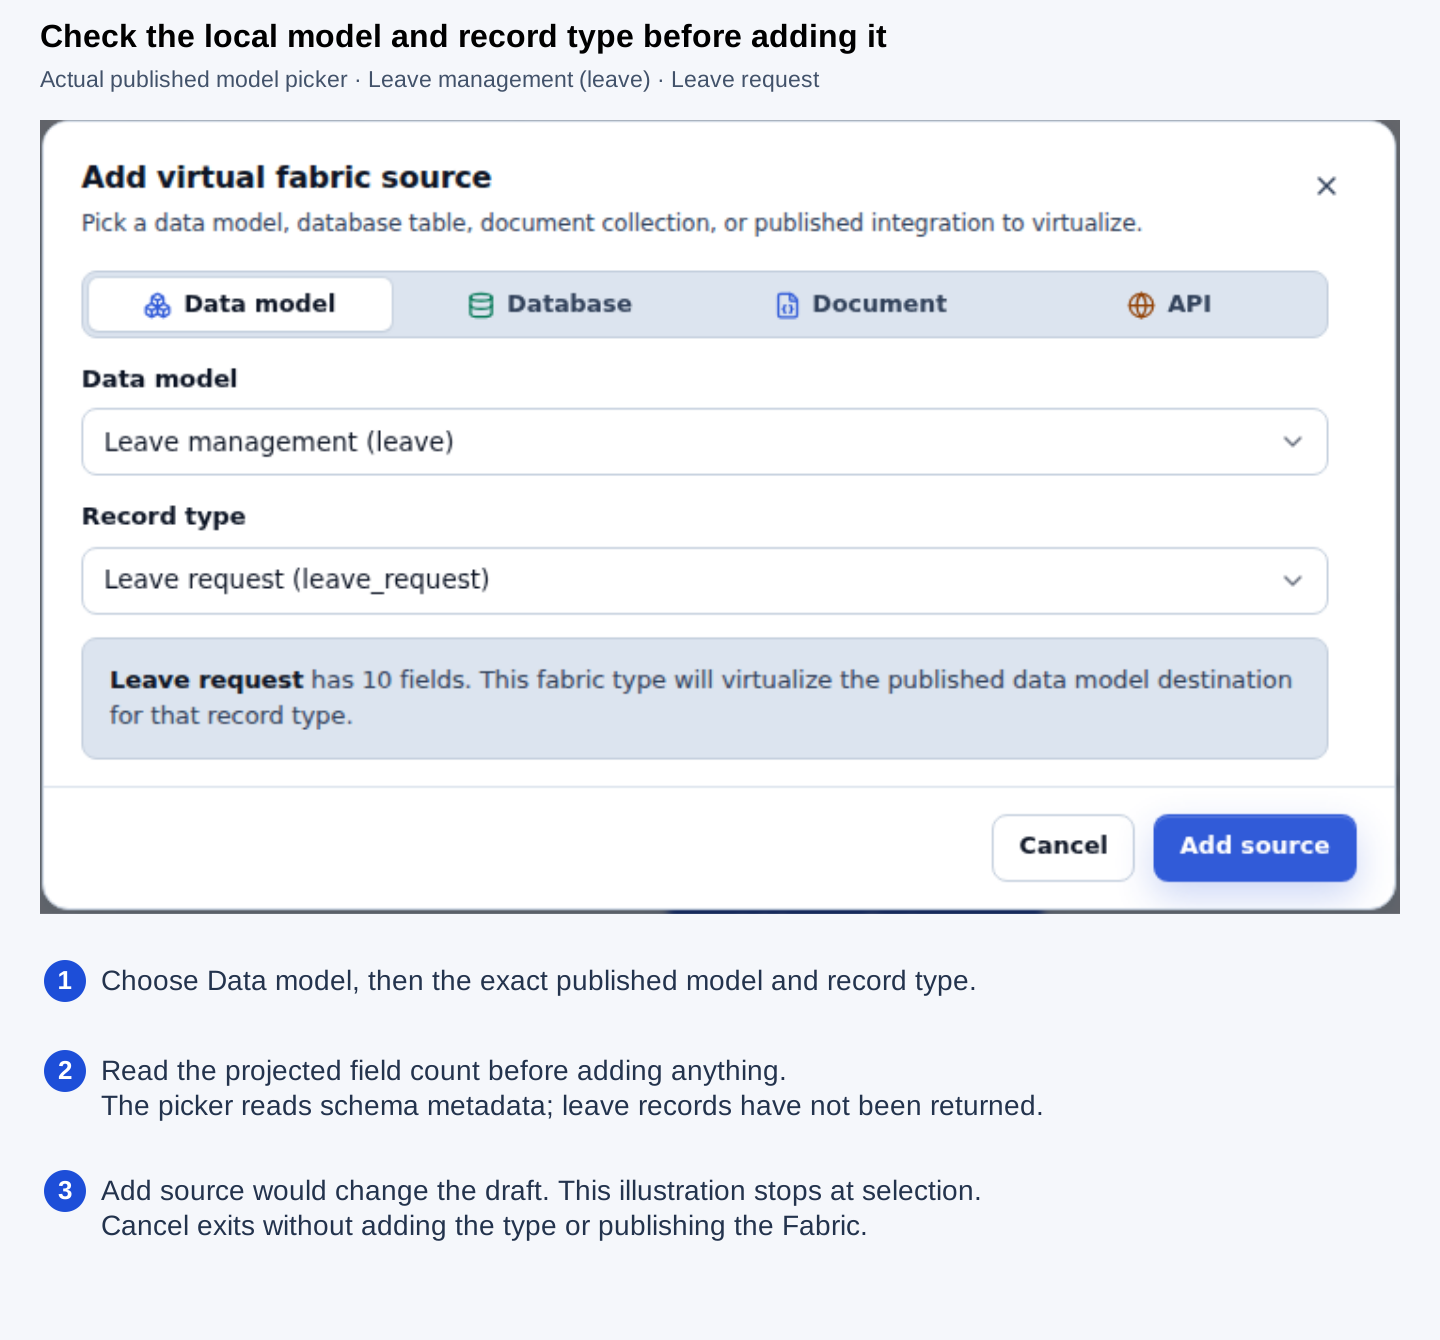
The information callout reports 10 fields for this practice type. That count describes the projected schema; it is not ten leave requests and does not show returned business data. Follow Step 6 only after checking that the exact type is needed and is not already in your Fabric. For this illustration, Nadia chose Cancel: no type was added, the new draft remained empty, and nothing was published or replicated. Open the unmarked picker screenshot.
Example 3: relate requests to employees only when the key is understood
Suppose the prepared sources contain Leave request and Employee. Before adding anything, ask the data owner which value on a request identifies the correct employee. A relationship is a configured field map, not just a line between two type names.
- In Grid, select the Leave request type and inspect its existing relationships. Reuse the matching relationship if it already connects these types with the approved fields; do not add a duplicate.
- If no matching relationship exists, use the relationship controls. Set Relationship many-side type to Leave request, Relationship parent type to Employee, choose one to many, then click Add relationship. For this direction the sentence should read Many Leave request records reference one Employee.
- Inspect Field Mappings for the new relationship. Keep a suggested mapping only if its meaning, types and permitted sample values match the data owner's business key. If no pair exists, choose Add, then use From field and To field to select the owner-confirmed pair. If an existing pair is wrong, correct that row's From field or To field instead of adding a duplicate. A request's employee business reference is not automatically the Employee record's internal
id; a matching-looking name is not enough. Compare the actual fields and values rather than guessing their keys. - Some external systems need several values together to identify the right record, such as a company ID and an employee number. When an API source requires that complete set of lookup values, the relationship controls are unavailable; do not connect the records using only one value. Ask the data or integration owner whether an approved source or already-published Query provides the complete lookup, and use it only where the editor offers it. Otherwise, leave the relationship out. Keep endpoint and request details in the optional technical reference.
- In Data, choose Leave request as the root and inspect Relationships used. Compare a known permitted request with the employee it should reference. For “which employees have no requests?”, choose Employee as the root; request-side fields are empty for those rows, and a request-rooted preview cannot show an employee that has no request row.
- If Relationships used says “no field map — click to configure”, click that message to open the relationship, add the confirmed field pair, save the draft and Refresh the preview. Check the same known association again before publication. If the owner cannot confirm a matching field, stop and keep the relationship unpublished.
- If the preview joins the wrong employee or duplicates a request unexpectedly, repair the map or cardinality and recheck the known example. Do not publish while the association is unexplained.
A successful Validate result checks the design's reported issues; it does not independently prove that your chosen business match is correct.
Check and publish the view
- Save the intended edits and choose Validate.
- Read the problems shown. Repair the relevant field, relationship or source configuration instead of ignoring the message.
- Before publishing, inspect each type's Materialization setting. If a type is marked REPLICATED, publishing automatically enables its sync and starts an initial replication. Confirm the intended source-read and local-copy scope with the data owner and responsible operator. If that effect is not approved, pause and correct the materialization choice before you publish.
- Choose Publish version when you understand the design and the listed issues are resolved.
- Read the actual publication message. If it reports attention needed for replication, involve the responsible operator rather than assuming all data is already copied.
- Select the published Fabric through the supported rule or data-control source picker in the next lesson.
Replication means keeping a local copy of source data for a configured purpose. It is an optional data-management choice, not something every consultant must enable. A published view does not mean every chart, grid and rule supports every source operation.
Example 4: a source is protected
Nadia can see the Fabric's business fields but not some connection or table details. Those details may be deliberately hidden. They are not necessarily missing or deleted.
When making an unrelated edit, leave the protected source configuration unchanged. Ask the authorized source owner if the binding itself needs changing. Do not guess a table, replace it with another connection or copy private source details into an AI prompt. The application continues to apply its own access checks when information is read.
Common mistakes
- Drawing a relationship without understanding it. Agree which business values connect the records and what happens when a match is missing.
- Publishing before checking the data. Inspect a small permitted example and explain the result to the data owner.
- Using the same source everywhere. Each rule/control has its own supported choices. Follow the actual picker and available settings.
- Treating visibility as permission to send data to AI. Ask the information owner about that additional use.
Keep draft, published version and copied data distinct
Saving stores the working draft. Validate reports design problems that need attention. Publish version freezes a version that supported rules and data controls can query or join. A new edit to the draft does not silently rewrite an earlier published version; publish a new version when you intend consumers to use the changed design. Before publishing, review the version message and any replication attention notice.
Replication mode is configured separately from the Fabric's schema, but a published draft can activate it. When a published Fabric contains a REPLICATED type, publication enables its synchronization and starts an initial replication. Treat that as a data-copy and sync action: check the source and local-copy scope with the data owner before you choose Publish version. If publication reports that initial replication failed, reached a row cap, or needs attention, the Fabric version may still be published while that type needs follow-up. Read the actual message, ask the responsible operator to address the issue, and confirm the materialization state before telling colleagues that copied data is ready. Do not turn on synchronization just to make the screen appear complete.
Common mistakes and recovery
- A diagram looks right, but the preview is wrong. Check the selected root, relationship fields and cardinality; compare a permitted joined row with the source owner before publishing.
- The preview returns no rows. Check workspace, root type and selected fields, then refresh once. Treat a visible error or unavailable state separately from a successful empty result.
- A field appears in Grid, so you try to edit it there. Grid members are read-only projections. Change the upstream source or model through its own authorized workflow, then refresh or re-add the prepared source as appropriate.
- A new draft was saved, so you assume every consumer uses it. Check whether the intended version was published. Existing consumers continue to use the versions and sources supported by their own configuration.
- A Fabric is published, so you assume every source was copied. Read the publication and materialization outcomes separately. Escalate a replication attention message to its operator.
- A protected endpoint or table is hidden. Leave it unchanged during unrelated editing and ask its owner if a binding change is genuinely required.
Continue with the query-driven application tutorial or control-choice guide. The separate XML catalogs, integration requests and implementation details are preserved in the optional Fabric technical reference.