Design a business process
A business process describes how a request moves from its beginning to its conclusion. Inflow calls this overall design a lifecycle. You use the lifecycle to describe stages such as Review, Approved and Declined, then add the work that happens inside each stage.
This guide is for consultants who build applications in Studio. You will design a small leave-approval process and understand how its forms, people and results fit together.
Understand the three things you are building
| Term | Plain meaning | Leave-request example |
|---|---|---|
| Lifecycle | The reusable design of the business process. | Every leave request goes through the review design. |
| Case | One running request following that design. | Mohammad's request for five days of leave. |
| Task | One piece of work given to a person. | Sara reviews Mohammad's dates and decides. |
| State | A business stage in the lifecycle. | Review, Approved or Declined. |
| State flow | The steps carried out while a case is in that state. | Open a manager task, wait for the decision, then finish Review. |
| Case file | Information carried through the case. | Request reference, dates, requested days and the manager's answer. |
A record in a data model is a separate thing. A saved leave record does not automatically start a case. Completing Sara's task does not automatically update the leave record either. You will add those connections deliberately as part of the application.
Before you begin
Prepare a development workspace where you may create and edit processes. Use fictional information while learning. The diagram practice below needs only that workspace and authoring access. To continue with the manager-task and running-case sections, you also need the published Manager leave decision form, with its Approved checkbox, Decision comment and Submit decision action, and an administrator-prepared test employee and manager.
If you have not built the forms, follow the form-building part of the application tutorial first. Publish the manager form before selecting it in the process. You can finish the application's start button and task page later, after the process exists.
If New lifecycle, Save or Publish is absent, ask the workspace administrator to check your access. Do not try another person's account to make the controls appear.
Find and resume an existing lifecycle first
Start in the intended workspace. A matching name in another workspace is not the same process, and creating another lifecycle with a new key can split future work between two designs.
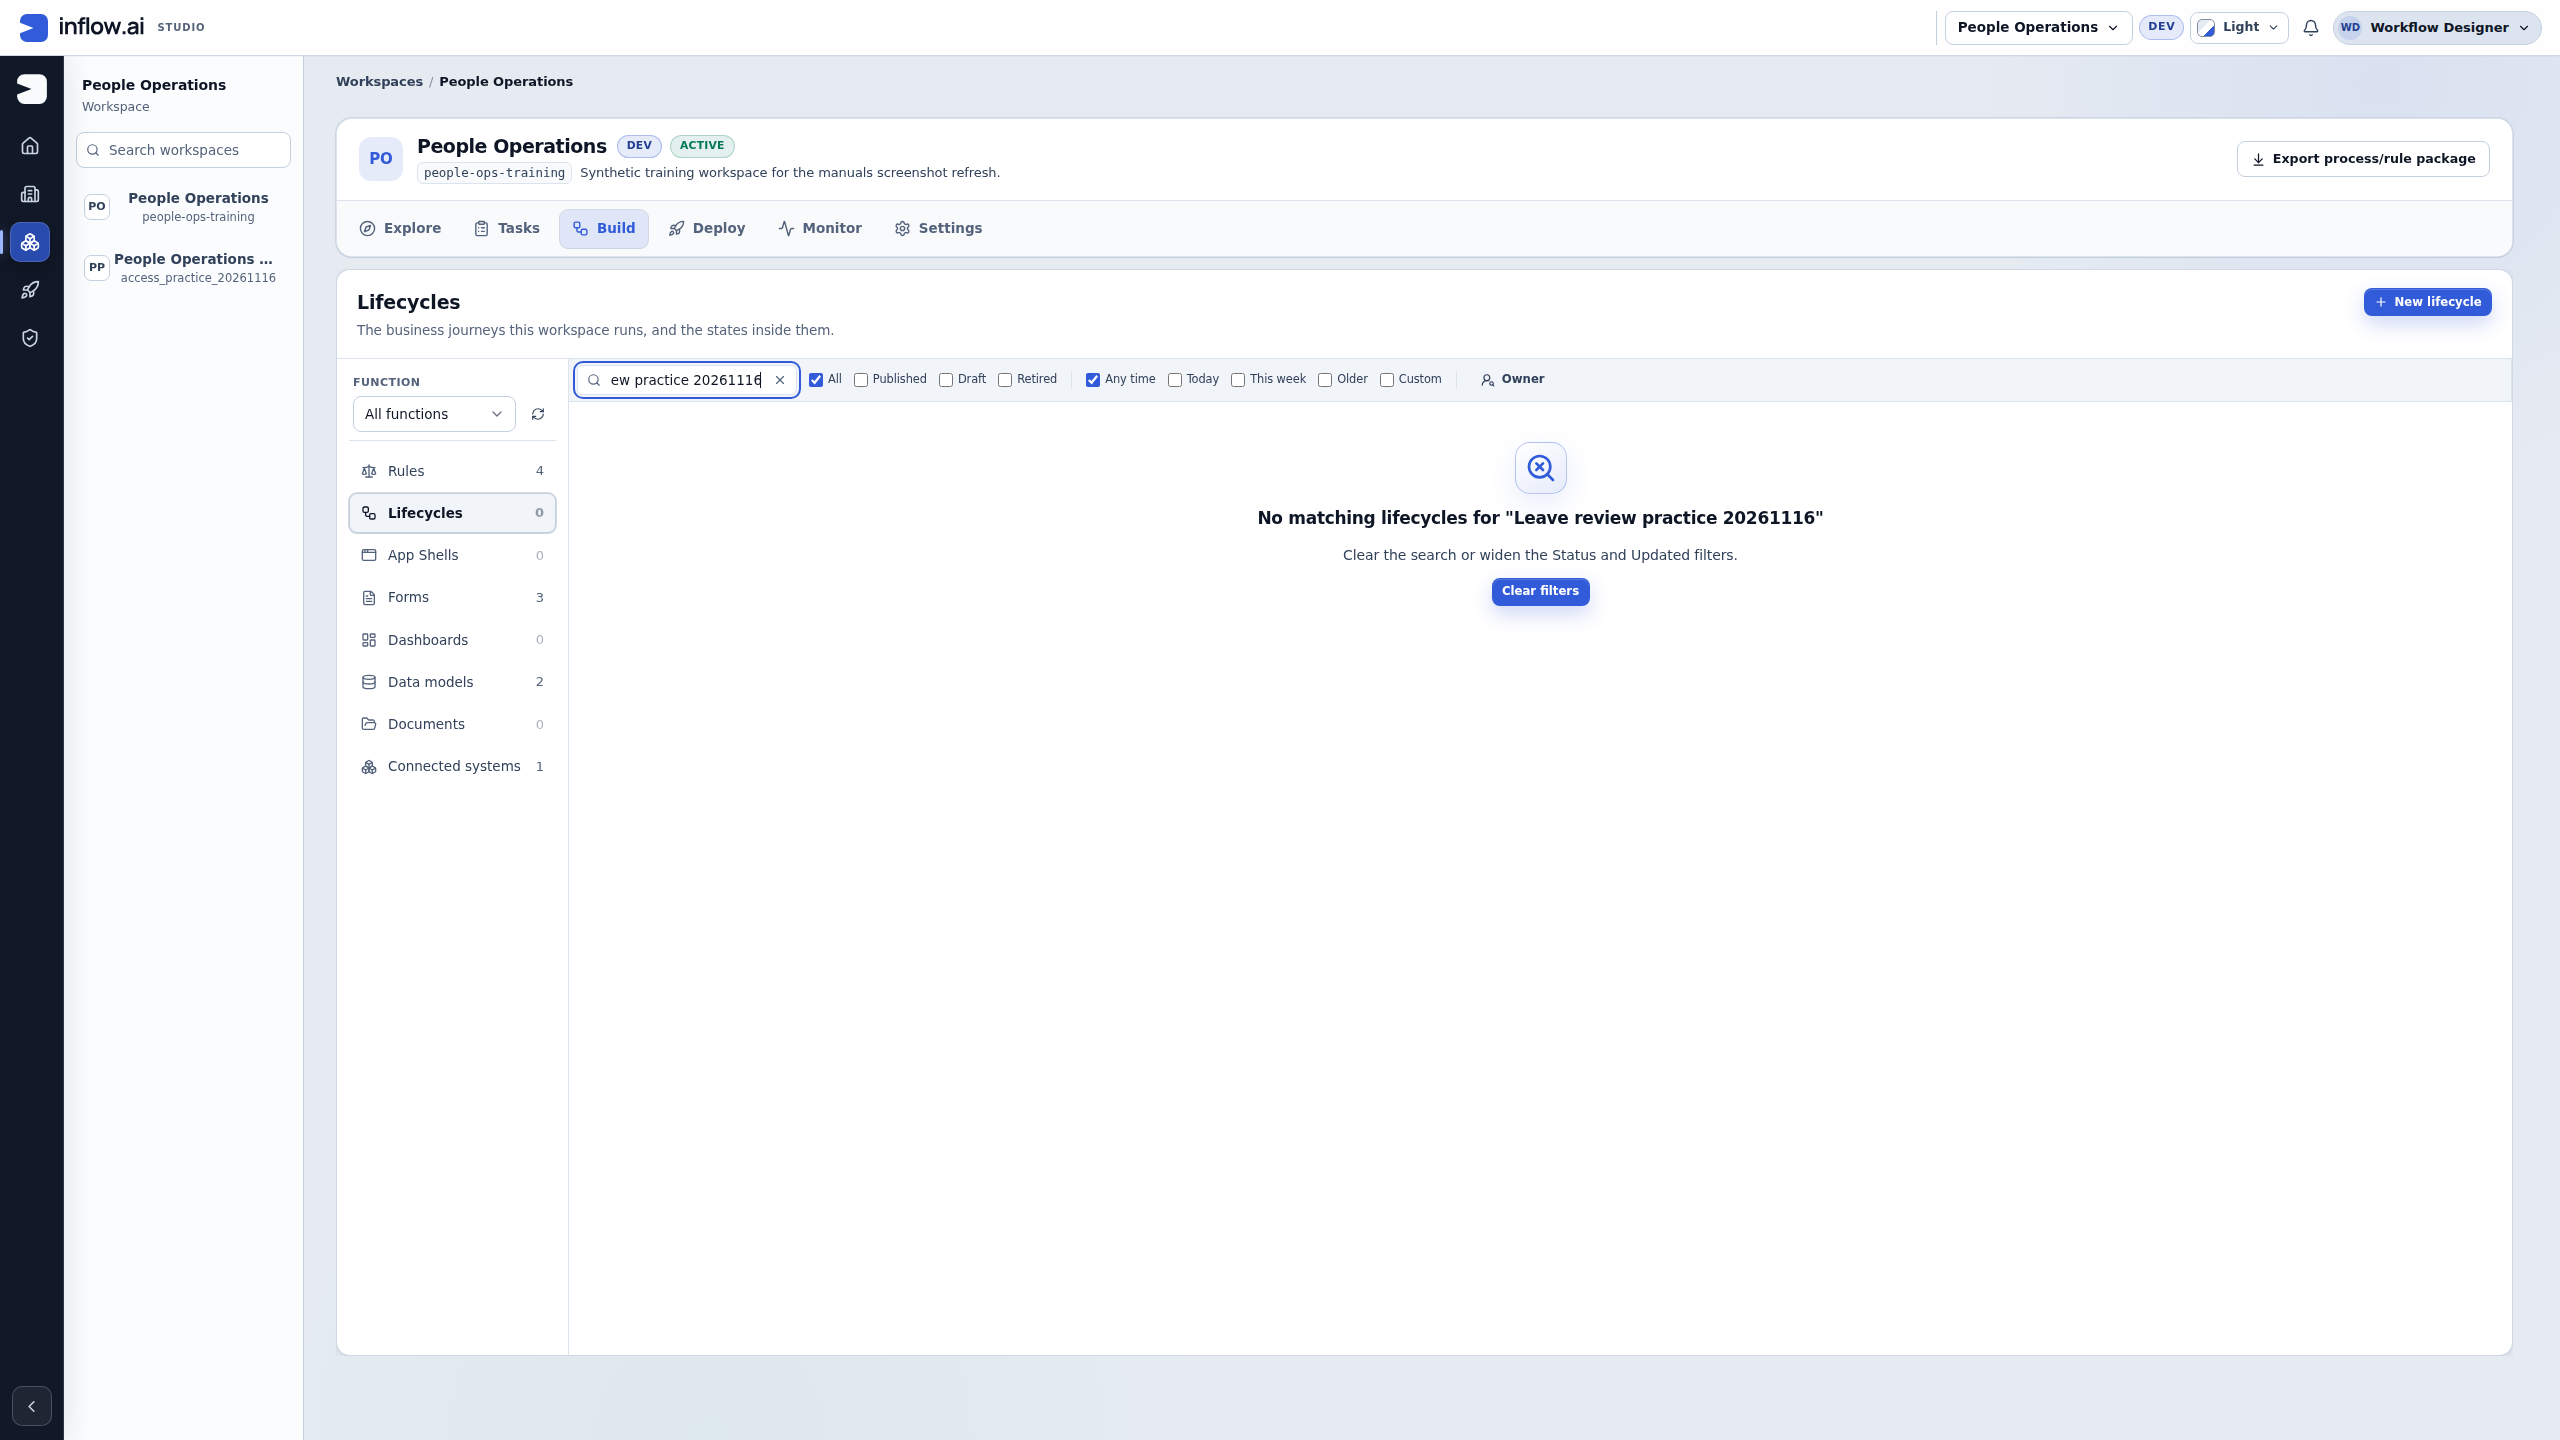
- Open Build → Lifecycles and use Search lifecycles to search the expected name or key, such as Leave requests or
leave-request. The search also matches the lifecycle status and owner information. - Select the matching lifecycle row to inspect its states and current details. Check the name, key, status/version, state diagram, saved flows, transitions and Case file. Use Open designer only when you have permission to edit. Confirm that it is the intended workspace's leave-request design and that the designer shows an editable draft before making changes.
- Reuse matching Review, Approved and Declined states, their initial/terminal settings, transitions, endings and outcomes. Open Review's existing flow and inspect its task, form, assignment and mappings before adding anything. Add only a genuinely missing item; do not create another state, task or case field simply because the existing one is not in the place you expected.
- Reuse case-file fields when both the name and type match. If an existing field has a different type, required/default setting or mapping, stop and ask the process owner to review its current bindings and callers before a deliberate change. Renaming a field can update bindings; deleting one that is referenced can affect the flow. Do not use this practice example to silently change a shared contract.
- If the exact lifecycle is absent, create one using the next section. If a similarly named lifecycle has a different key, status, owner or business purpose, do not create a near-duplicate; ask its owner which design to continue. If the matching lifecycle is published and no editable draft is offered, stop and ask the owner how to prepare an authorized draft.
What you should leave with: one intended Leave requests design, with existing compatible states, mappings and work reused. A search result is only a candidate; verify its workspace and business purpose before editing.
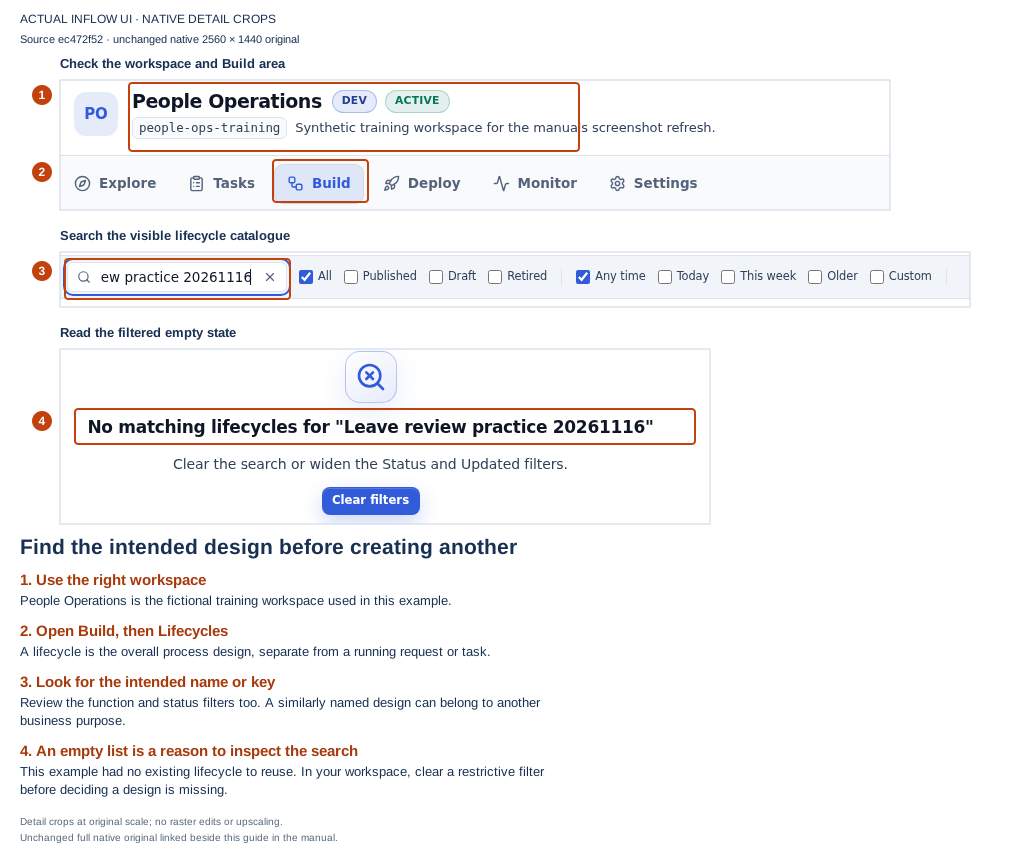
Open the unchanged native original.
Create missing process stages
Use this creation path only when the previous search found no matching lifecycle. Nadia uses the separate name Leave review practice 20261116 for the screenshots, so she can learn without changing the application's real Leave requests design. Use a different available practice name if that one already exists, or resume your intended existing design.
The pictures were captured on 16 November 2026 from Inflow source ec472f52. They follow one draft through creation, a saved three-state diagram and its Verify findings. They stop before state flows, manager assignment, publication or a running request. The later sections explain how to add those parts.
Name the draft and choose its subject
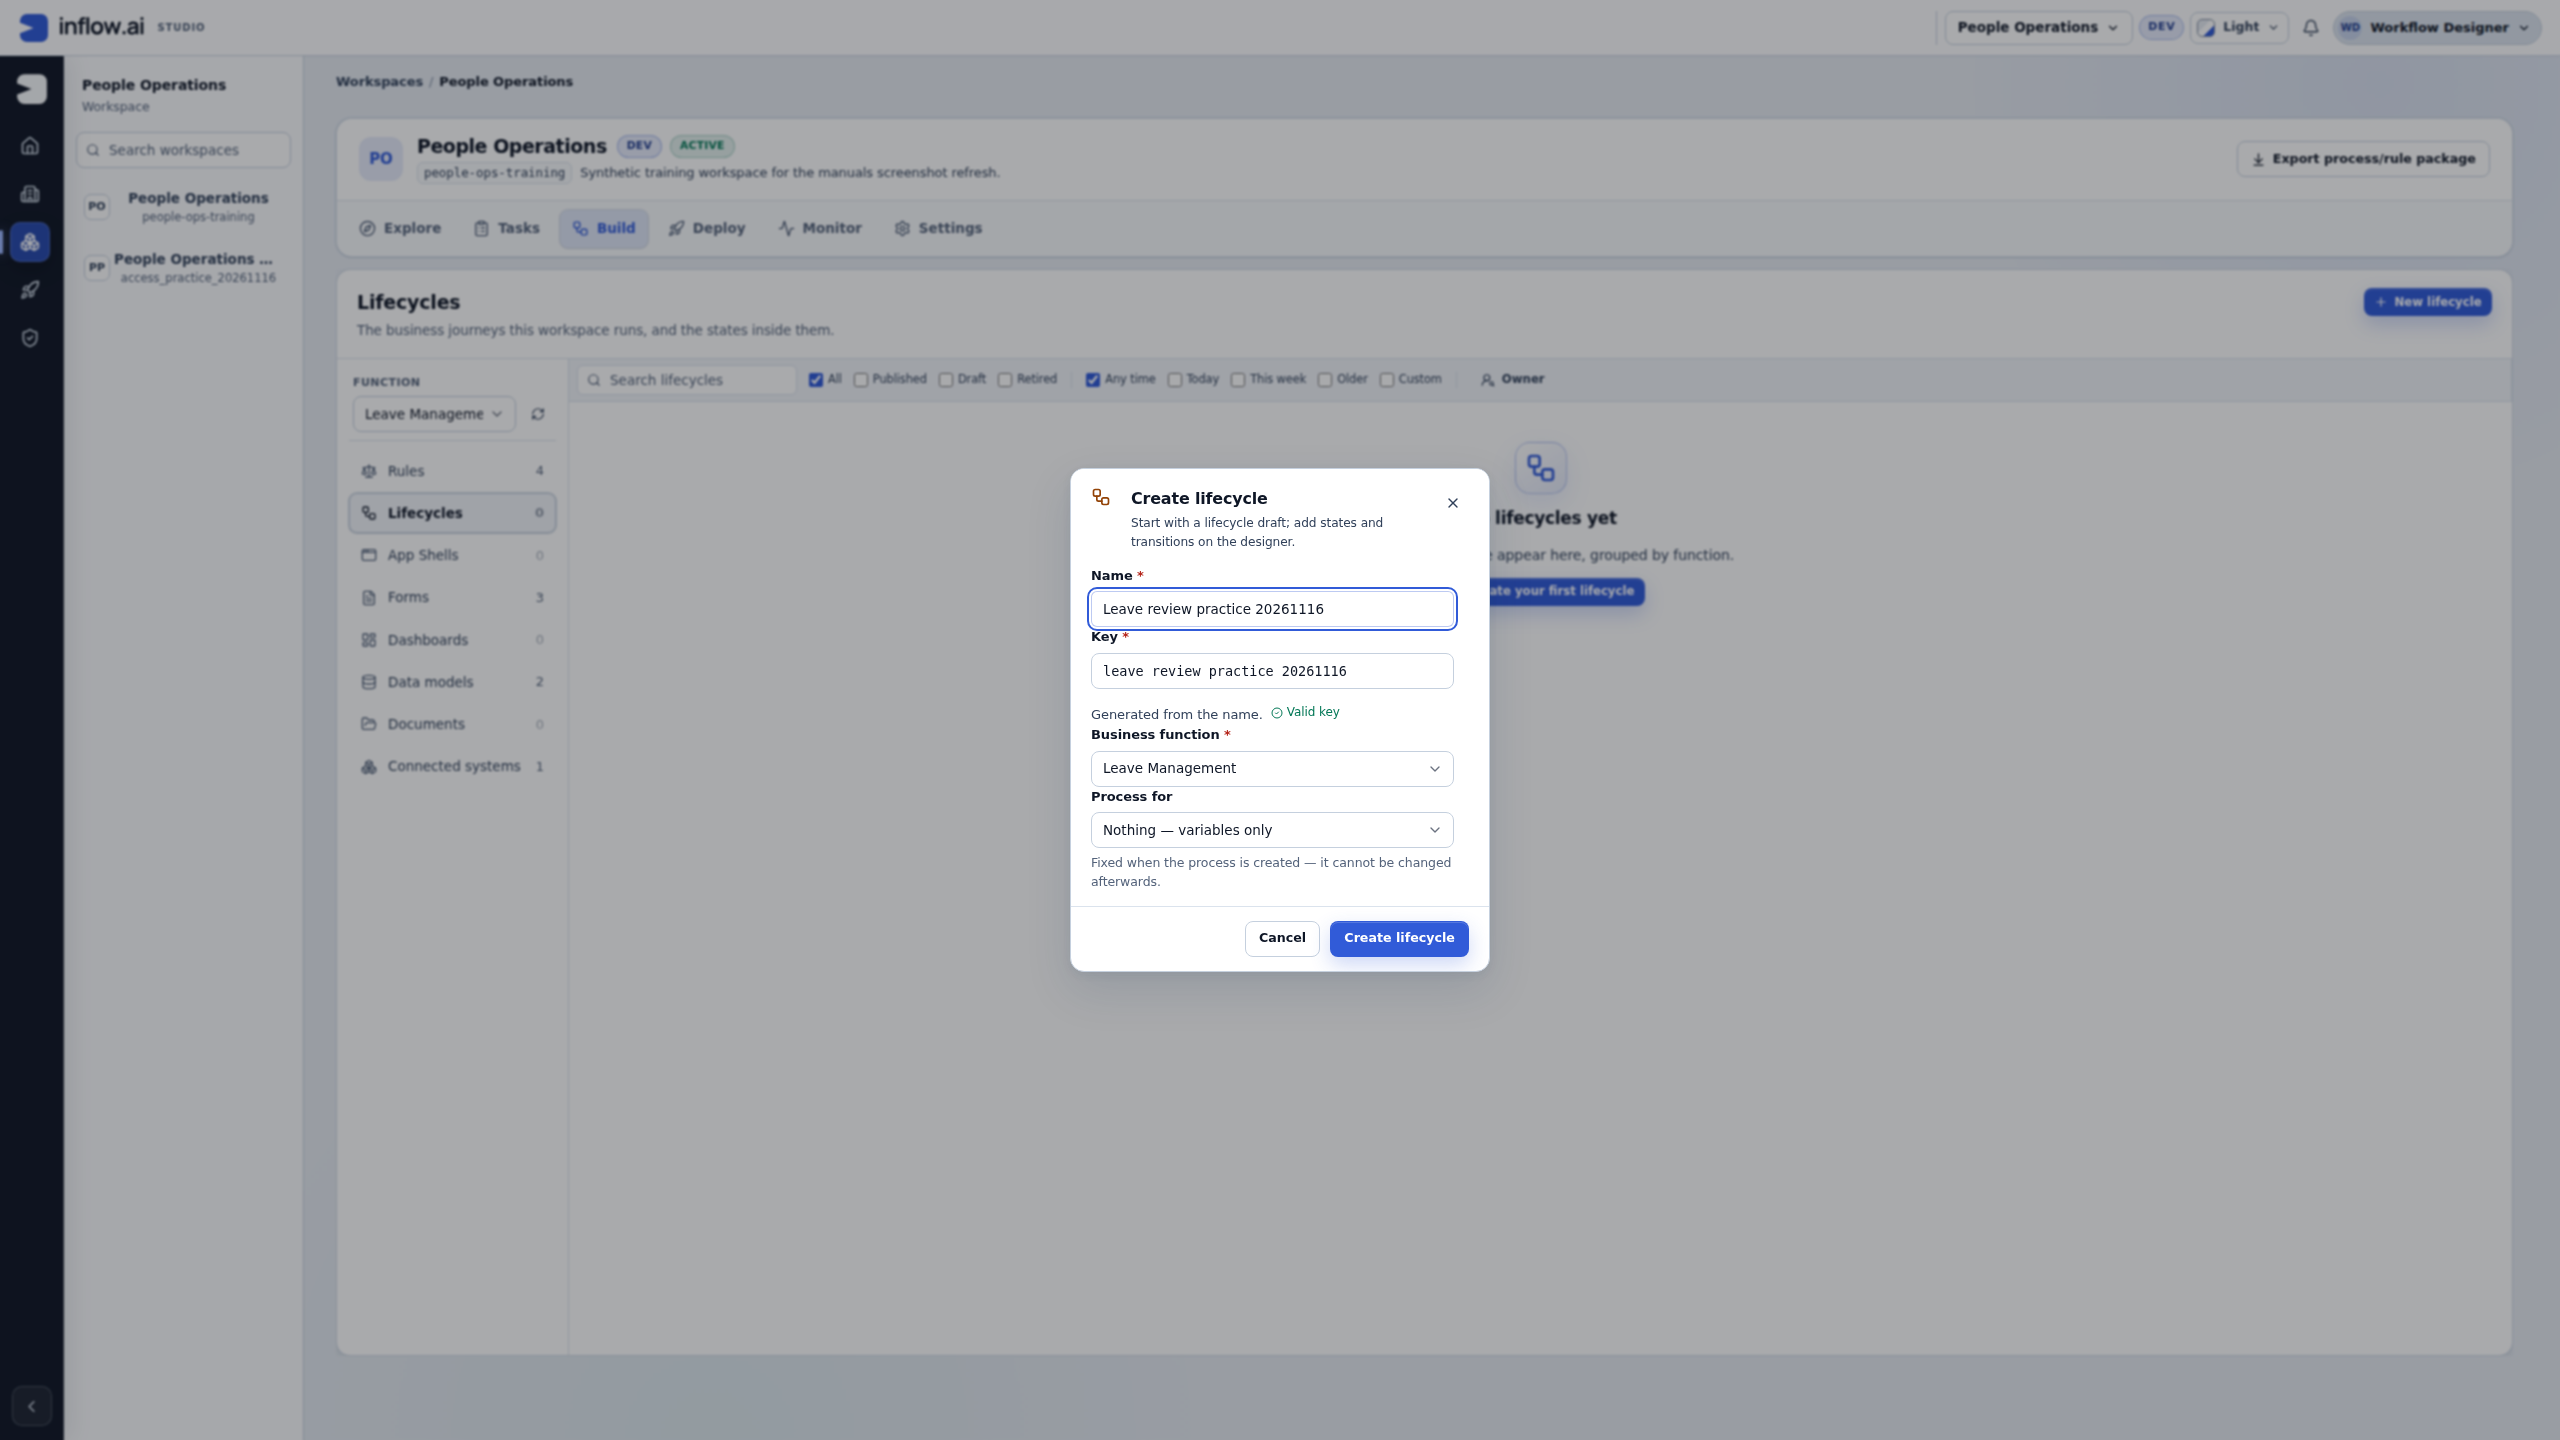
- In Build → Lifecycles, choose the intended Function scope, such as Leave Management, then New lifecycle. Check Business function in the dialog; it groups this design with the relevant work.
- Enter the readable Name Leave review practice 20261116 and inspect the generated Key,
leave_review_practice_20261116. The name describes the design; the key is its stable reference. Keep an existing design's key unchanged. - For this diagram-only practice, leave Process for as Nothing — variables only. This creates an unbound process: it does not select a leave record. The subject is fixed when the process is created. If your real application needs a record or document subject, agree that binding before creating its lifecycle rather than copying this practice choice.
- Review the details and choose Create lifecycle once. Studio opens the new draft's designer. If the response is unclear, inspect the catalogue for the new name and key before trying again.
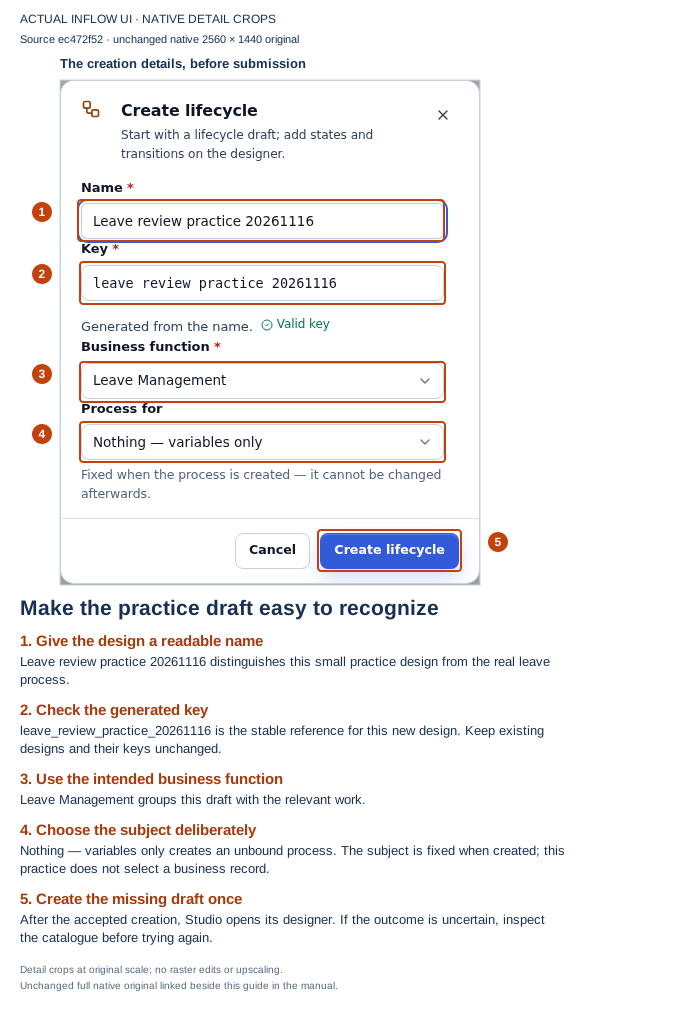
Open the unchanged native original.
Example: tell a quiet starter screen from a validated process
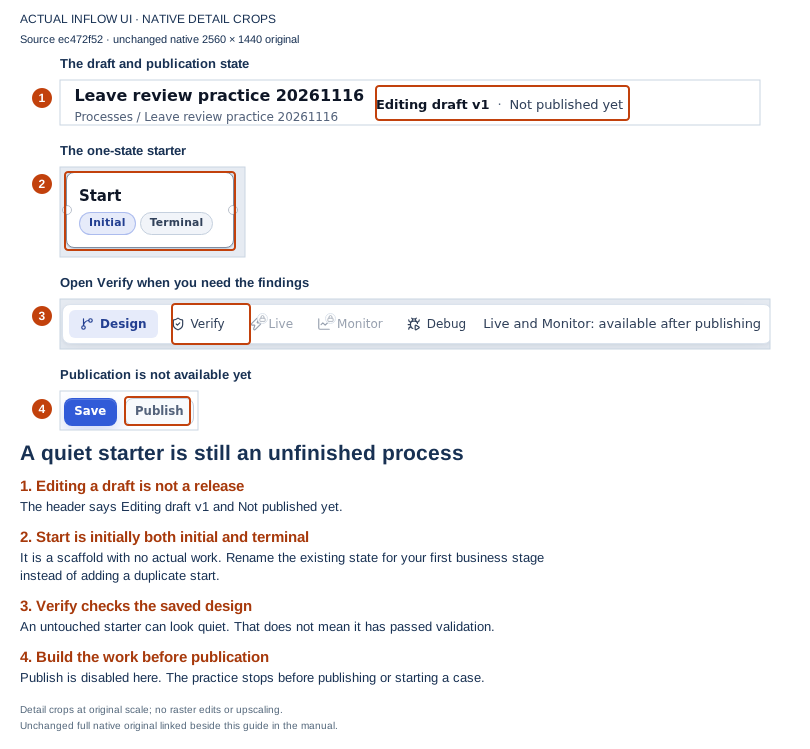
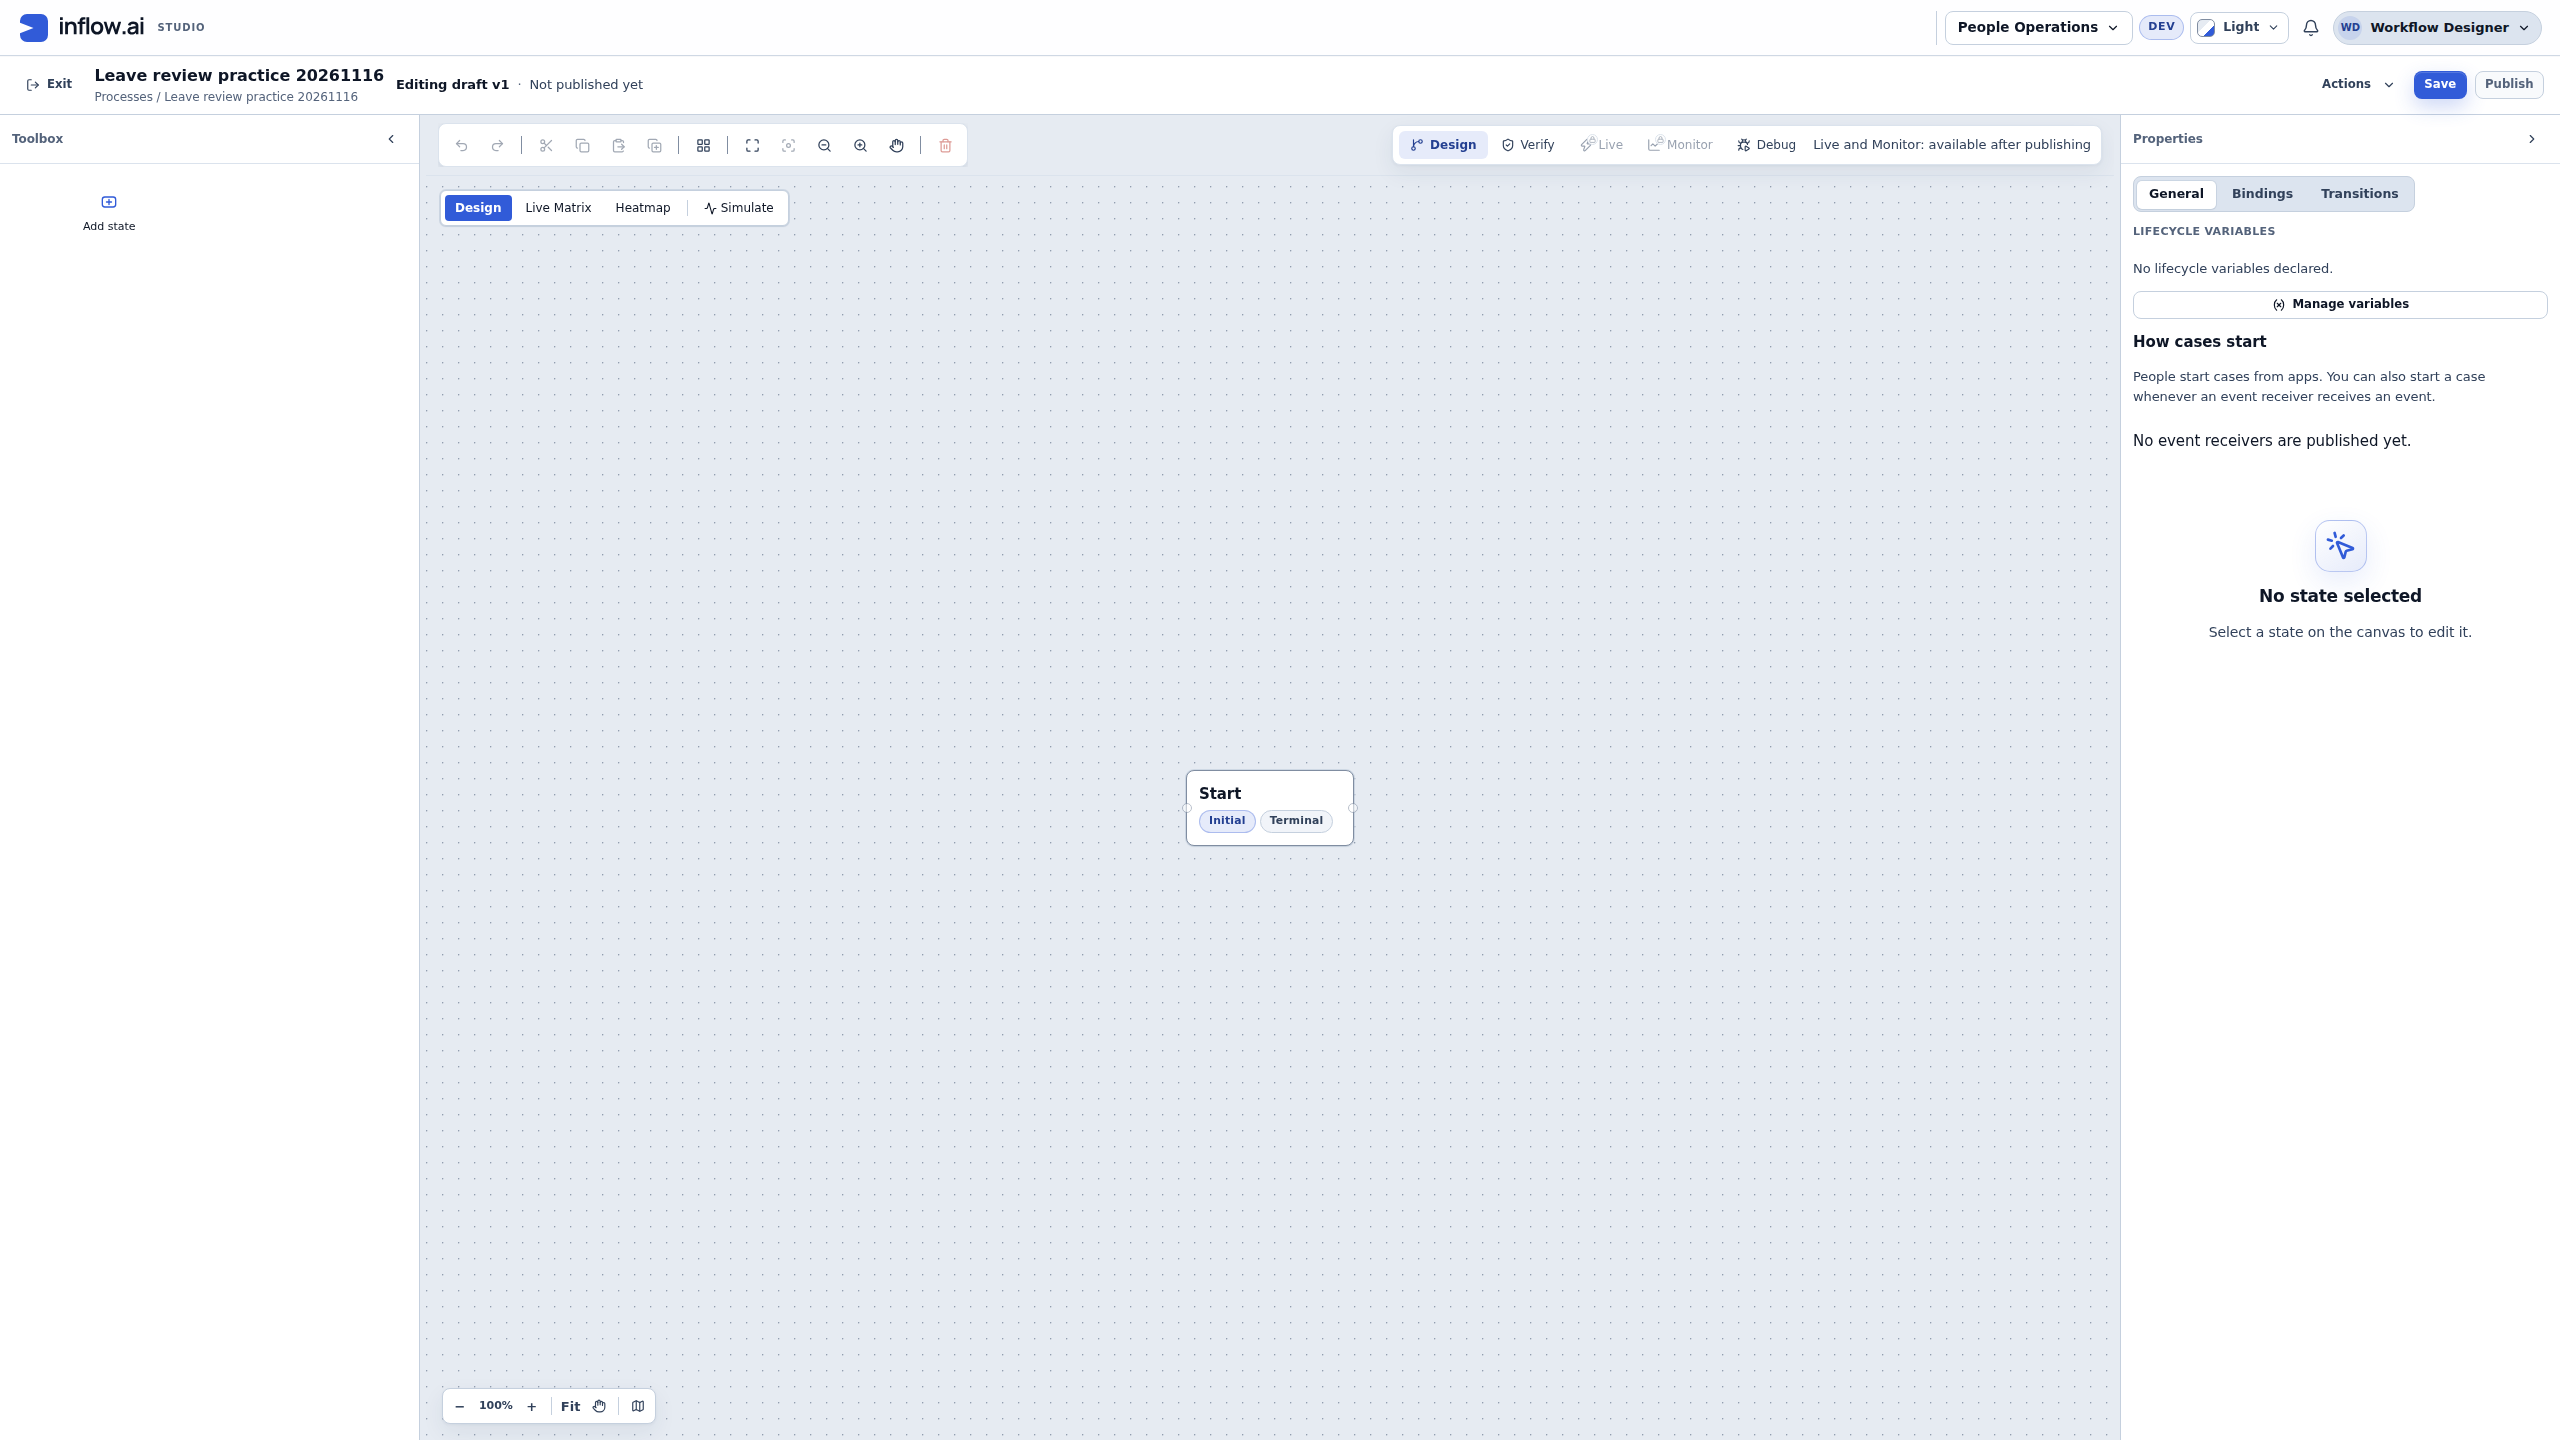
Immediately after creation, this example has one Start state, marked both Initial and Terminal. The header says Editing draft v1 and Not published yet. There is no actual work inside the state.
Studio may show this untouched starter without an empty-flow error strip or a review-count badge. That quiet screen is not a successful validation. Publish remains disabled until a state's flow has work. Open Verify when you need the findings; continue designing rather than reporting the starter as ready.
Nadia will rename this existing Start state to Review. She does not add a second start beside it. Existing or changed designs keep their validation findings; the quiet initial view applies only to the untouched starter scaffold.
Open the unchanged native original.
Shape and save the practice diagram
- Select Start on the canvas. In General, change Design name to Review. Keep this as the initial state so the process begins in Review.
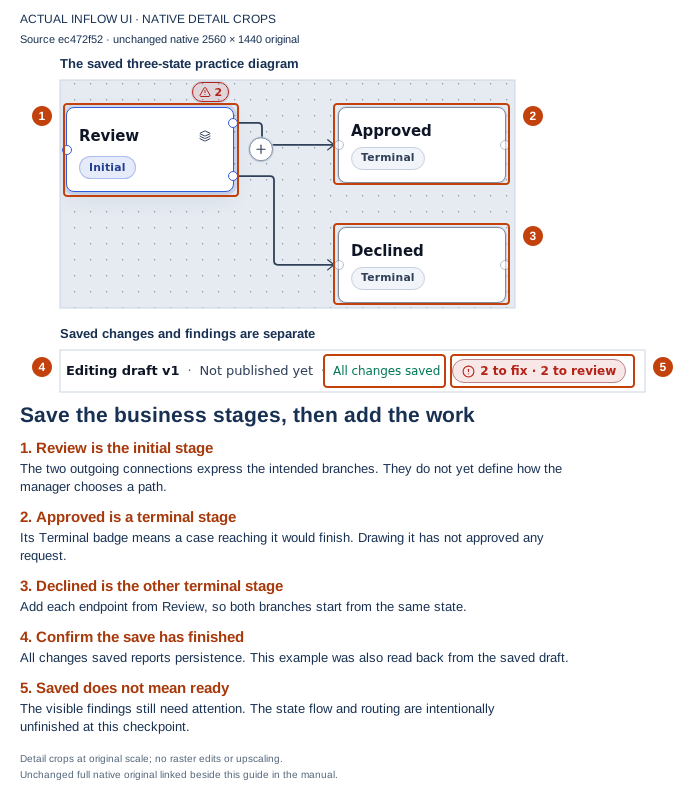
- With Review selected, use its Add next state plus button. Studio adds a connected endpoint and clears Review's Terminal setting so the process can continue from it. Select the new state and change its Design name to Approved.
- Select Review again, then use its Add next state button for the second branch. Select that new state and name it Declined. Adding after Approved would create a chain through Approved, which is a different business story.
- Check that both Approved and Declined show Terminal. A state added with Add next state starts as a terminal endpoint; inspect its actual setting rather than toggling it blindly. Review should be Initial and should no longer be terminal.
- Use Arrange the diagram into ranks if the drawing needs tidying. Confirm that there are exactly three intended states and two connections, both leaving Review. Do not draw another connection over one the plus button already created.
- Choose Save and wait for All changes saved. Local recovery or autosave alone is not a finished save to the shared draft. Before leaving, check that the intended diagram remains and that no save error or unsaved-change message is present.
Open the unchanged native original.
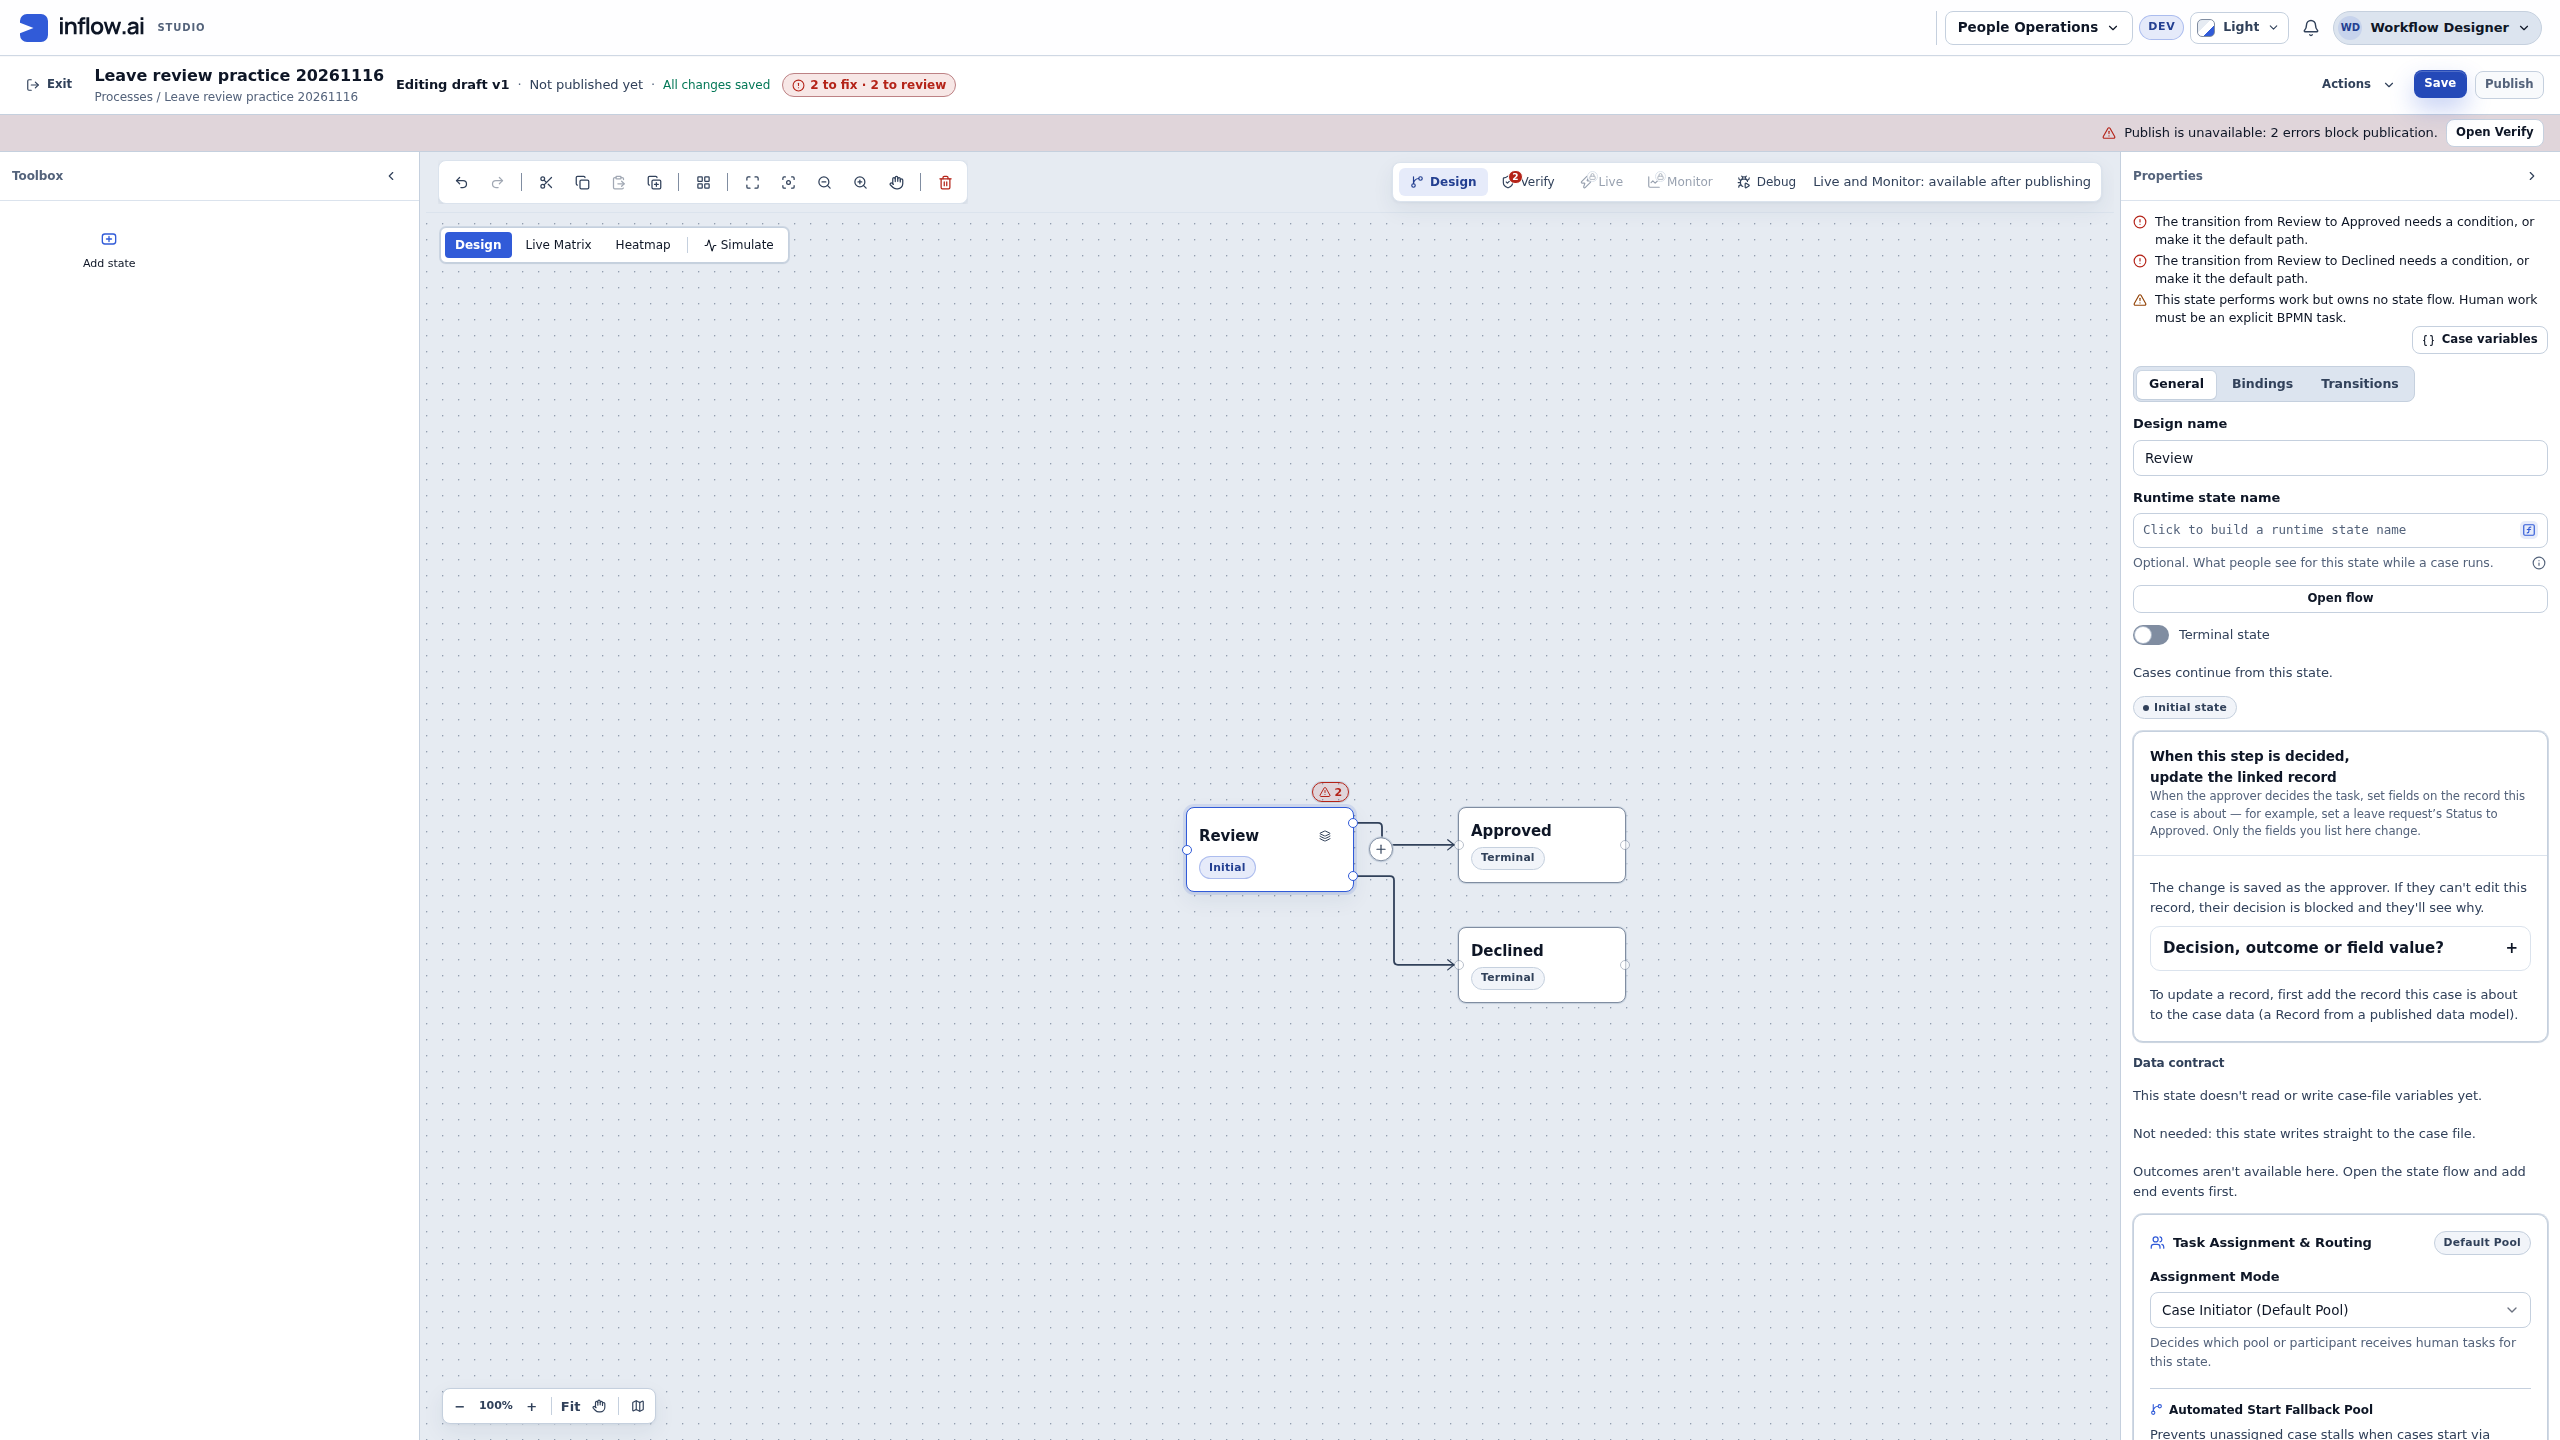
Check your result: the diagram expresses the intended business stages. It does not yet explain how Review gets a manager's answer or chooses a branch. Drawing Approved has not approved a request; no case has been started in this practice.
If you resumed an existing process, reuse its matching states, settings and connections. Inspect its saved work and ask the owner before changing a different initial state, terminal setting, guard or outcome. A complete existing design does not need duplicate states or another publication just to follow this lesson.
Read the saved draft's findings
- Open Verify after the intended save. In this practice, All changes saved appears alongside a result with 2 errors, 0 warnings and 9 checks passed. The passed checks do not cancel the errors; publication is still blocked.
- Read the branch finding under Review. It says a transition from the branching state needs a guard or the default flow. A connection describes where a case might go; it still needs the rule that chooses the path. Do not mark a random path as default merely to remove the error.
- Read State needs its own flow. Review needs actual steps, including the manager's task. Renaming the state or drawing terminal outcomes does not create that work.
- Continue with the case-file and manager-task sections below, then connect the submitted answer to the intended flow endings and lifecycle outcomes. Save the intended changes and use Verify again. Resolve the current findings before publishing or starting requests.
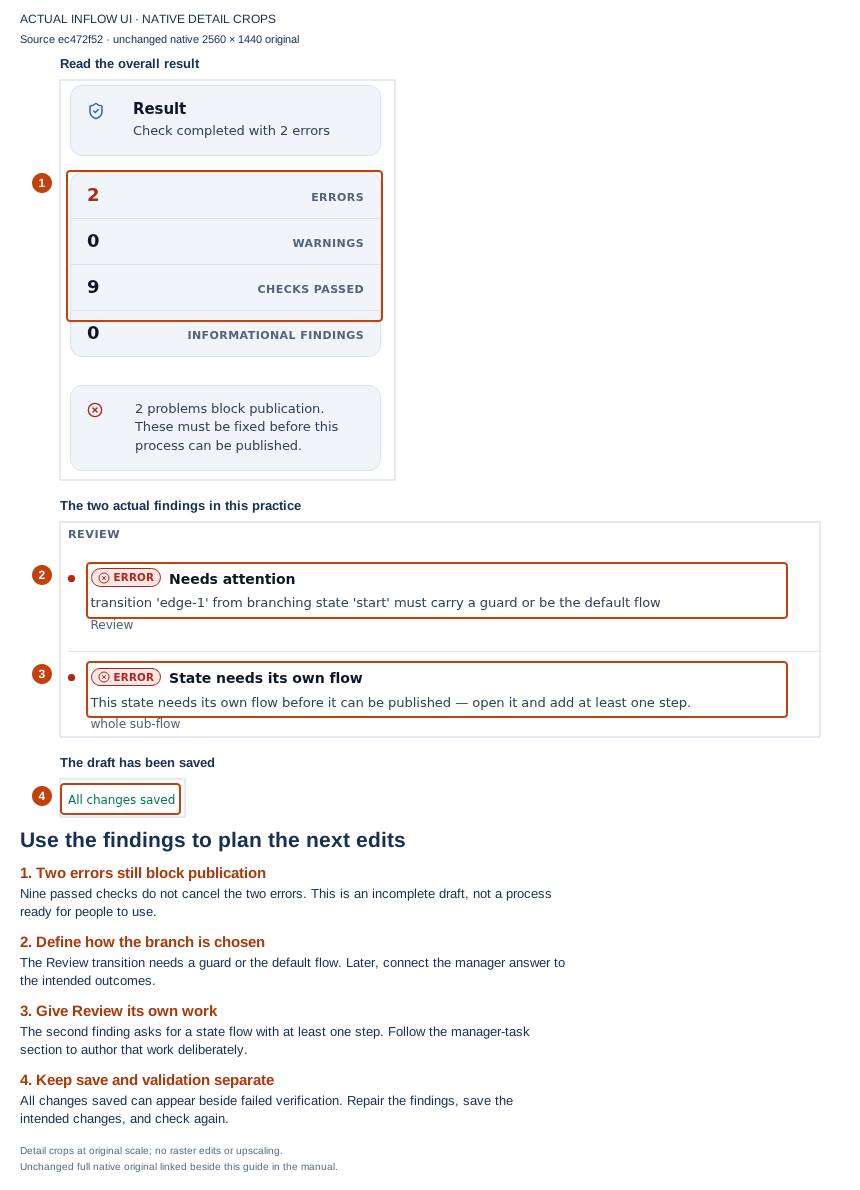
Open the unchanged native original.
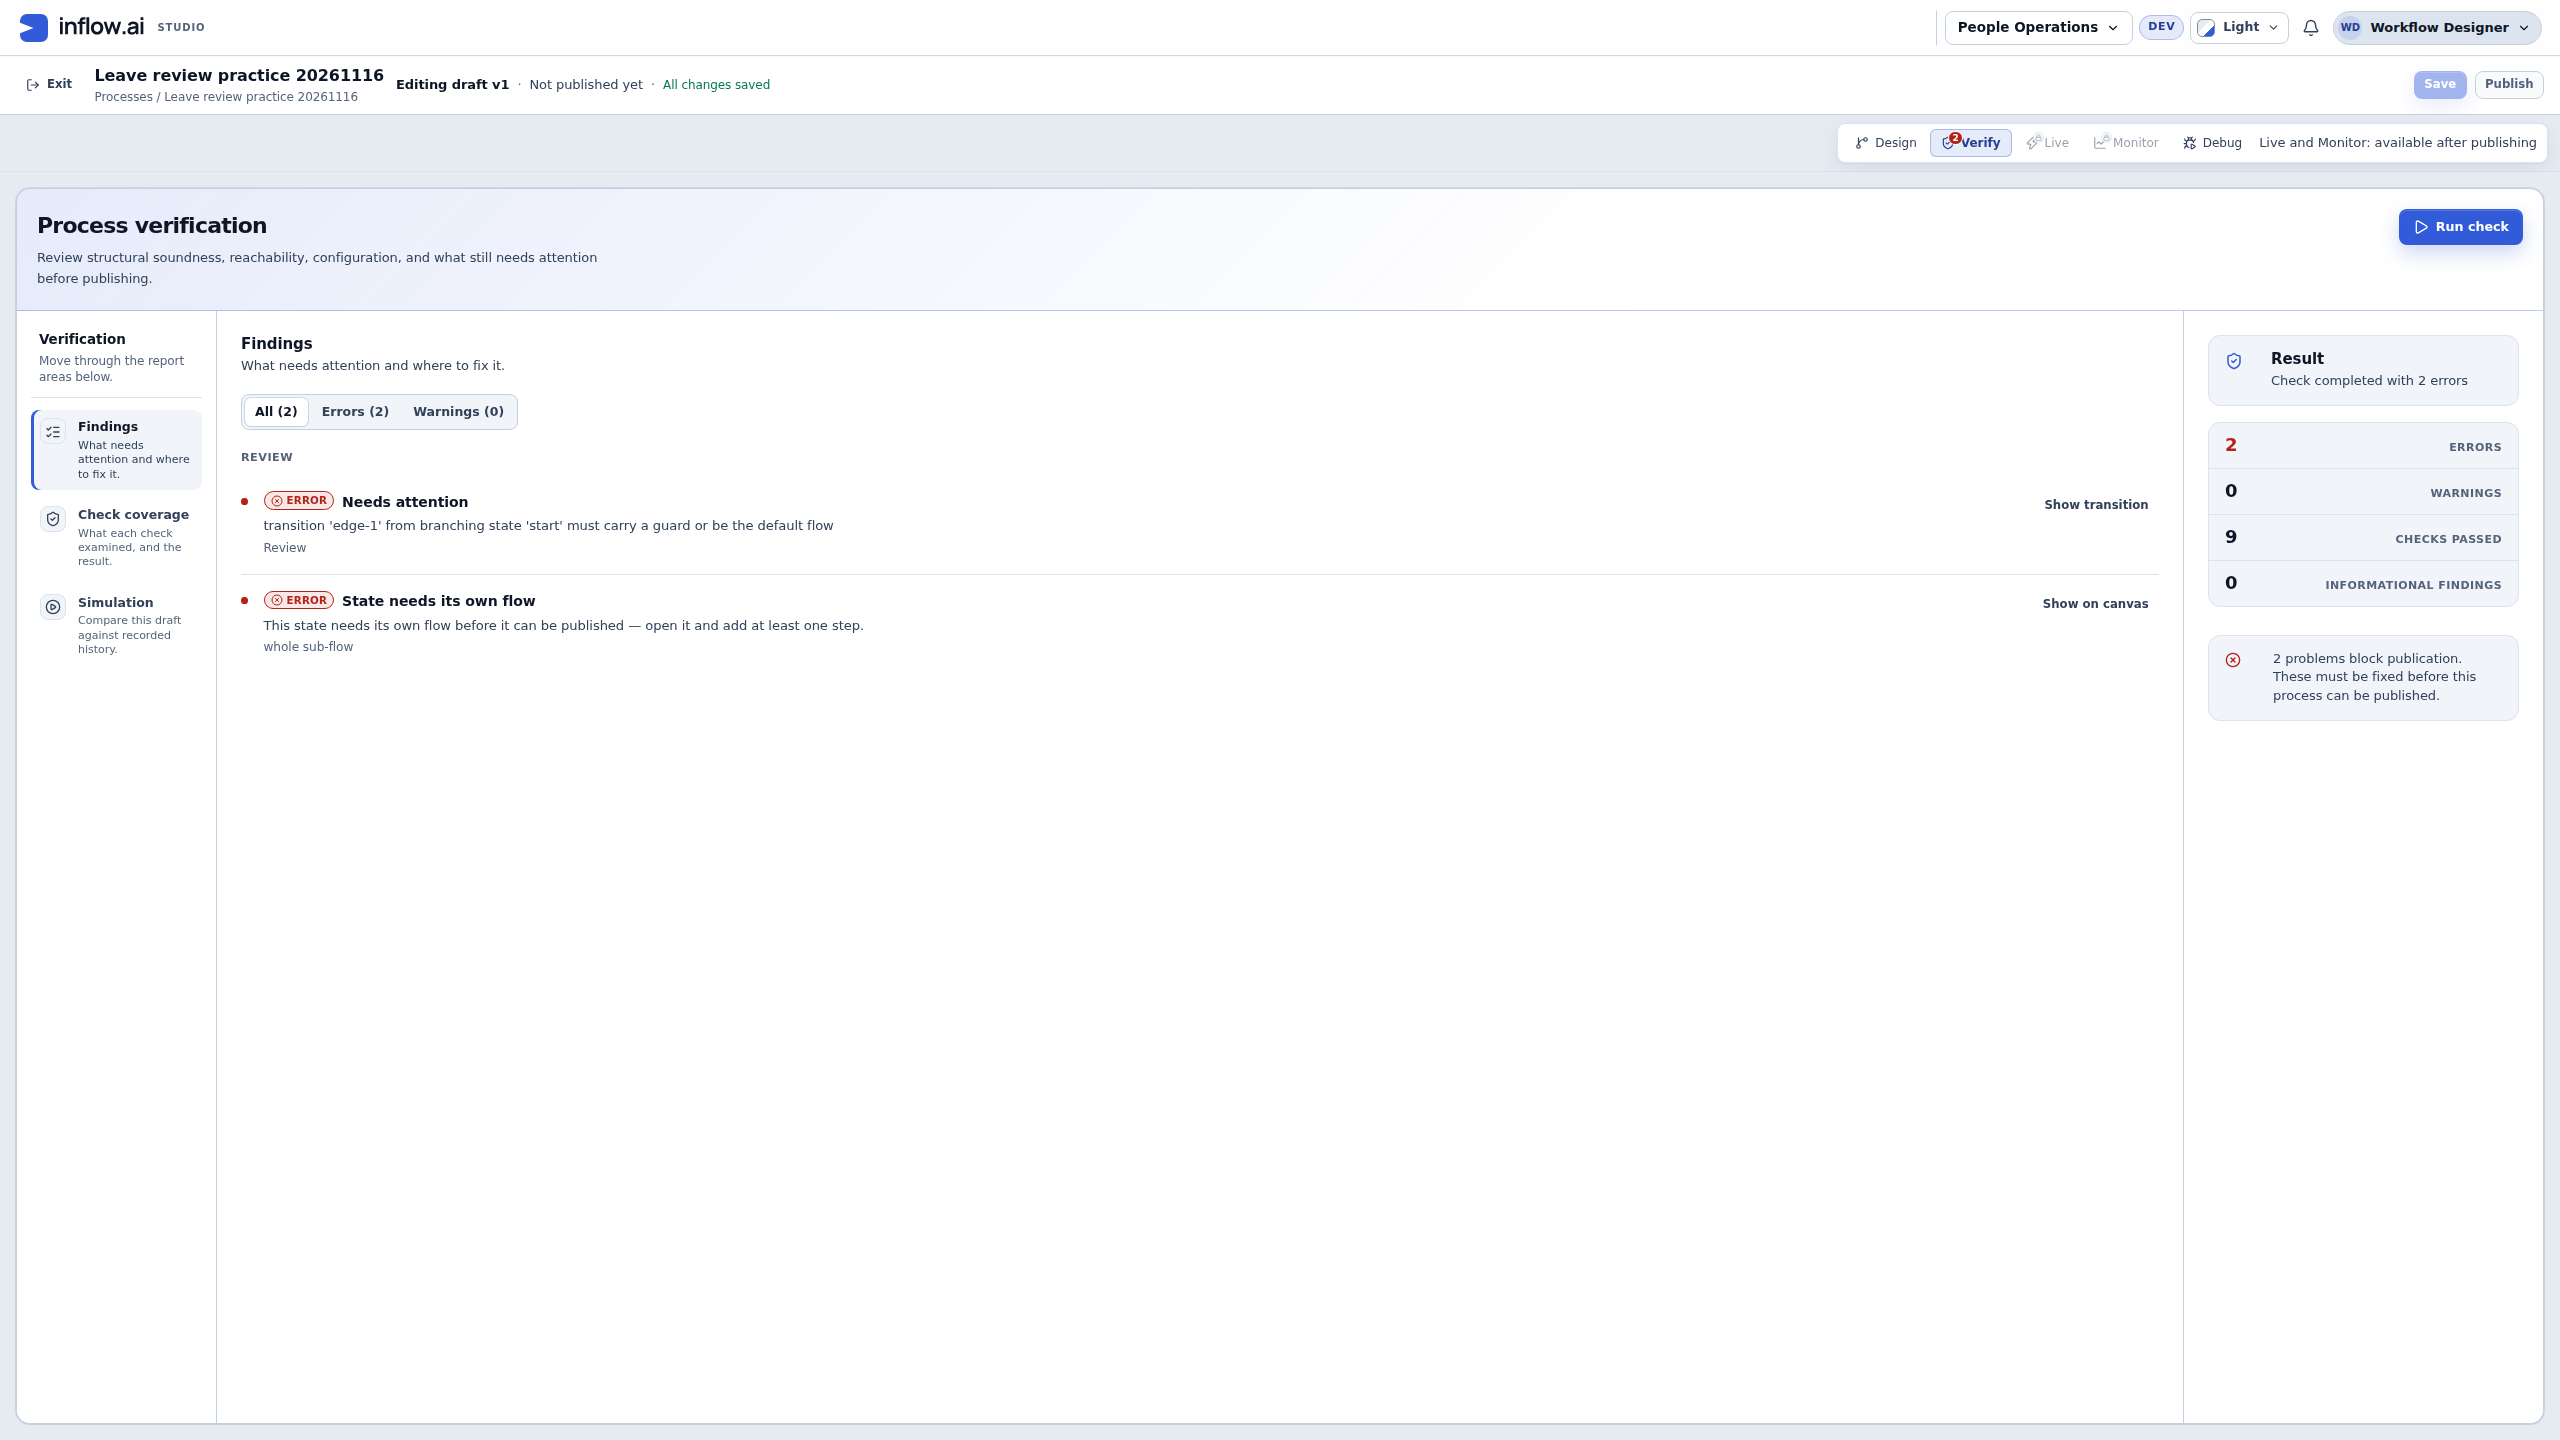
The finding may include short identifiers such as start or edge-1; this draft's initial state was renamed Review, while its underlying identifier stayed the same. Use the finding's Show transition or Show on canvas action to locate it. The saved diagram and the current finding describe different things: one confirms what was stored, the other explains what still needs work.
Add the information a leave request carries
Use the lifecycle's case-file settings to declare the information your process needs. First inspect the current Case file and reuse matching declarations. When a state is selected, choose Case variables to open the lifecycle-level case-file editor; those declarations are shared by the lifecycle, not separate per-state lists. Add only the missing fields before mapping form or task results. If a name exists with a different type or contract, follow the owner-review guidance above; do not rename, retype or delete it as a shortcut.
| Field name to enter | Type | Example value | Business meaning |
|---|---|---|---|
requestId |
Text | leave-2026-017 | The recognizable request reference. |
startDate |
Date | 14 December 2026 | First requested day. |
endDate |
Date | 18 December 2026 | Last requested day. |
requestedDays |
Number | 5 | The amount being reviewed. |
reason |
Text | Family vacation | The employee's explanation, separate from the manager's comment. |
employeeId |
Text | M014 | The business employee number; separate from a login identity. |
approved |
Yes / no | Default false; selected only when approving | The answer the manager will submit. |
decisionComment |
Text | Cover is arranged for the full week. | The manager's explanation. |
Enter these short field names exactly, including their capitals, when following this example. The form can show a friendlier label such as Requested days, while its mapping uses requestedDays. The Approved checkbox's answer maps to the case field approved.
- Add only fields that are missing from the intended draft, using the appropriate type. Do not declare a second field with an existing name.
- Decide which values are required when the process starts. Request reference, employee number, dates, requested days and reason come from the application’s matching start-form fields. Select the real recipient in task Assignment separately; no employee or managerUser User input is required by this lesson.
- For the Approved field, choose Yes / no (the Boolean type) and enter
falsewithout quotes in its Default value. This prepares a real yes/no value for the clear checkbox; it does not complete a decision. Do not default it to true. Leave the Decision comment for the manager to supply. - Save and re-open the declarations to check names and types before configuring the state flow.
The employee number M014 is ordinary business text. Choose Sara’s actual directory account in Assignment below; a Text value such as S002 or “Sara” is not a task assignment. The case starter comes from Mohammad’s normal signed-in submission.
Put a real manager task inside Review
- Select the Review state and choose Open flow. Inspect its saved flow first. If it already contains the intended manager task, form and assignment, reuse that task and check its mappings; do not add a second review task.
- Only when the intended human task is missing, add the supported human-task step for the manager's review and give it a useful name, such as Review leave request. If the existing task or mappings differ, ask the owner to review its callers and behavior before changing them.
- In the task's form settings, inspect the selected form. Reuse Manager leave decision when it is already selected; choose it only when the task's form is missing. Check that the task does not point to the employee's request-entry form. Ask the owner before changing an existing task's different form or mappings.
- In Assignment, keep an existing Specific user source if it already selects Sara's intended account. If there is no matching source, open Add assignee source → Specific user, choose Choose…, find Sara through Search users in Pick a user, confirm Select, and check the person chip. Add assignee source appends another source; do not choose it again when the task already has Sara or another intentional candidate. If the existing assignment differs, ask its owner to review the task's responsibility before changing it. The business manager number S002 is not the assignee.
- In Fill the form’s inputs, inspect existing mappings and retain any correct ones. Add only missing mappings: requestId, employeeId, startDate, endDate, requestedDays and reason from the matching case fields into the six declared manager-form context inputs. Keep employeeId as Text and dates as Date; map the case’s Number requestedDays into the form’s compatible Decimal input. The form displays them read-only. Also map the case’s Boolean Approved value into the form’s approved input. In Save the form’s outputs, retain the existing approved and decisionComment mappings or add a missing one; do not expose request context as writable output. Leave the form input’s own text Default empty; use the typed case value rather than typing a string into the form declaration. Review a mismatch with the form/process owner before changing a shared mapping.
- Inspect the flow after the task. Retain an existing Exclusive decision gateway, Approved/Declined endings and matching guards/outcomes. Add only a missing gateway, ending, connection or outcome; follow the routing steps below for any newly added branch. Do not add a second set beside a complete route.
- Return to the lifecycle and select Review. Retain the existing declared results. Add only a missing result that the case must carry after Review, including Approved or Decision comment; review a type or name mismatch with the owner before editing it.
- When you made an intended change, save the flow and lifecycle, then open Verify and follow each blocking finding to the named state or step. If the existing design already matches, inspect its current Verify state and test requirements without making a duplicate edit or republishing an unchanged version.
Check your result: the task has an actual recipient, the correct published form, two intentional decisions and a route from those decisions to the final business stage. A blank flow inside Review cannot carry out the manager's work.
Route the submitted yes/no answer
The manager form uses an Approved checkbox and one Submit decision button. Selecting the checkbox means approve; clearing it means decline. The button submits the decision, while the process decides which path follows. Do not make this checkbox Required, because a clear answer must remain a valid decline.
- Inspect whether the manager task is already connected to an Exclusive (XOR) gateway, which chooses one outgoing path. Keep a matching existing gateway and connection; add one only if missing.
- Inspect for existing Approved and Declined end events. Reuse each matching ending and create only a missing one. Do not add a duplicate pair when both are already present.
- Keep a correct Approved condition if it already uses the submitted Boolean. Only on a missing condition, select the Approved path, open Condition expression with fx, and enter
approved == true. This means “take this path when the saved Approved answer is yes.” If a current condition differs, ask the owner to review its behavior before changing it. - Keep a correct Declined condition if present. Only when it is missing, set it to
approved == false, meaning “take this path when the answer is no.” Use the actual Boolean field declared and mapped from the form. - Select each end event and use its Declare as action with the readable outcome name if it is not already declared. If the panel asks for a usable Outcome id, enter a short name such as
approvedordeclined, choose Apply, then declare it. This short outcome name connects the flow ending to a lifecycle transition; it is not an instruction to edit the form’s generated component identifiers. - Return to Review on the lifecycle diagram. Retain matching transitions and outcomes. For a missing transition, choose the corresponding Outcome → Approved or Outcome → Declined value. If an existing transition points to another outcome, ask the owner to confirm before changing it.
- If you changed the route, save, Verify and test both answers. Make sure the cleared checkbox supplies a Boolean no, rather than leaving the value missing. If no change was needed, inspect the current verification and test evidence without adding duplicate branches.
For this generic Submit decision action, leave Business outcome blank and Reason from form field unbound. The Approved answer controls the two flow paths. Decision comment is ordinary form information mapped back to the process; do not assume it becomes the activity reason.
Example: approve a five-day request
Nadia builds the process. Mohammad will request 14–18 December 2026, with Requested days set to 5. Sara will review it. The process start values describe the request; the task's Specific user assignment identifies Sara separately.
- Check that the process inputs receive requestId, employeeId, startDate, endDate, requestedDays and reason from their matching start-form controls. In this example the employeeId value is the business number M014; it is Text, not Mohammad's Inflow account.
- Confirm that Review opens Review leave request with the manager decision form.
- Confirm in Assignment that Specific user is Sara's actual directory account. This assignment is authored on the task; it is not a Manager start input or business field.
- Follow the Debug lesson to enter the declared process values and pause at the task. Debug does not add implicit Employee or Manager selectors.
- Select the Approved checkbox, enter a comment such as Cover is arranged for the full week, and choose Submit decision.
- Inspect the finished stage and case file. The case should reach Approved, and the decision comment should remain available after Review.
If Approved is reached but the comment is missing later, check both mappings: from the form into the Review flow, and from Review's declared results into the case file. The same field name in two places does not automatically connect them.
Example: decline without accidentally approving
The second test uses a different fictional request whose team does not have cover. Supply its own requestId, employeeId, dates, requestedDays and reason, then keep the separately authored Specific user assignment to Sara (or another eligible test recipient chosen by the process owner).
- Enter the declared request values using a distinct request reference. Do not enter a manager identity in the form; the task recipient comes from Assignment.
- At the manager task, enter Please choose another week as the decision comment.
- Clear the Approved checkbox and choose Submit decision. The cleared checkbox means decline in this teaching form.
- Check that the case reaches Declined and retains the comment. Saving the comment without choosing the decision action should leave the task unfinished.
The saved approval answer and the flow’s selected branch must agree. If the wrong stage follows the action, inspect the form's configured action, its mapped answer and the Review outcome rather than renaming a final state to disguise the error.
Update the linked record when the decision is made
When the leave request lives in a data model (for example a Leave request record the employee submitted from an App), the case usually carries it in a case variable of type Record. A Record update lets the approval write its answer back to that record, so it no longer reads Pending.
- Save the lifecycle first: the pickers read the saved flow. Select the Review state. Near the top of its properties, in When this step is decided, update the linked record, choose Add a record update. The section appears only if you may view the data model, and the button only when the case has a Record from a published data model and the flow has an approval task one person decides, with a form. If the section says it couldn't load the approval tasks, choose Retry; it asks you to save only while the state's flow has not been saved yet.
- In Linked record, choose the record, for example Leave request, and in Approval task the task whose decision counts. You choose both once for the section; every update in it uses them.
- Each update is a card whose heading reads as one sentence, for example Approve → Status = Approved on Leave request. In When the decision is, choose one of the decisions the task's buttons submit, for example Approve. Choose Add an update for another decision for Reject: it takes the next decision and, for a field with a fixed list of values, the value that matches it (Rejected). A task several people decide (a quorum or one task per person) cannot update a record. Any task id the flow uses works, including ids with hyphens such as
approve-leave. - In each Set … box choose the Field. For a field with a fixed list of values, such as Status, Set to lists exactly those values, plus The approver's decision (only valid when the decision is itself one of the values) and An answer from the task form; you cannot type a value the field does not allow. For any other field, Set to offers A value you type, The approver's decision, The approver's comment (for example into Decision comment) and An answer from the task form. Choose Set another field to change more fields; the trash button removes a field or a whole update. Only fields the record allows you to edit are listed; keys, numbering, computed, read-only and protected fields are never offered. A value that is empty when the decision is made (no comment, an unanswered form answer) leaves its field as it is. A field you have just added shows what is missing only once you work on it.
- Save and Verify. Verify's Record updates check counts the updates it checked and refuses a field that does not exist on the record or cannot be changed, a value, decision or comment the field's list does not allow, a task or decision the saved flow does not have, and a form answer the task does not save. Publish lists the same warnings as Verify and, under Record updates, what changed since the published version; you can publish straight from Verify. The version's page in the lifecycle's history lists the same changes, and the state's card on the canvas shows Updates Leave request.
The person deciding sees, before they decide, which record and fields each decision will change, on the task page and in the App Chat card. At run time the update happens together with the decision, as that person. If they are not allowed to update that record, or the update fails, the decision is not saved and the task stays open with a clear message, in the task page and in App Chat alike. Only the fields you added change, and every update is recorded in the audit log with the old and new values (protected values are hidden). Debug runs never change real records. A final state cannot carry record updates; the section there only lets you remove leftovers.
Common mistakes
| What you notice | What to check |
|---|---|
| Review has no work to run. | Open its flow and add/connect the actual task. |
| The wrong person receives the task. | Check the actual Sara directory selection and the task’s Assignment settings. Opening the designer as Nadia does not make her the manager. |
| A later stage cannot see the answer. | Check the task's answer mapping and Review's declared results. |
| The process cannot be published. | Save, open Verify and resolve the blocking findings. Do not ignore a type mismatch or an unconnected outcome. |
| A newly created lifecycle looks clear even though it contains only Start. | The clean initial view is not validation success. Add the actual states and work; use Verify to read the findings. Publish remains disabled until a state's flow has a step. |
| Someone else changed the process while you edited it. | Keep your intended changes in a note, reload the current saved design and compare before applying them again. |
| The leave record still says Pending after approval. | Add a Record update to the approval state (see Update the linked record when the decision is made). The person deciding must be allowed to update that record. |
| The approver is told "this approval can't update the linked record right now. Contact the process owner." | Another open task was created by hand for the same approval step, so the platform cannot tell which one is the real approval. Cancel the extra task; the approval then works again. Each such refusal is in the audit log. |
Where to go next
Continue with Test a process before people use it. For implementation contracts and administrator/developer details, use the optional technical reference. You do not need that reference to follow this lesson.