Build the Leave requests forms and app
Nadia builds a small application in People Operations. Mohammad uses it to request leave; Sara reviews the resulting manager task. This tutorial connects the interface pieces in an order you can follow without creating work before its prerequisites exist.
Screenshot context: The historical images from the fictional training run captured on 8 November 2026 show only that earlier run. A separate, numbered current-master sequence was captured on 15 November 2026 from origin/master commit 29807c7 at 2560×1440. Those 15 November images show the empty Forms and App Shells lists and unsubmitted wizard drafts only. A separate 16 November sequence from master 93afd995, added under milestone 6, shows a created and reopened three-page practice shell and Interactive Preview navigation. That shell remains unpublished; these images do not show the complete employee/manager application. A separate 17 November sequence from build-start master 113c43a3, under milestone 7 and its following illustrated example, shows a new manager-decision Form, local answer checks and its successful Form v1 release. It does not show a submitted task, a published lifecycle or employee/manager access checks. Follow the written steps for the complete journey, and if a screen differs, ask your administrator to confirm the current setup.
A Form asks for answers. A record stores a request. A workflow case follows the request through its process. A task asks someone to do work in that case. An App Shell holds the application's pages and navigation. Creating a form does not automatically create a record, case or task.
Current ordinary-user example: the worked whole-day pilot now illustrates the published request page, employee receipt, assigned manager task, saved answer and actual completion. Its employee requestedDays input is Integer and explicitly asks for whole days. Keep the published process’s compatible numeric input and six field mappings. This bounded example does not demonstrate Decimal/fractional-day argument evaluation, an in-app task worklist, notification delivery or a leave-record update. The manager receives a permitted task link as a separate prerequisite. Earlier authoring and preview pictures below remain distinct.
Follow the course in stages
| Stage | Work to complete |
|---|---|
| Prepare | Identity lesson milestones 1–4, then the data/rules lesson. |
| Build the interfaces | This tutorial milestones 1–7, including a separate manager decision form. |
| Build the workflow | Workflow lesson milestones 1–4: author, test and publish the process using that manager form. |
| Connect the release | Return here for milestones 8–9, then identity milestone 6 for the completed app's access review. |
| Use the application | Workflow milestones 5–8, then this tutorial milestone 10 and identity milestone 7 for the final user checks. |
The prerequisite data lesson already creates request leave-2026-014 and other teaching rows. Configure and publish the employee form without submitting a new record during these early interface milestones. The workflow tutorial's milestone 5 performs the single ordinary-user create of leave-2026-017 after the workflow and access are ready. This tutorial's milestone 10 returns to that same request to check the App Shell and its outcomes; it must not create or decide on 017 a second time. Alternatively, deliberately open/update an existing permitted row. Do not submit a duplicate create to reset the lesson.
Milestone 1 — Prepare a business worksheet
- Complete the initial people and access preparation and data/rules lessons.
- Write down the visible workspace, model/type and relevant published rule names. Know which business function holds this work.
- Confirm what the teaching record needs: request reference, employee/manager business values, dates, requested days, status and ordinary reason text.
- Agree which normal users may create, read and review requests. Ask the administrator to prepare that access rather than making every user an administrator.
The teaching employee value M014 and manager value S002 are business text values in the record. They are not login identities. The workflow lesson chooses real users/participants through its own controls. Prefilling an employee field does not establish who may access a request.
Checkpoint: you can explain which information the form collects and who owns the related access decisions.
Milestone 2 — Create the employee form
- Open Build → Forms → New form.
- Choose Form if Type is shown, select the intended Placement and enter Leave request as the Title.
- Review the details and choose Create interface.
- In Designer, choose Generate form when using the prepared record destination. Choose the Create pattern, select the actual live Create destination and the fields this application needs, then review and choose Generate.
- Read any destination warning. If the form is described as validation-only, stop the persistence part of this lesson and have the data owner finish the live destination/rules first.
- Inspect the generated fields and action rather than immediately replacing them with a hand-built form.
Generation gives you a starting design tied to the selected destination. The source must be the actual one prepared by the data lesson. A similar display name from another model is not interchangeable.
Checkpoint: a named working employee form exists, with a known destination or an explicit missing prerequisite to resolve.
Current-master Form setup screens
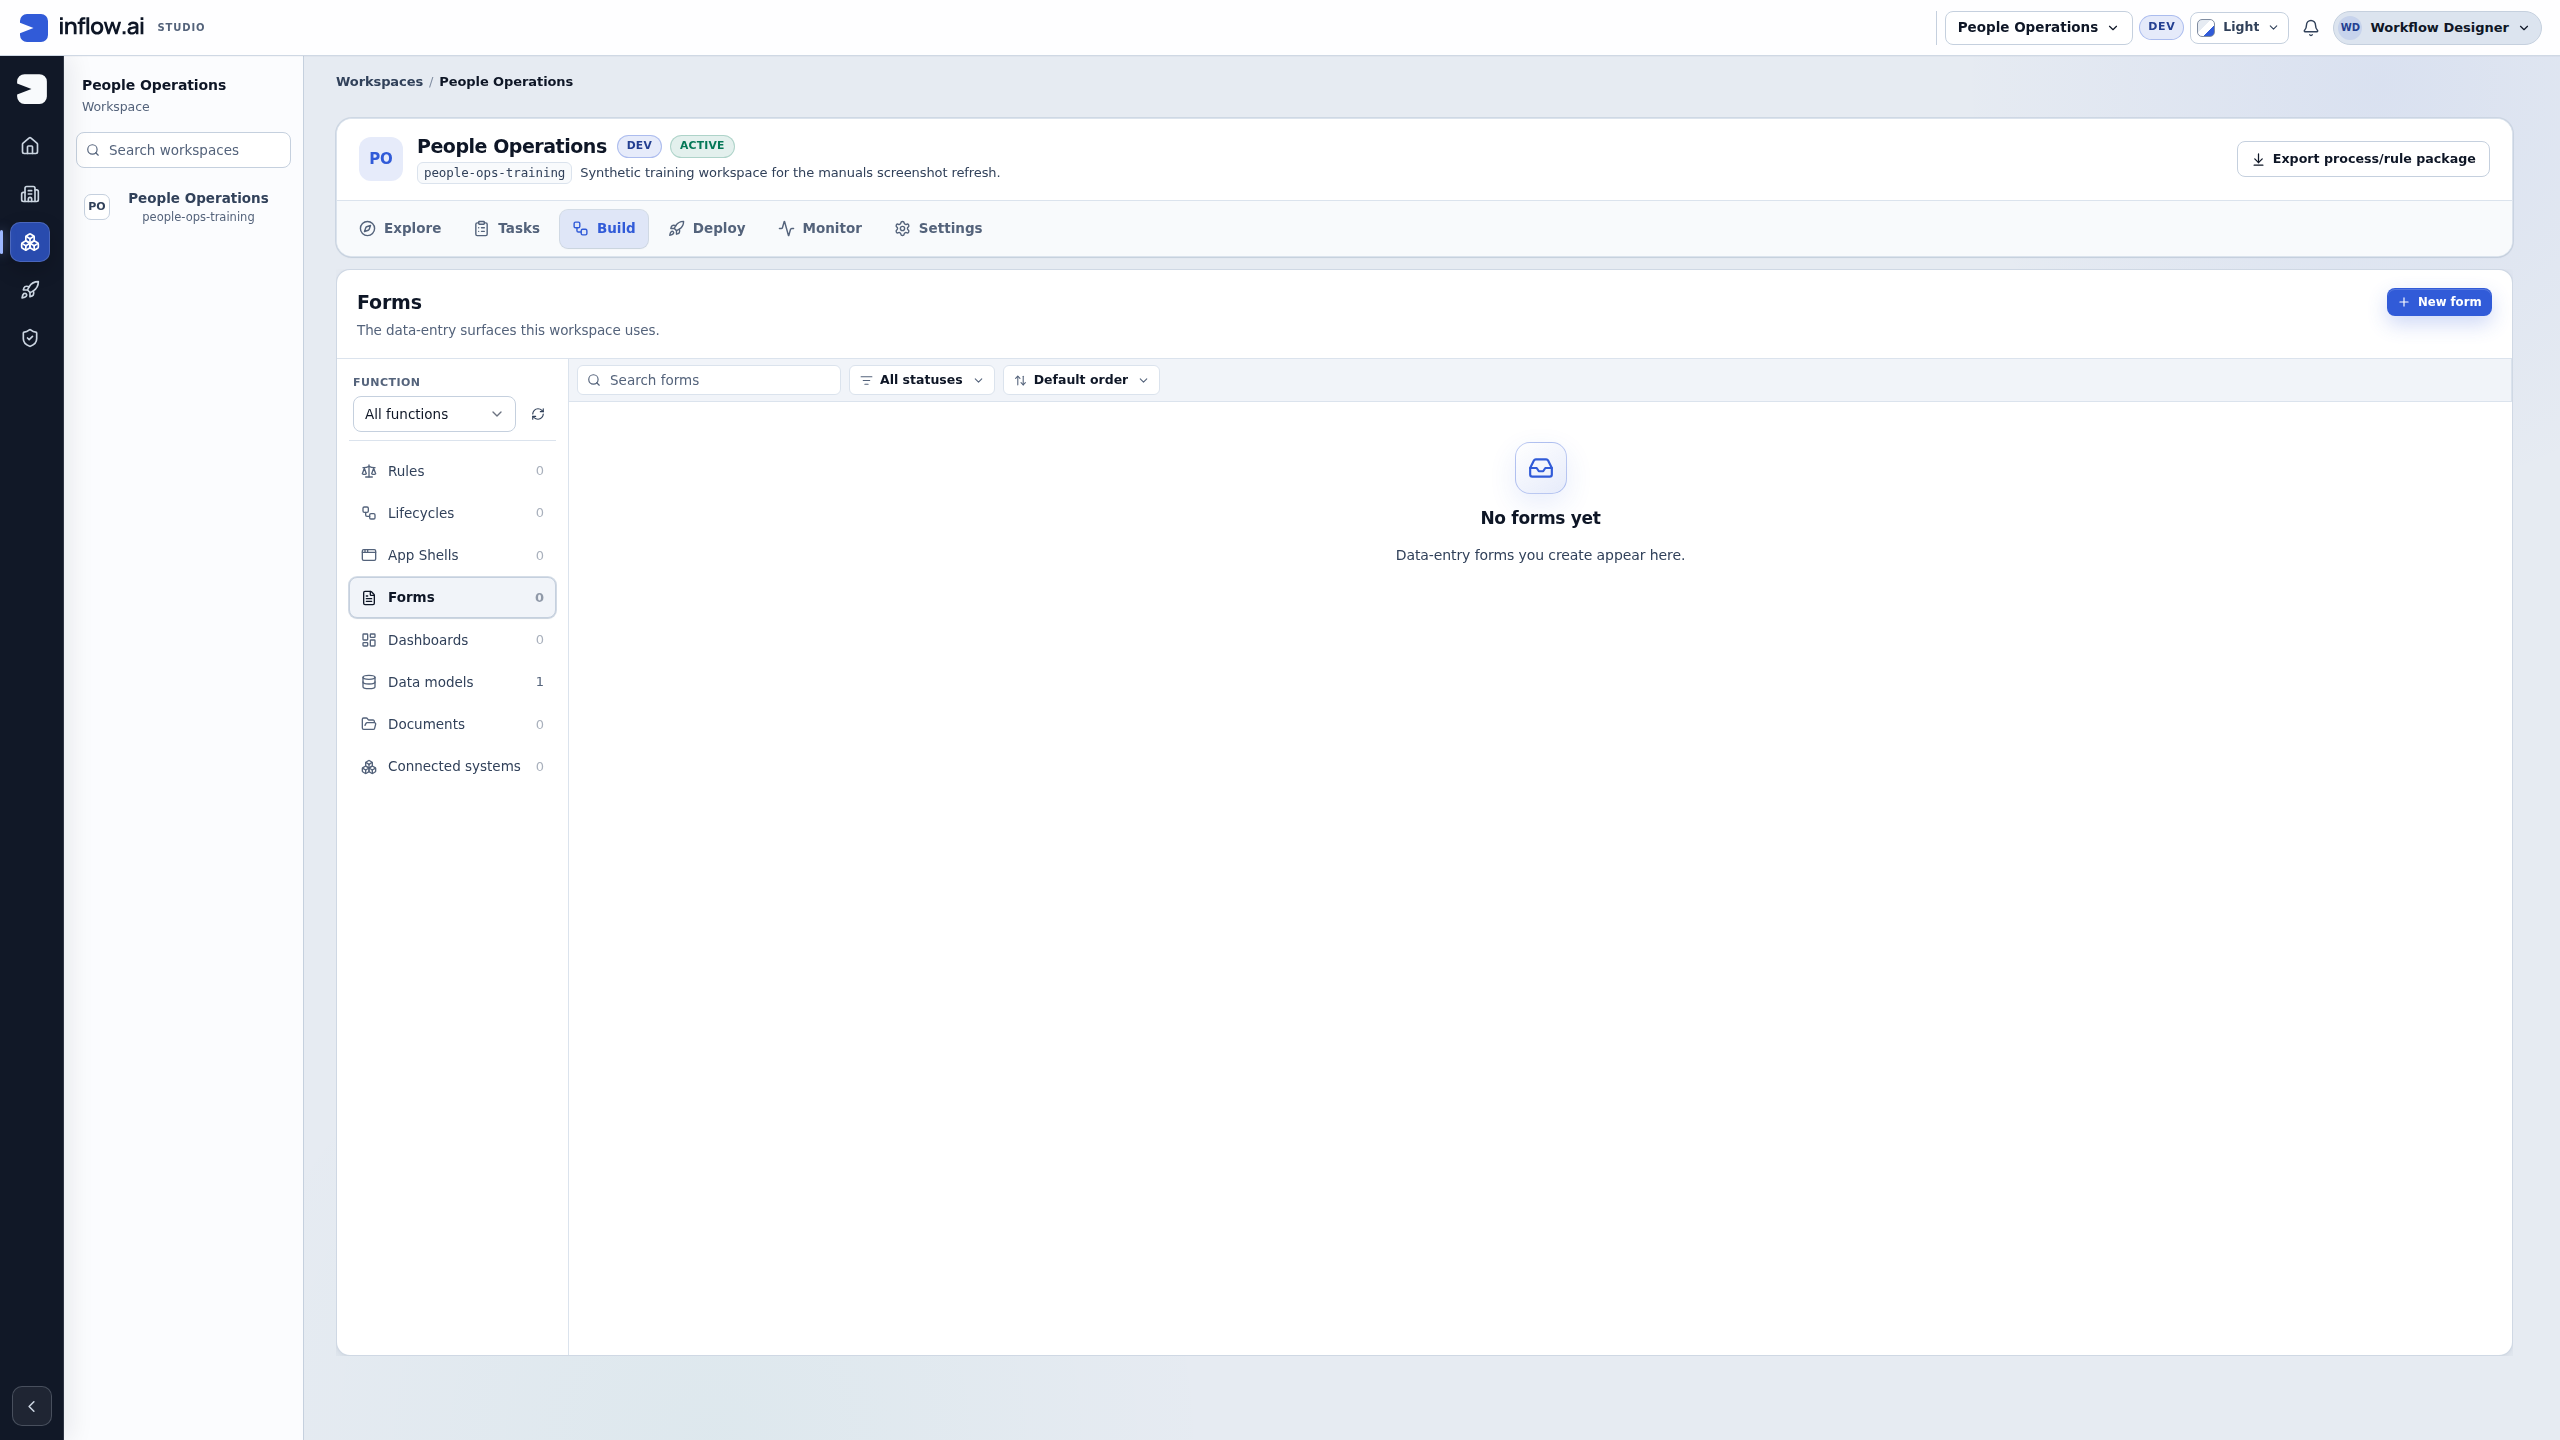
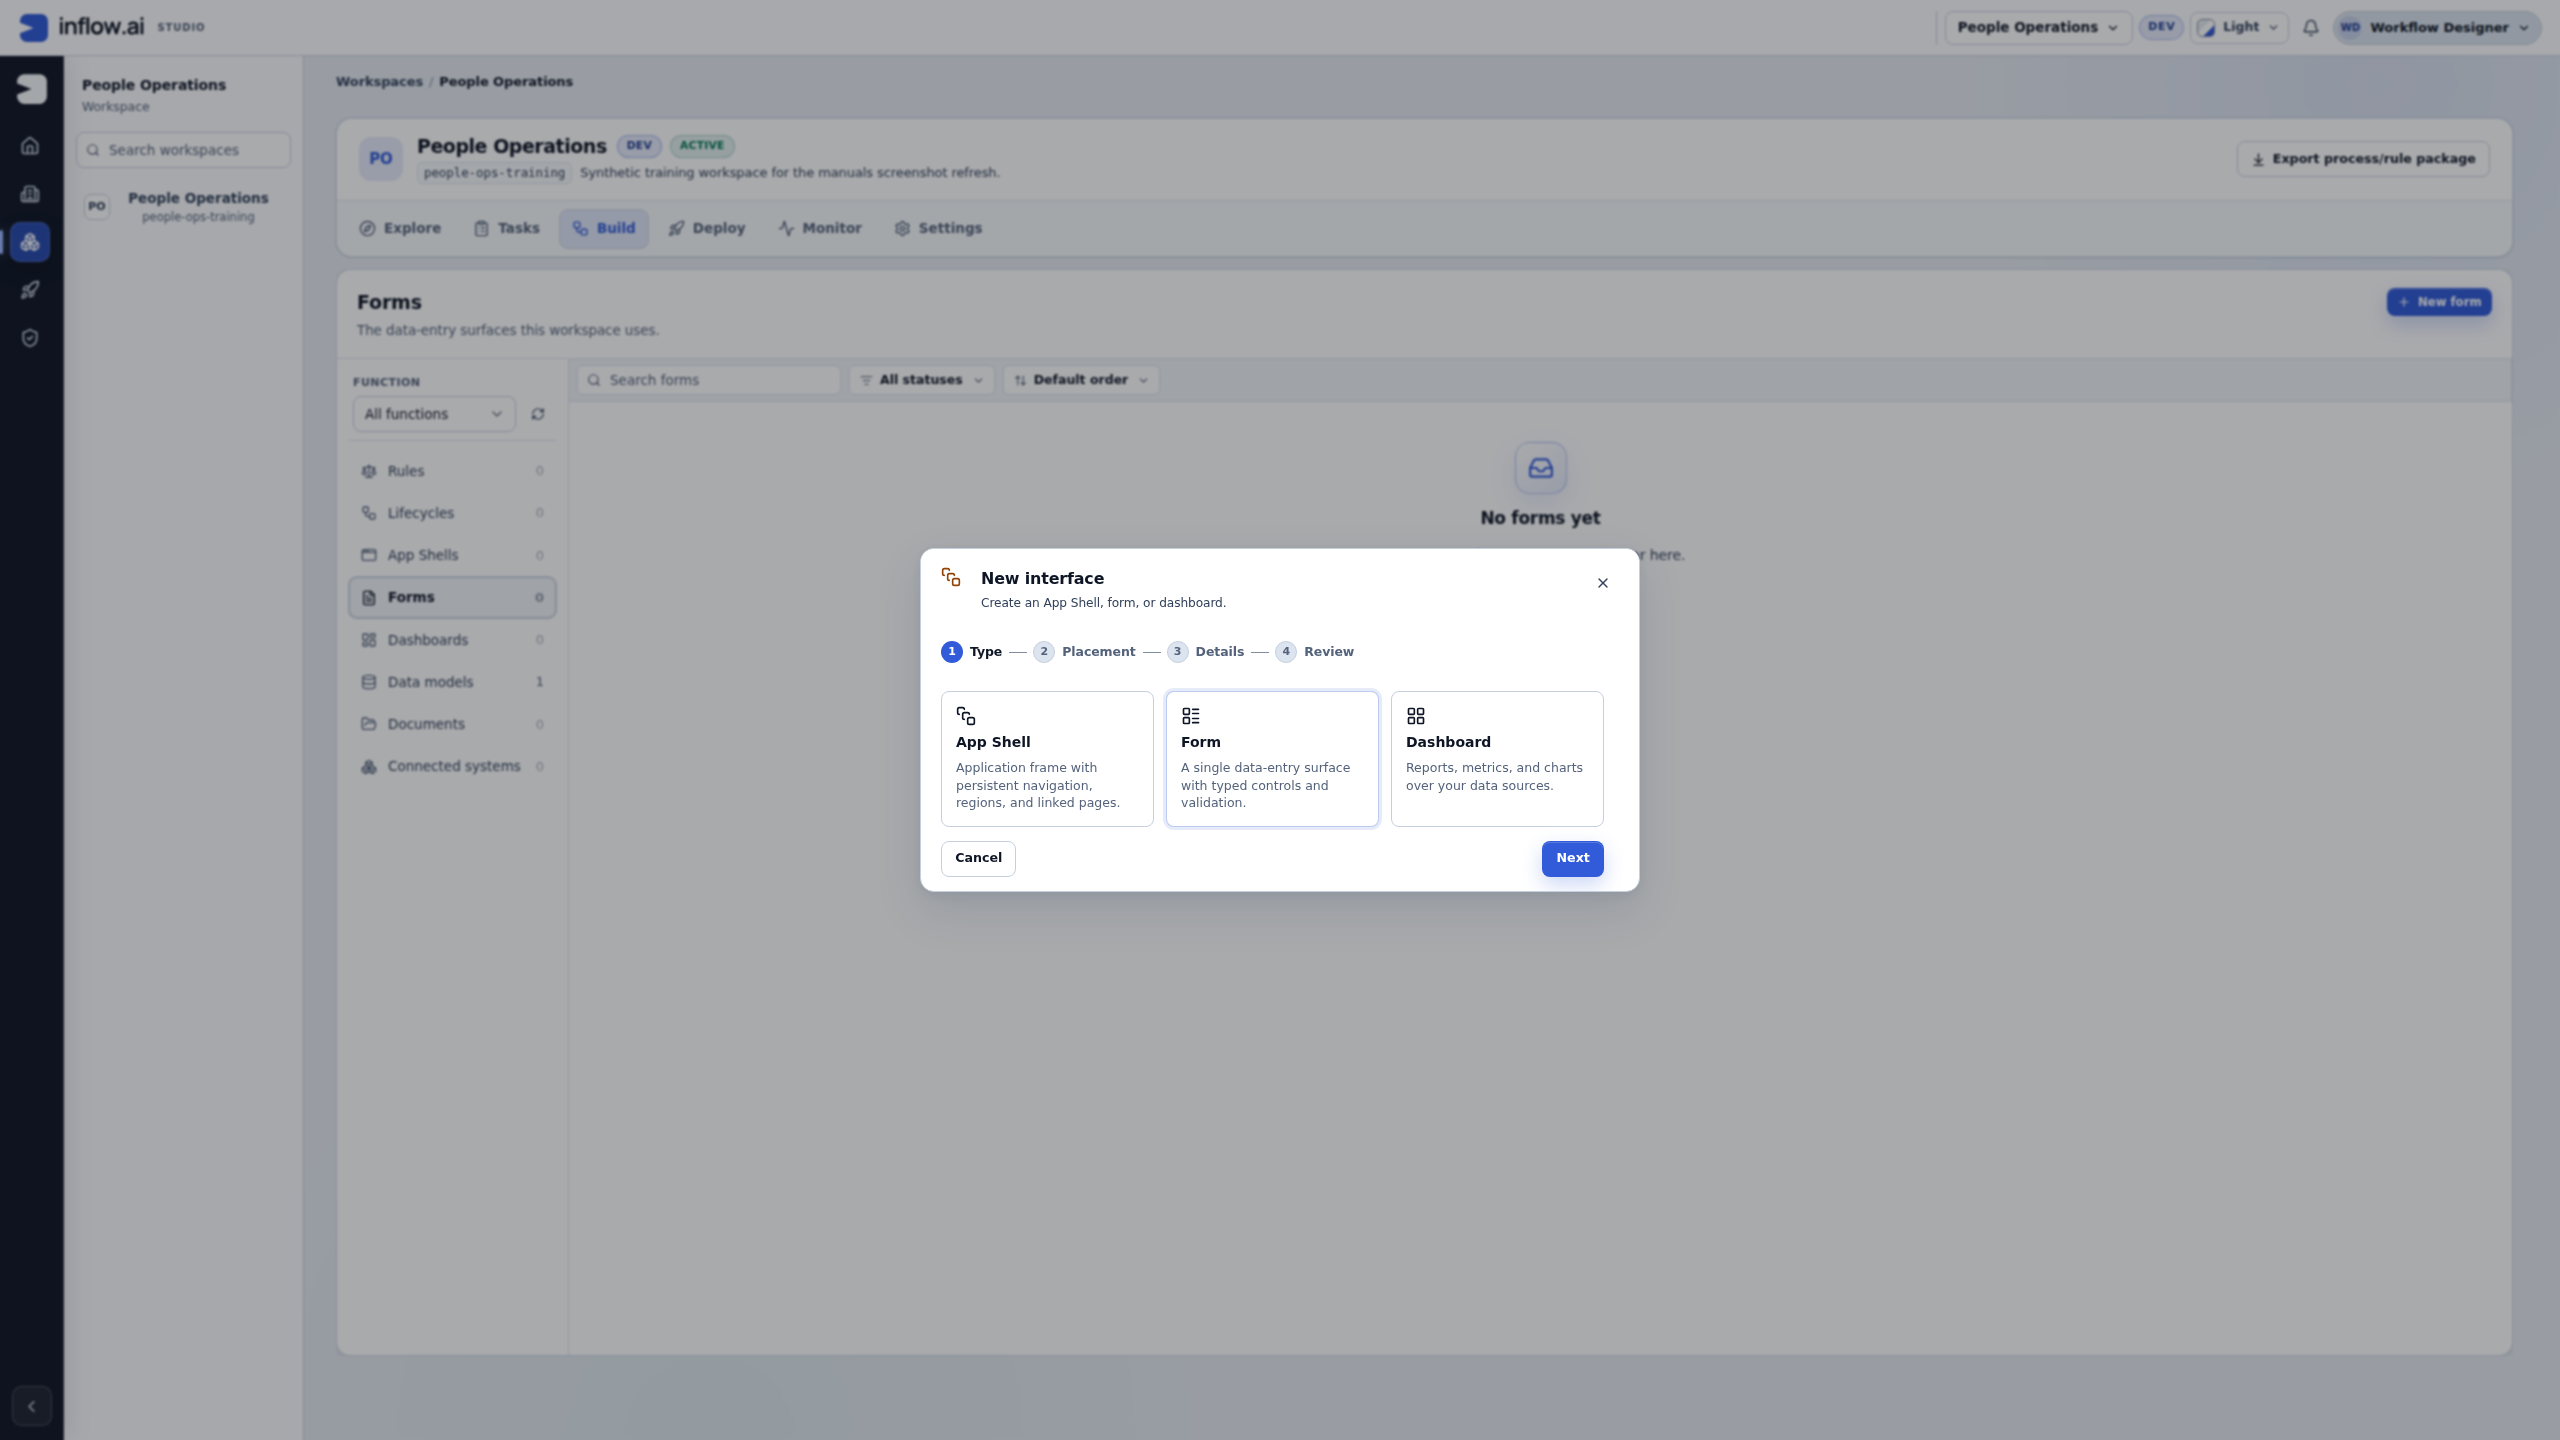
This sequence records the wizard before an interface is created. It complements the detailed Designer walkthrough below; it does not replace the required data model, destination, validation, access or publication checks.
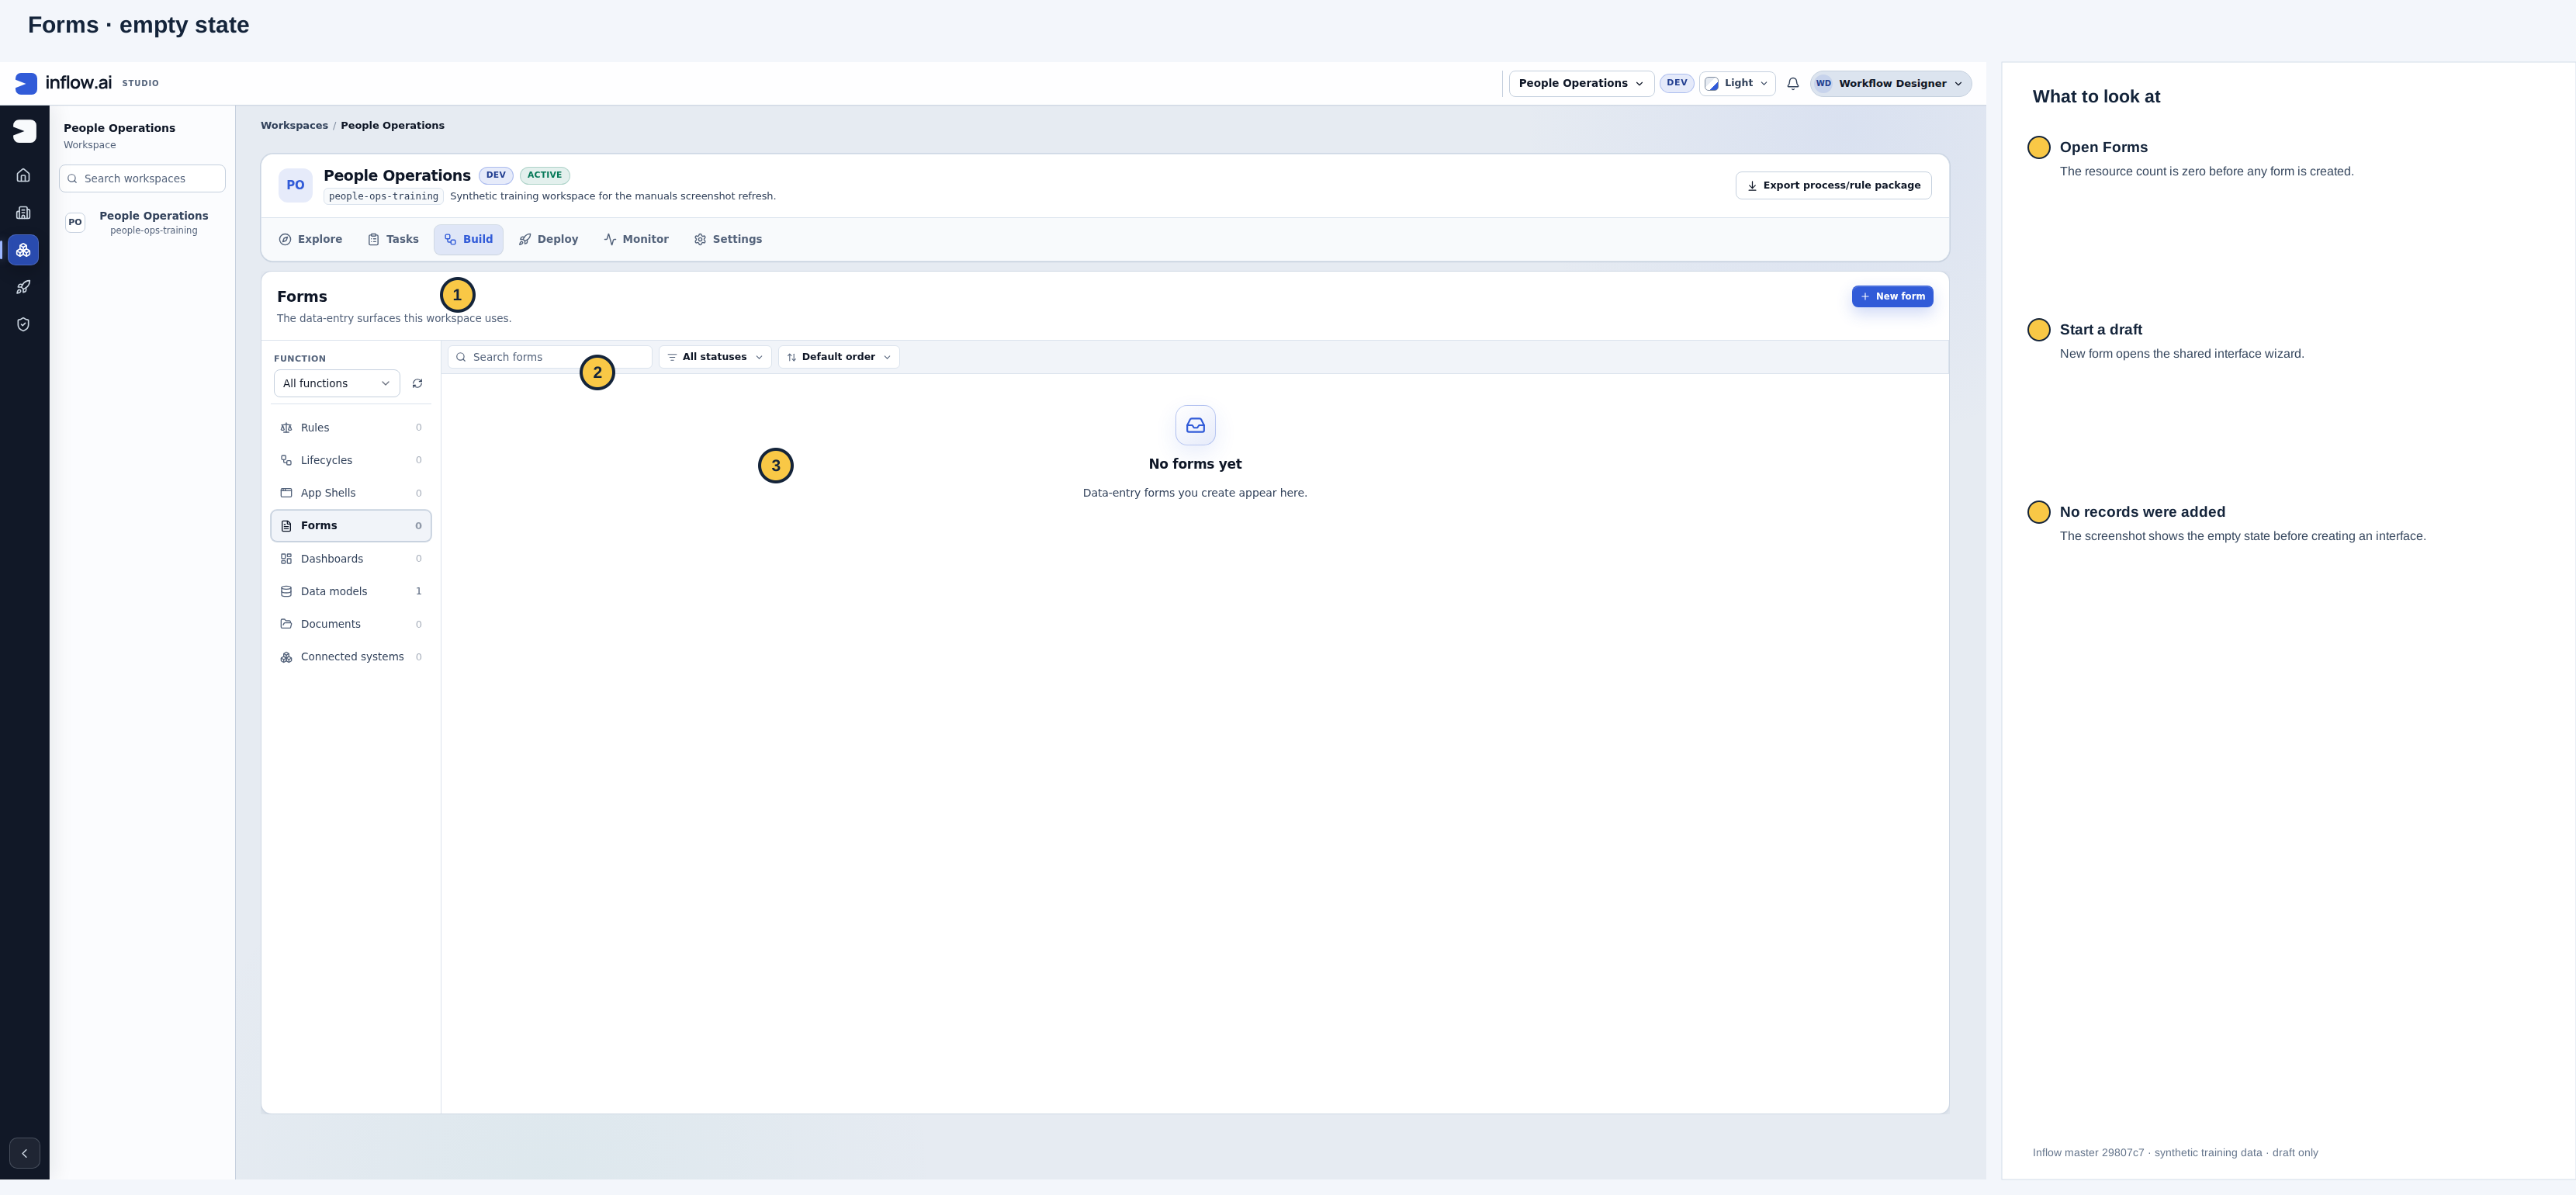
The synthetic workspace has no Forms yet. Open the unchanged 2560×1440 original.
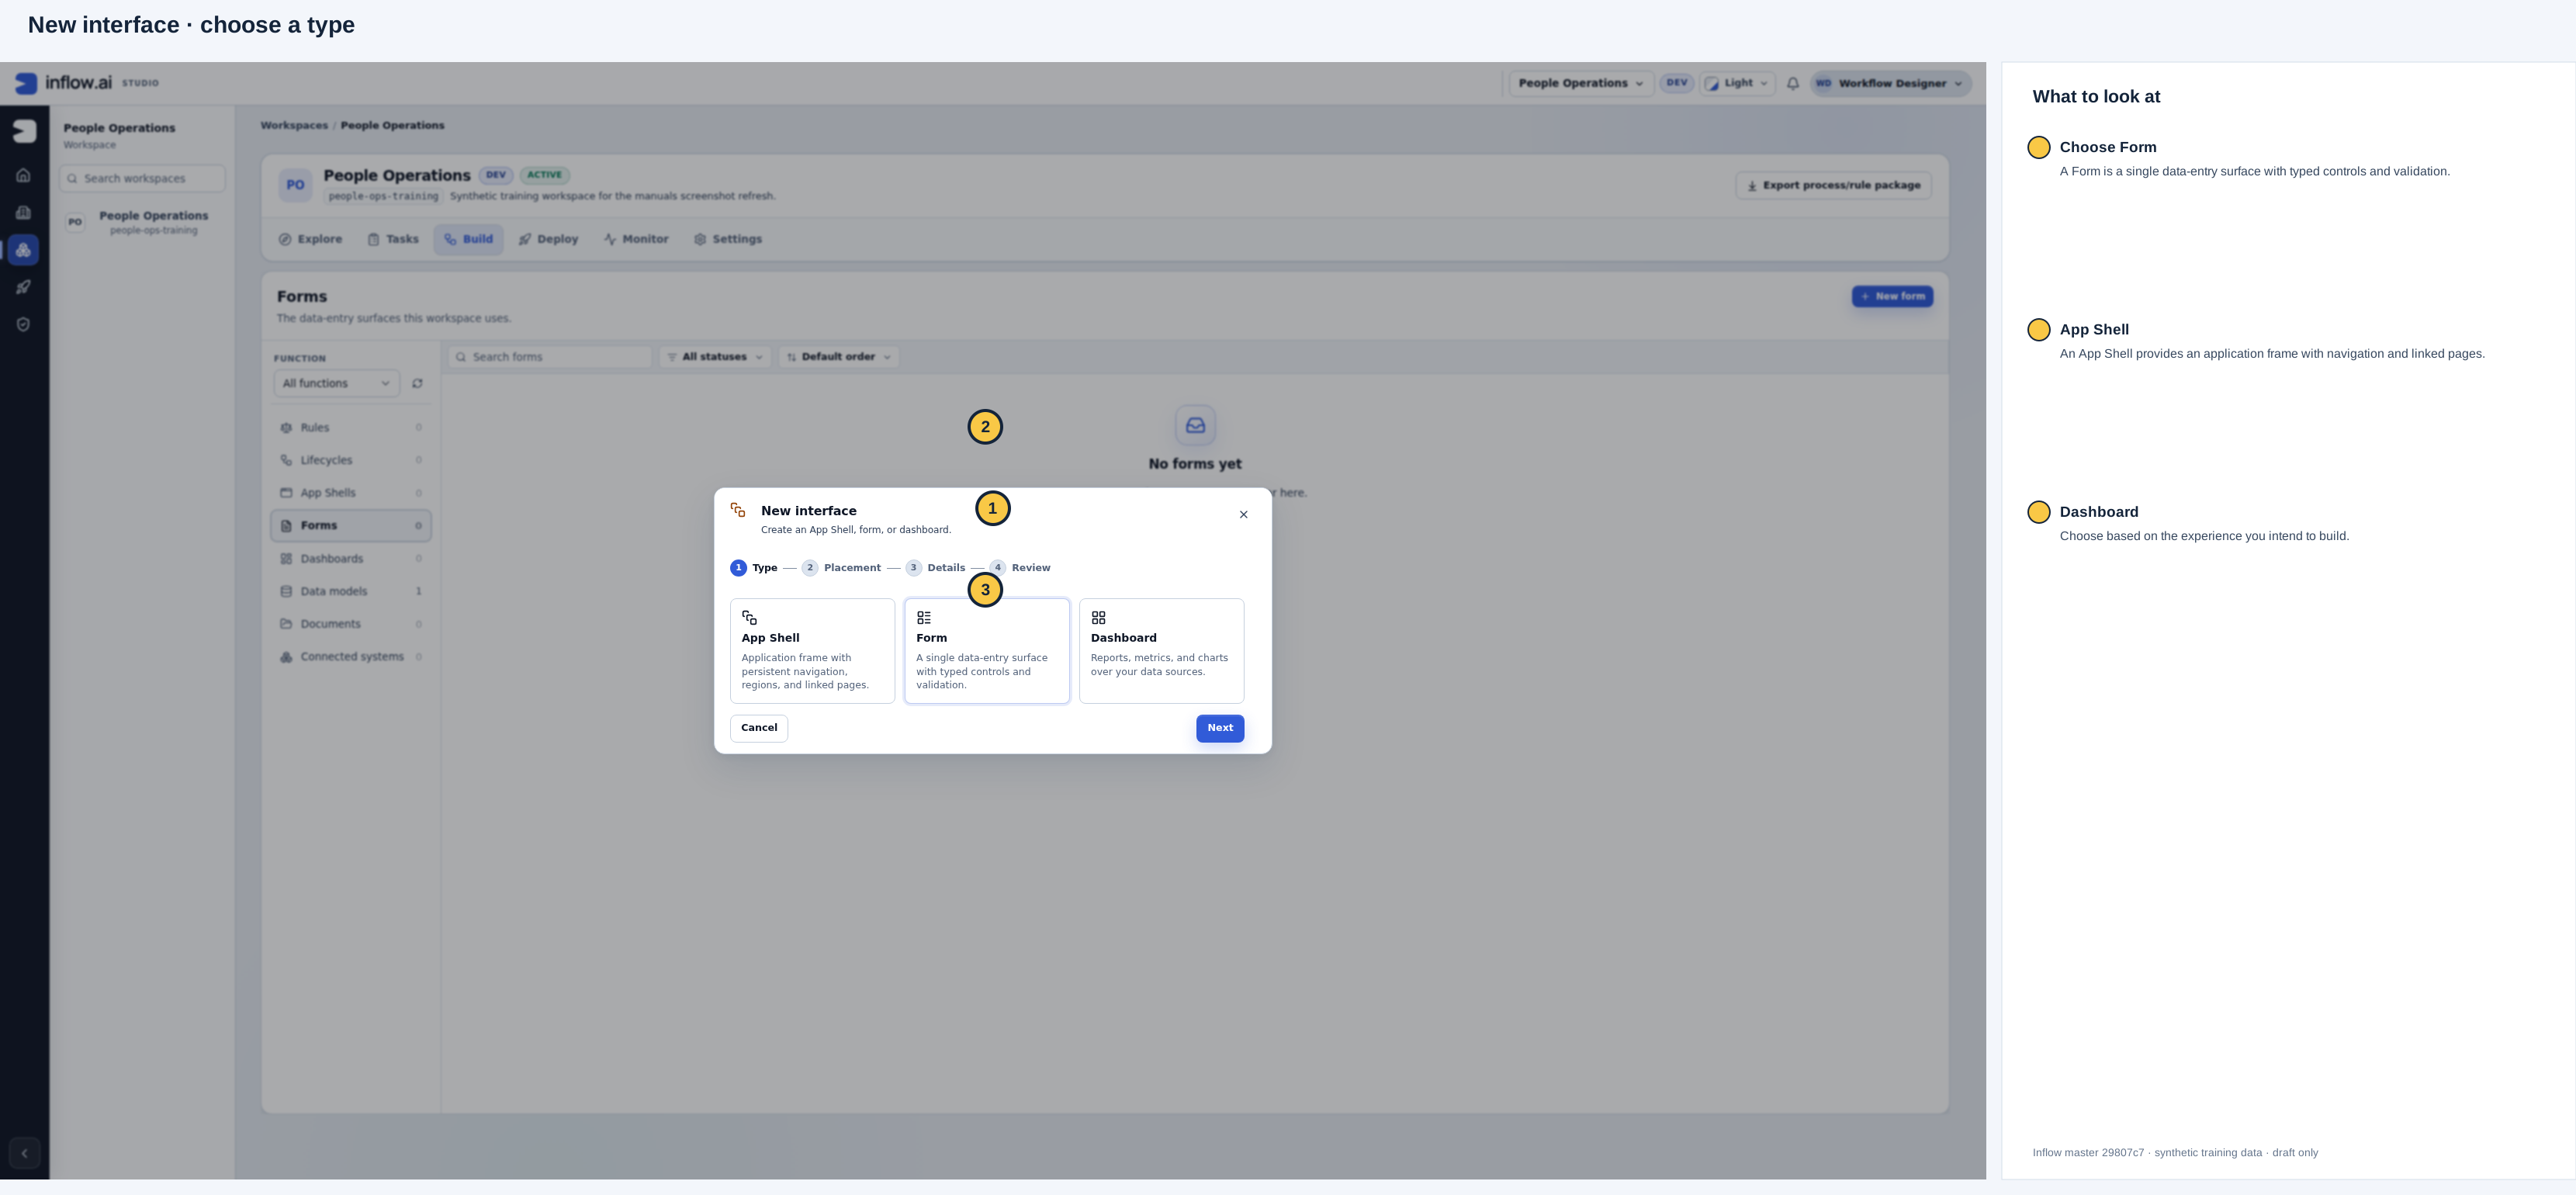
Form is selected for this draft. Open the unchanged original.
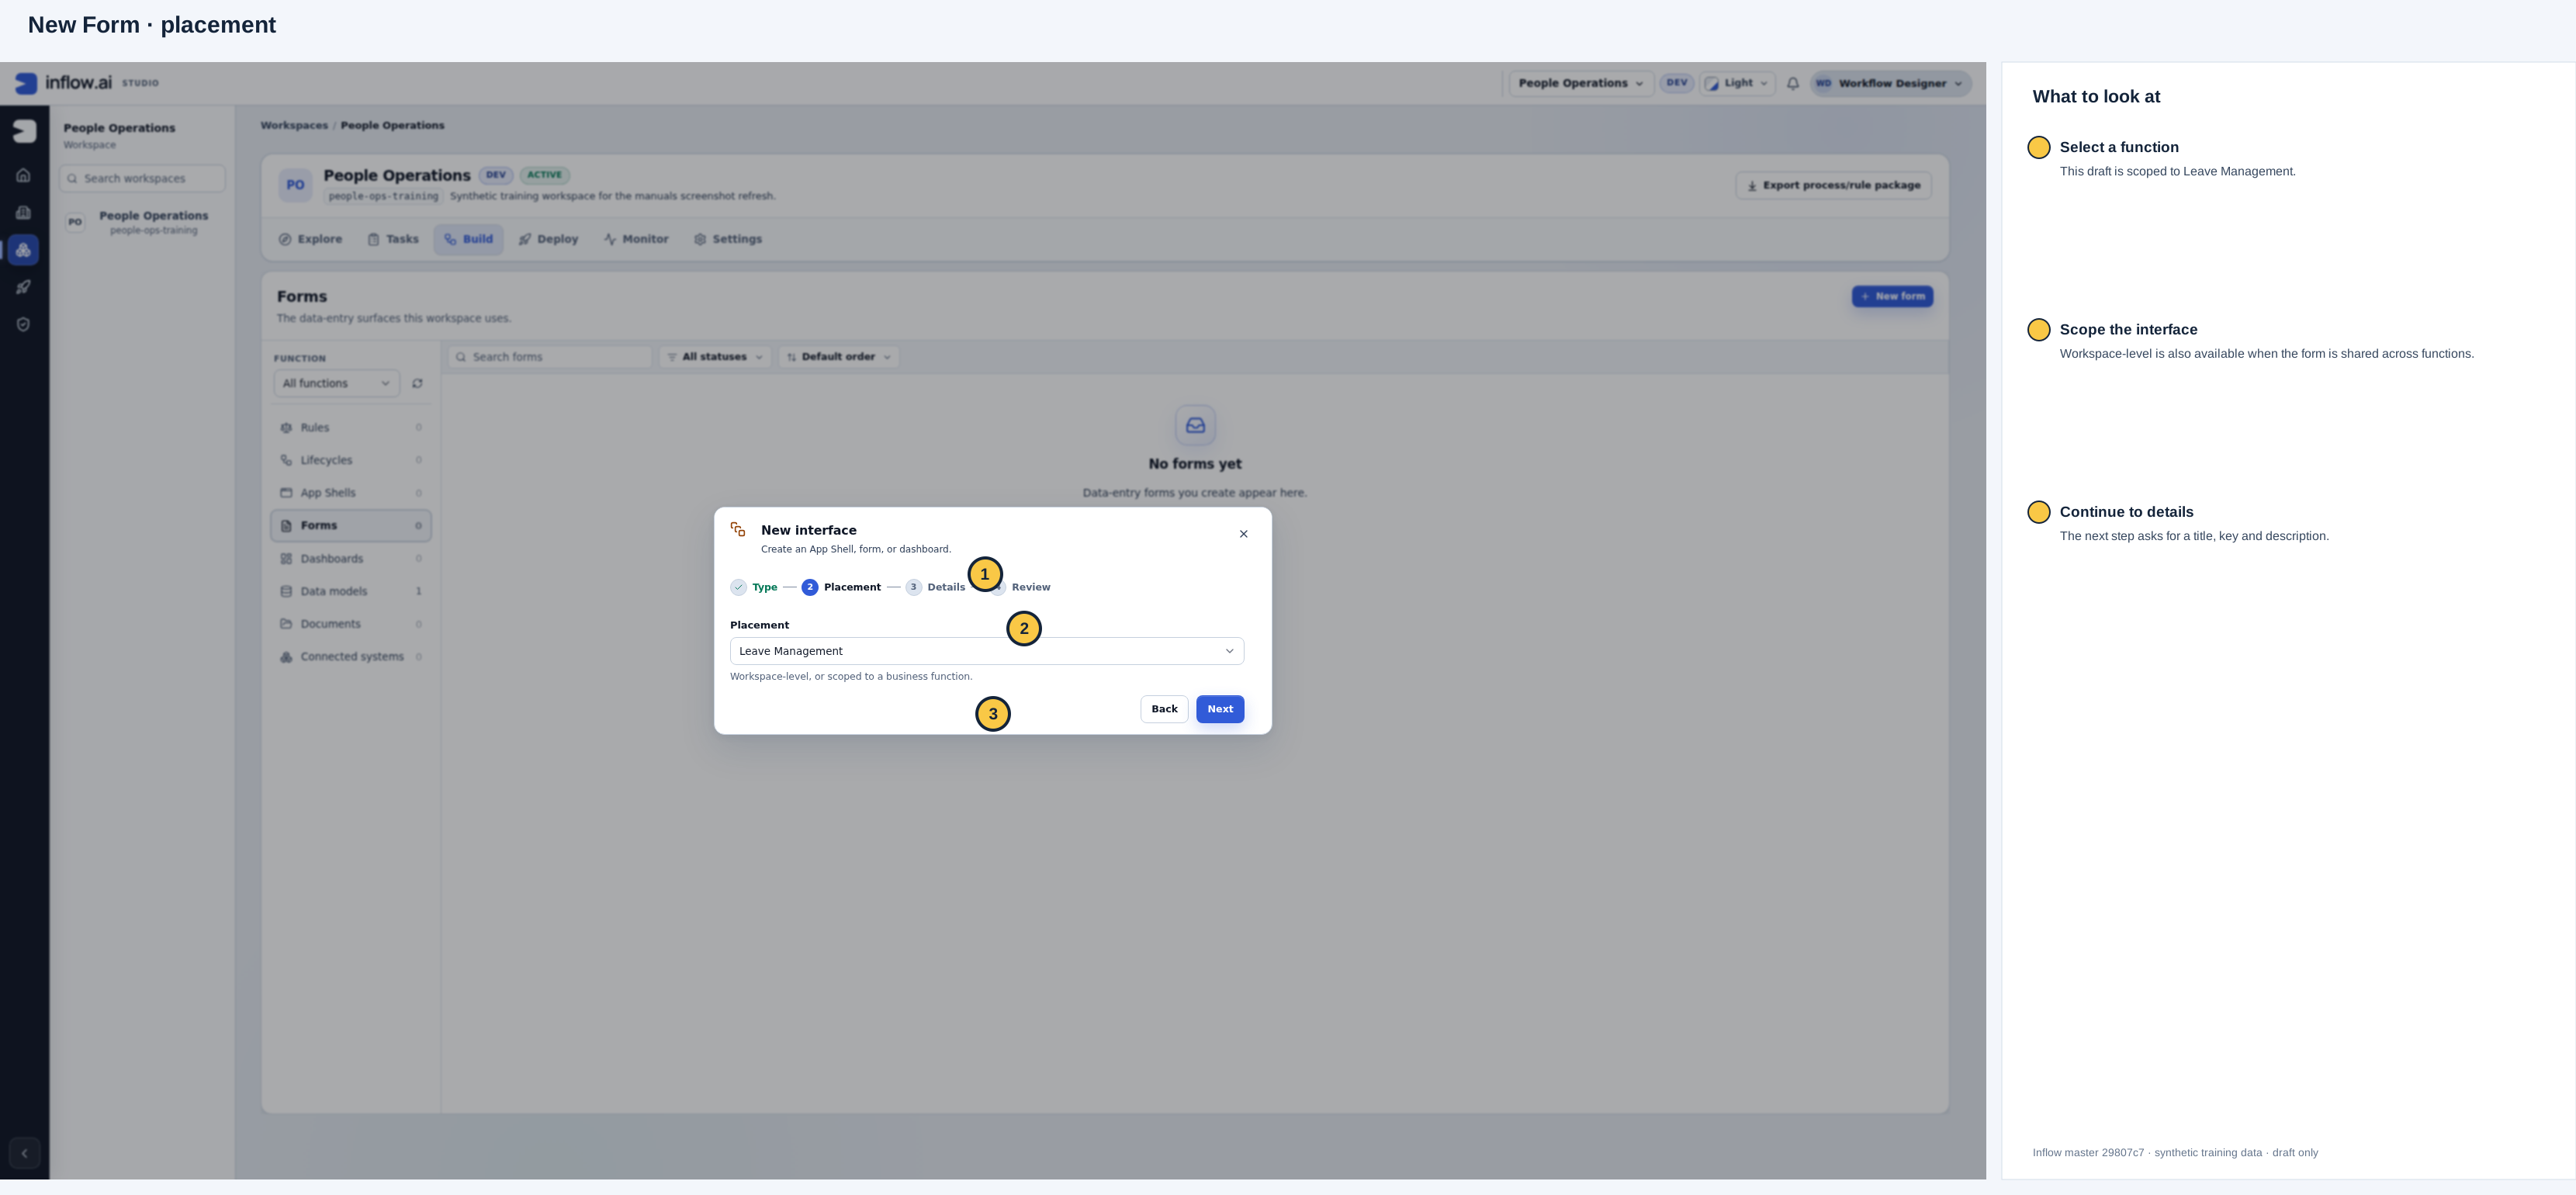
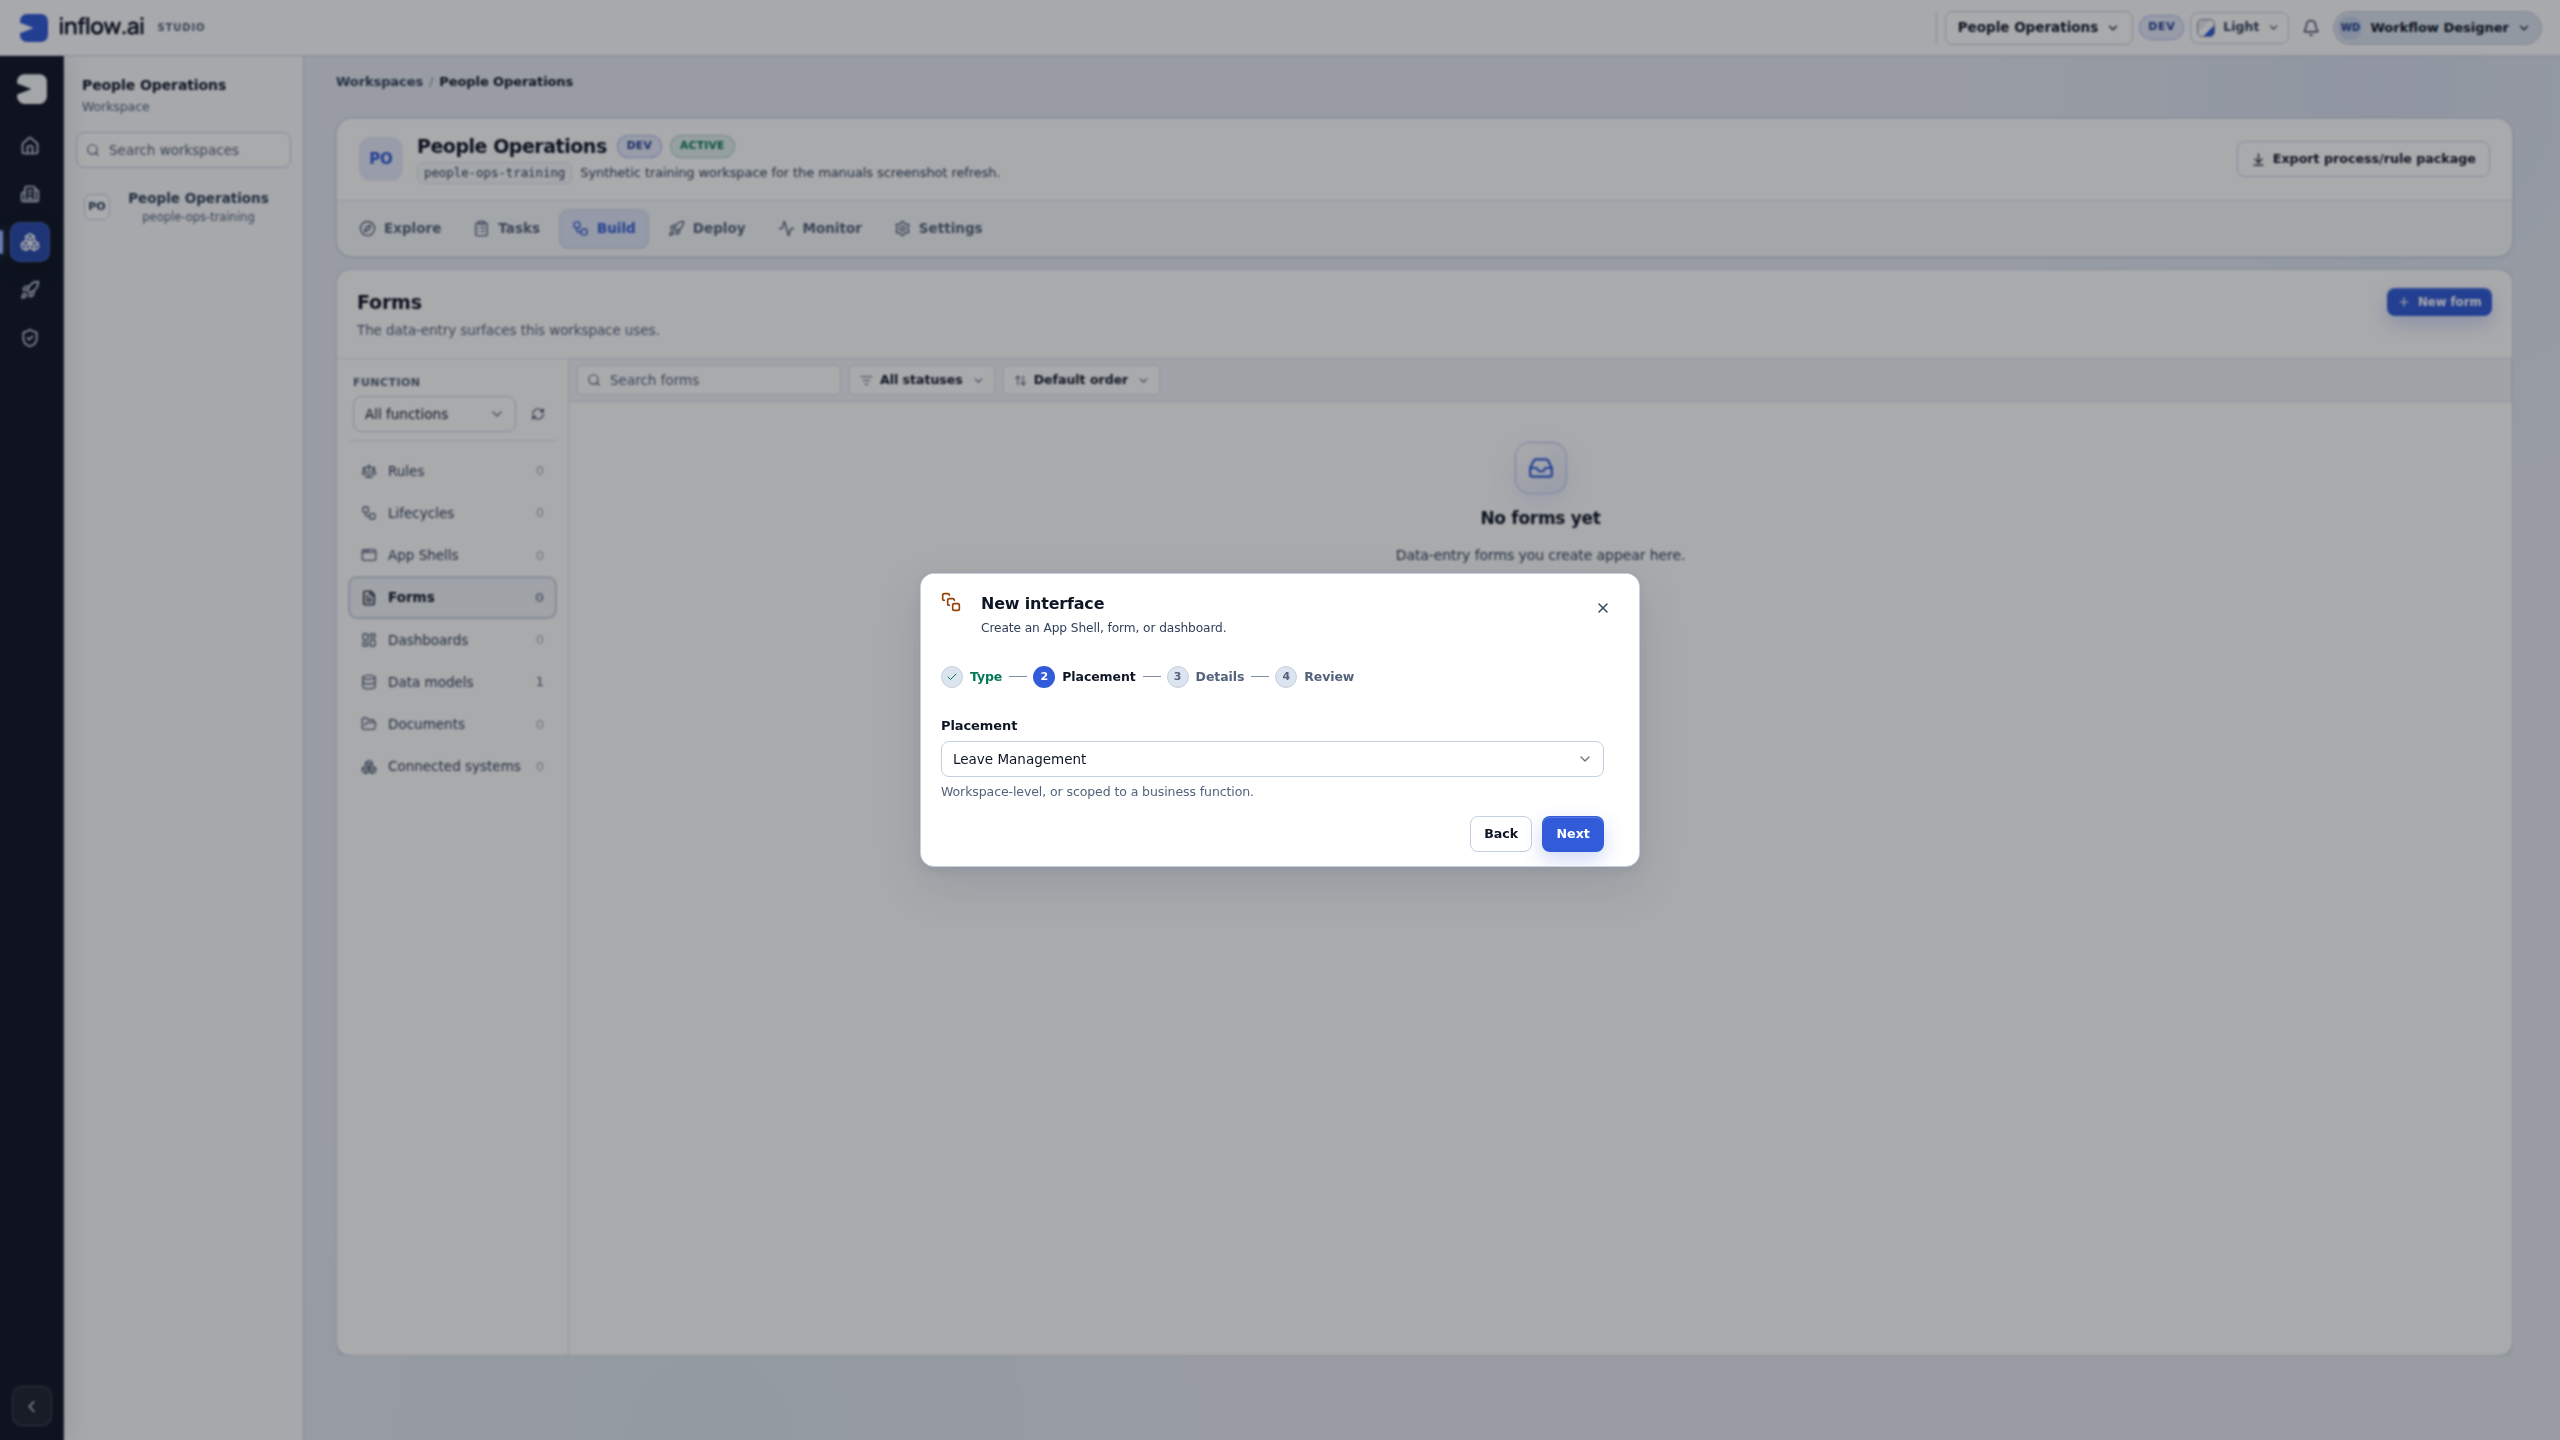
This example scopes the draft to Leave Management. Open the unchanged original.
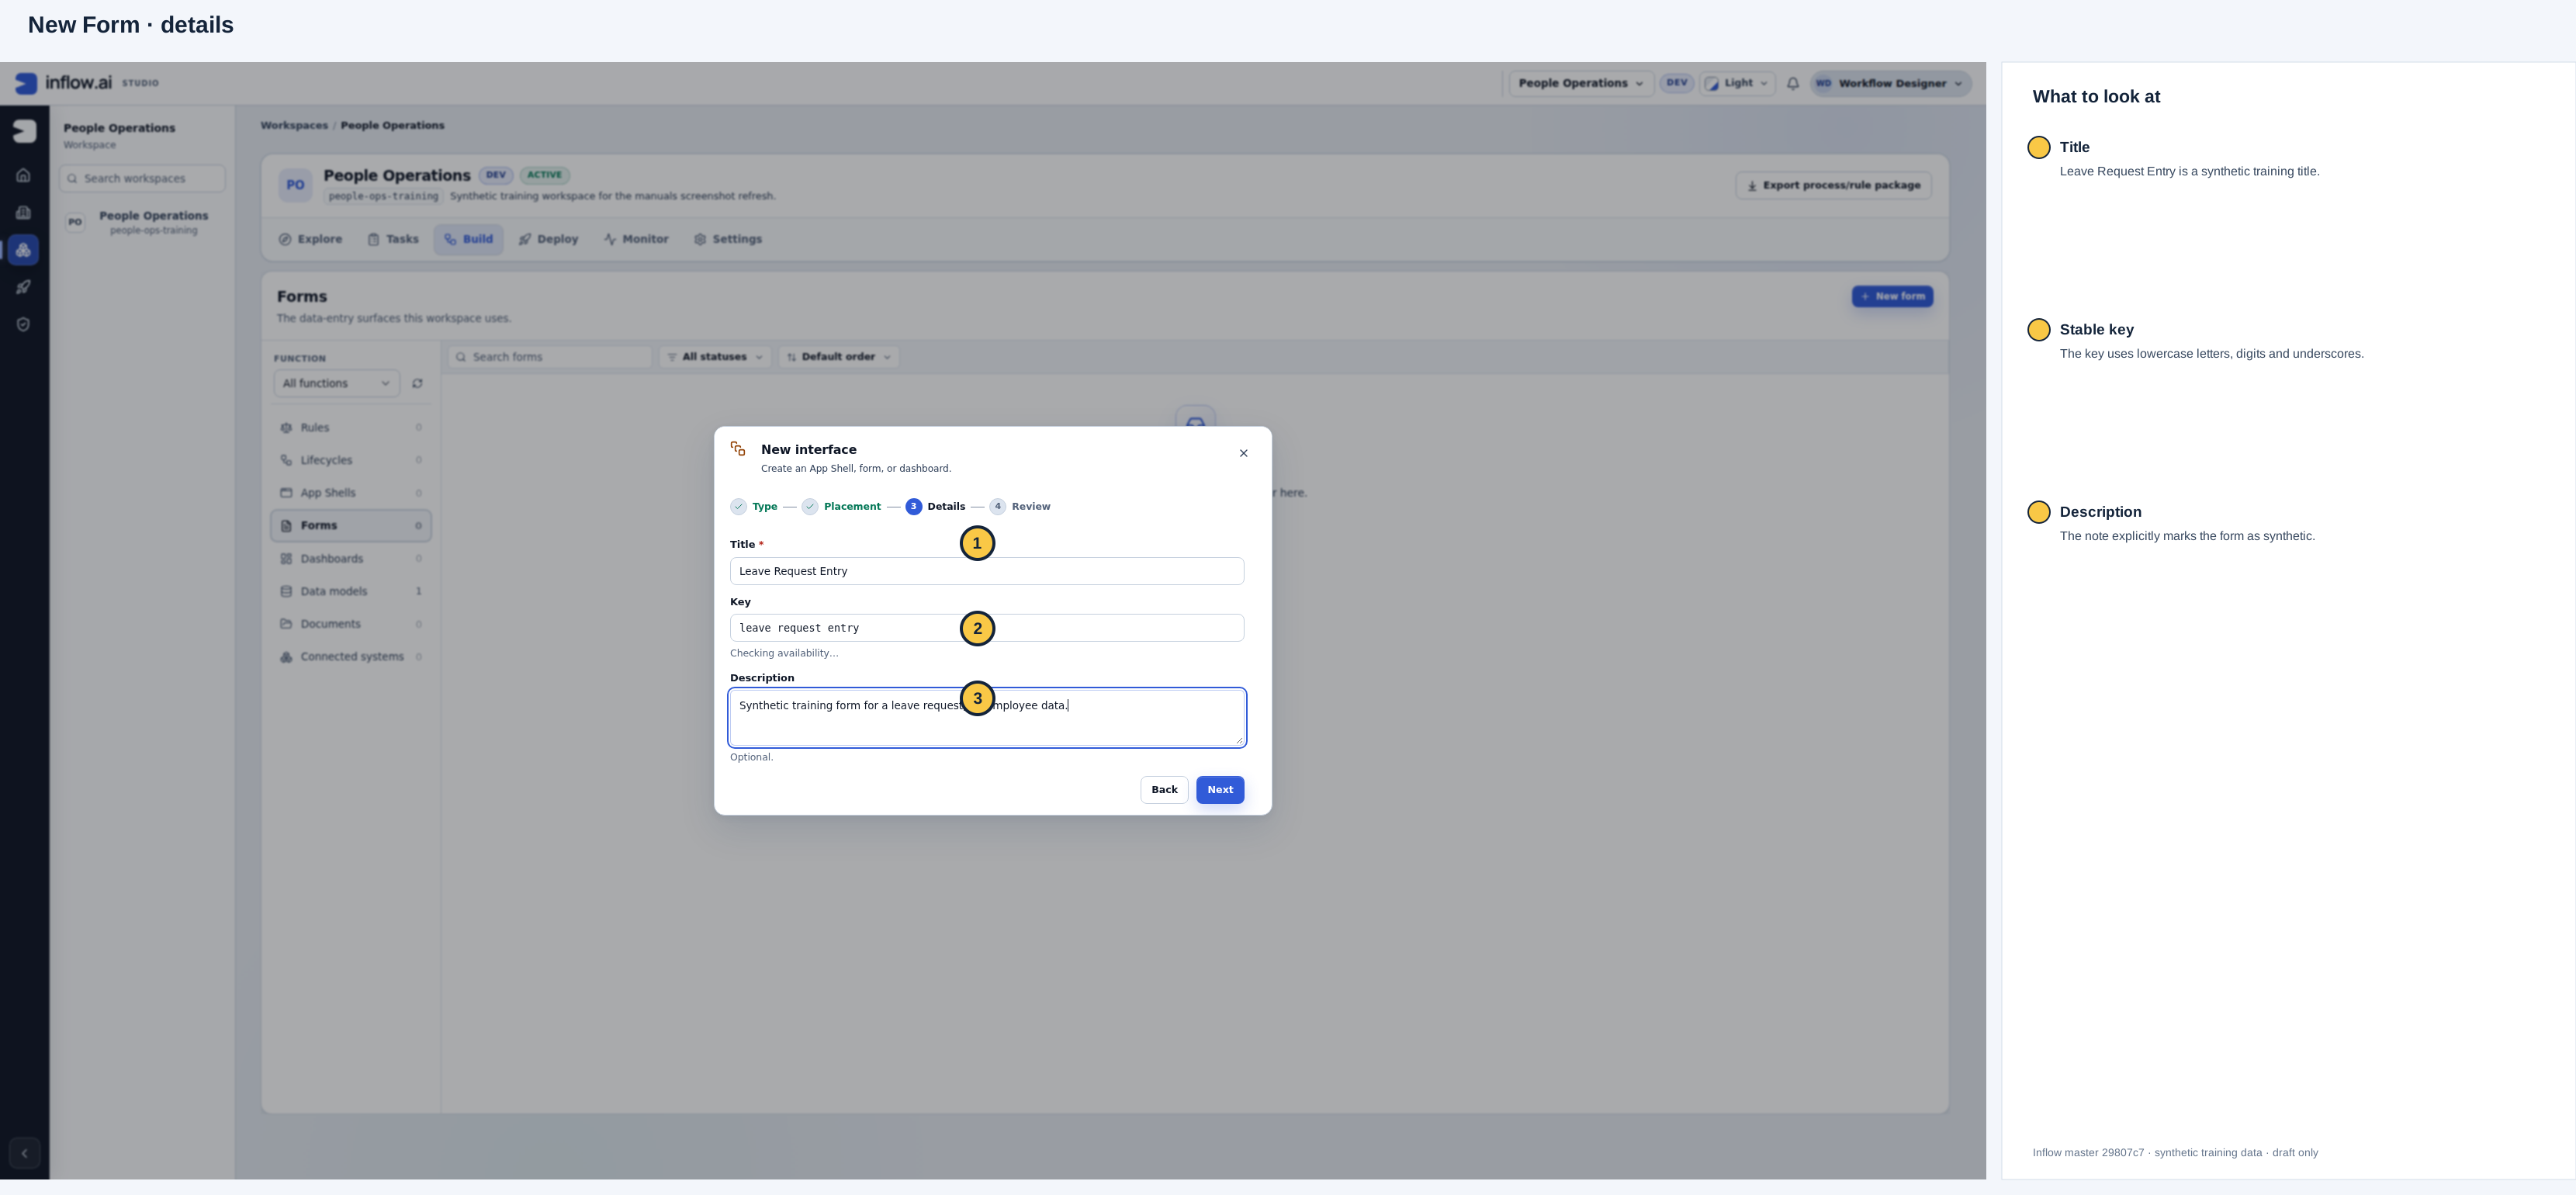
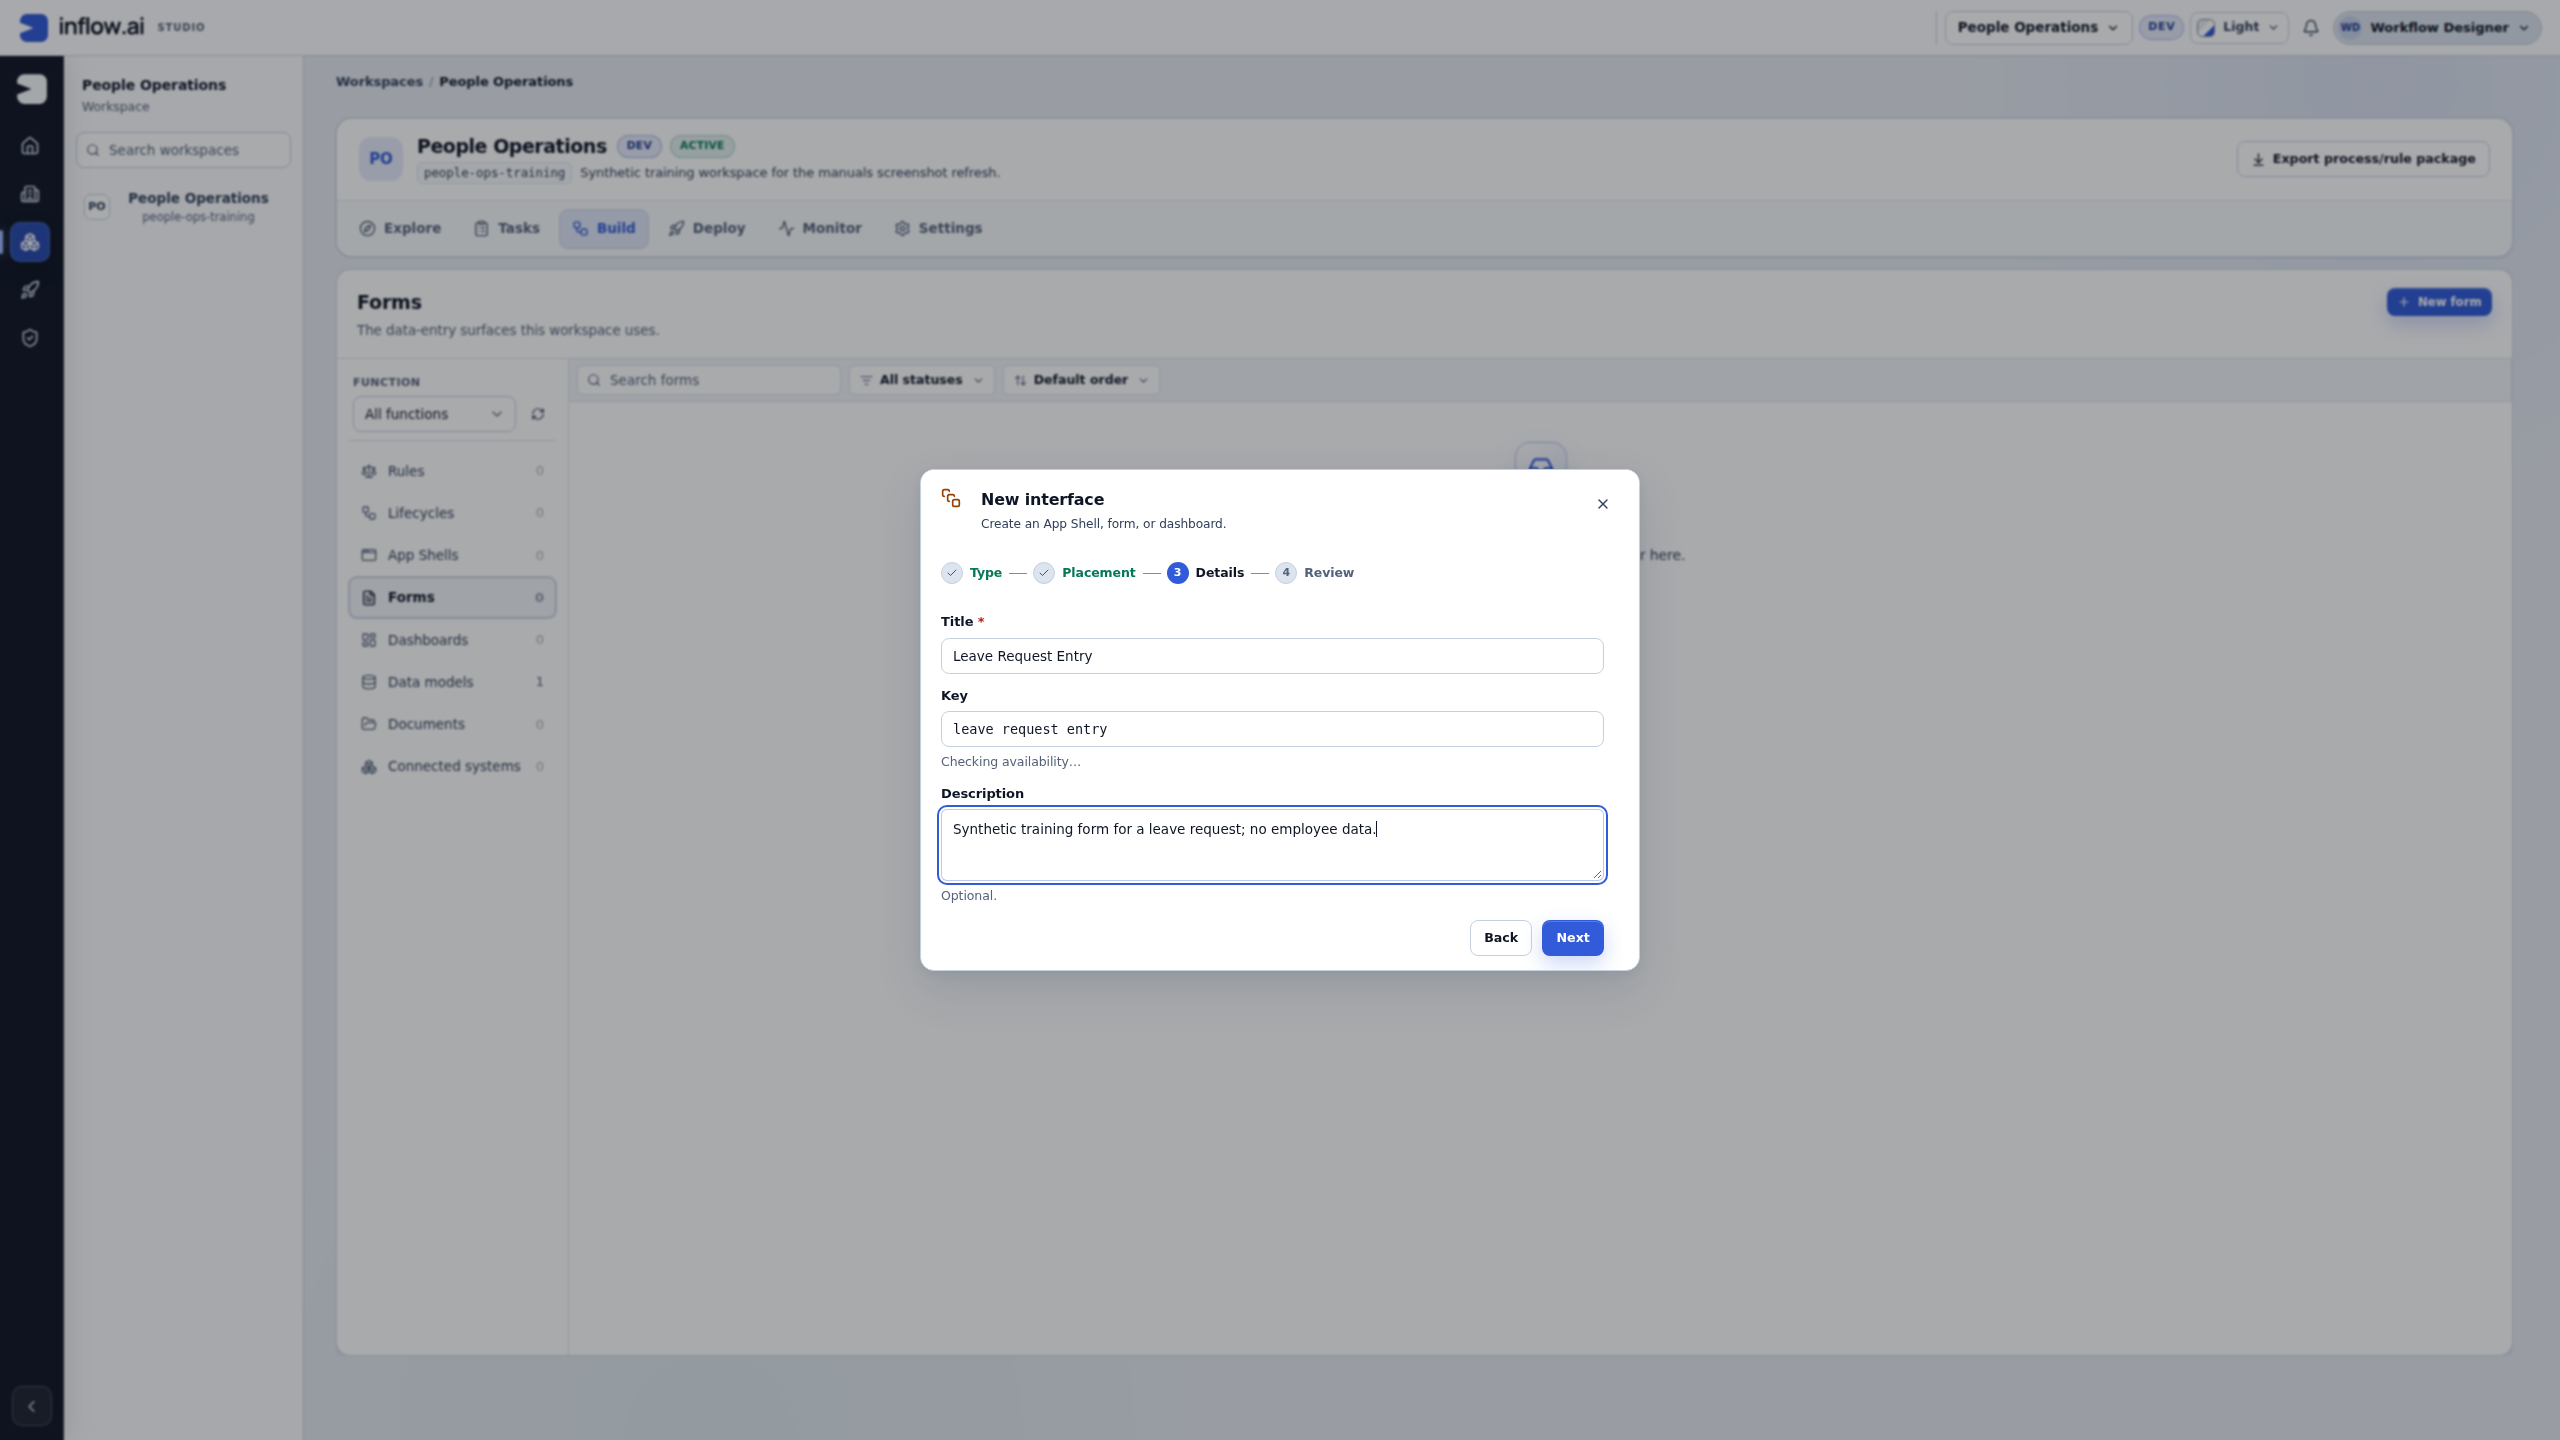
The title is Leave Request Entry and the key is leave_request_entry. Open the unchanged original.
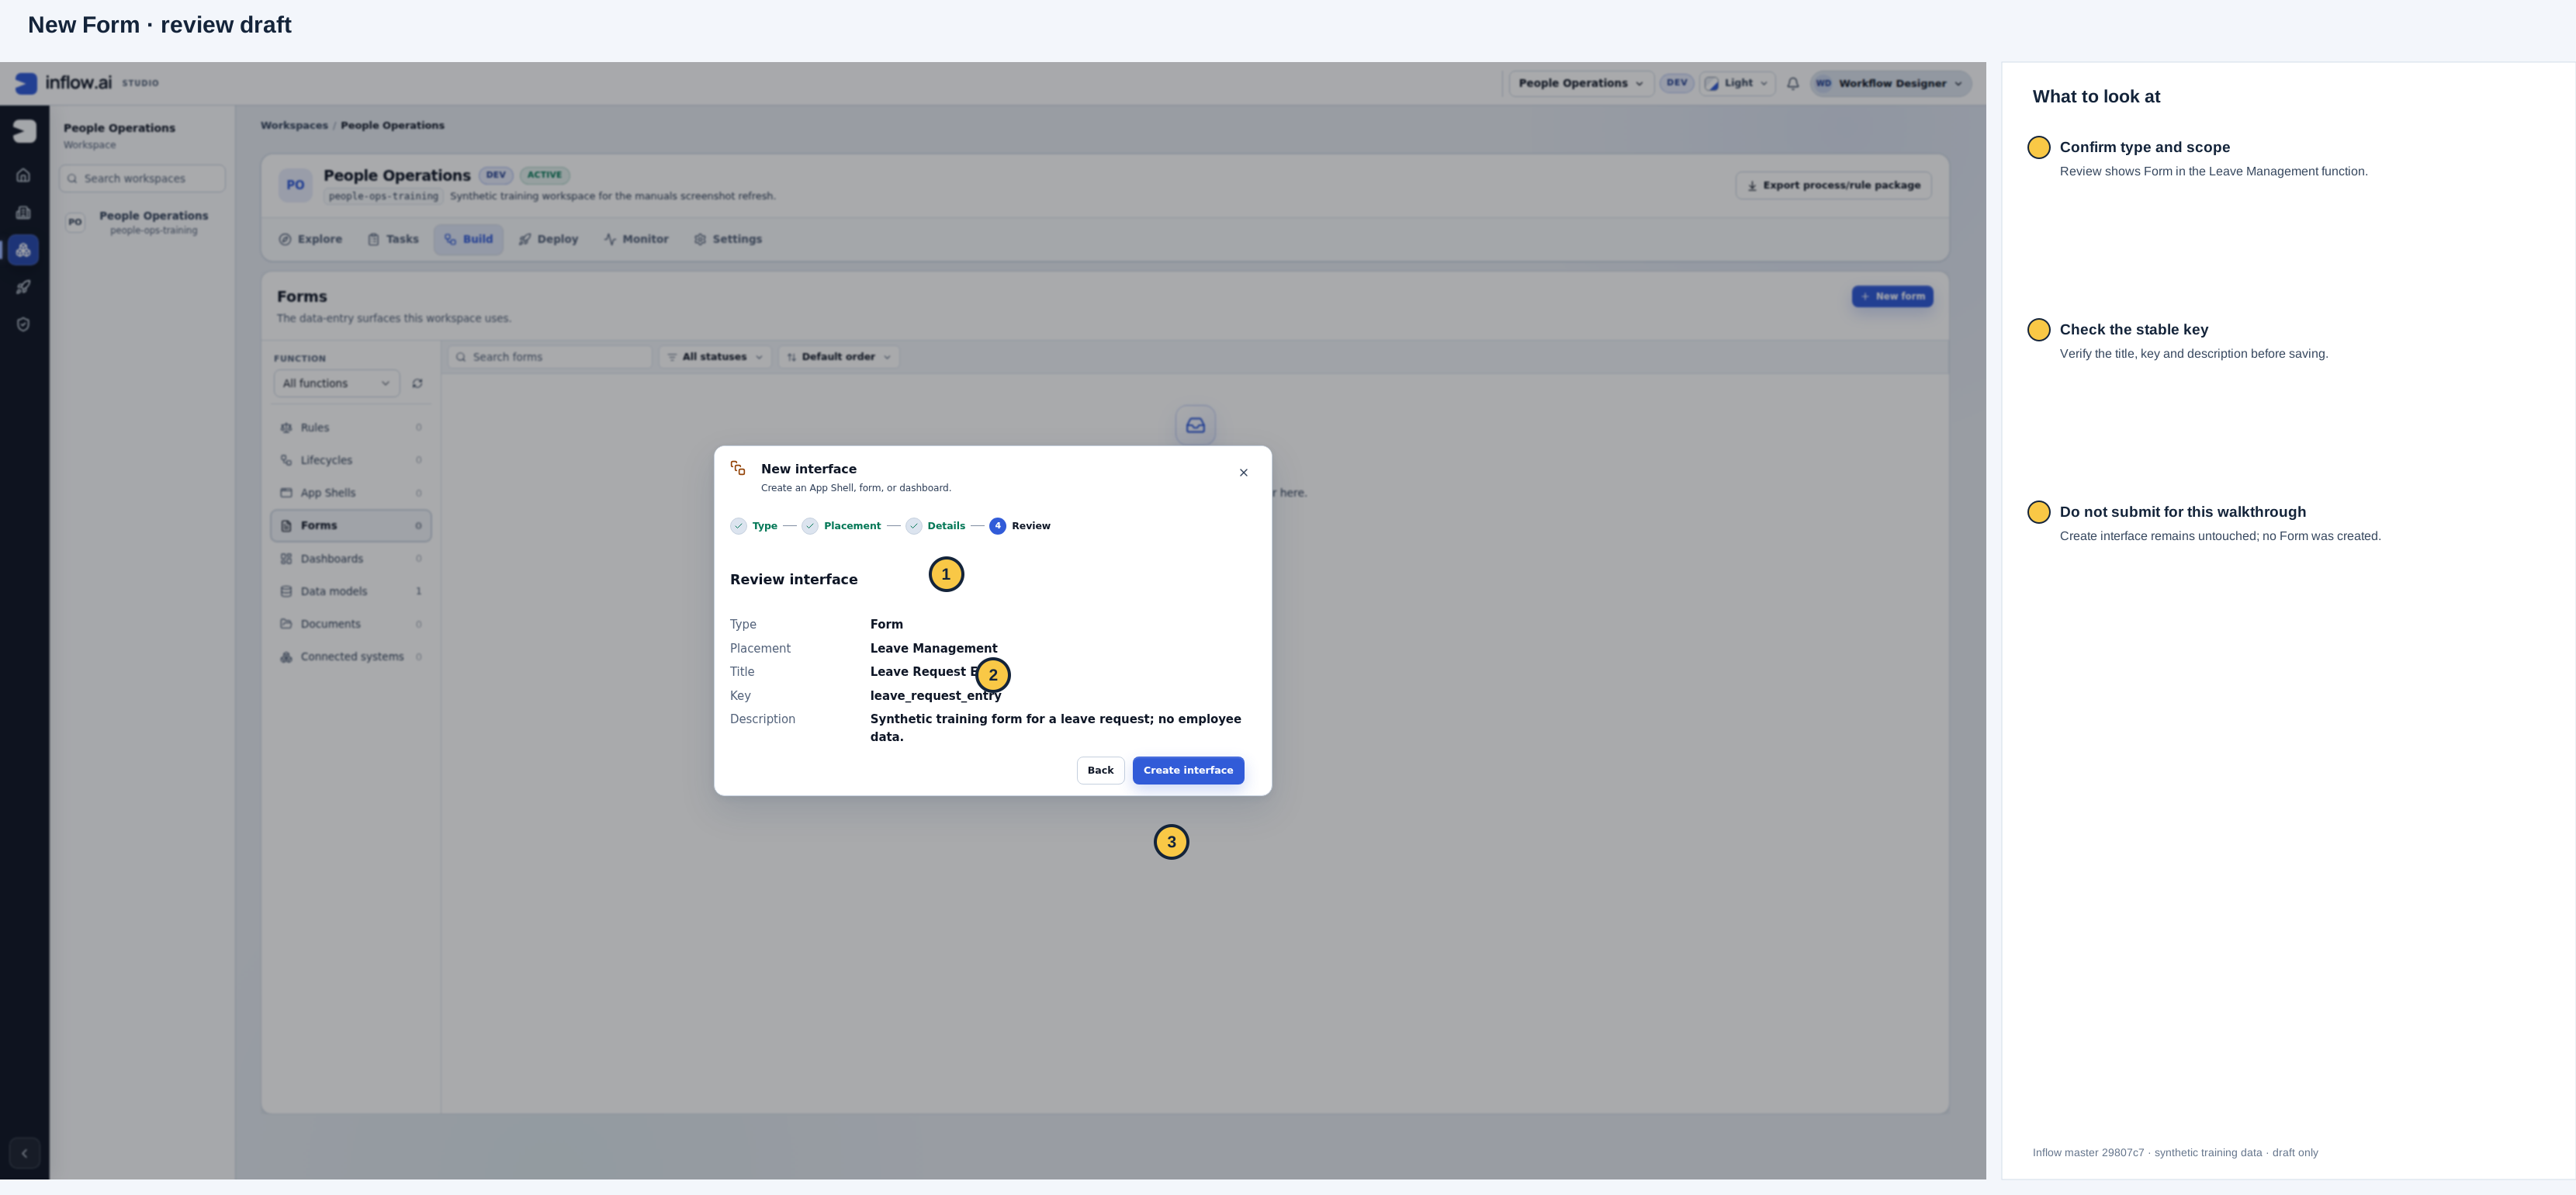
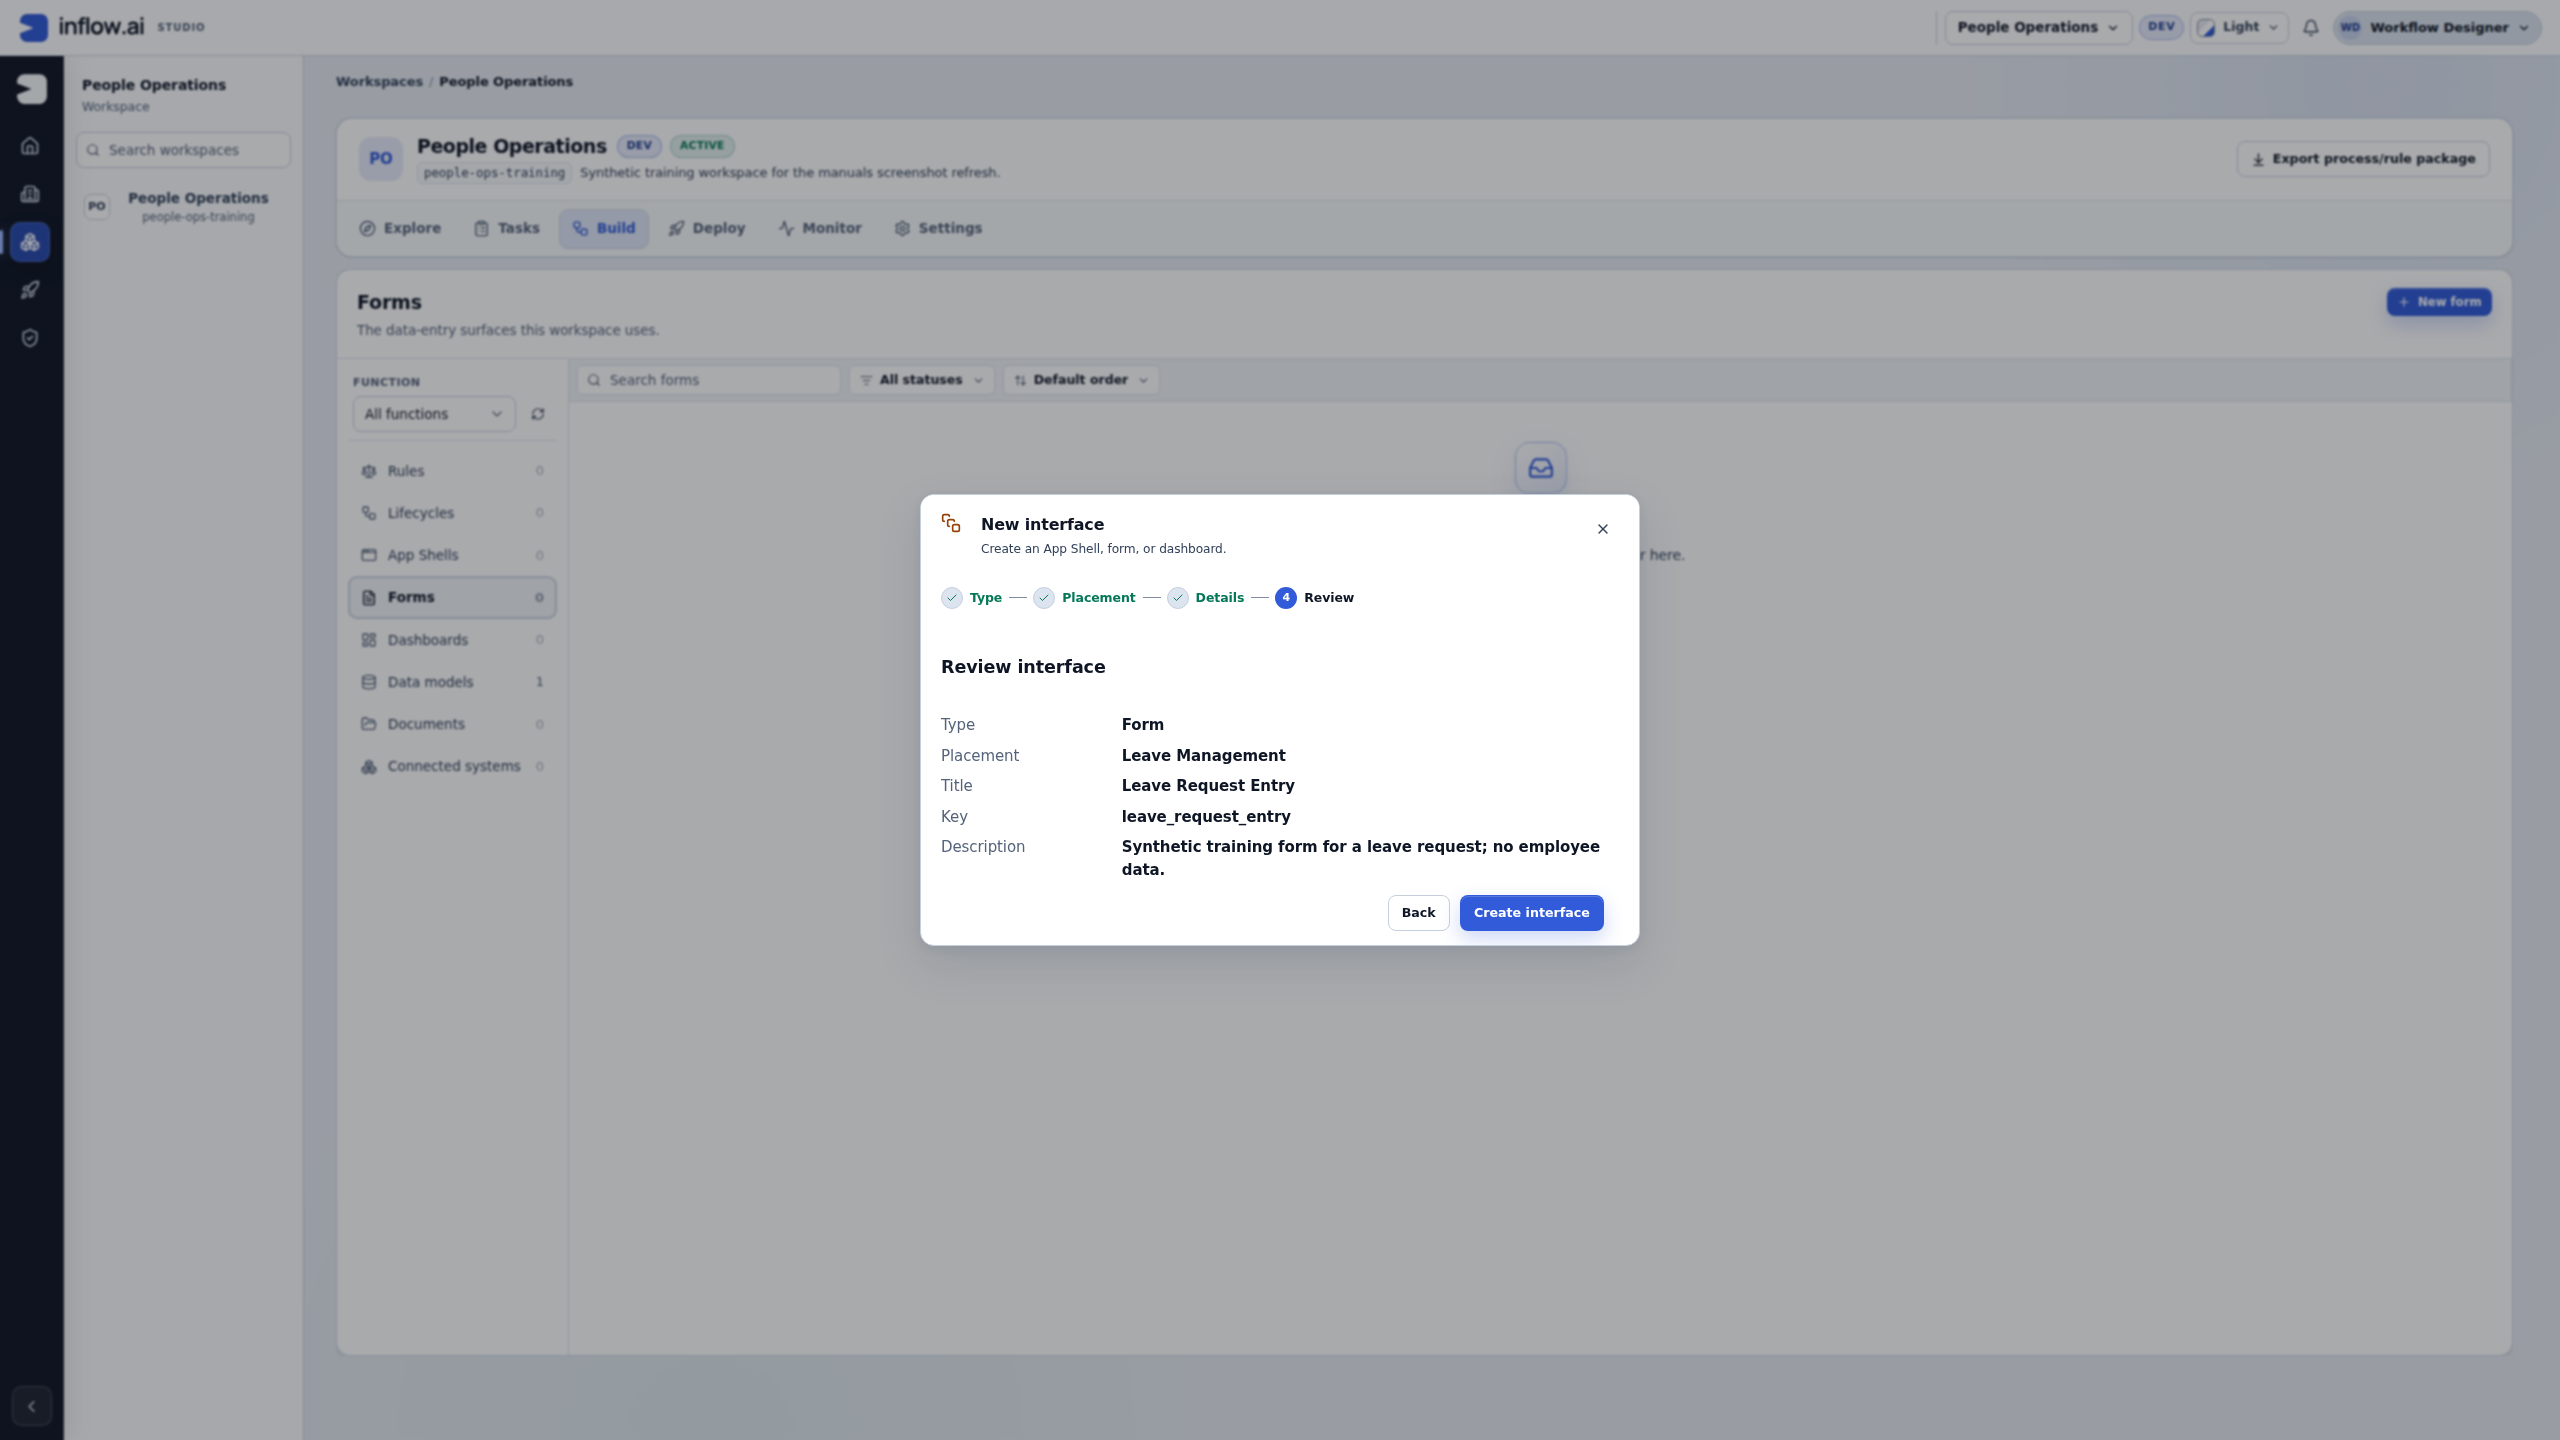
This is an unsubmitted synthetic review. The wizard was closed before selecting Create interface, so no Form was created. Open the unchanged original.
Milestone 3 — Make the questions understandable
- Group the employee-facing questions under Leave details.
- Use Date controls for Start date and End date, Integer for Requested days and a TextArea for Reason for leave.
- Check each generated Store value in destination before changing a label or moving a field.
- Set the required answers under Validation and add the date-order check explained in Properties and answers.
- Keep Reason for leave separate from the manager's later Decision comment.
- Inspect both a valid date range and a missing/invalid answer in Preview.
Use the sample dates 14–18 December 2026 and 5 requested days. Five is an agreed teaching quantity, not a calculation of weekends or public holidays. Keep the initial business status PENDING aligned with the data lesson; do not make the employee choose an approval result.
Checkpoint: a first-time employee understands the questions and can repair the intended validation mistakes.
Milestone 4 — Check the create or update action
- Select the generated submit control and inspect Automations.
- Review the selected published rule and the displayed inputs. Match the request reference, dates, requested days, status and ordinary reason to the intended record fields.
- Keep any required generated identity or protected values under the supported form behavior; do not expose them as arbitrary employee-editable credentials.
- For this staged course, inspect the rule and every input mapping but do not invoke the create/update action yet. You will submit once through the finished ordinary-user journey after the workflow and access are prepared. If a separate project needs a persistence test here, agree on a distinct unused fictional reference with the data owner and check whether it already exists before submitting.
A successful record create is one effect. Starting a workflow is another effect, connected later in milestone 8. Configuration review and non-submitting Preview help you inspect the form; the later end-to-end journey checks persistence and workflow start together. If a response is unclear then, inspect the existing result before trying the same create again.
Checkpoint: the selected rule, inputs and field mappings are understood, and no teaching record has been created early.
Milestone 5 — Publish the employee form
- Save the intended changes and wait for the saved status.
- Choose Validate and repair the named issues.
- Choose Publish, read the review and confirm the intended release.
- Check the actual published result. Keep the visible form name/version in your project notes.
- Do not submit the published form during this milestone. The workflow tutorial performs the one ordinary-user submission after its process and access are ready.
If someone else edited the form, reload and compare changes before deciding what to keep. If publication confirmation is missing, inspect the released state and follow the offered recovery rather than clicking repeatedly. Publishing does not create a business record or start a workflow.
Checkpoint: a real published employee form is available for the App Shell page picker.
Milestone 6 — Create the application frame
- Open Build → App Shells → New App Shell.
- Complete the actual wizard steps shown. Choose an appropriate Shell template, review Options and name the app Leave requests.
- Inspect the initial page/navigation arrangement in Designer.
- Use the Pages panel's Add page flow. For Overview, choose Design a page and add a short explanation of the app.
- Add New request using Show an existing interface. Choose the published Leave request form from the offered list, then create the page.
- Inspect Page settings for its title, address and what it shows. Use the offered navigation settings, then save, validate and publish the shell.
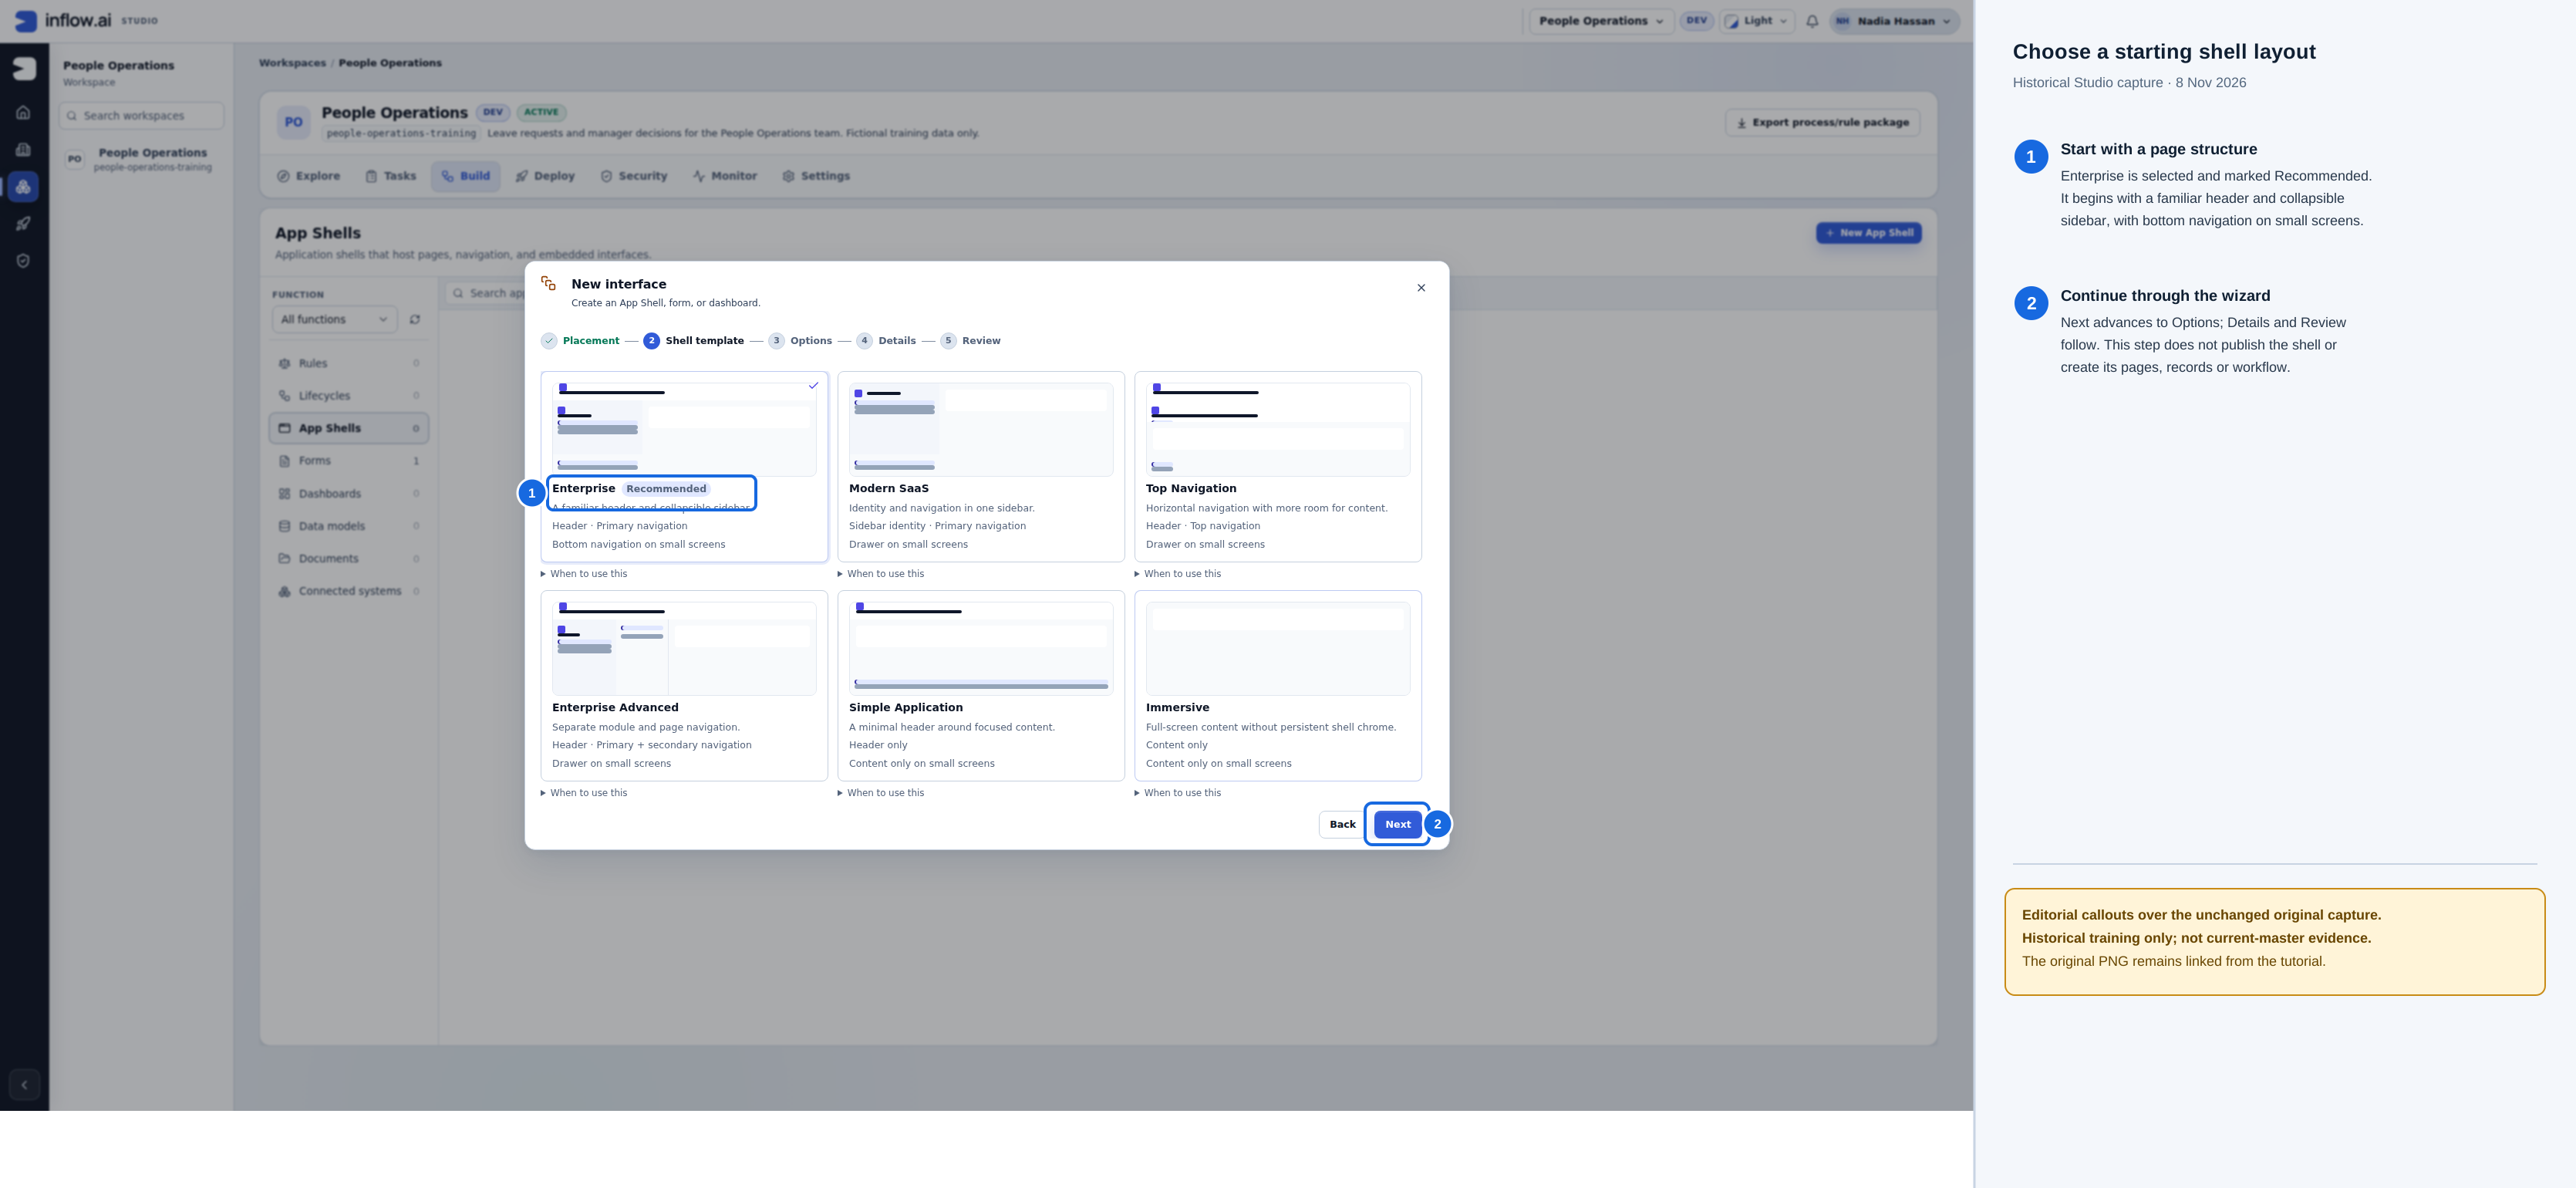
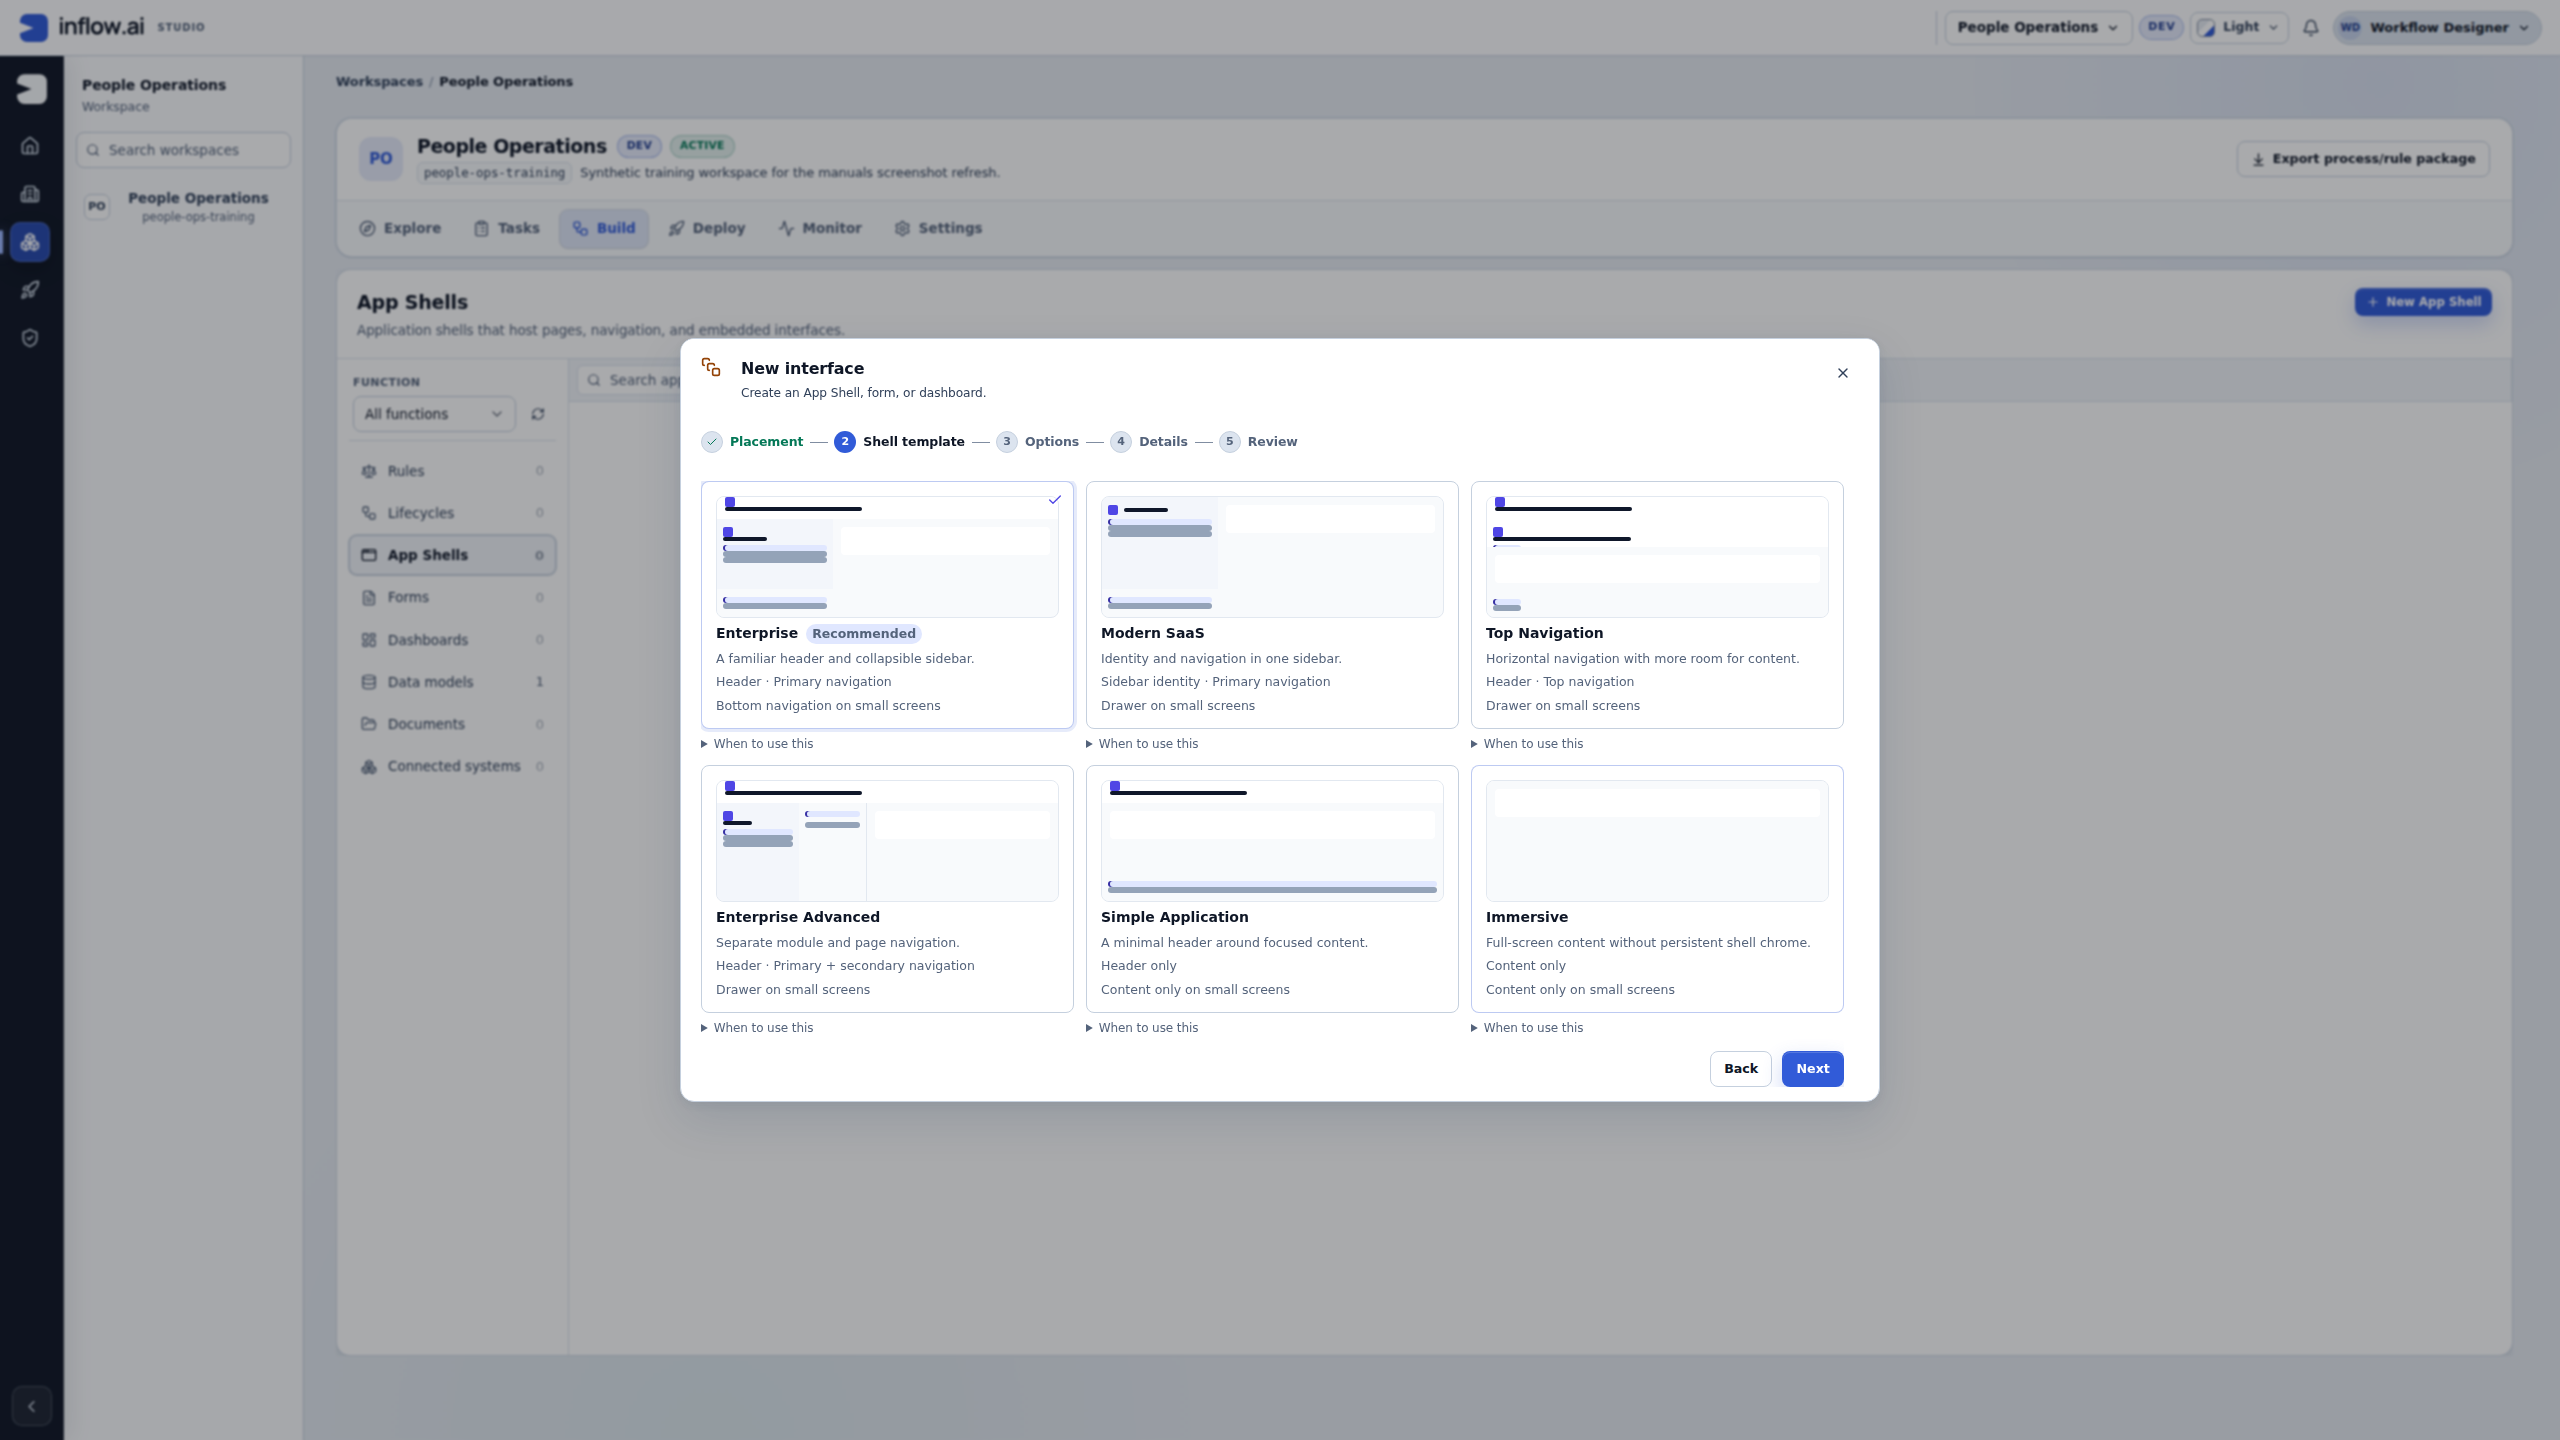
- Enterprise is selected and marked Recommended. The wizard describes its header, collapsible sidebar and bottom navigation on small screens.
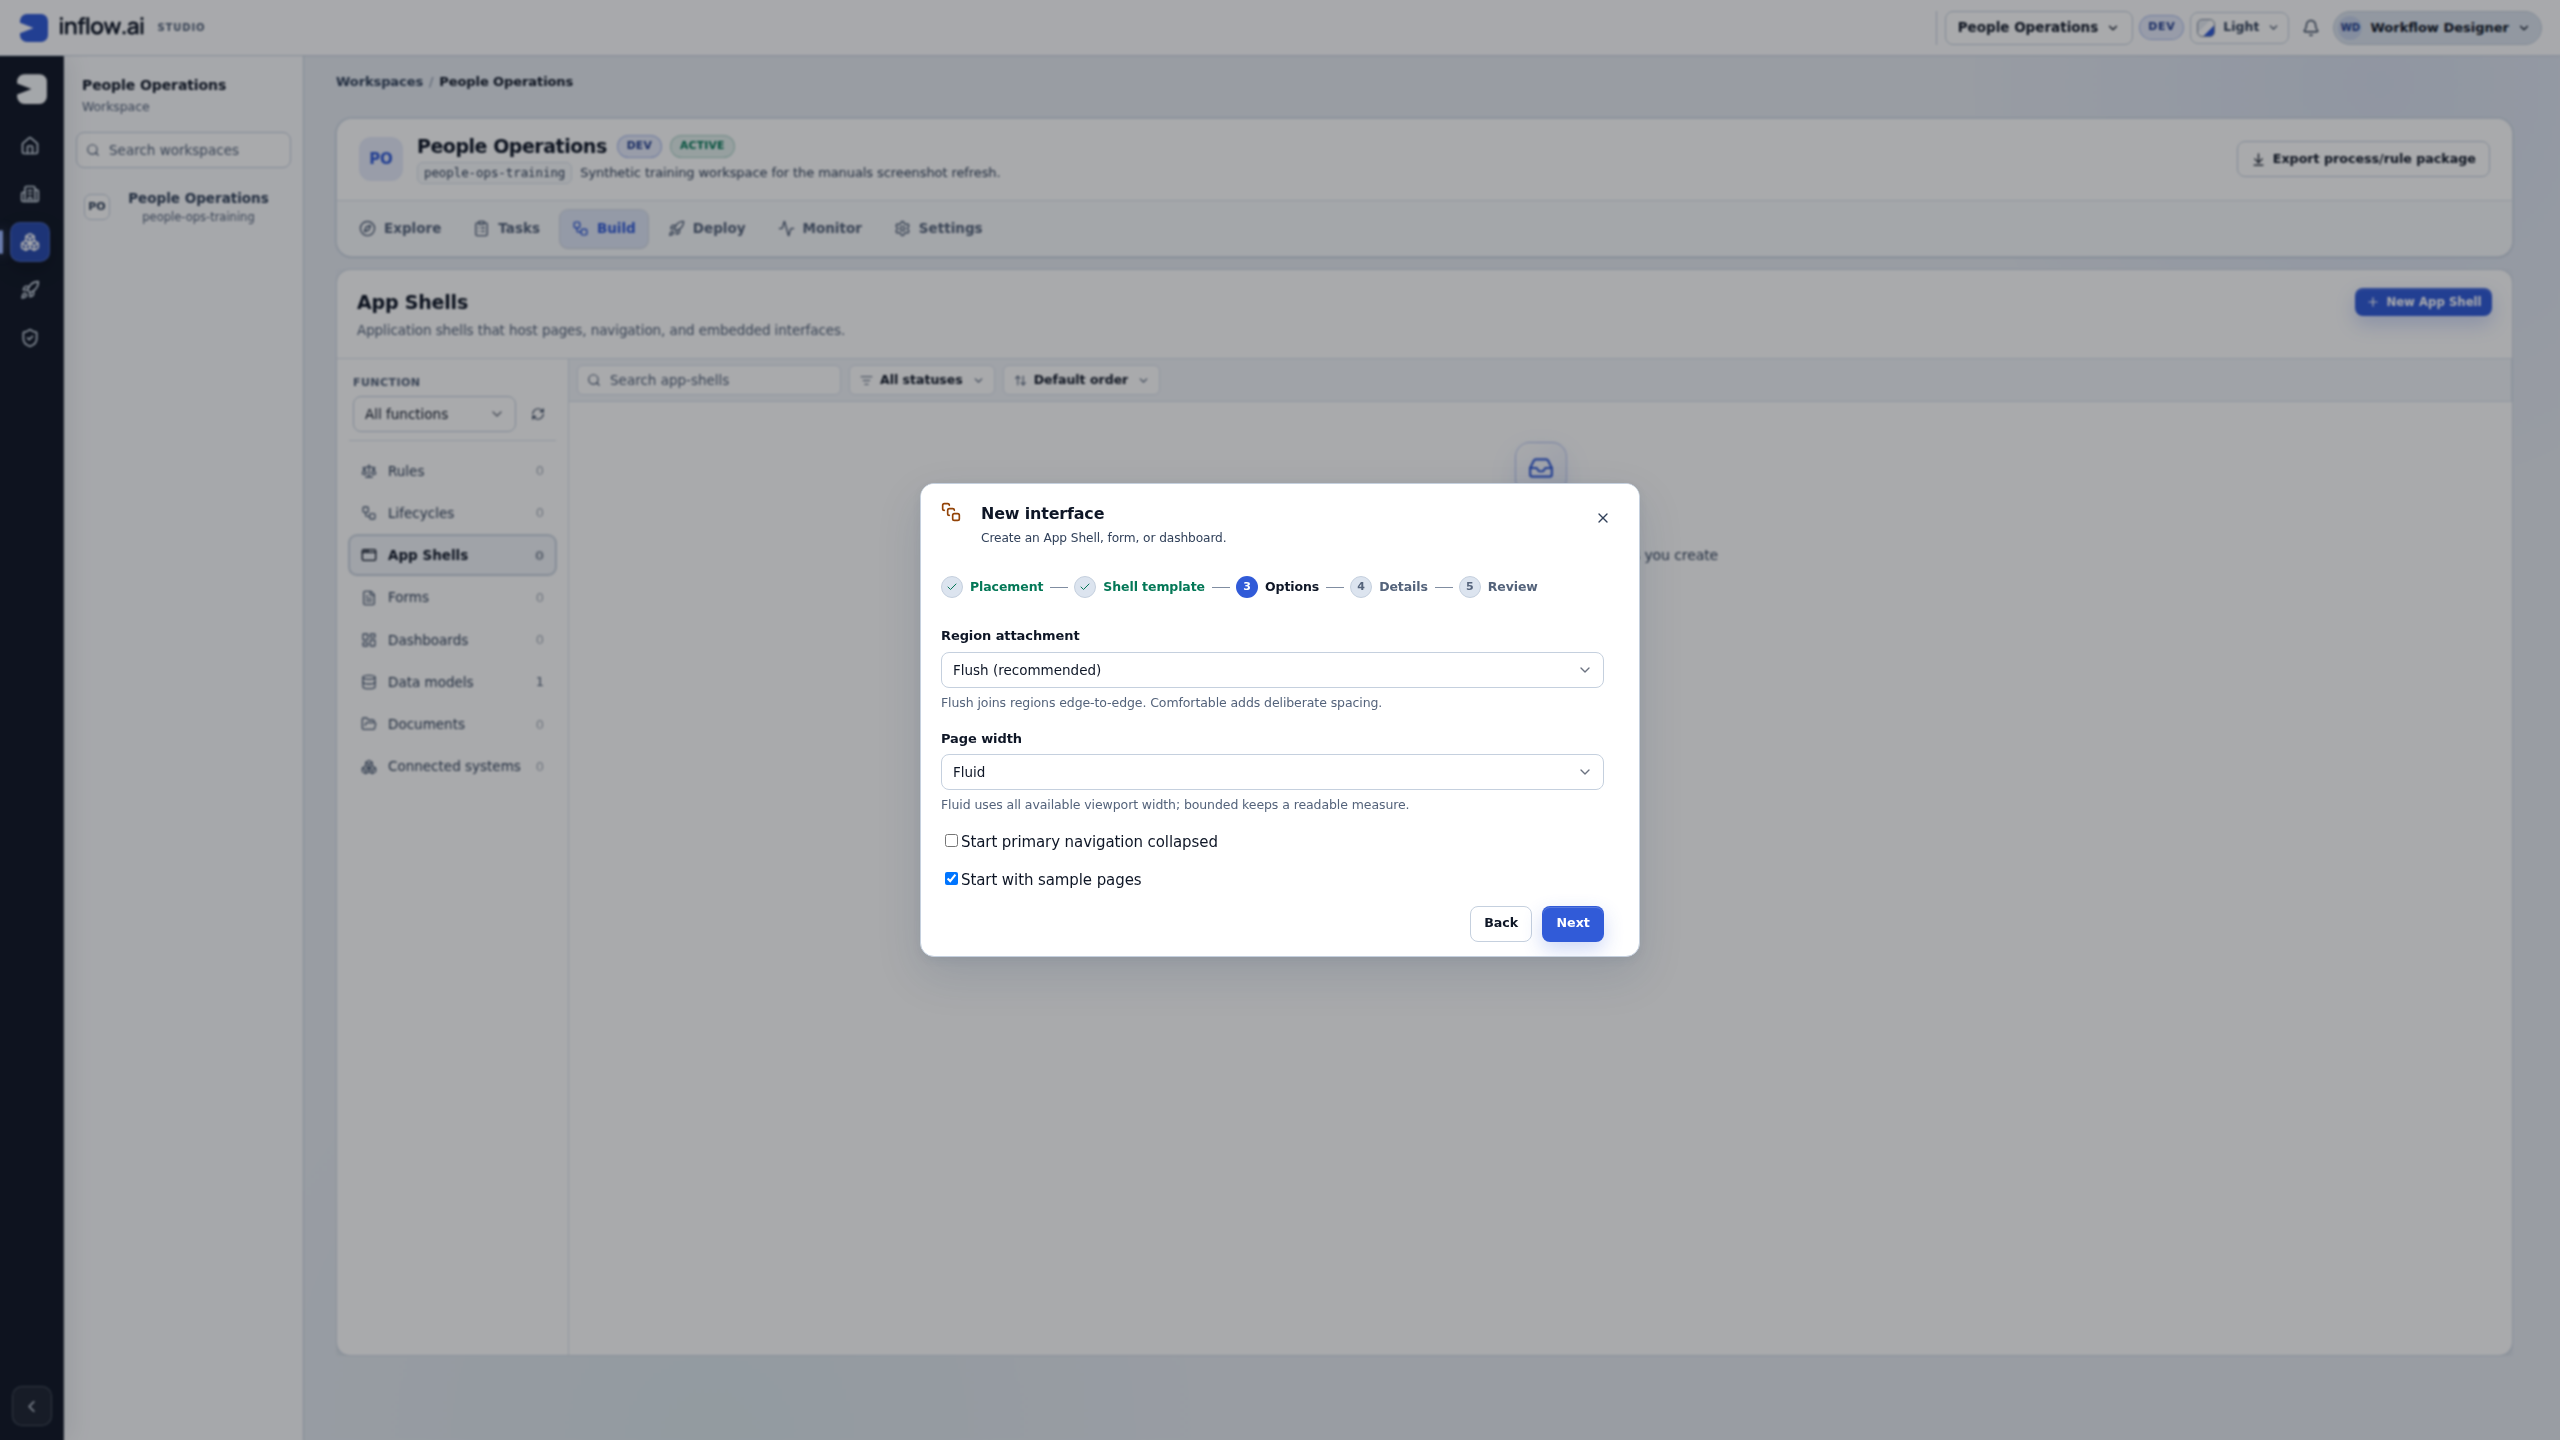
- Next continues to Options, then Details and Review. This step chooses a starting layout; it does not publish the shell or create its pages, records or workflow.
Historical UI capture, recorded 8 November 2026 from source dac13e8 (build 86667d68). The numbered overlay is editorial guidance, not a new capture; follow the choices available in your current build. Open the unchanged original PNG. This is not current-build evidence.
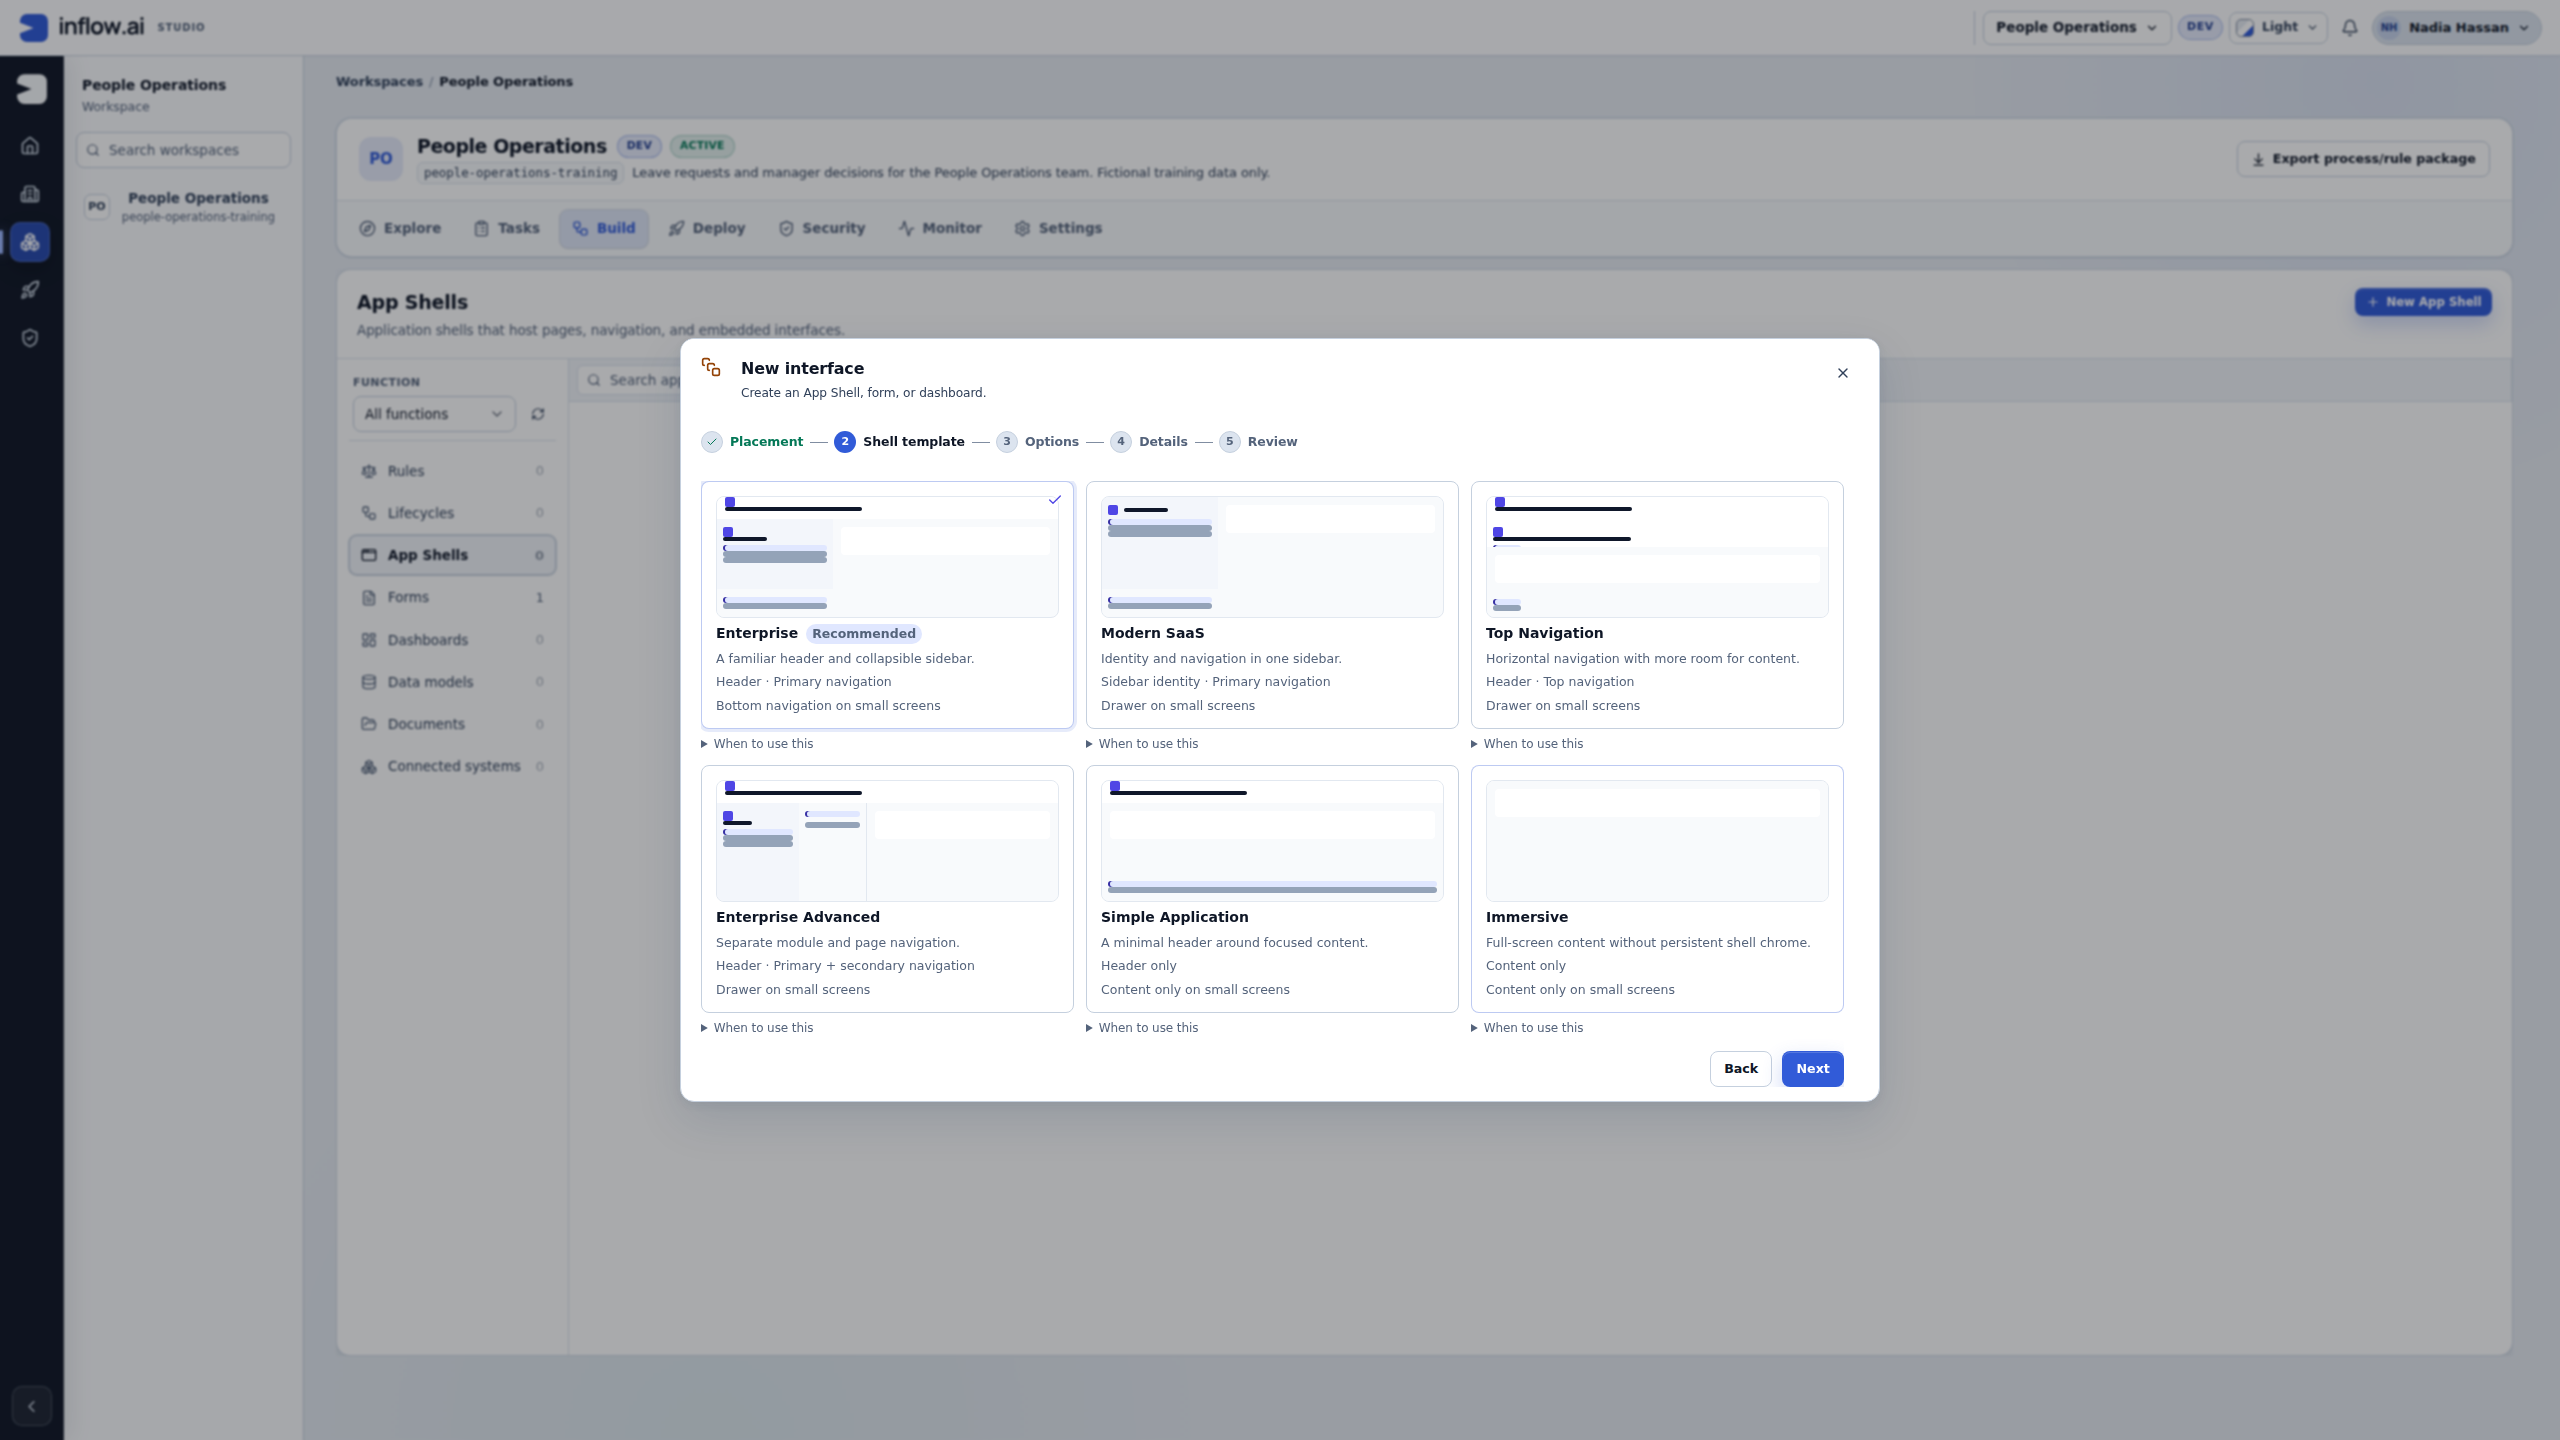
Check the frame: Enterprise provides a header and collapsible sidebar. On Options, clear Start with sample pages when you want to build the teaching pages yourself. The wizard still gives you a starting Home canvas; a template does not create the Leave request record, process or manager task.
Current-master App Shell setup screens
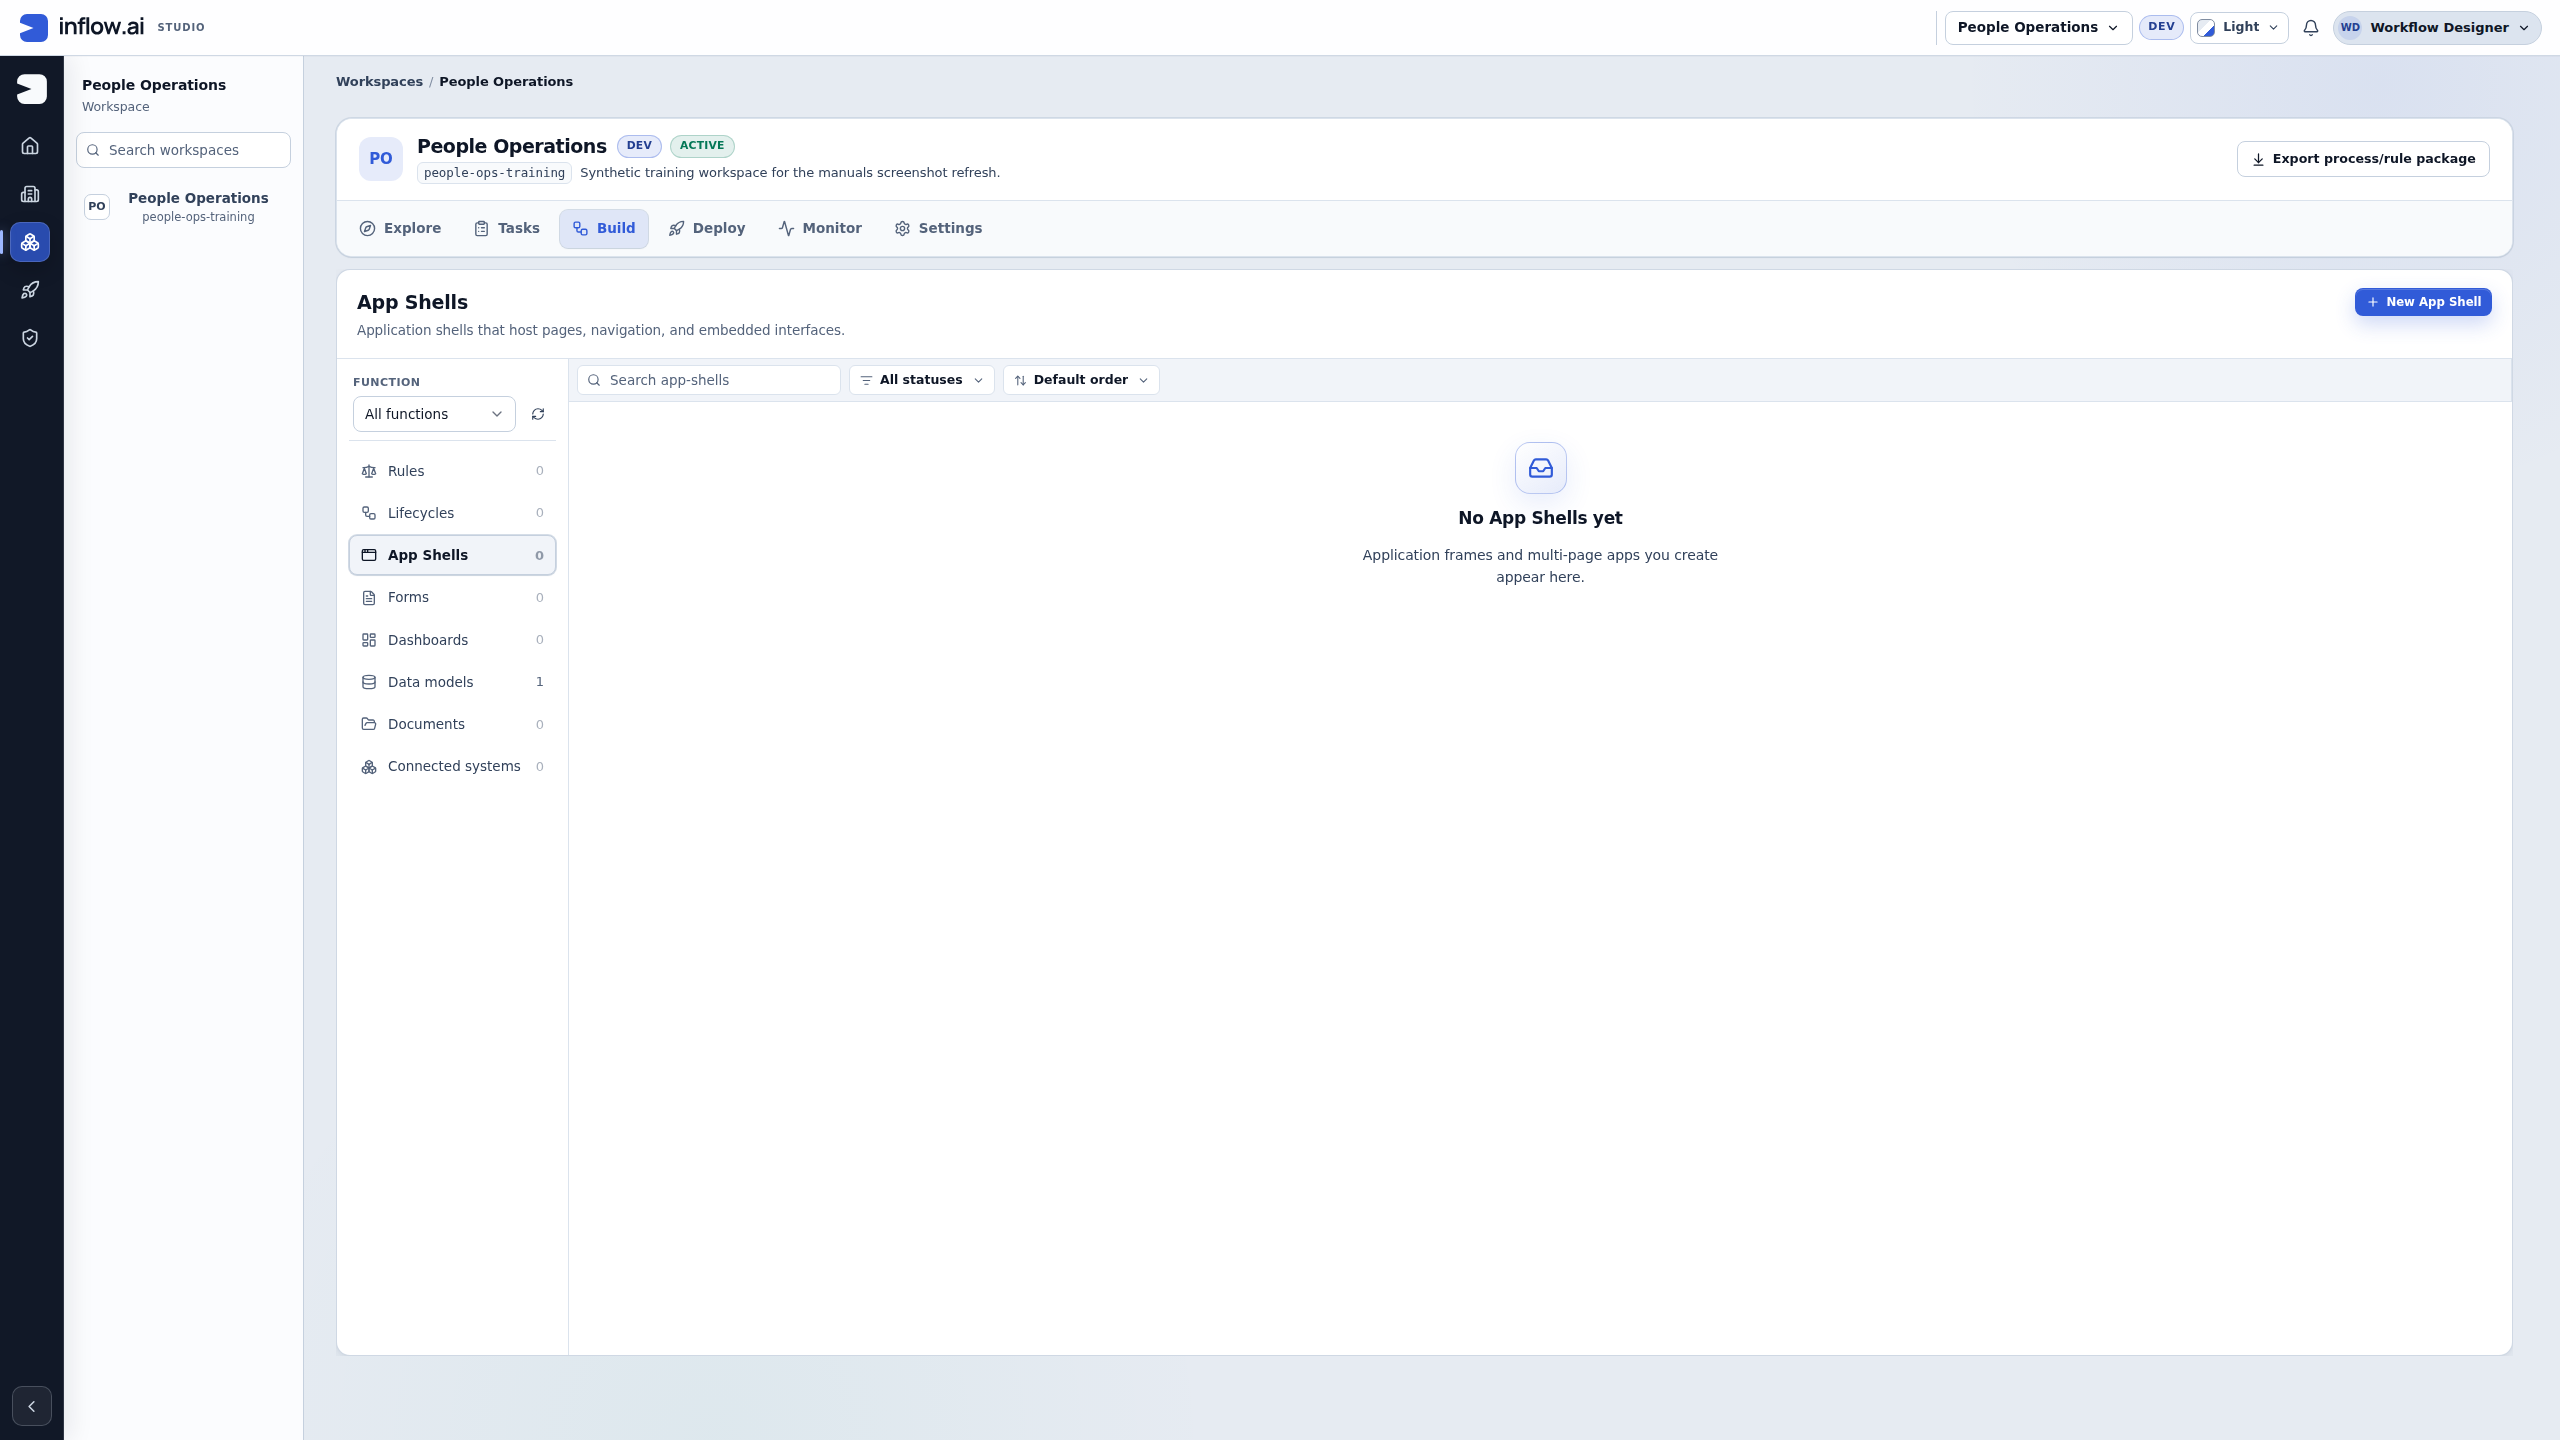
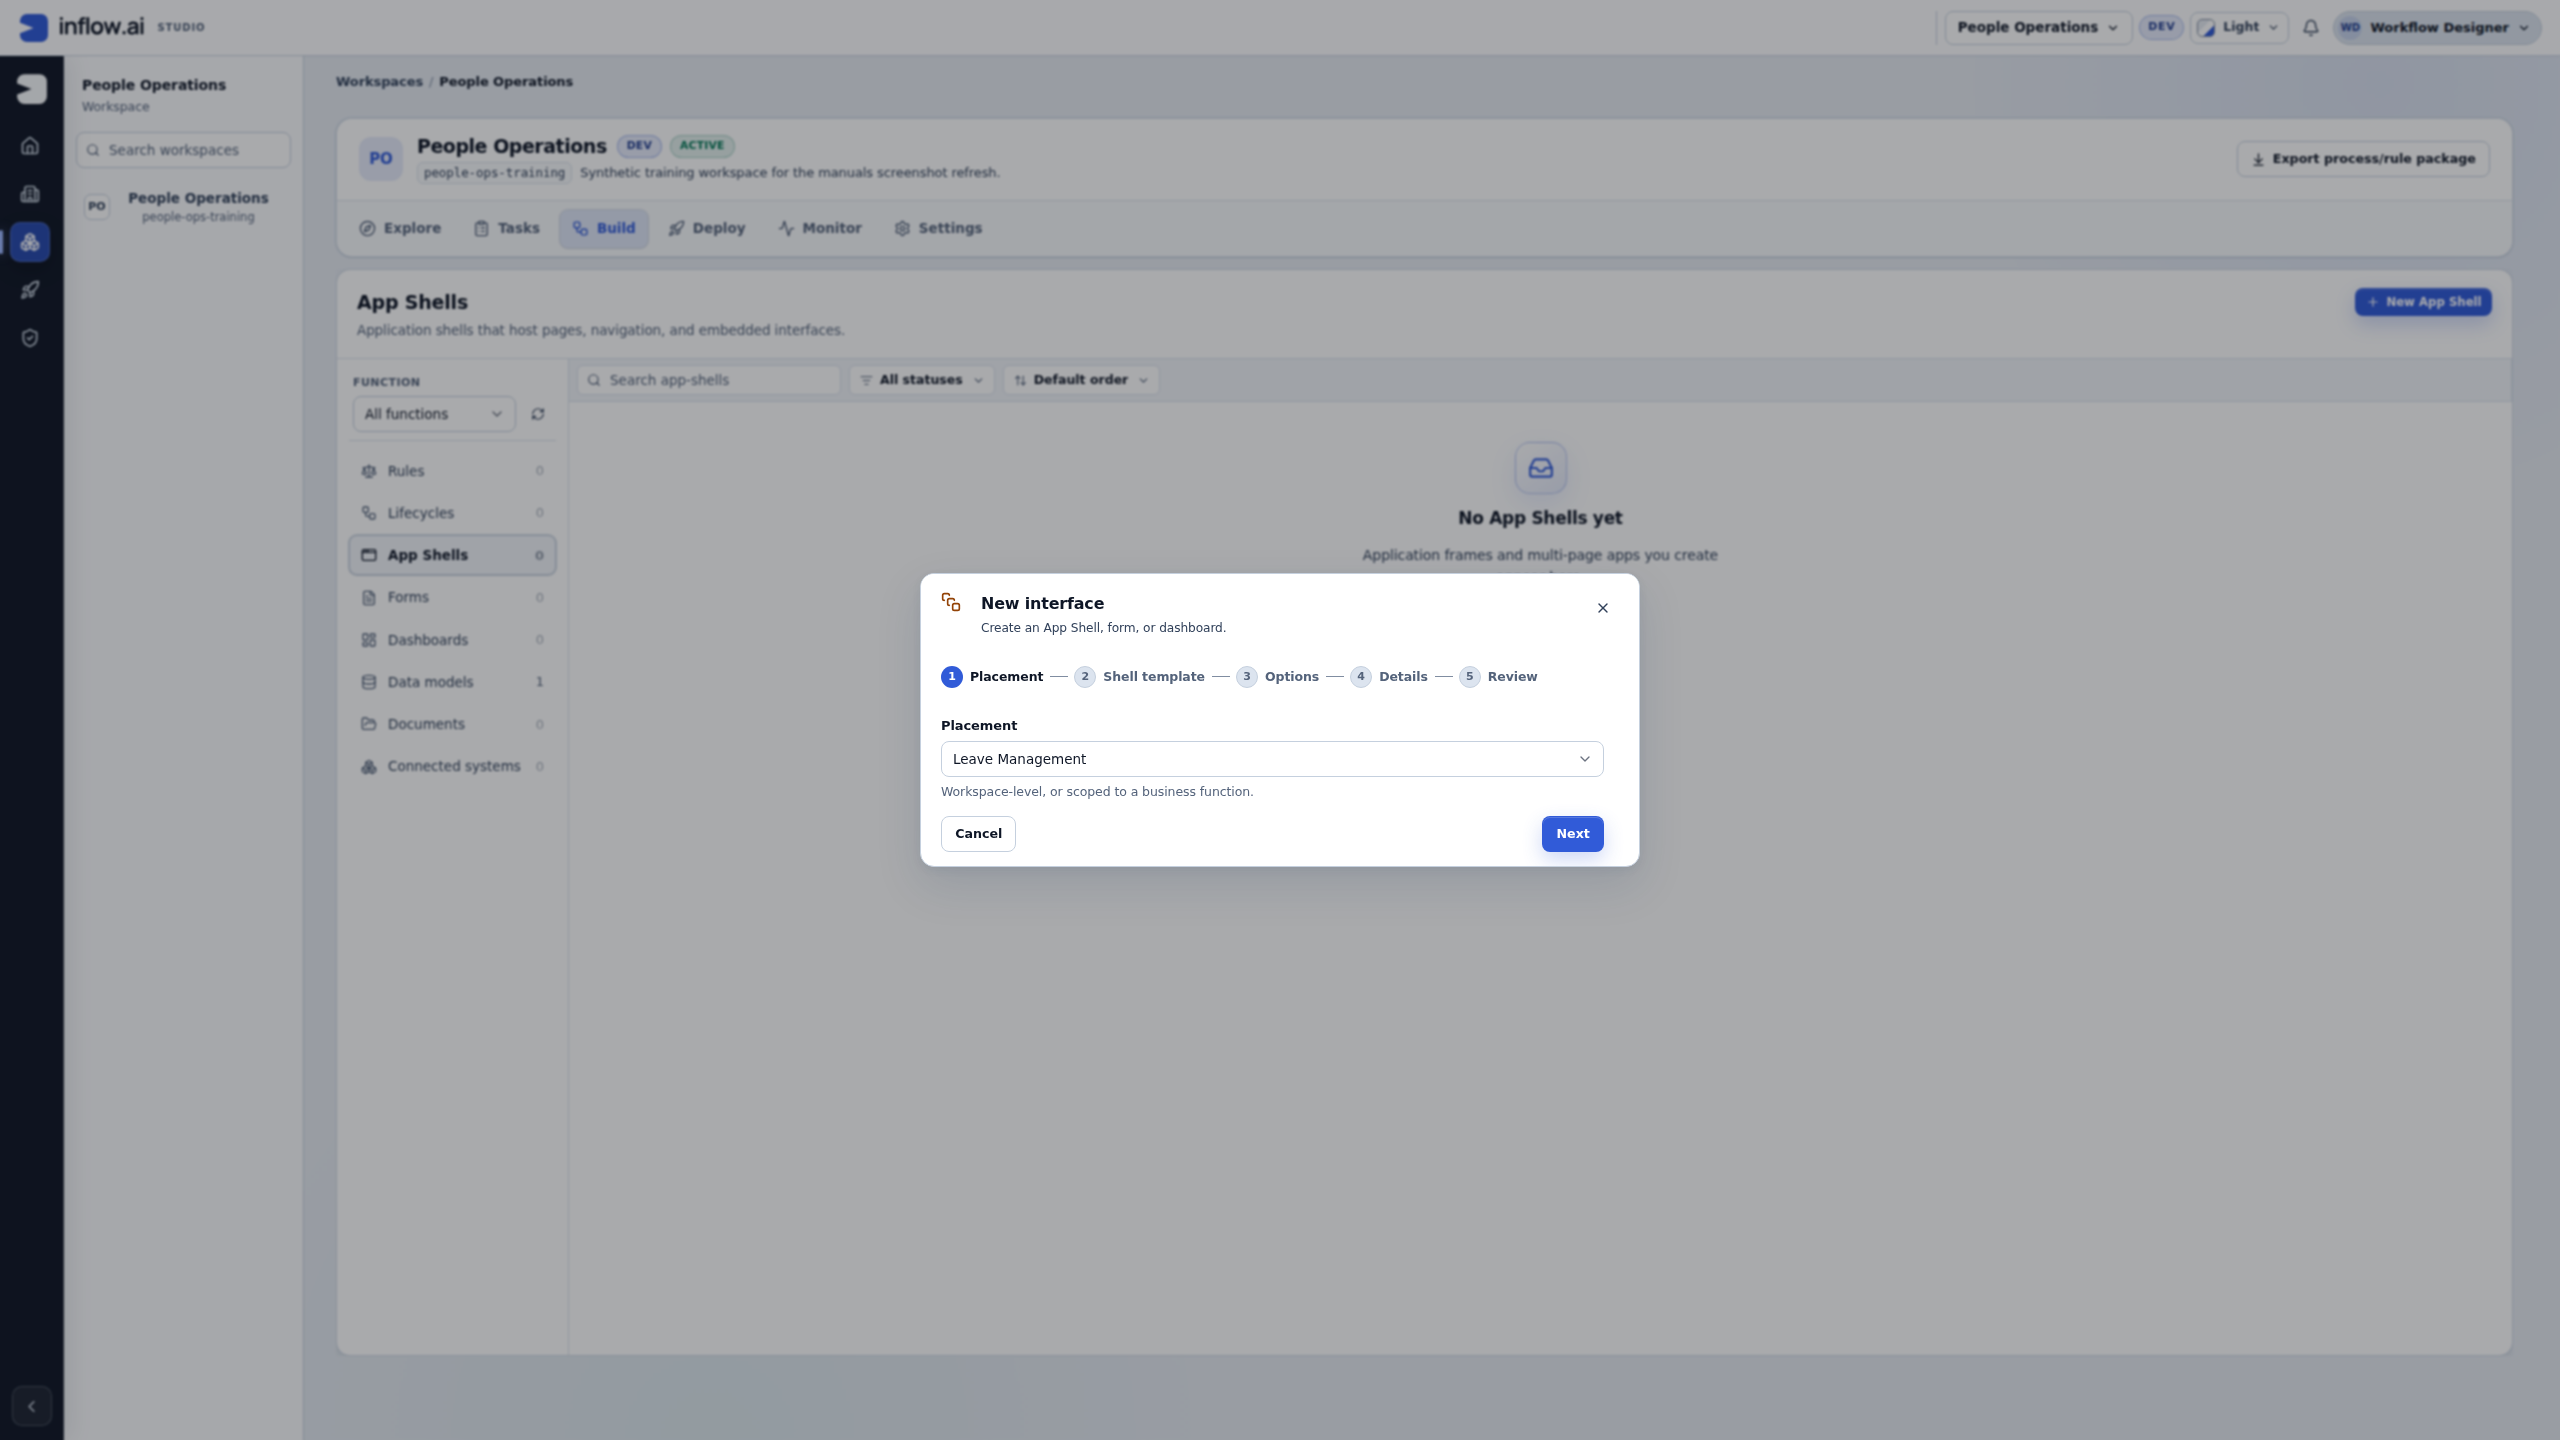
The current-master sequence below starts at the empty list and follows the five wizard steps. The review is intentionally left open in the capture and then canceled. These images teach the configuration choices; they do not show the Designer, published shell, app access, or the employee and manager journeys later in this lesson.
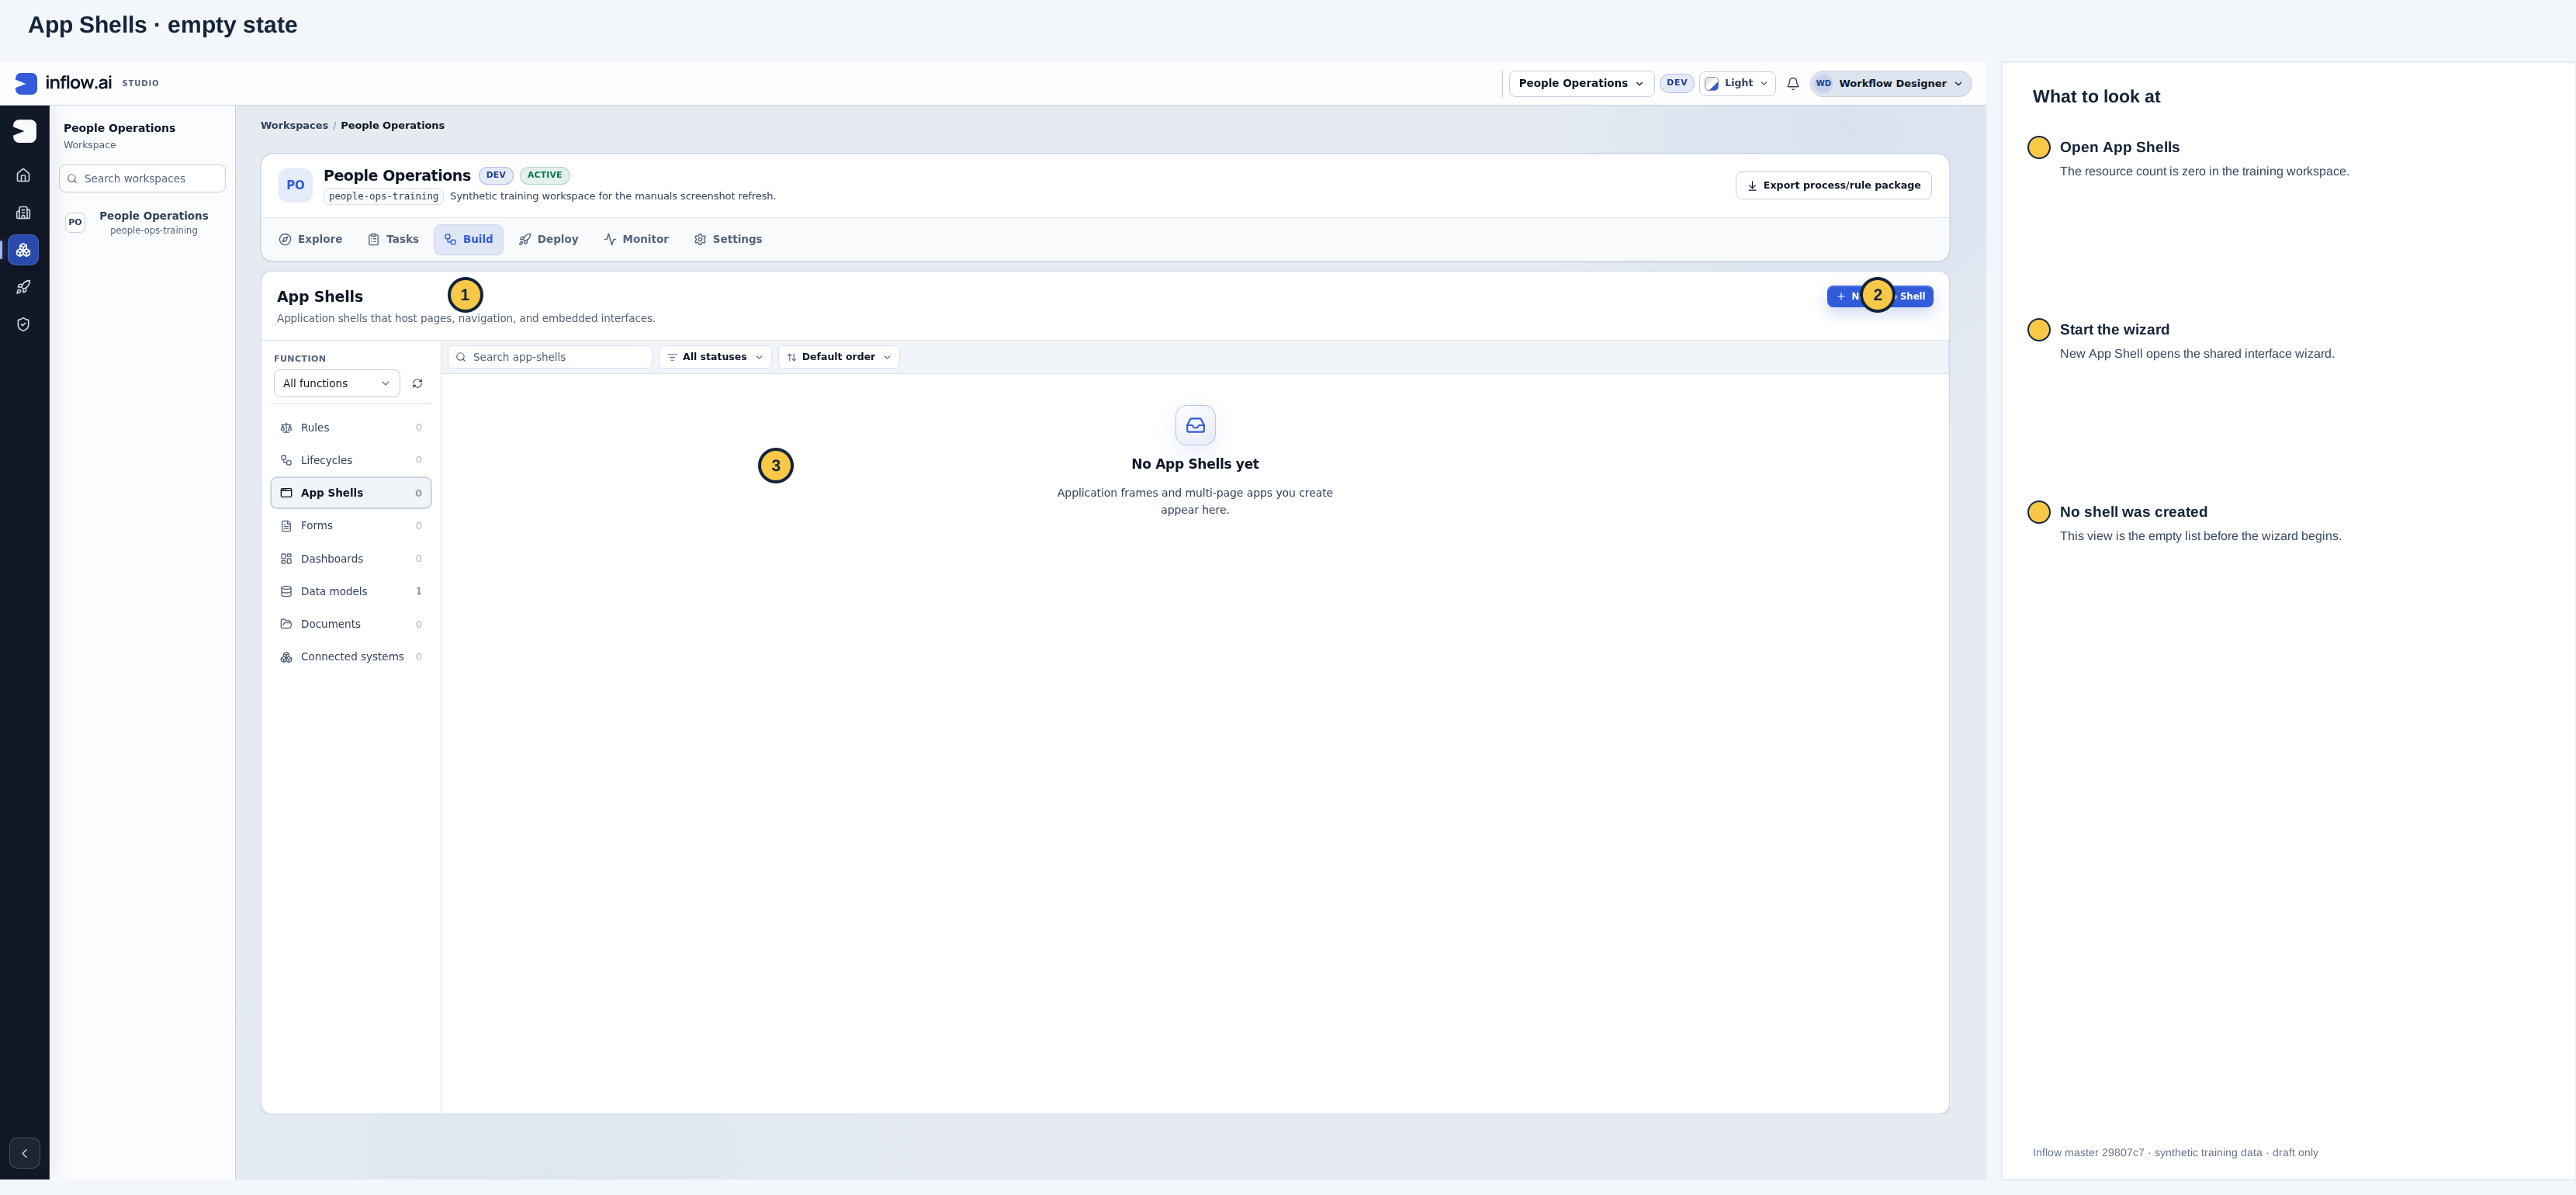
The synthetic workspace has no App Shells yet. Open the unchanged original.
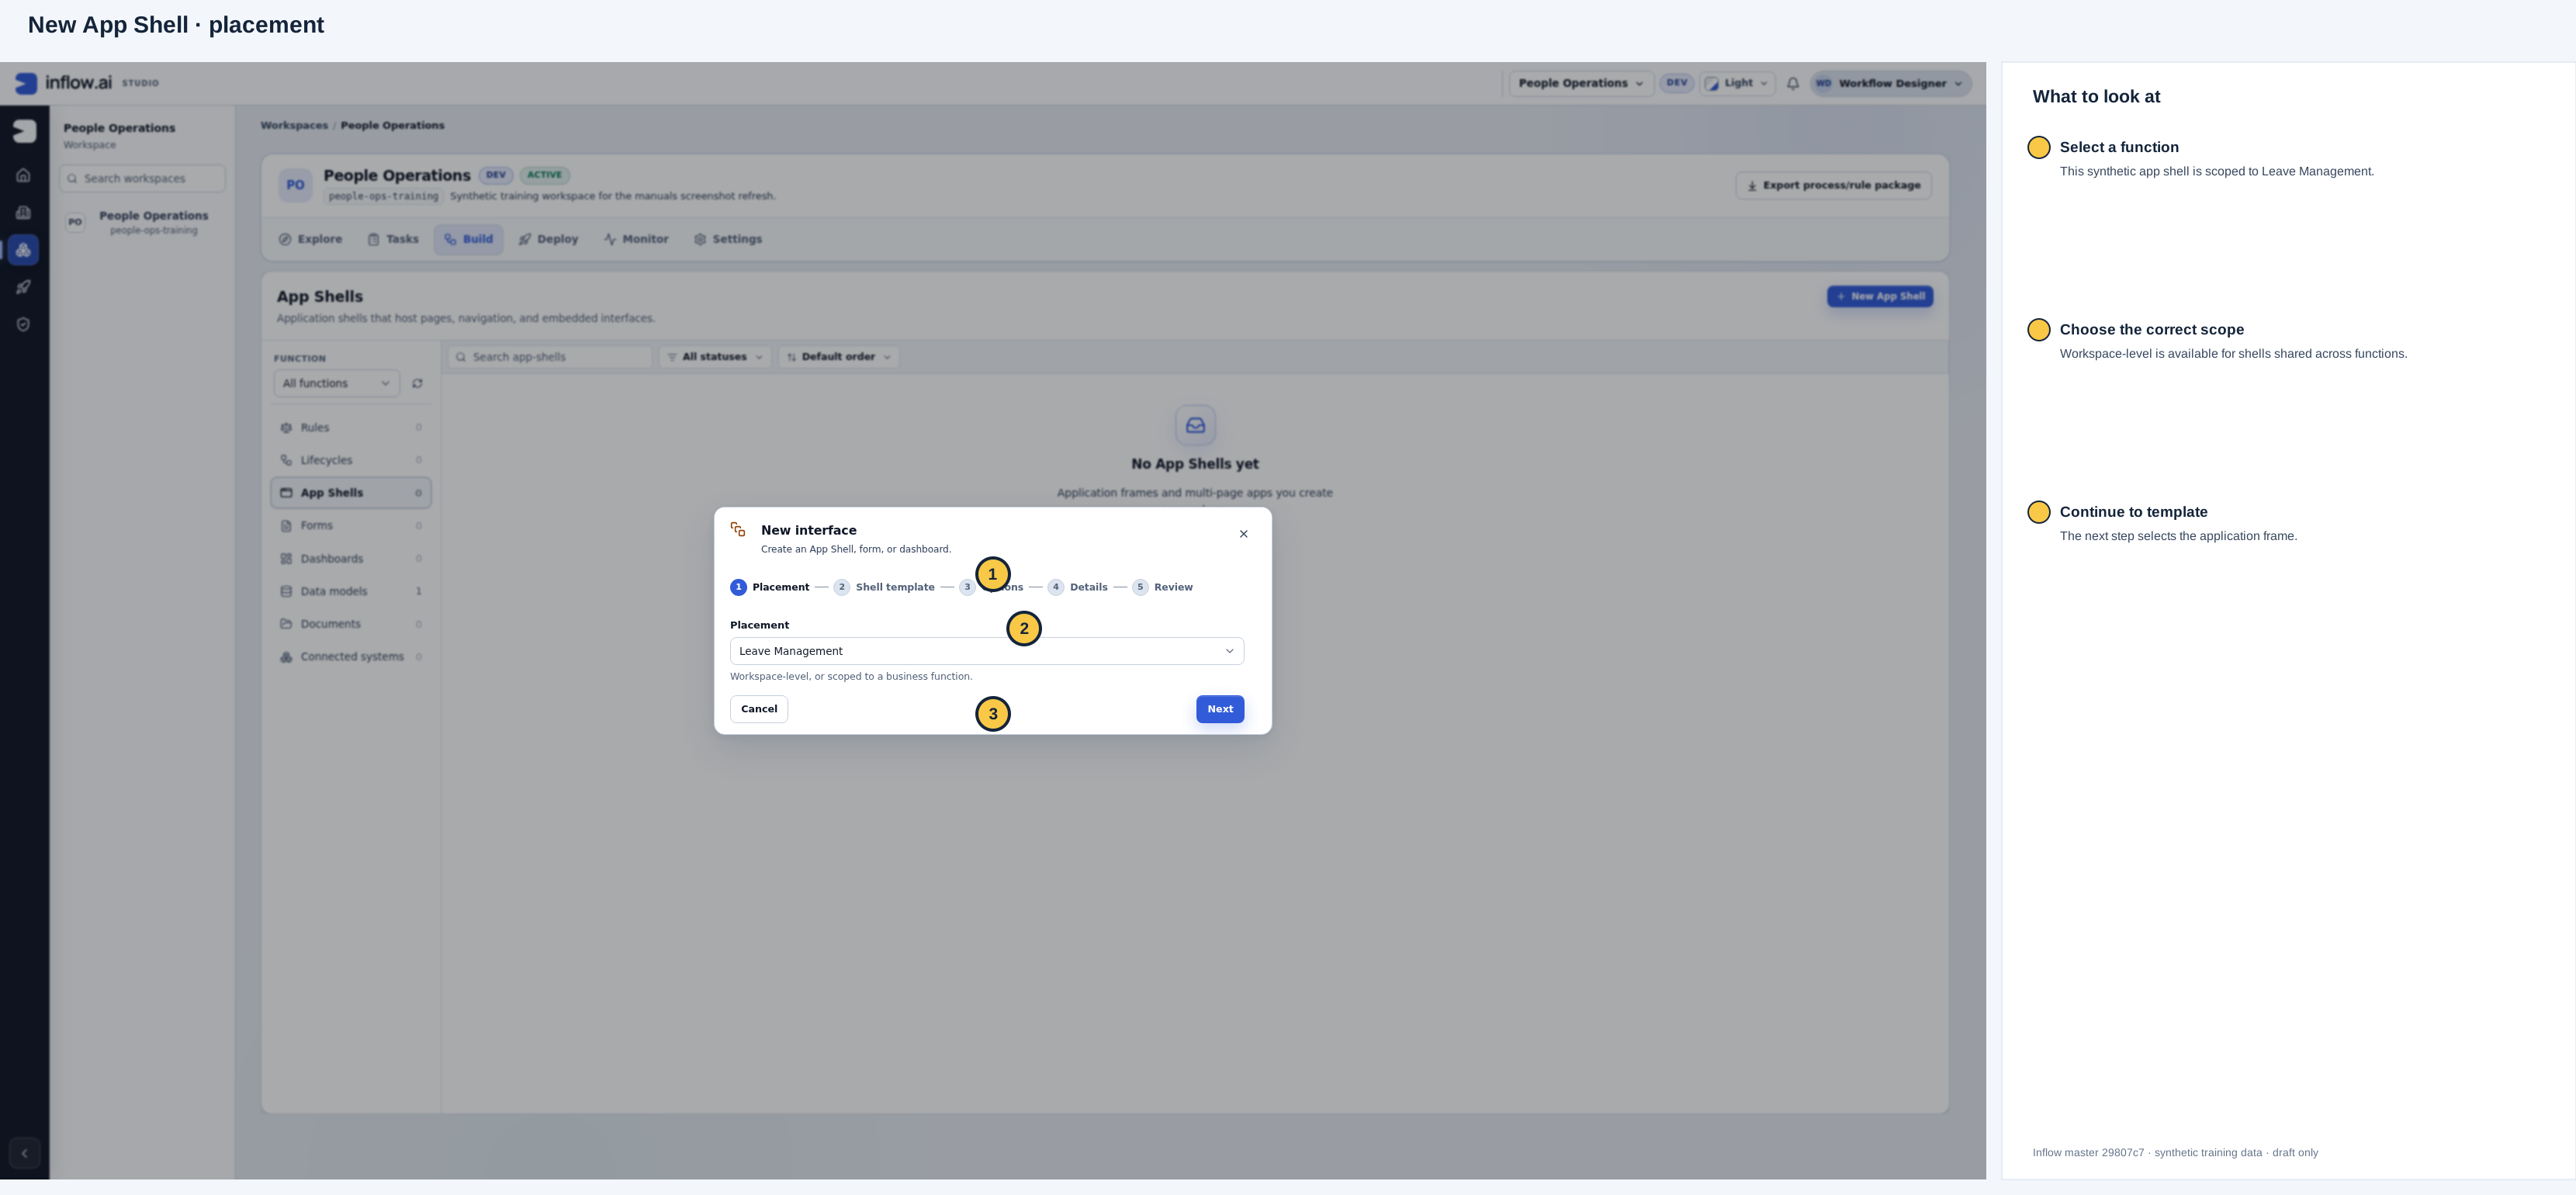
This draft is scoped to Leave Management. Open the unchanged original.
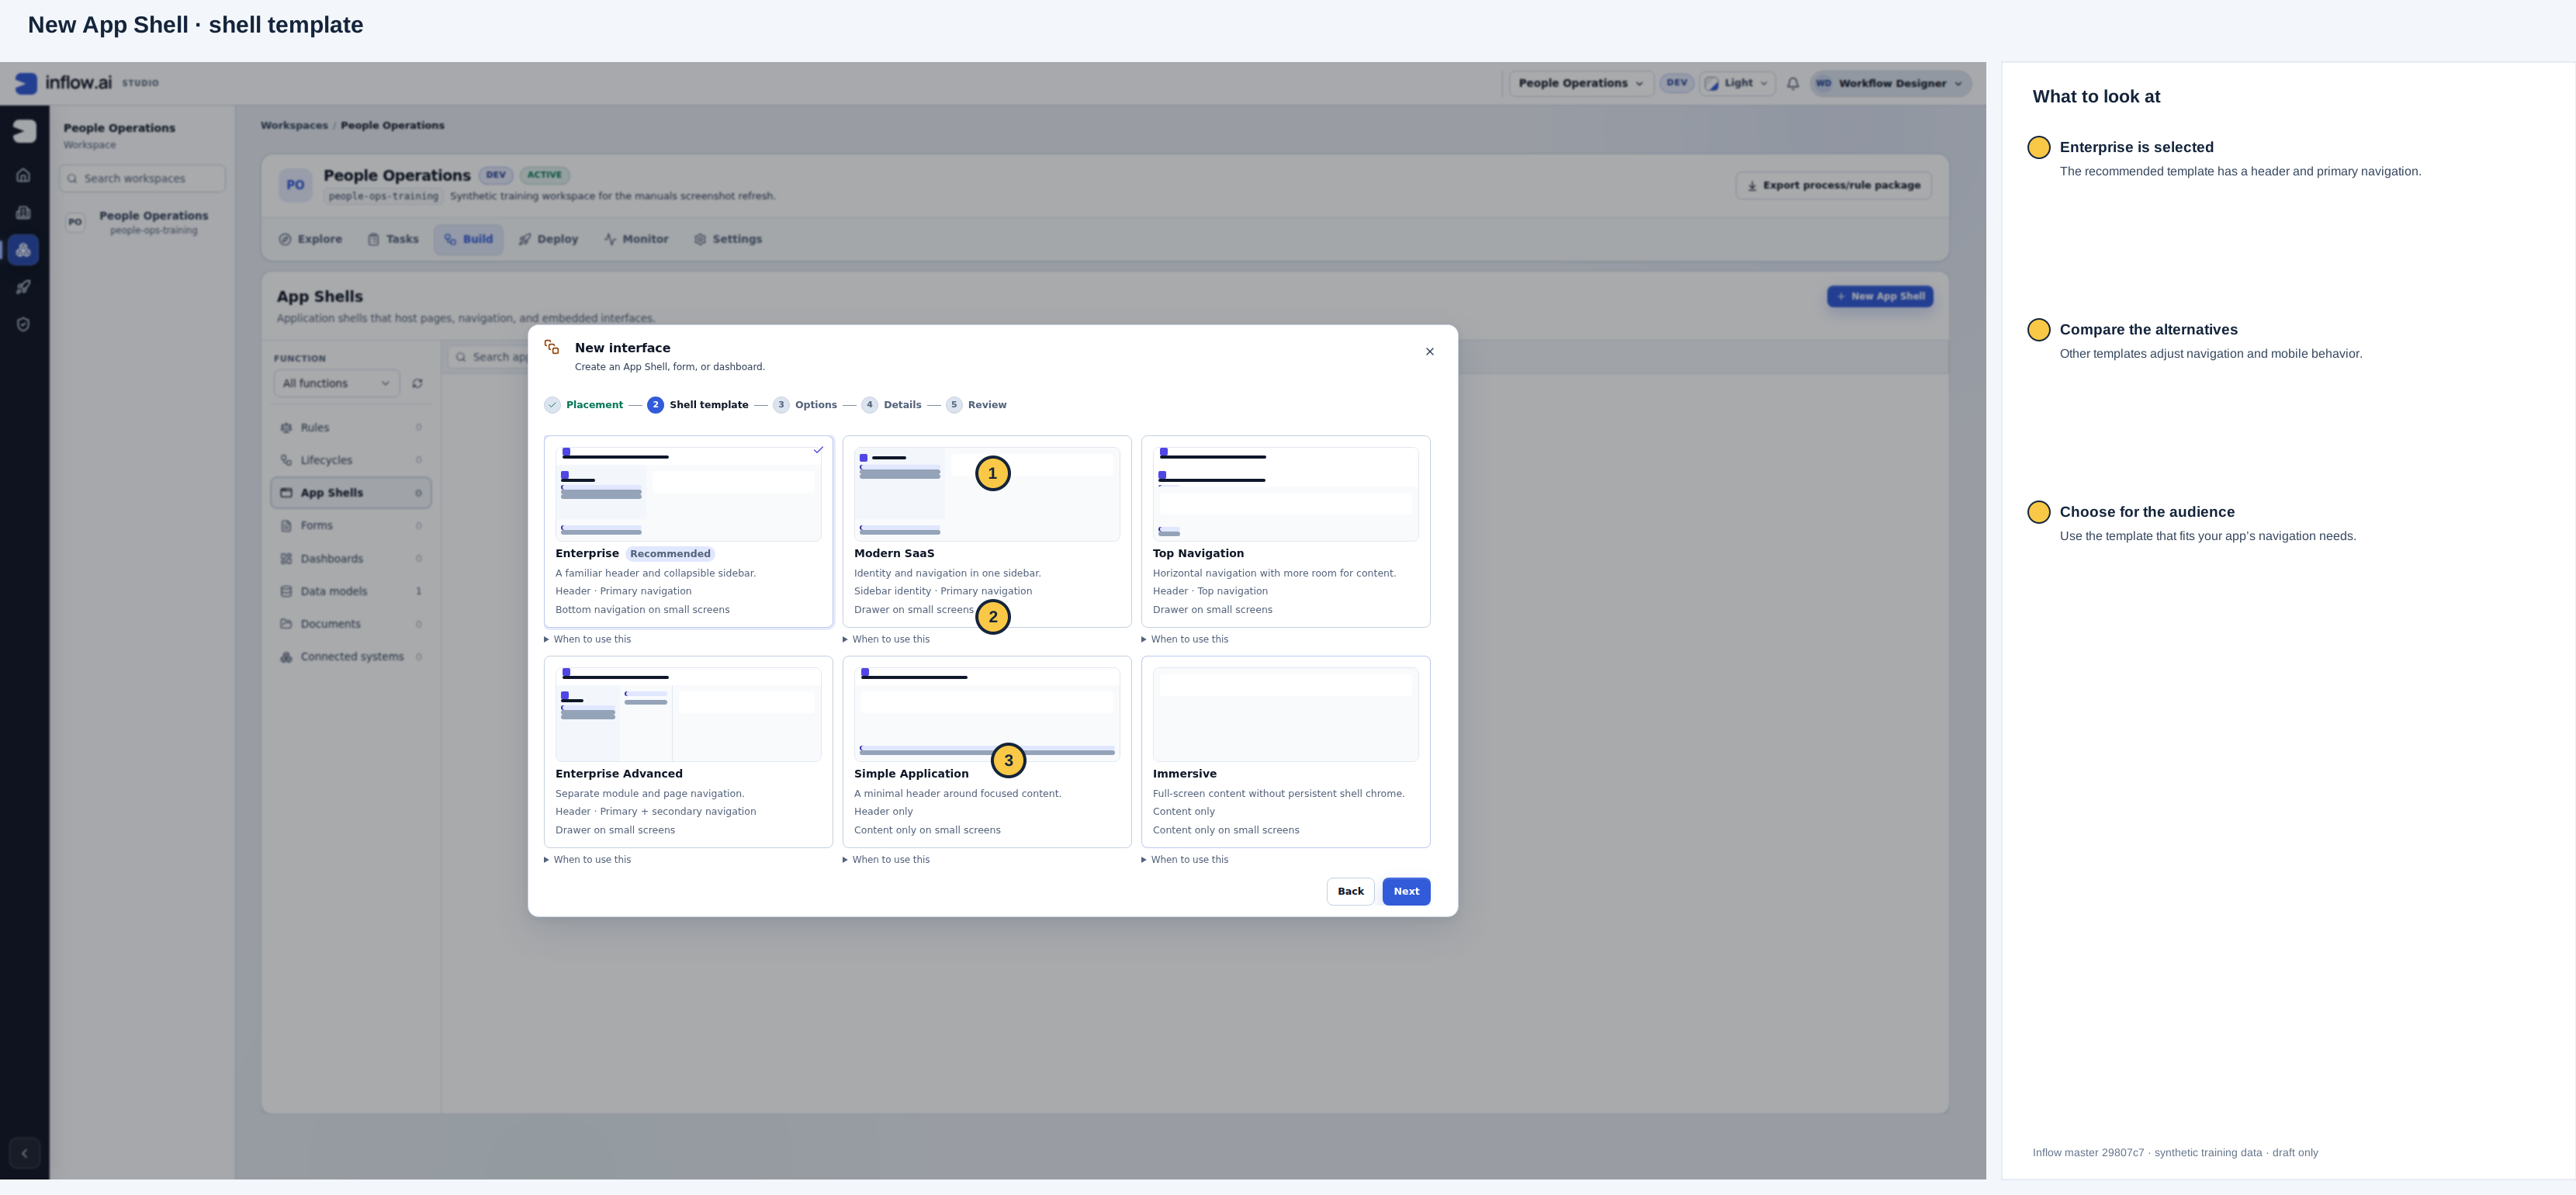
Enterprise is selected for the example; compare its navigation with the alternatives before choosing for your own app. Open the unchanged original.
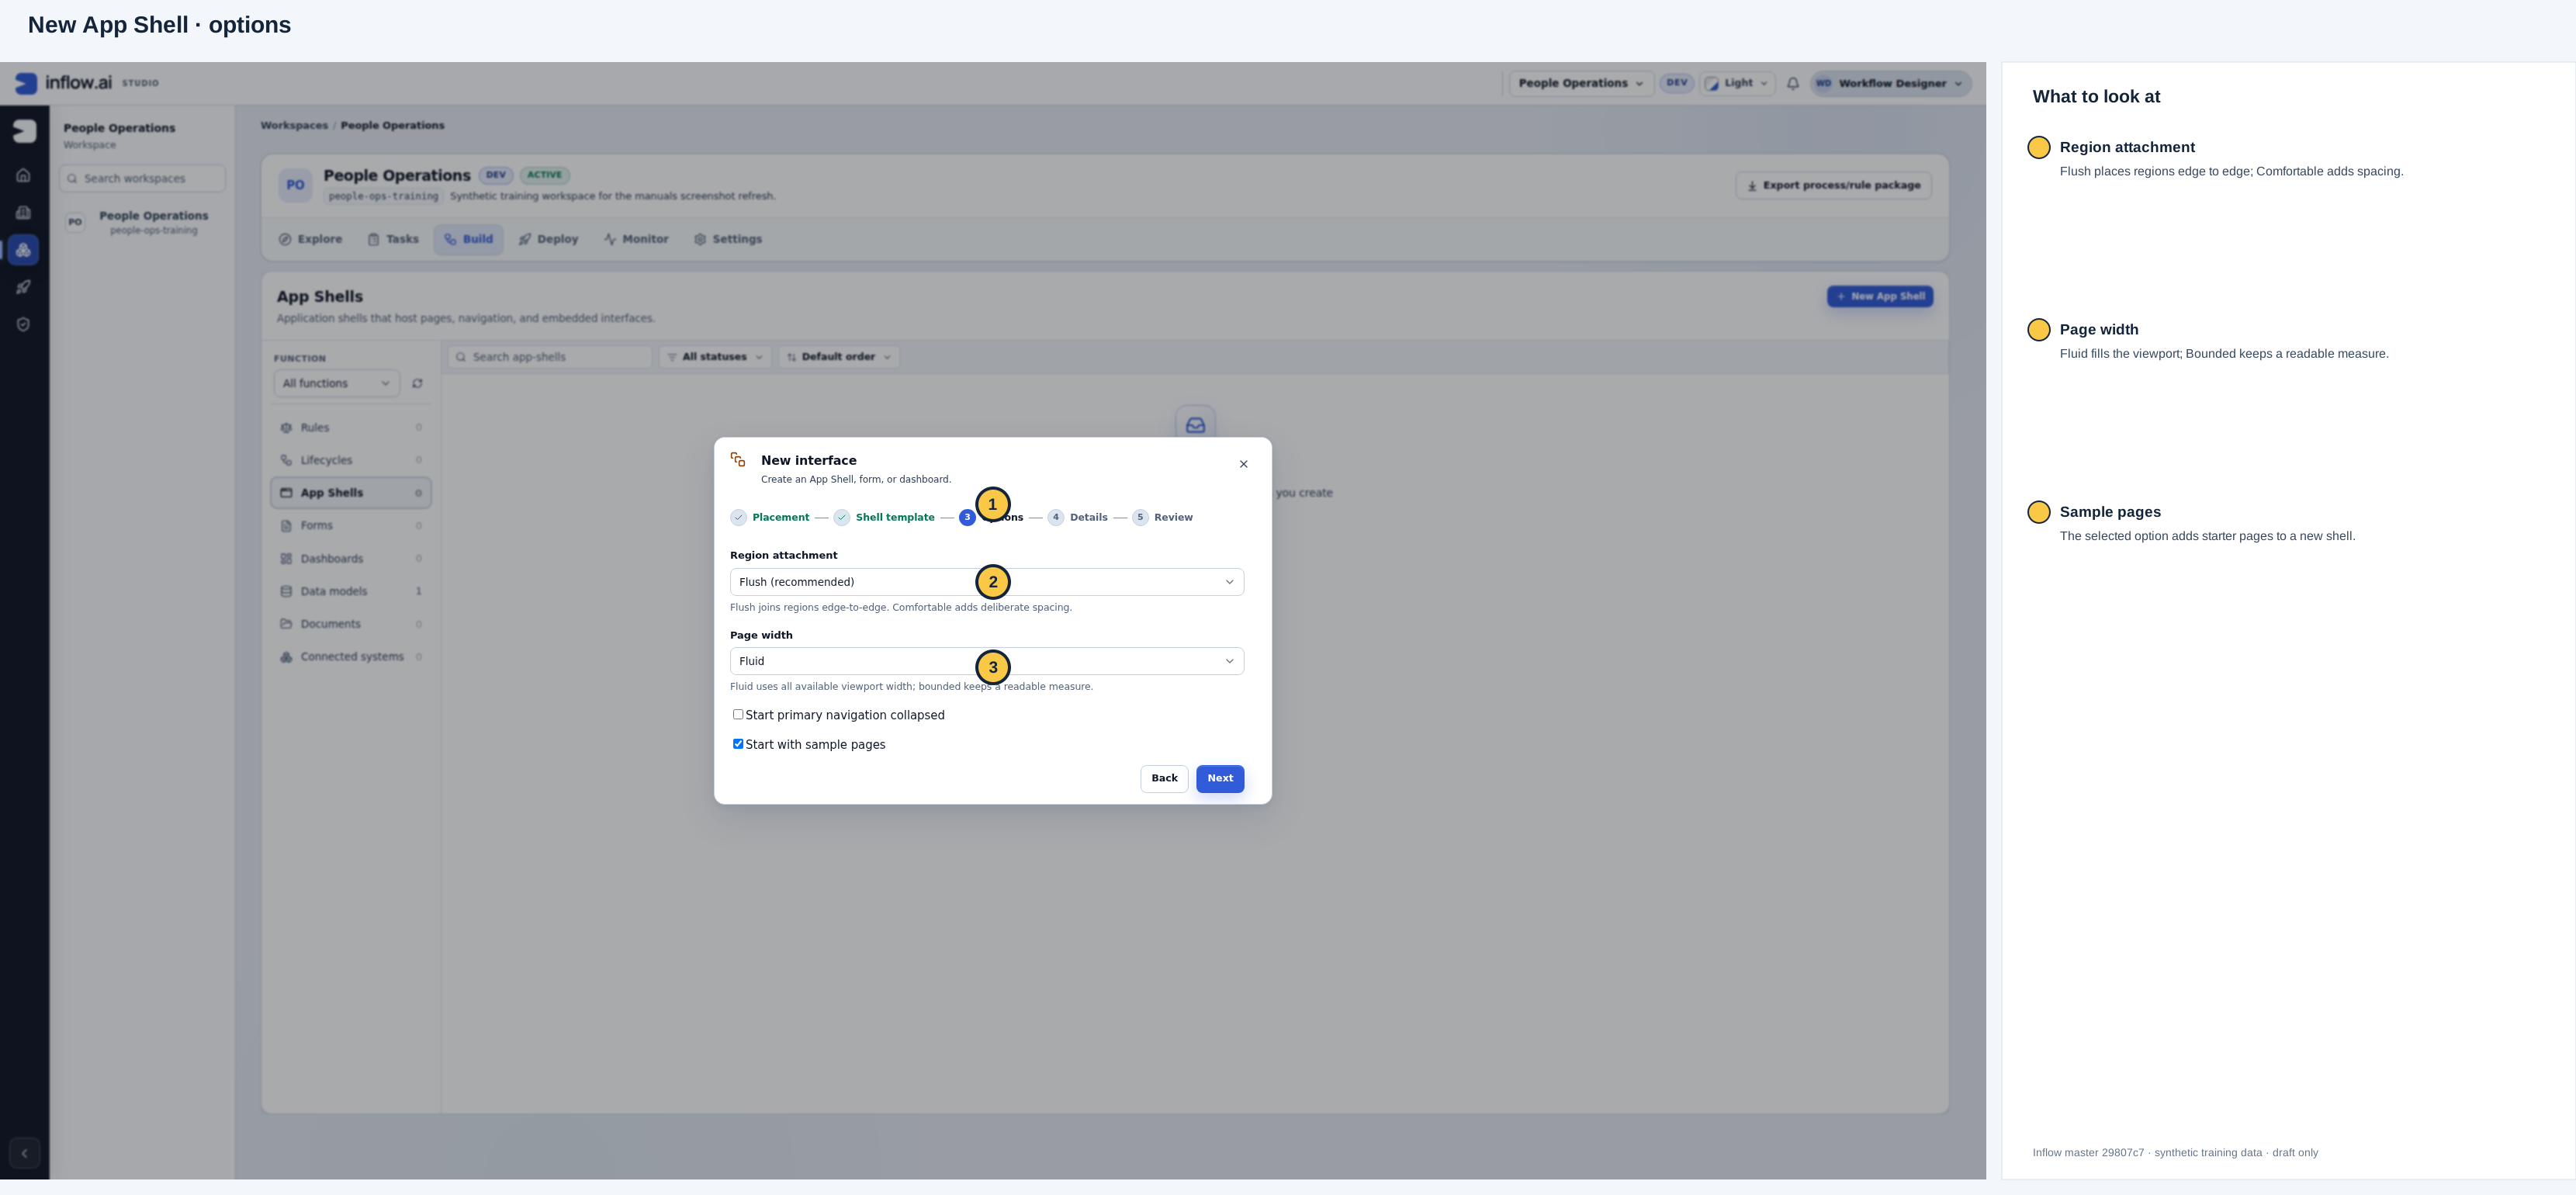
These are draft choices, not a recommendation for every app. Open the unchanged original.
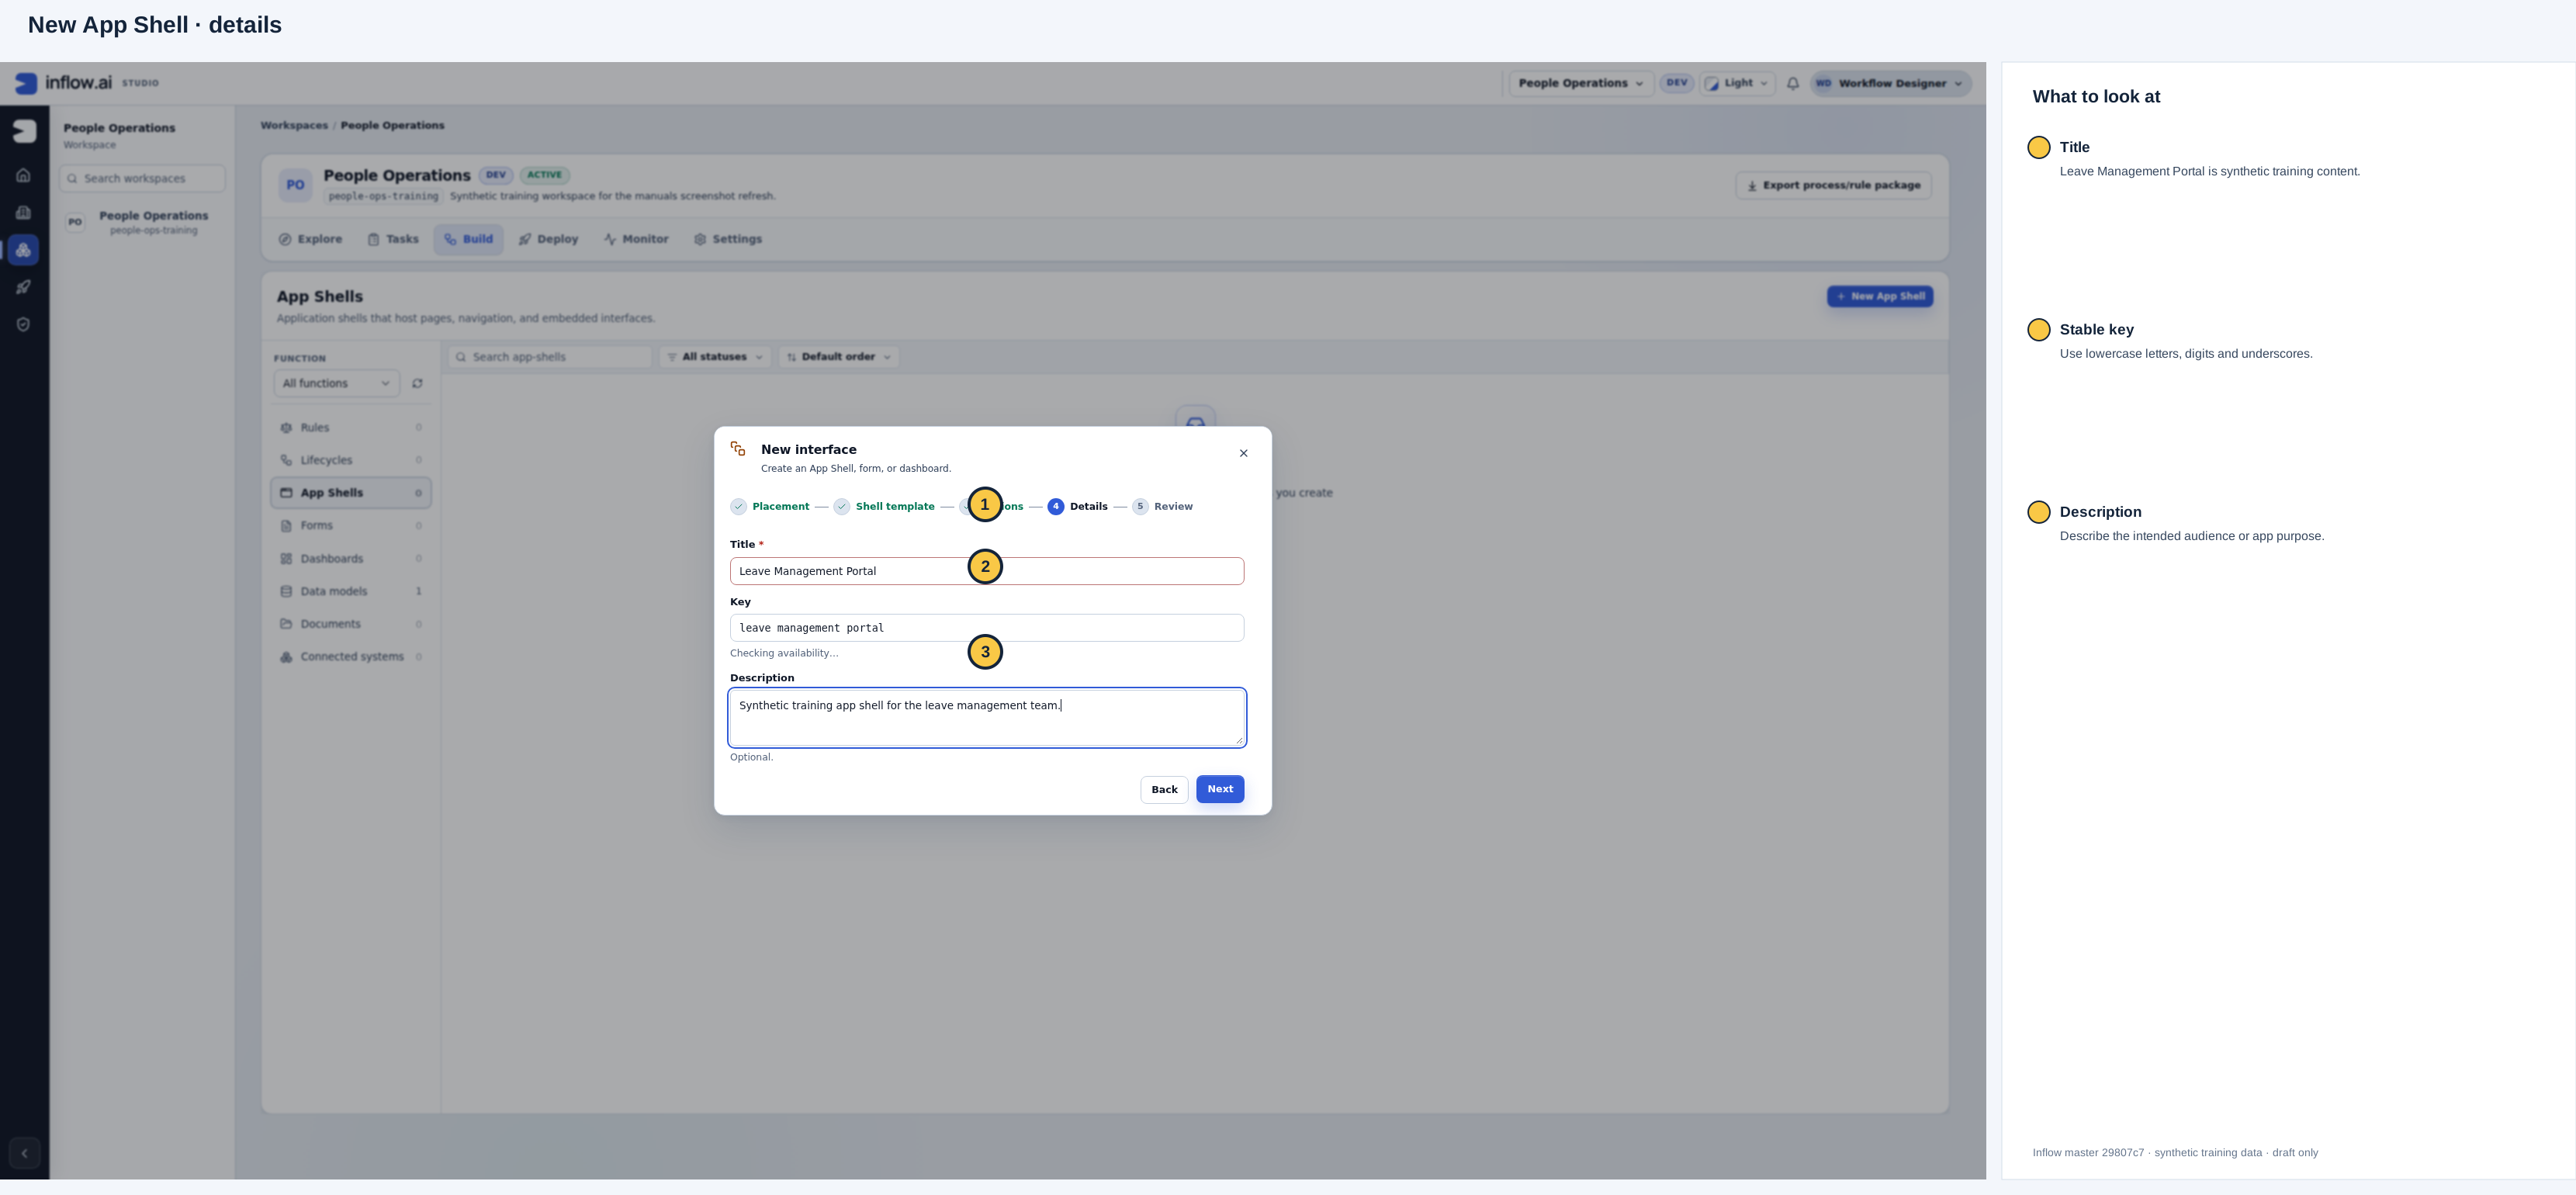
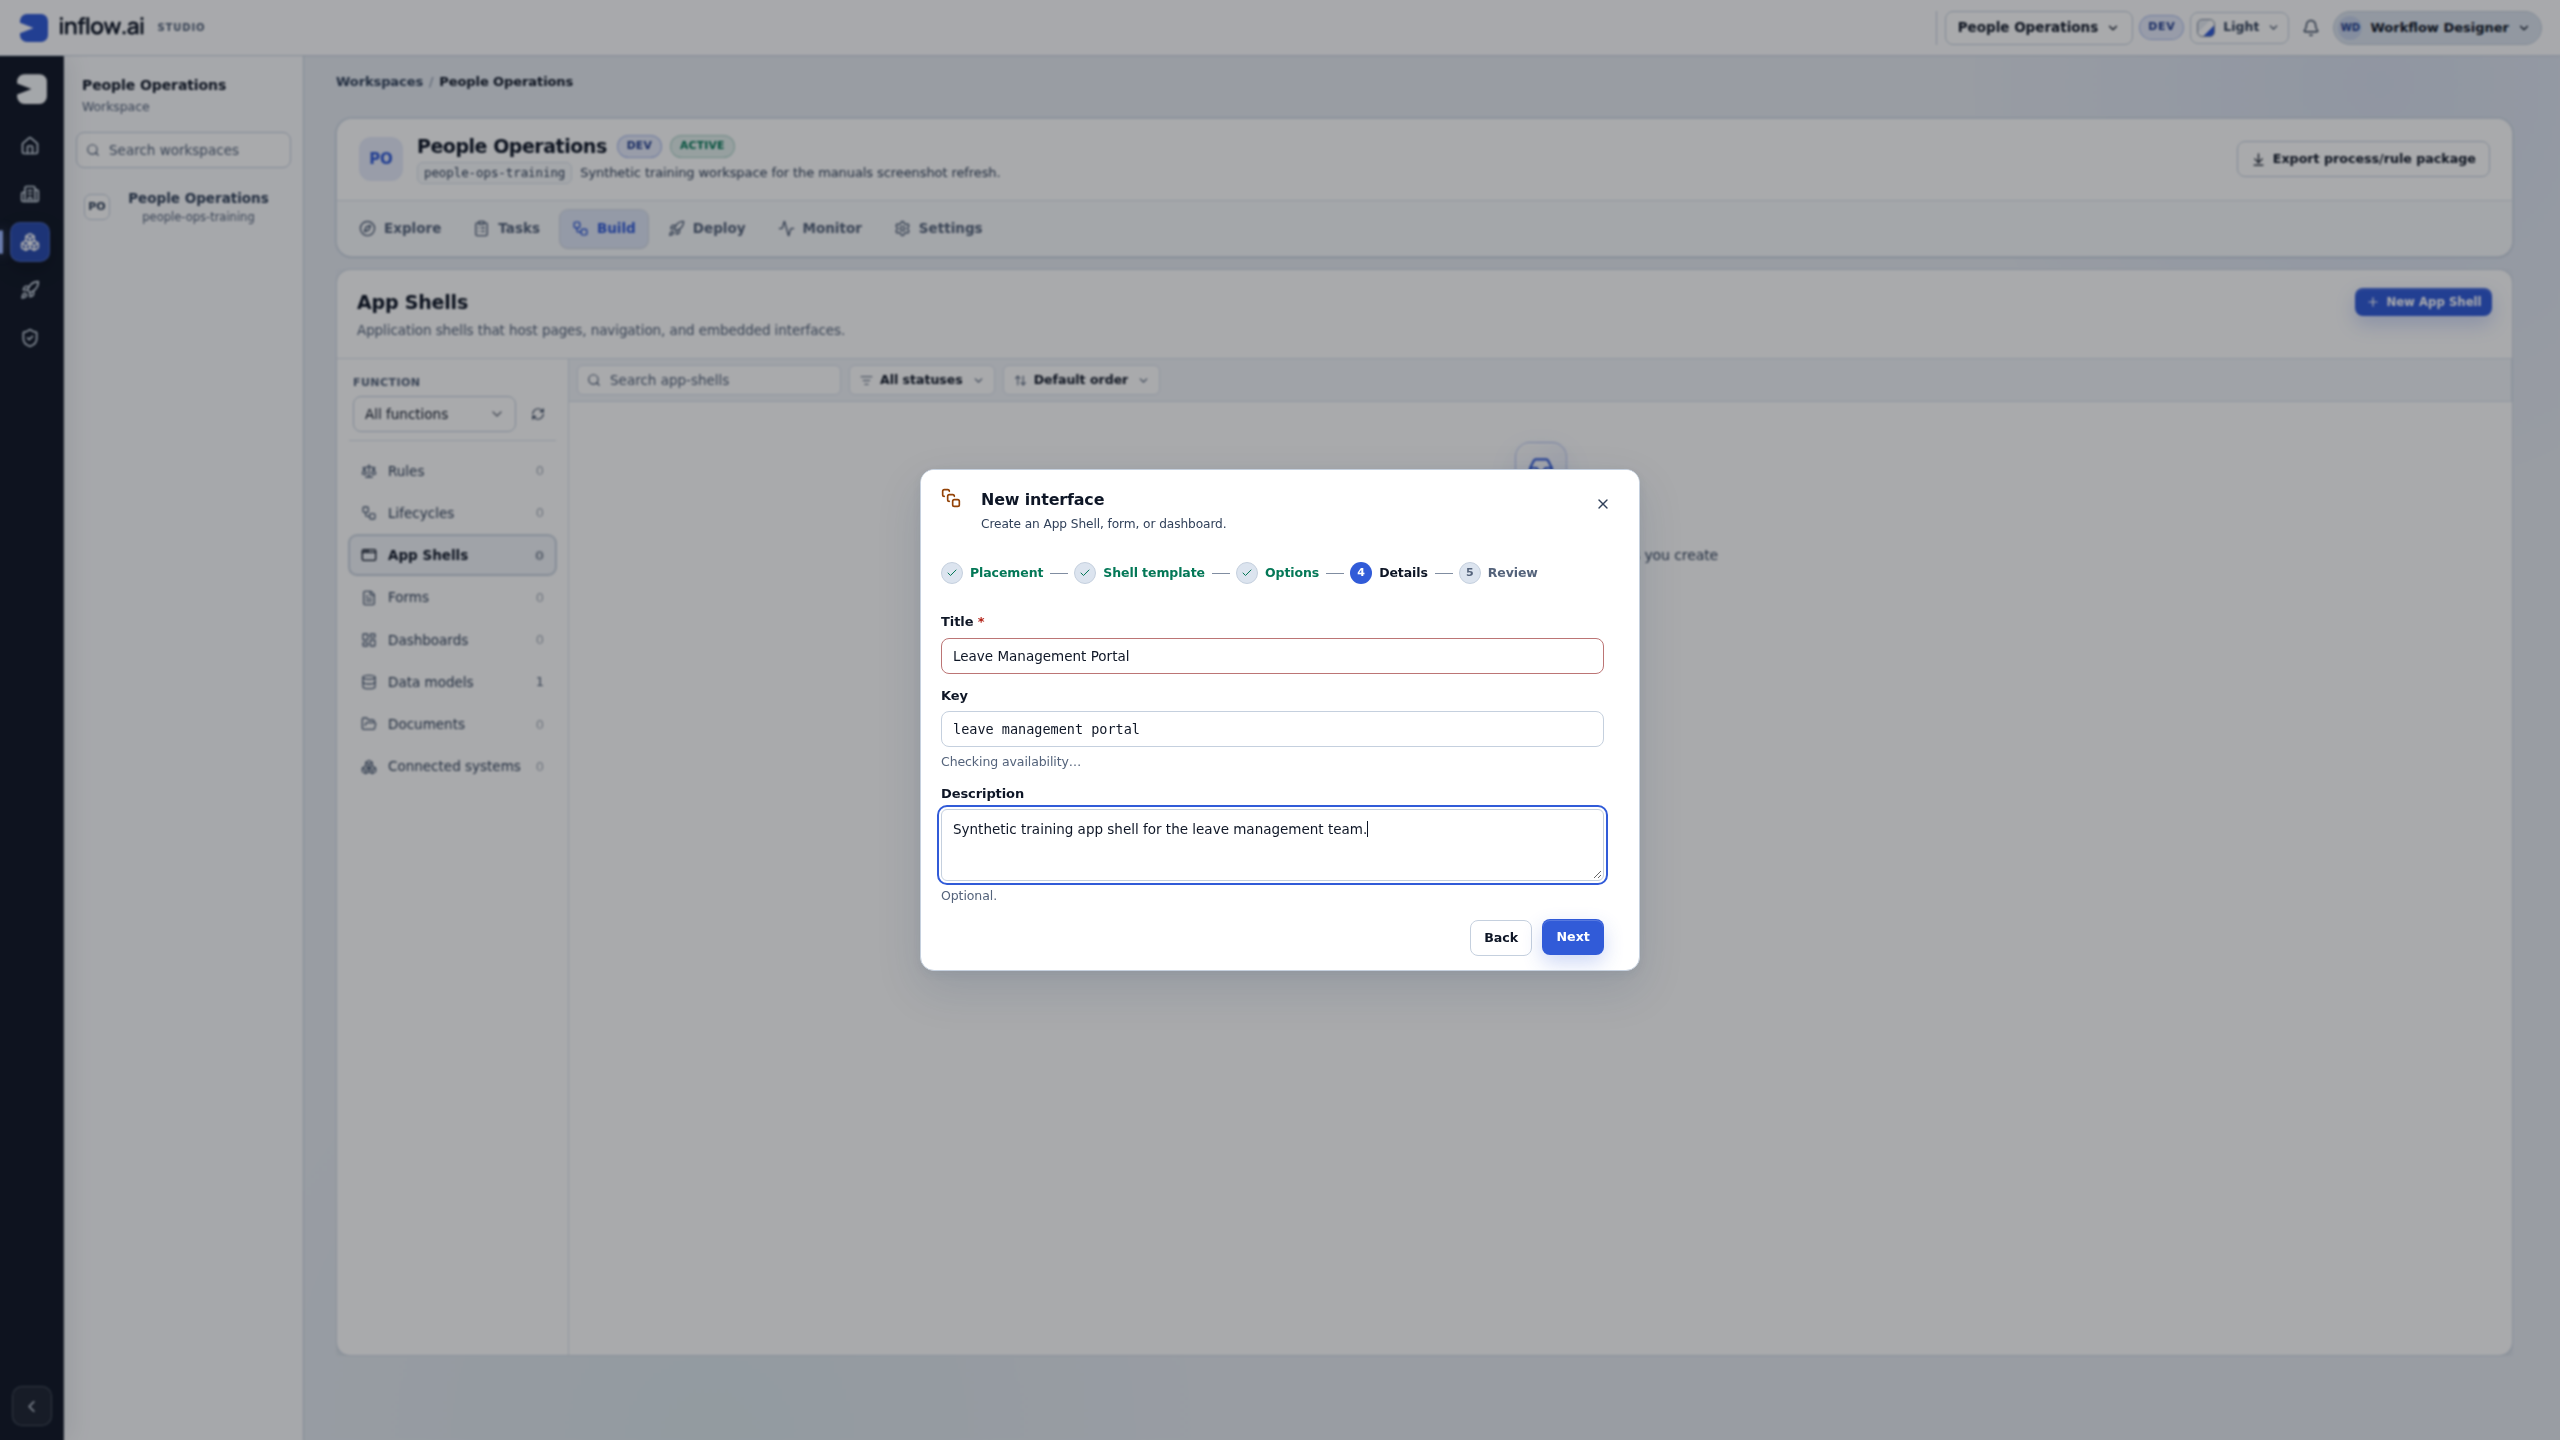
The title is Leave Management Portal and the key is leave_management_portal. Open the unchanged original.
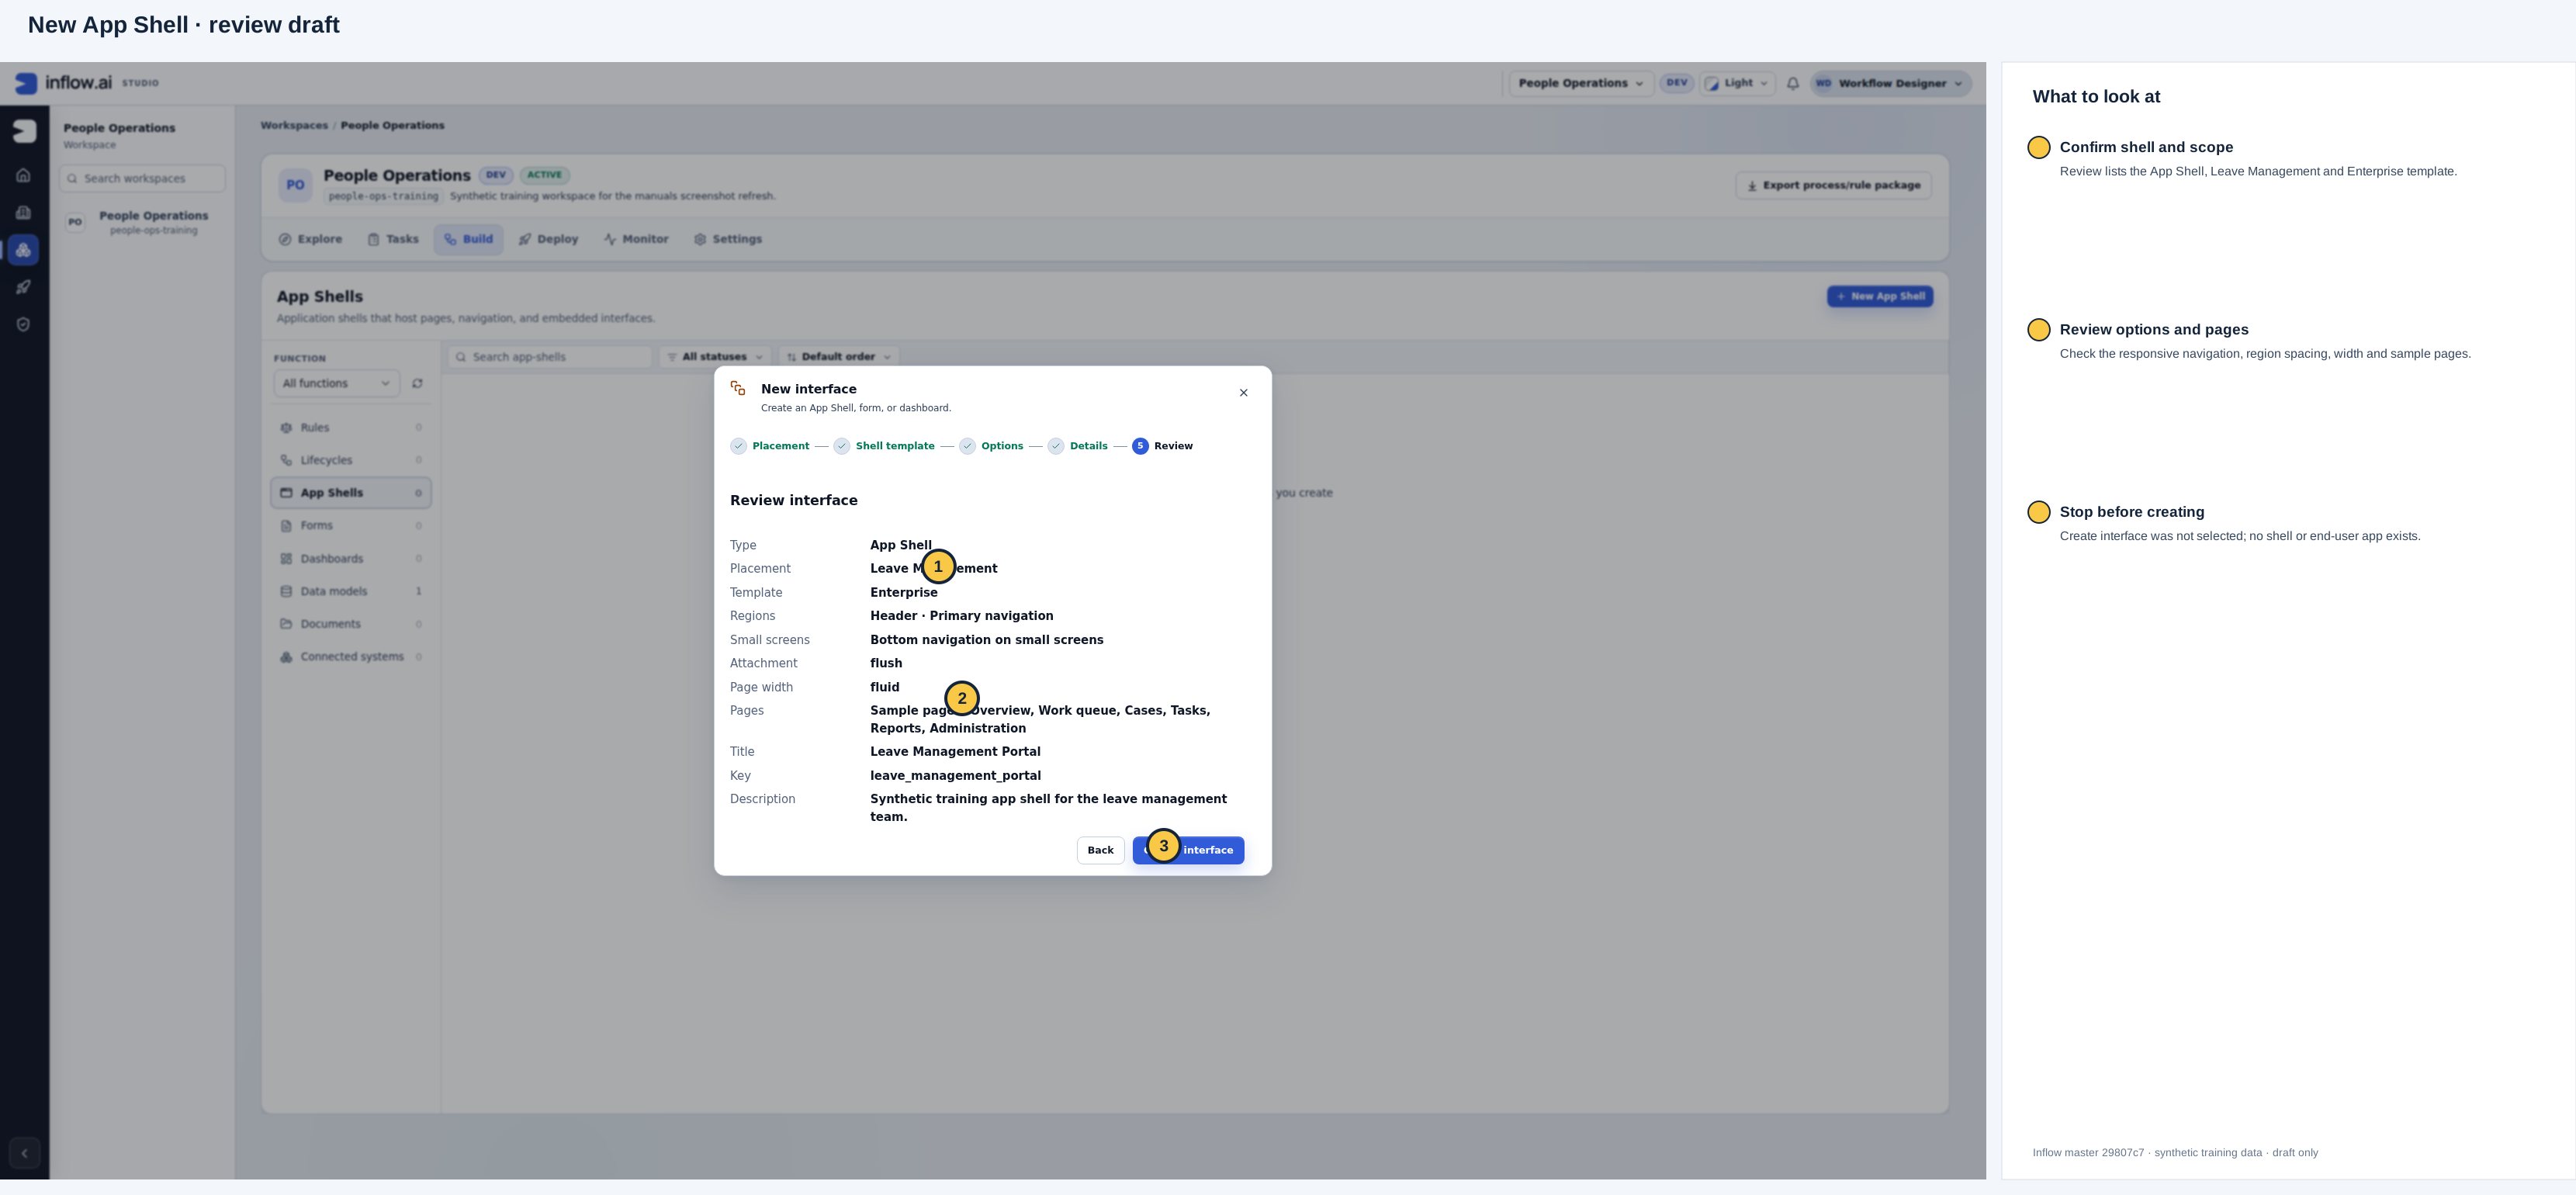
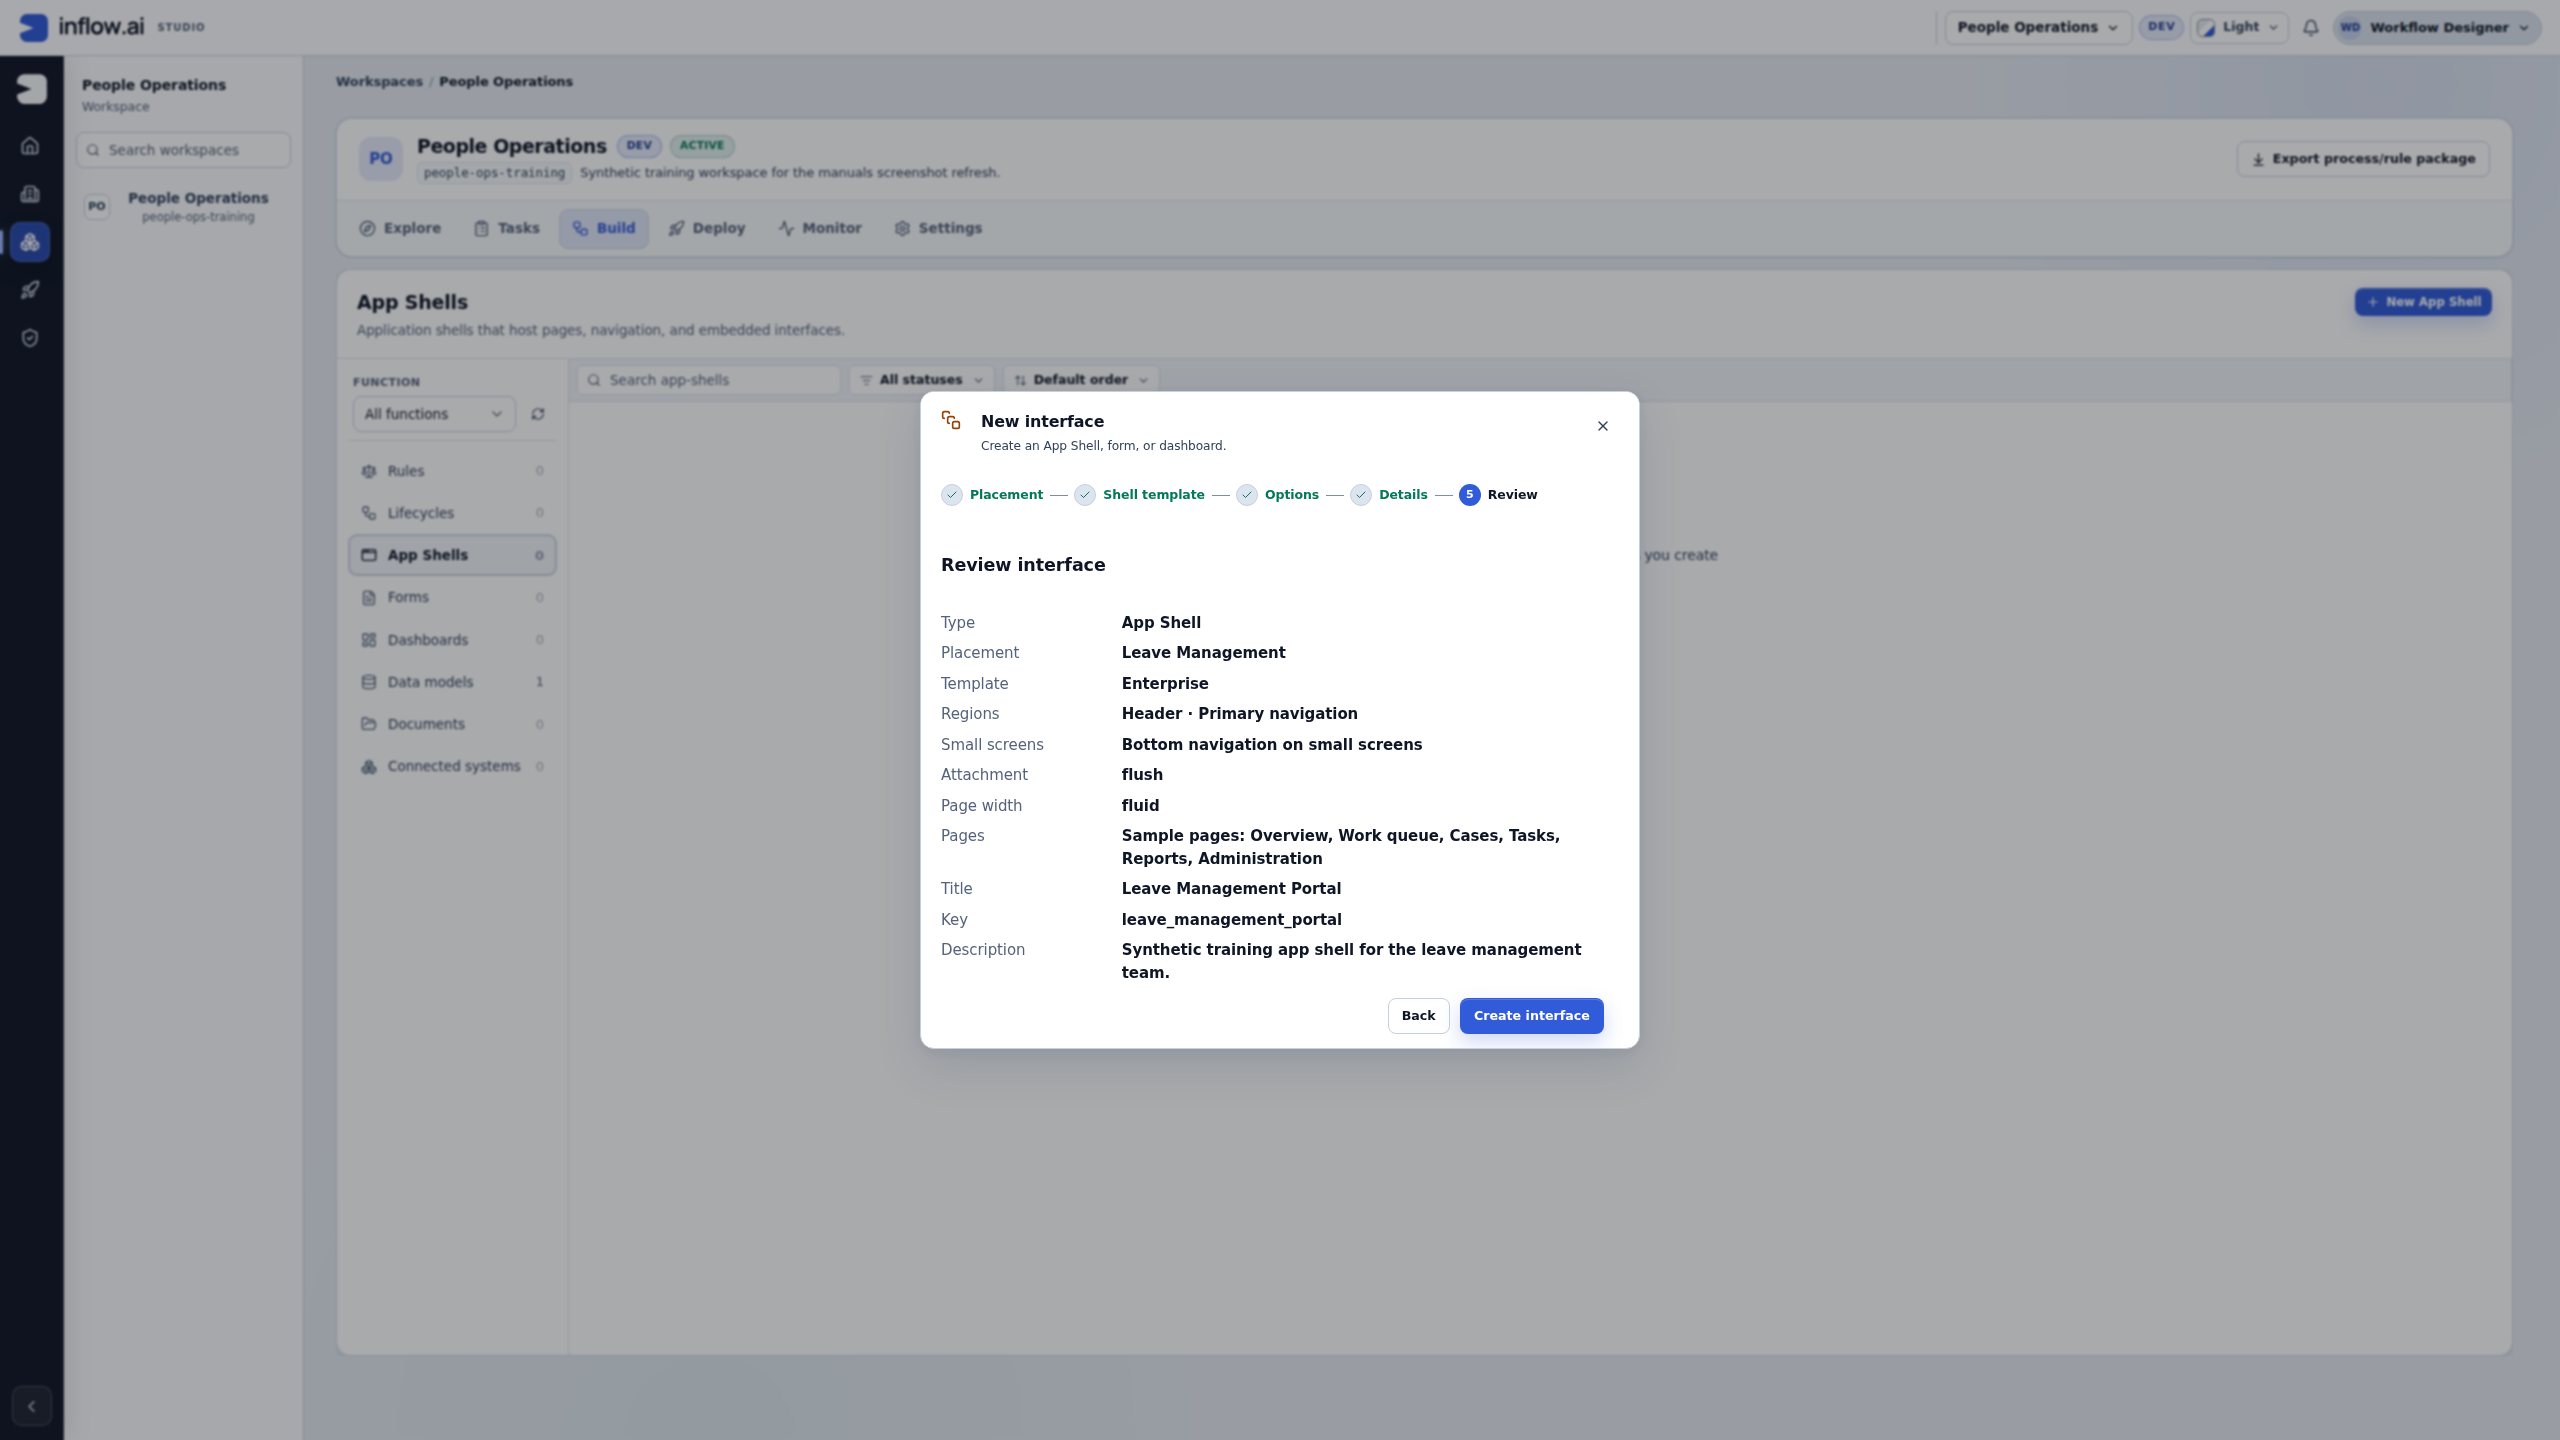
This is an unsubmitted synthetic review. The wizard was closed before selecting Create interface, so no App Shell or end-user app was created. Open the unchanged original.
Practice: build and reopen a three-page app
Before connecting the employee and manager journeys, try a small page-navigation exercise. Nadia wants to explain the application, then show an existing interface inside the same frame. She needs one page she can design and another that reuses a published form. This practice stops at a saved draft and Interactive Preview; the release and access checks for the complete Leave requests app still follow in later milestones.
Recorded example, 16 November 2026: the numbered pictures below were captured from master commit 93afd995 at native 2560×1440. They show a newly created App page practice App Shell in People Operations Access Practice, using an ordinary designer login with workspace Admin access. They are a separate exercise from the older wizard drafts above. The practice shell remained unpublished, and its earlier five practice Forms were unchanged. No employee request, workflow case, manager task, approval or App Chat conversation was created.
1. Prepare the two kinds of page
Use an approved practice workspace and an account allowed to design interfaces there. Have an existing published text-only form available. In this recorded workspace it is Publication practice, with a heading and short paragraph and no visible Submit action. Its published heading reads Publication practice — first wording. The later working draft has different wording; do not publish that draft to perform this exercise.
The local names in this walkthrough are examples, not objects you should expect in every workspace. If you use another practice form, check its content and actions first. A form with a Submit button, record destination, external data or automation needs its own agreed test plan. Displaying a form inside a shell does not make those effects disappear.
Plan the pages before creating them:
| Page title | Page kind | What the reader should see |
|---|---|---|
| Home | Designed canvas supplied by the wizard | The initial page, retained for comparison. |
| Overview | Design a page | A heading and short explanation written on this page. |
| Published example | Show an existing interface | The selected form's current published content. |
Open Build → App Shells in the intended workspace and choose New App Shell. Check the workspace name before entering the wizard. This creates an application definition, not a leave-request business record.
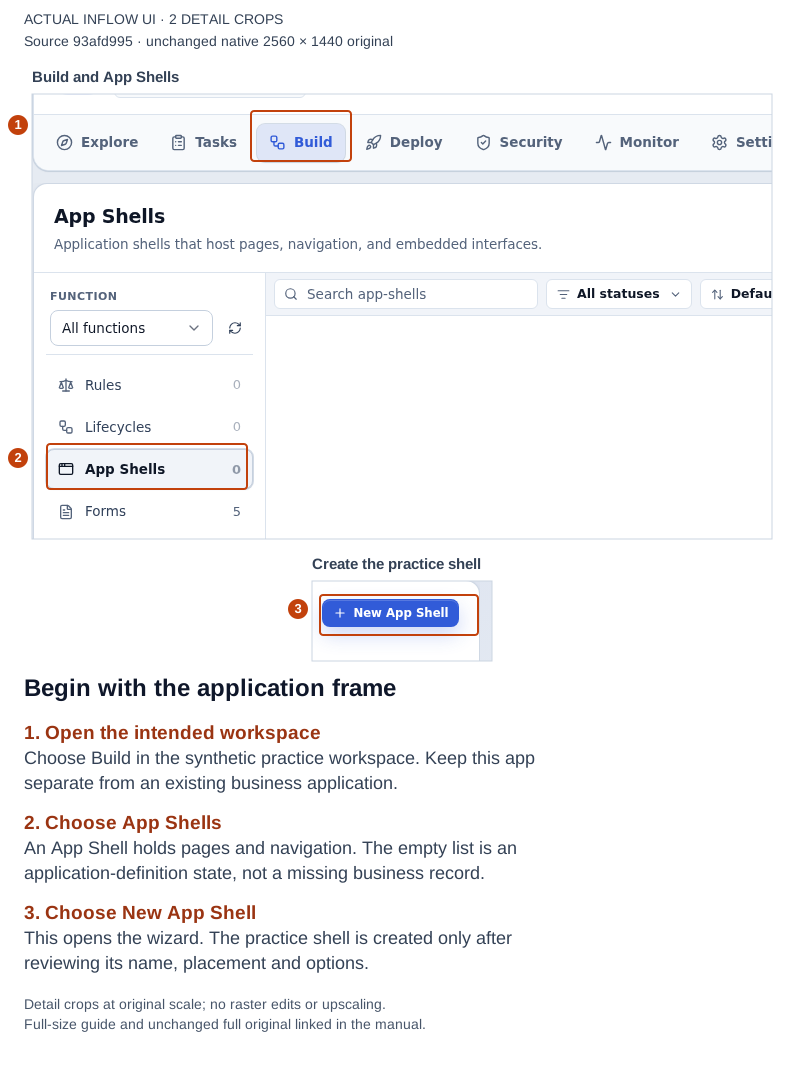
Start with the App Shells resource. Open the unchanged native original.
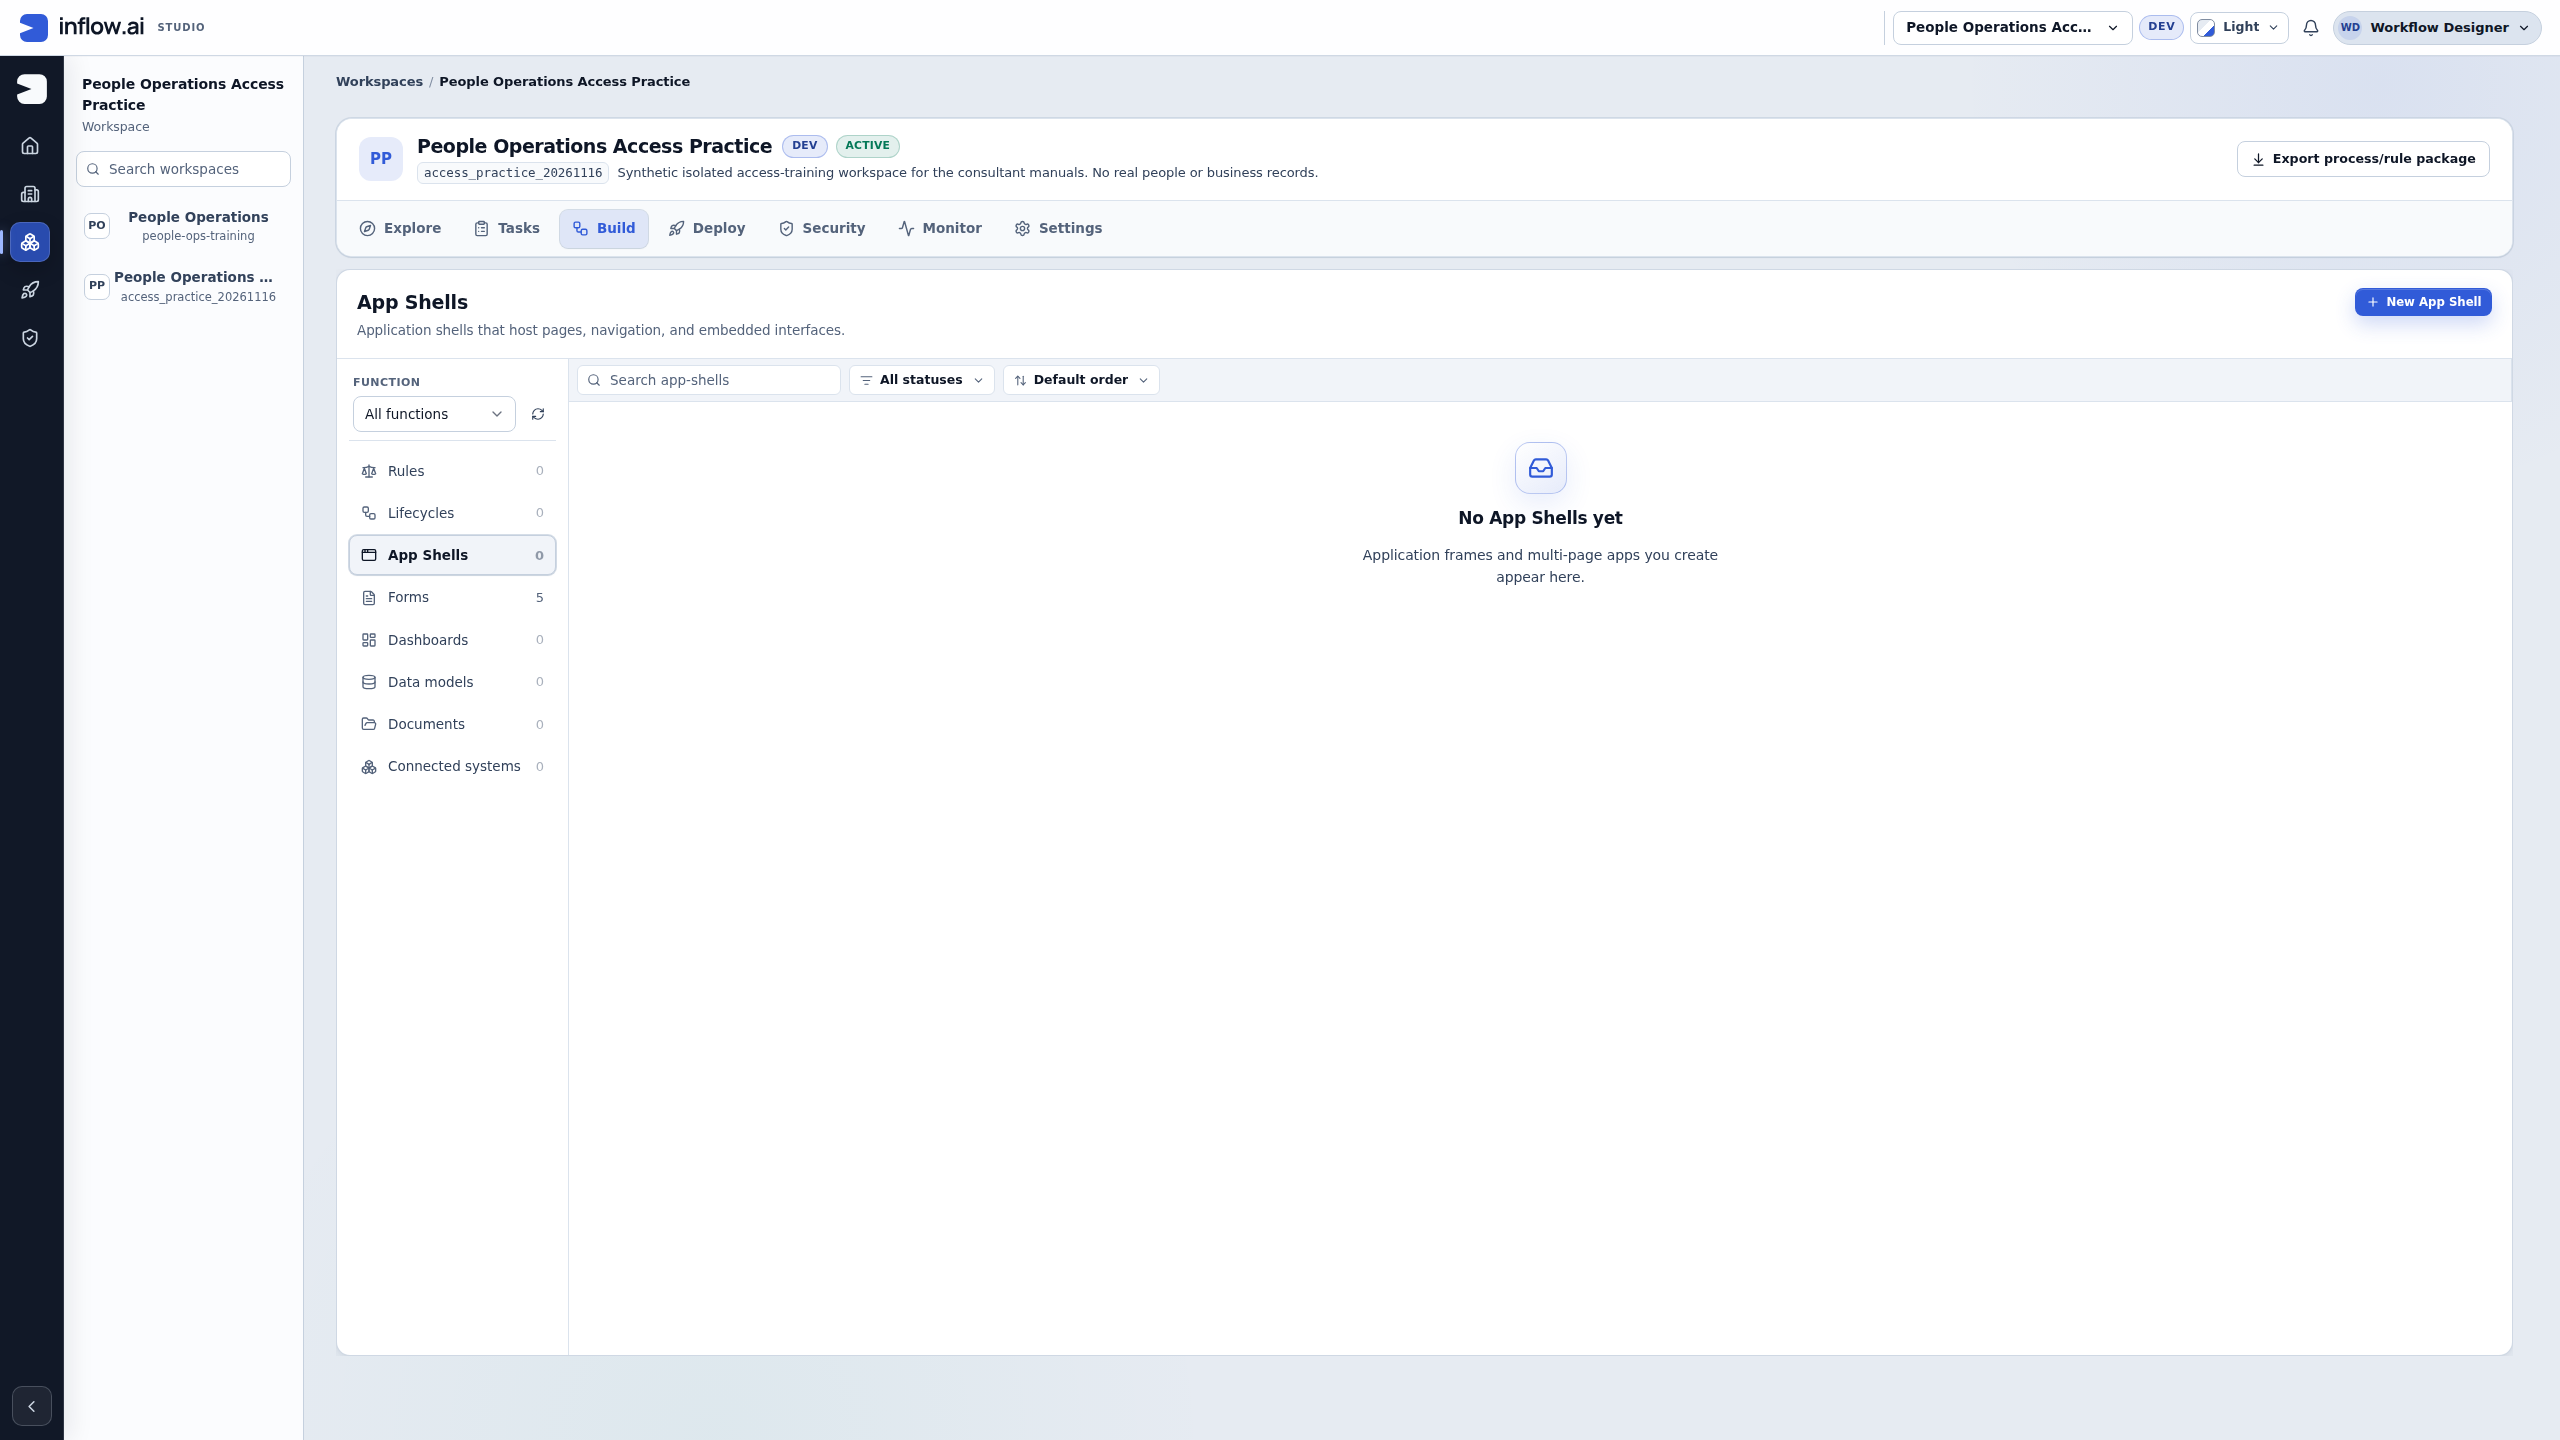
2. Create a frame without sample pages
- In Placement, choose the intended business function. The recorded example uses Leave Management.
- Choose Enterprise in Shell template. It provides the header and collapsible primary navigation used here.
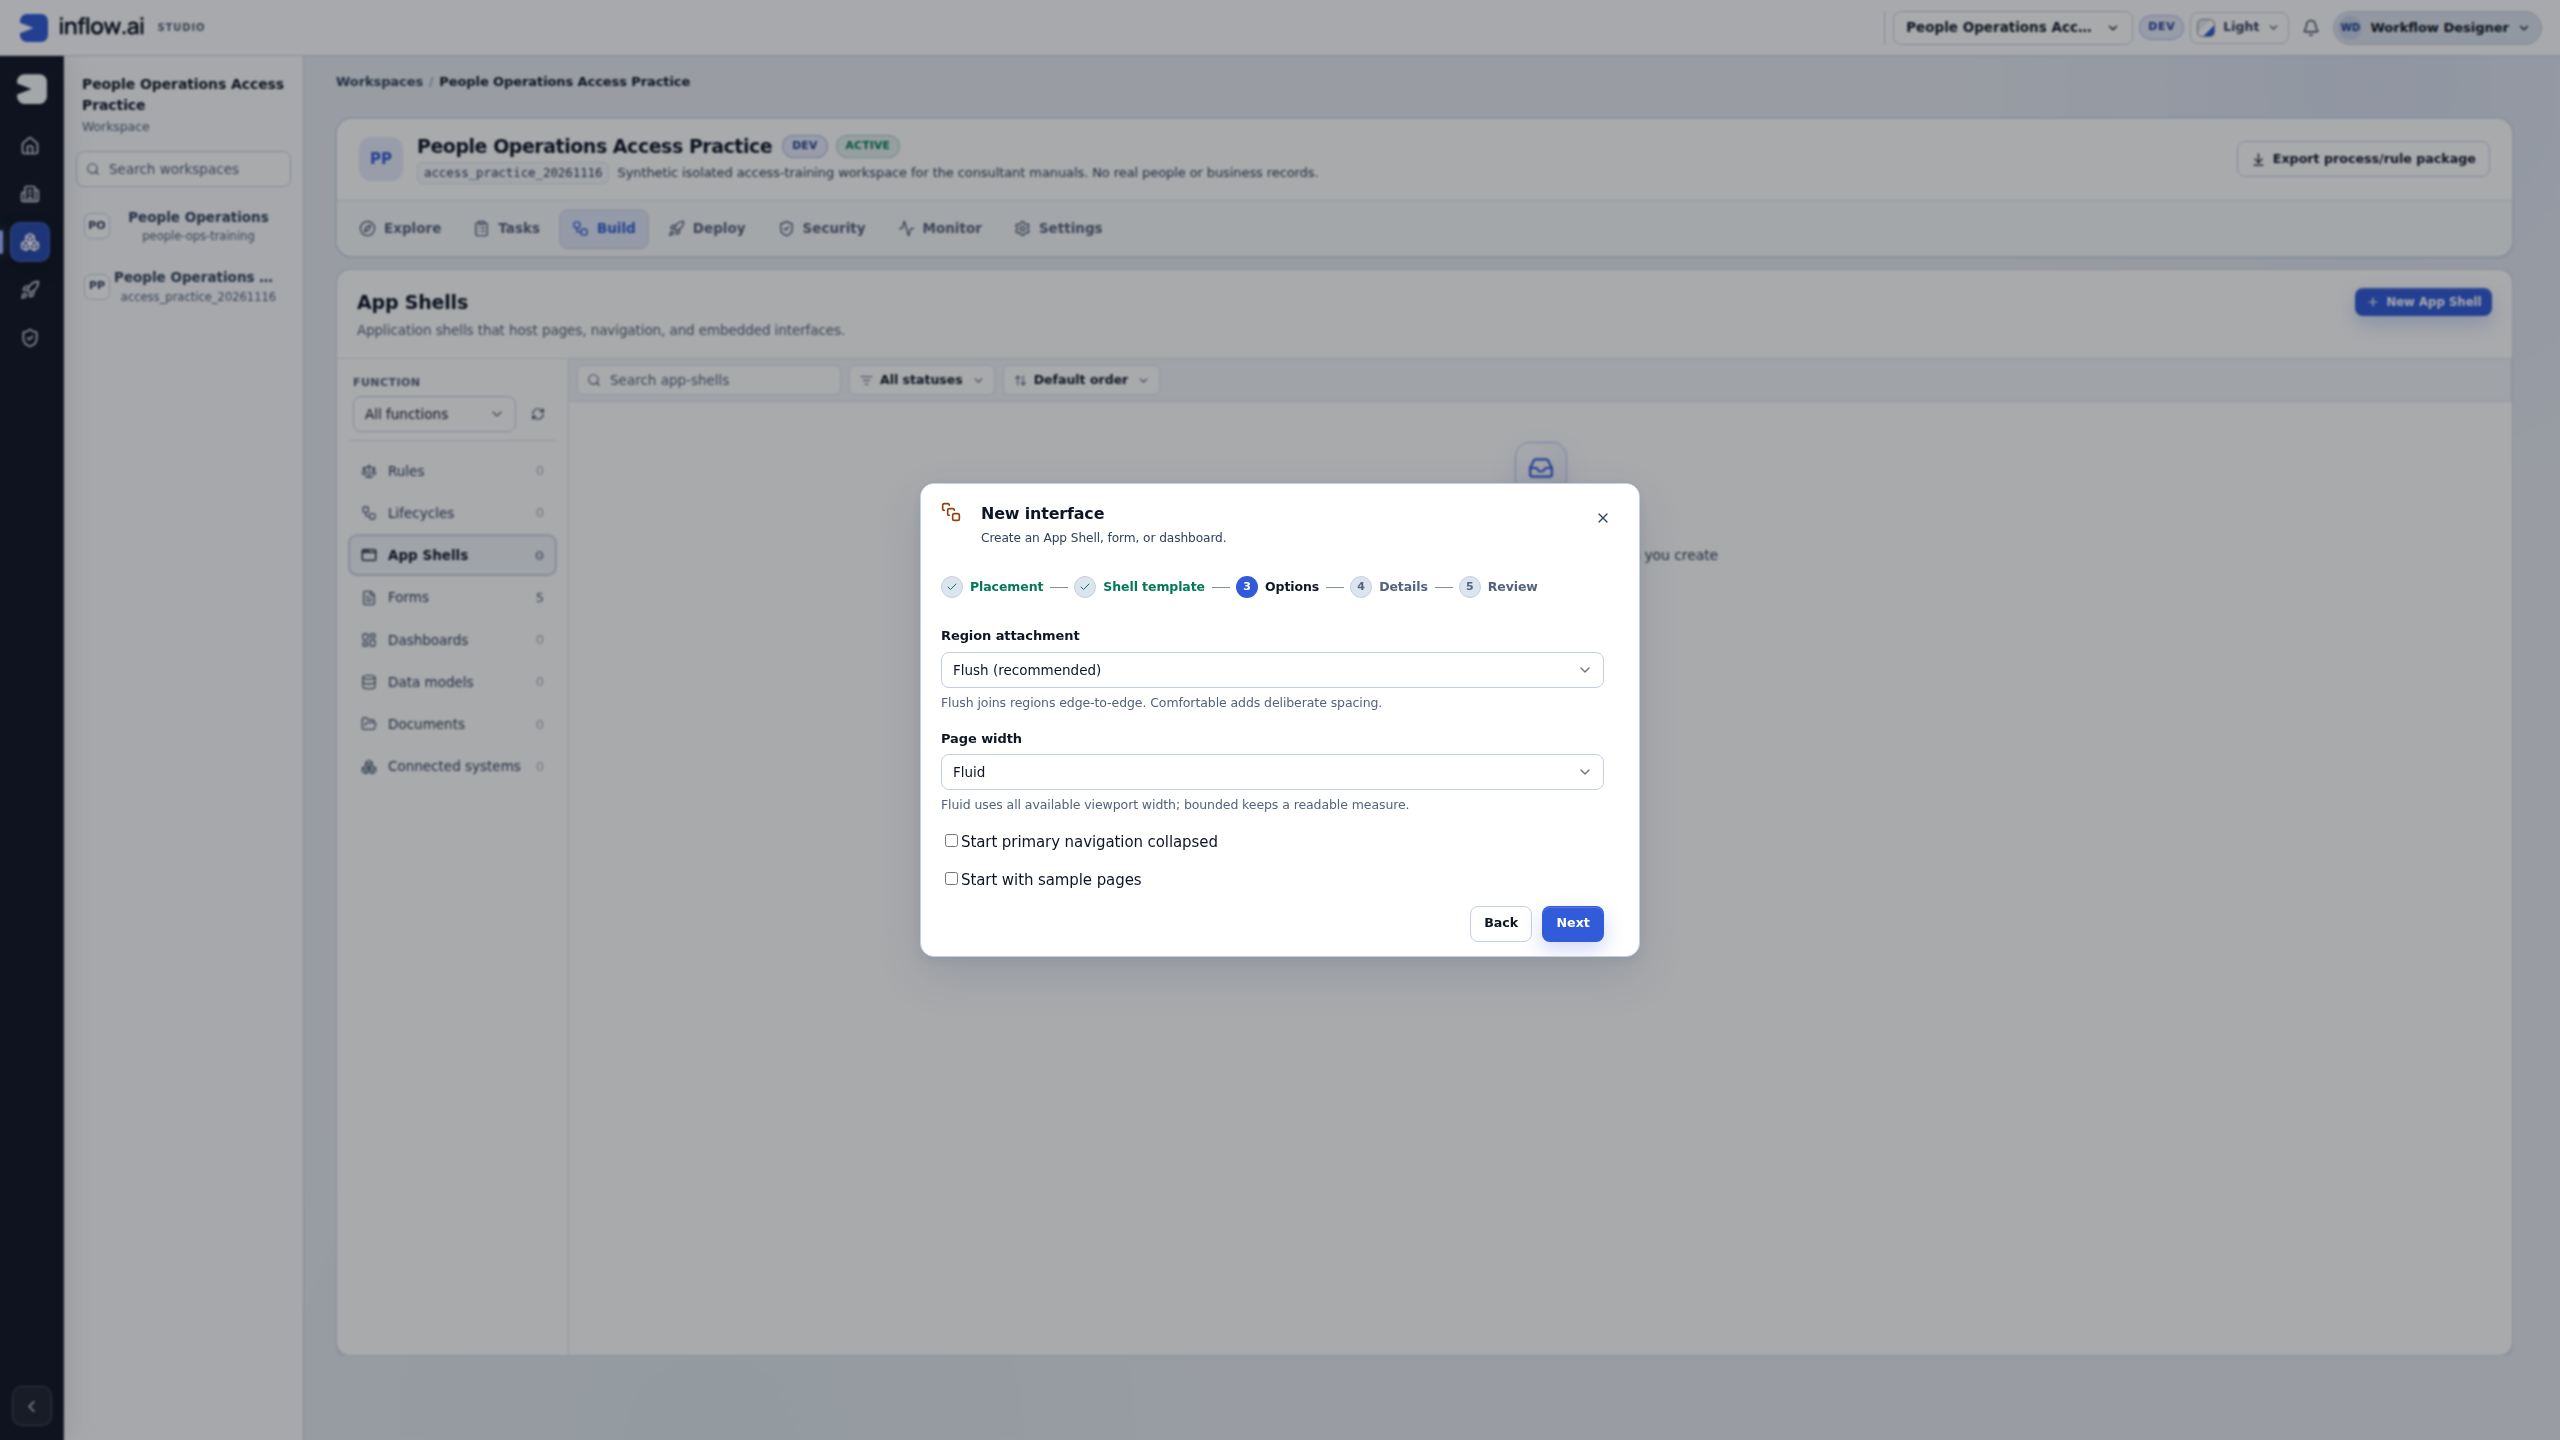
- In Options, keep Flush region attachment and Fluid page width for this exercise.
- Leave Start primary navigation collapsed clear so the menu begins expanded.
- Clear Start with sample pages. This is different from the older 15 November wizard example above, where sample pages were selected. With this option clear, the review promises One empty Home page.
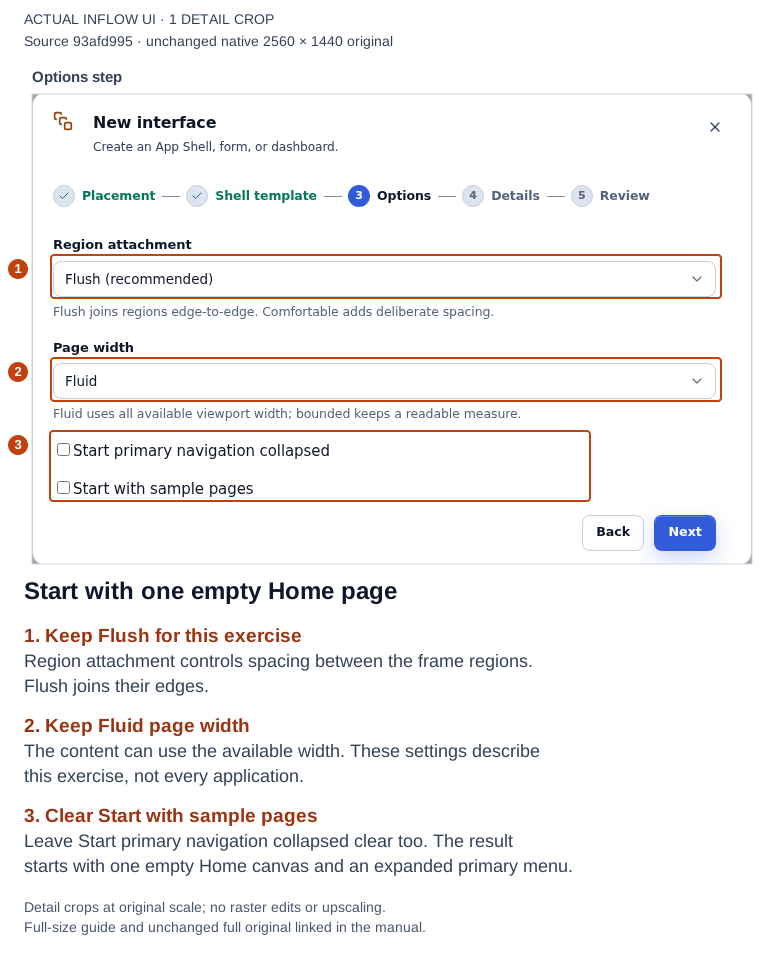
Read the options before continuing. Open the unchanged native original.
In Details, enter App page practice as the Title. Use an unused valid key, such as app_shell_page_practice_20261116 in this recorded workspace. Keys are permanent identifiers; use your own unused practice key if this example already exists. Add a description explaining that this is a text-only navigation exercise.
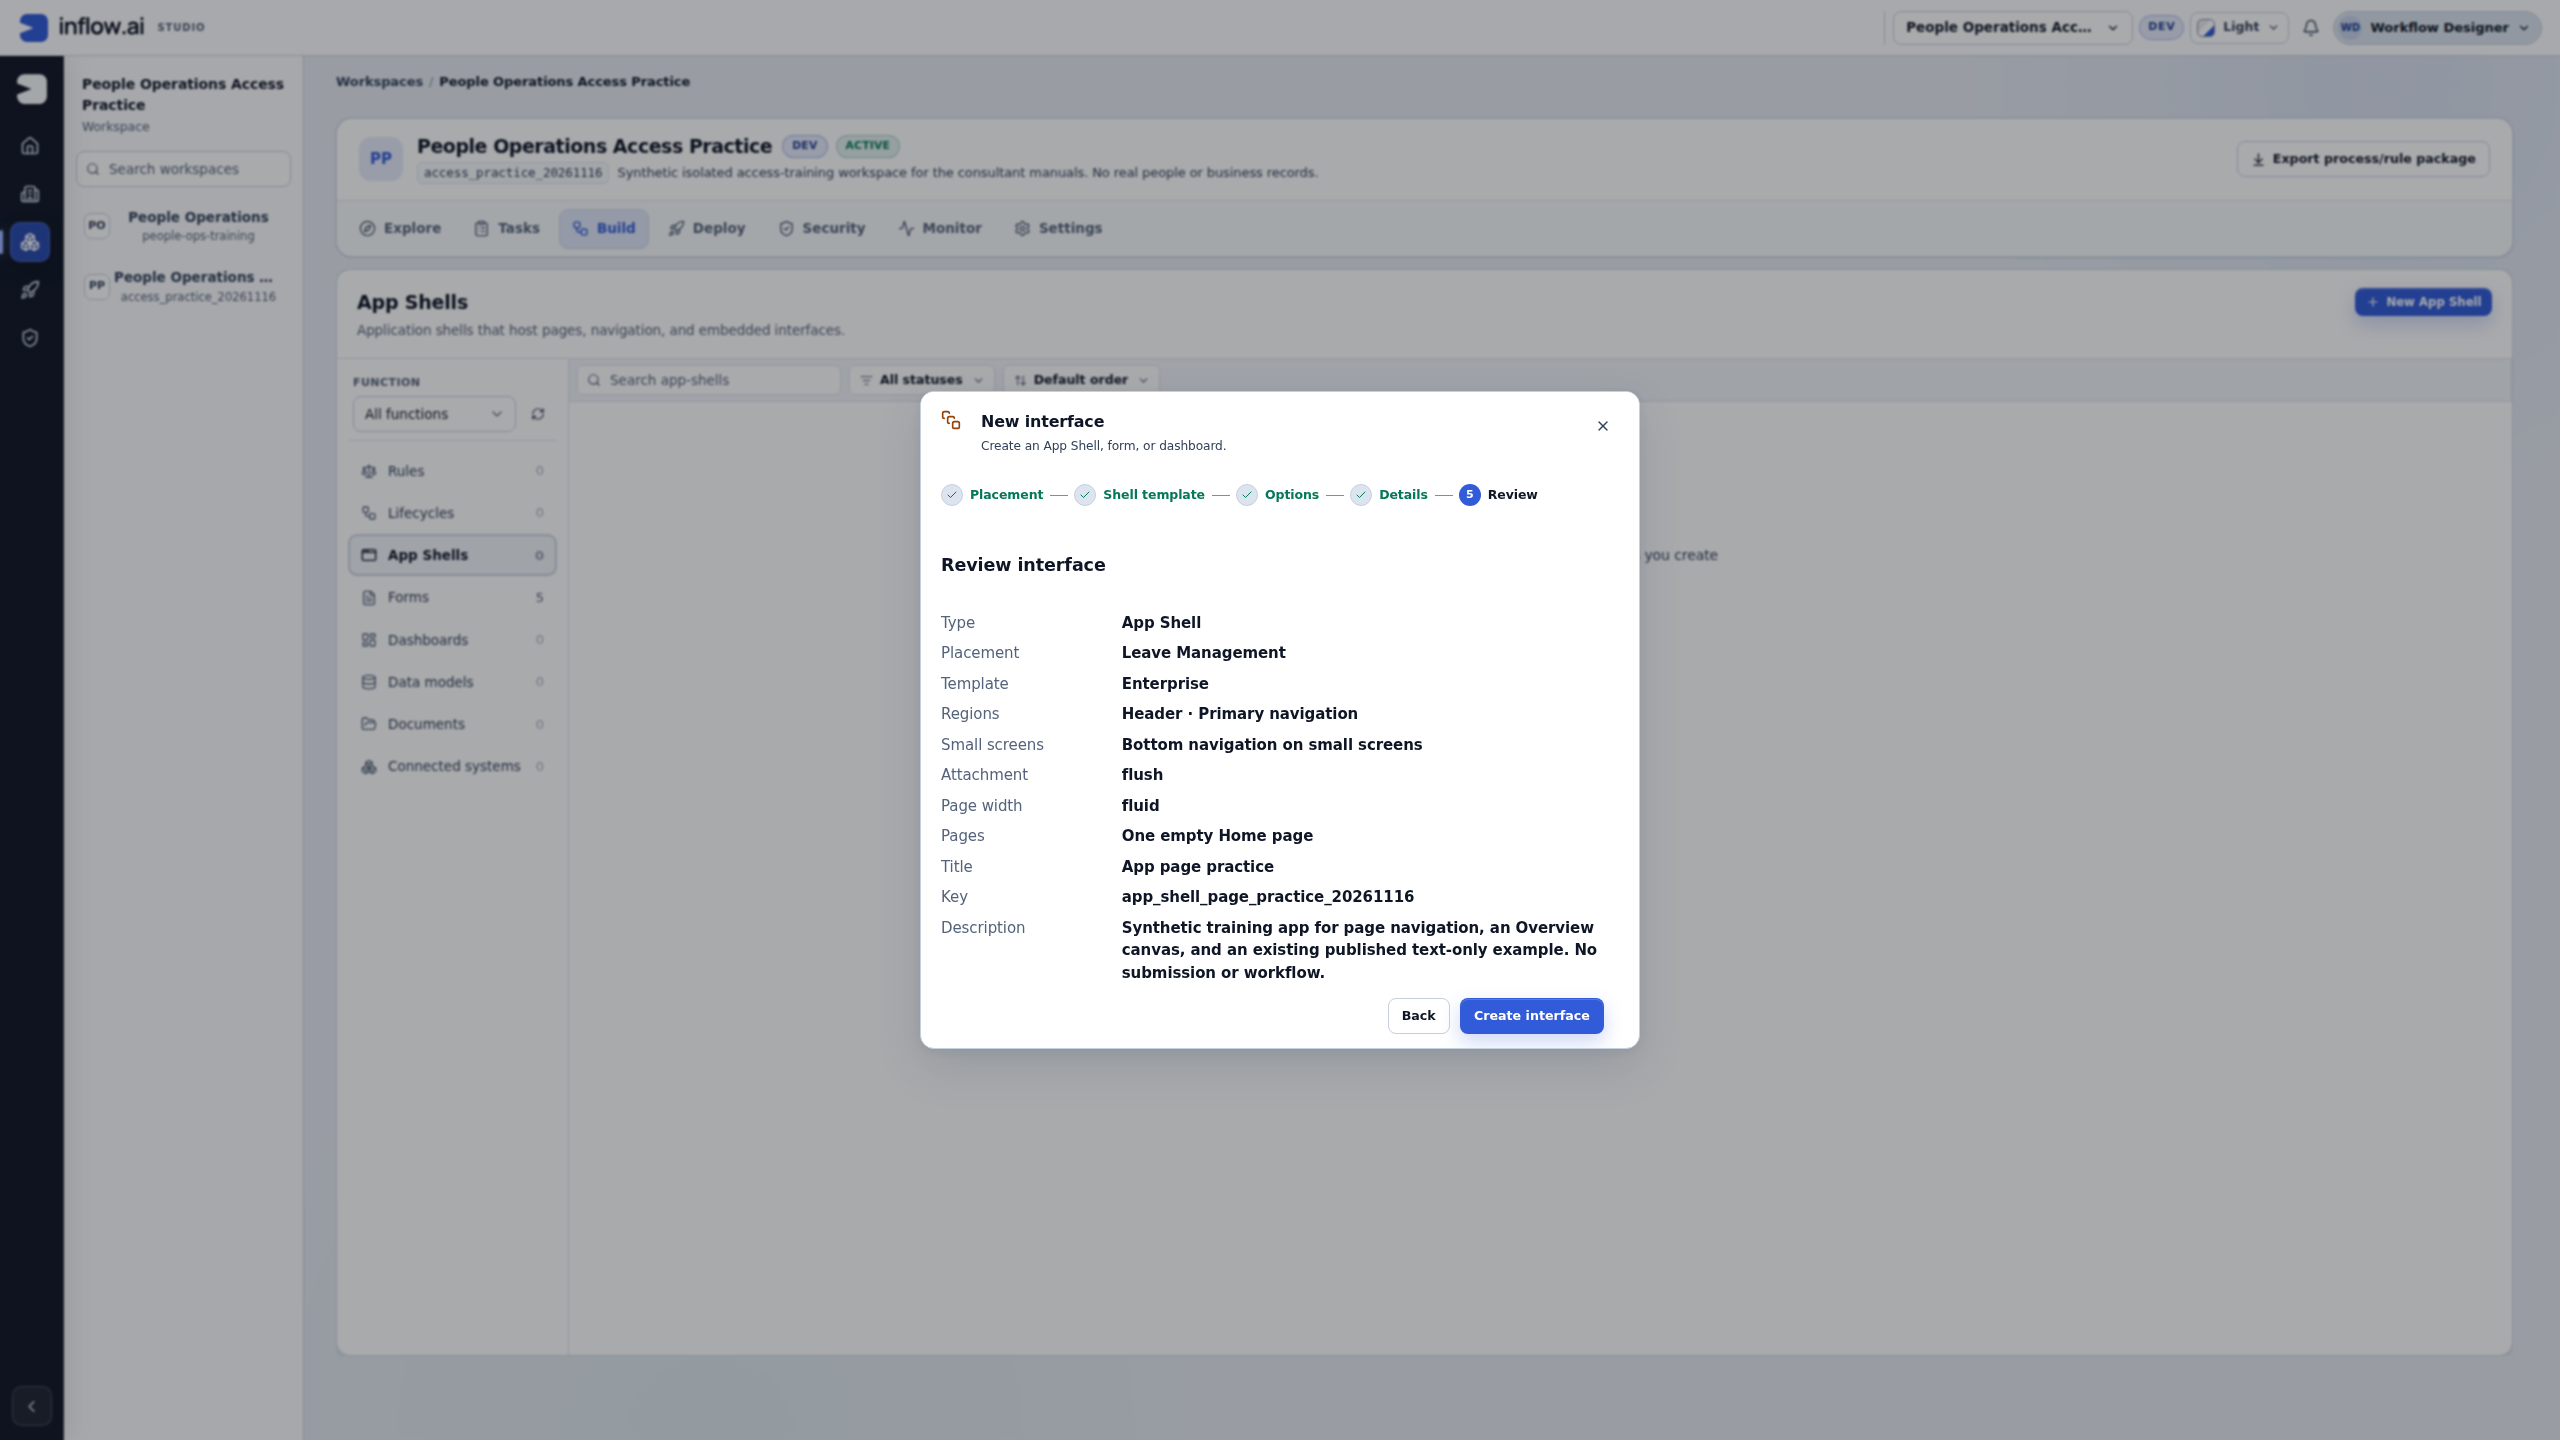
In Review, check the placement, template, page plan, title and key. Choose Create interface once, then wait for Designer. If confirmation is uncertain, check whether that definition already exists before creating another one.
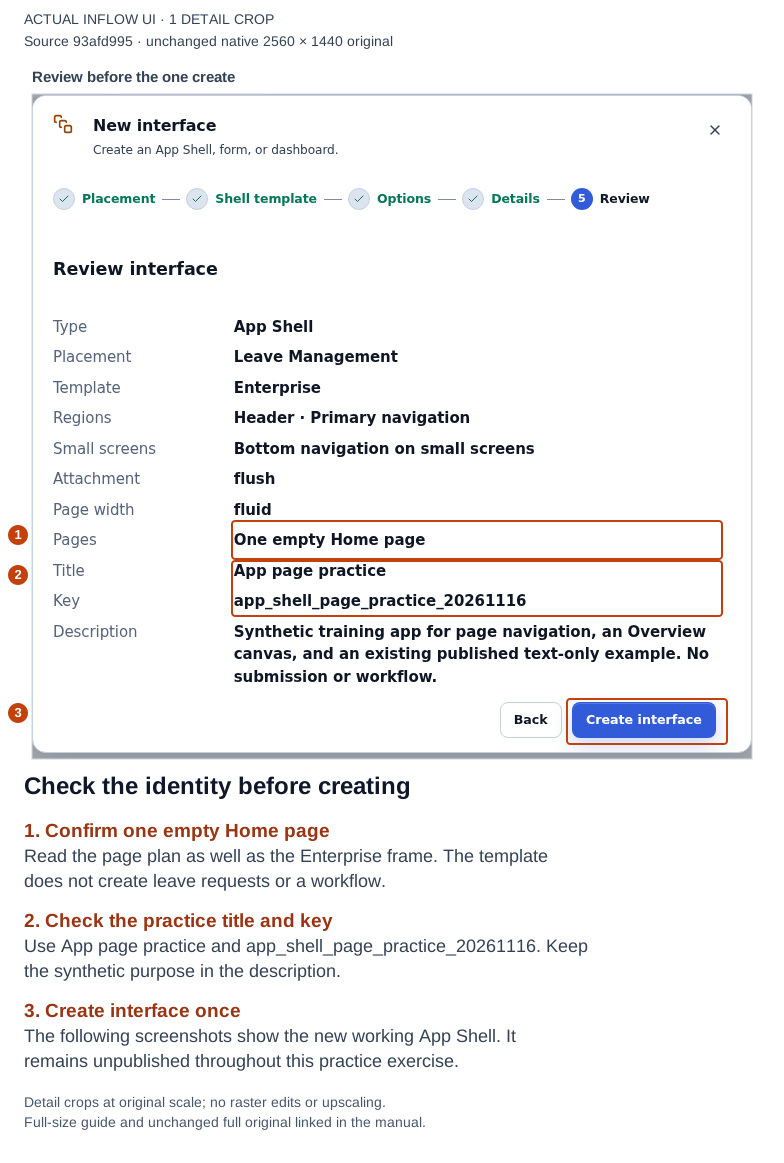
This review was followed by one actual create. Open the unchanged native original.
3. Read the Pages panel before editing
The new shell opens with Home selected. The Pages panel lists shell regions, followed by pages. Header and Primary navigation describe the frame; they are not extra application pages. Home is the initial canvas, and Add page creates another page.
Keep Home unchanged. Its Stack contains Target area: main. A target area is where an interface opened within the page can render. For this static exercise, keep that target area and add the explanation as other children of the new Overview page's Stack.
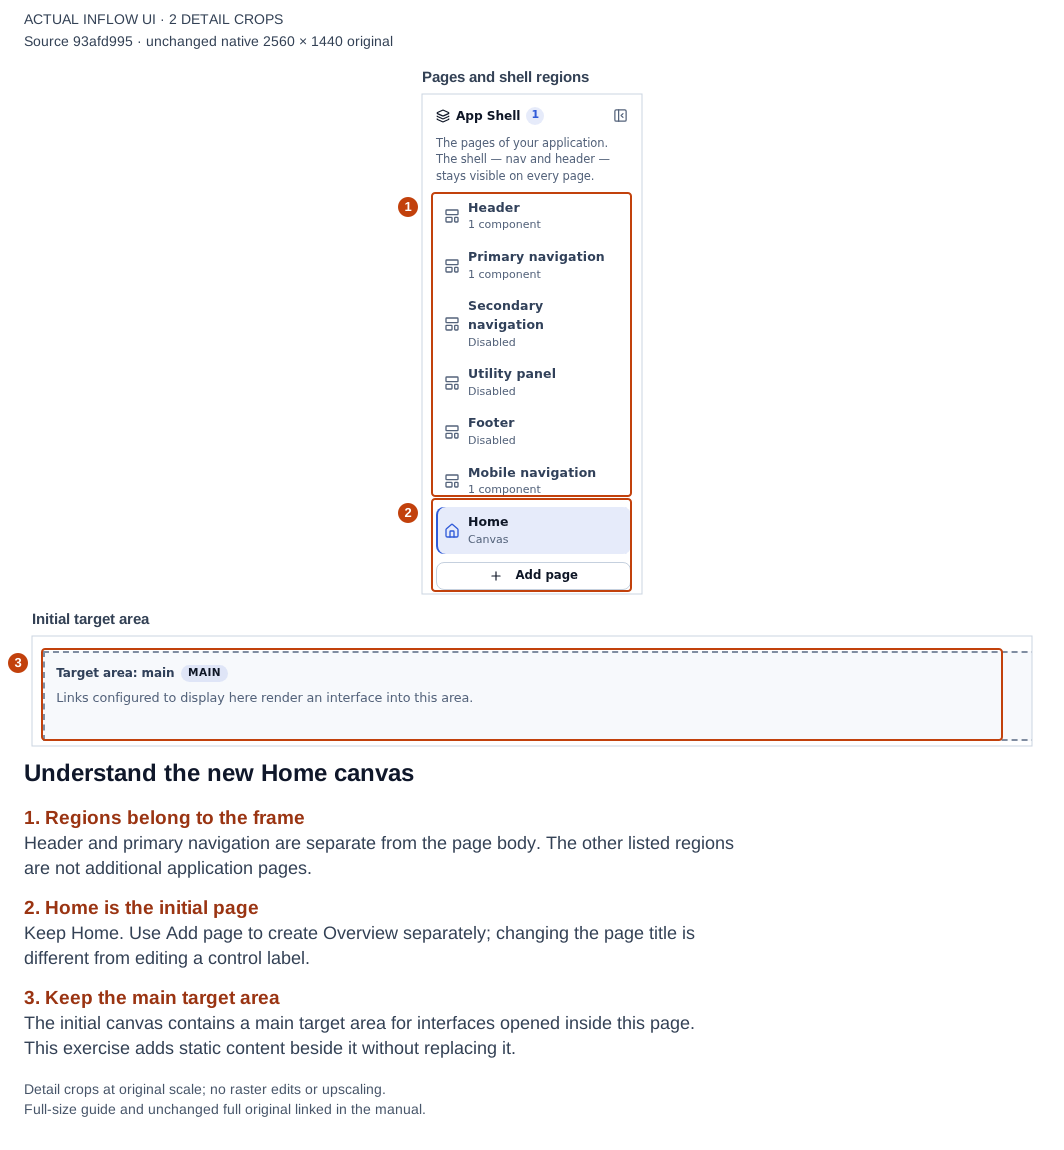
The shell exists as a working draft. Open the unchanged native original.
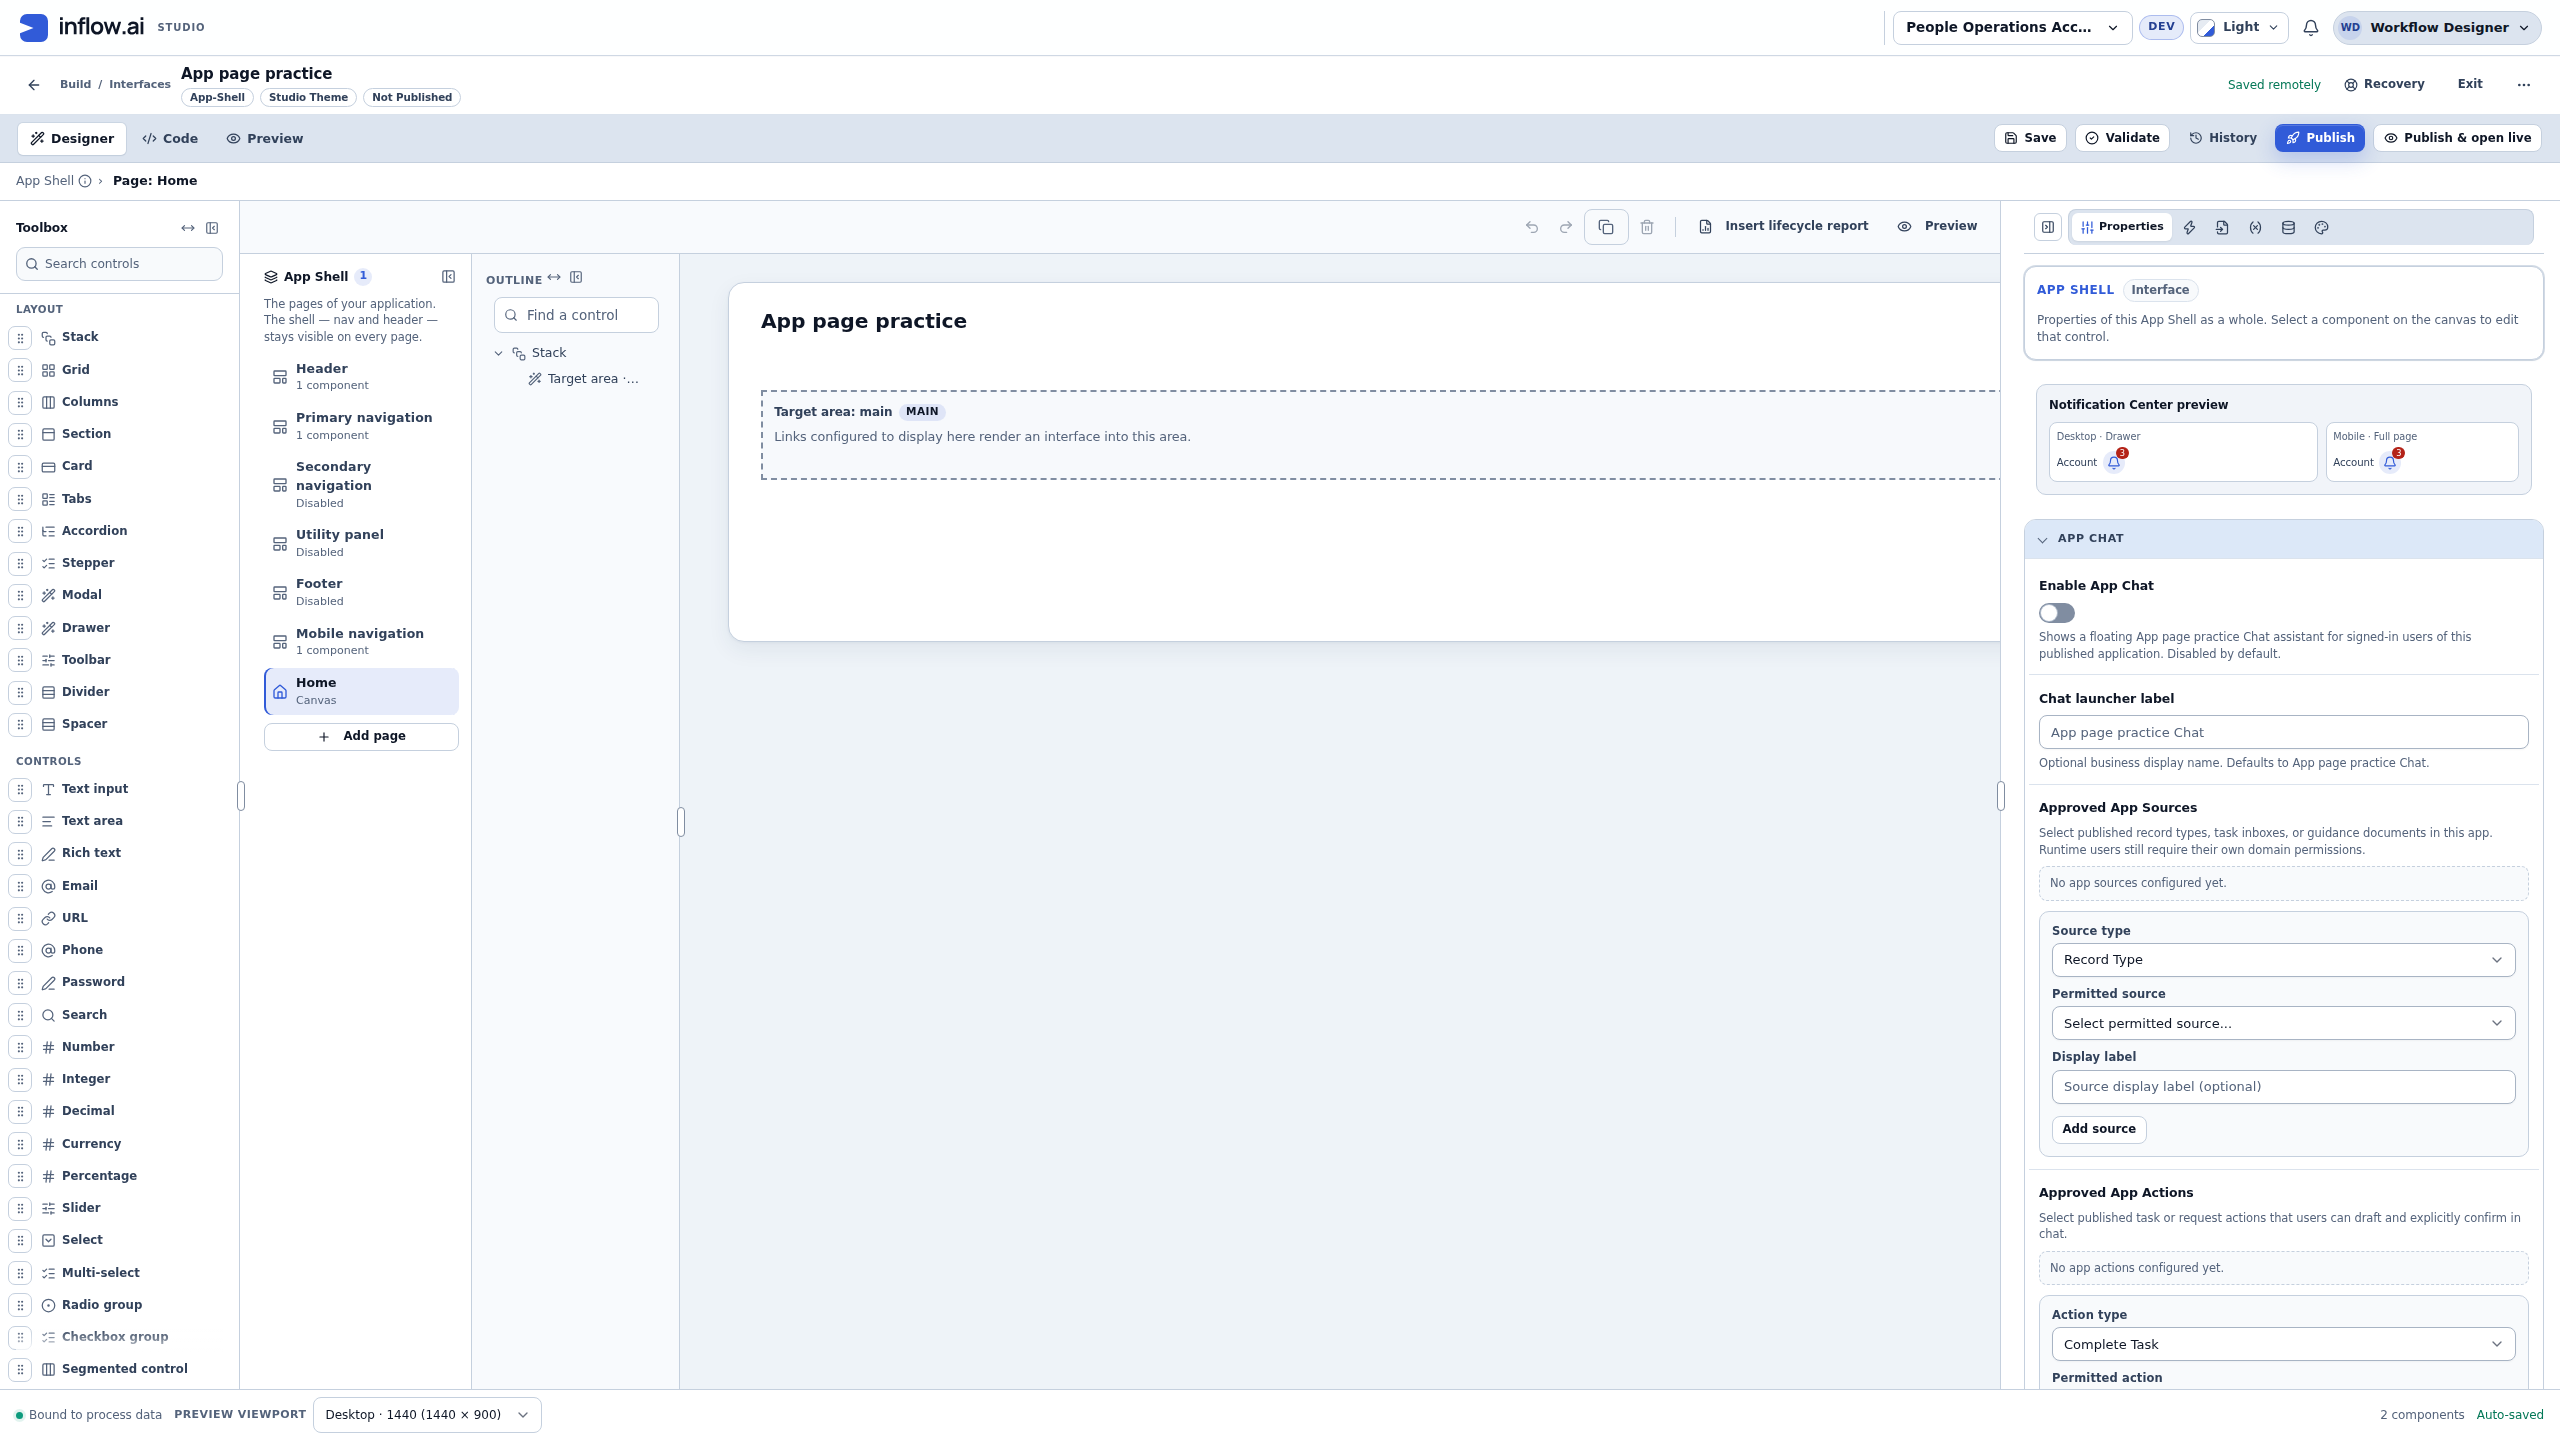
4. Design the Overview canvas
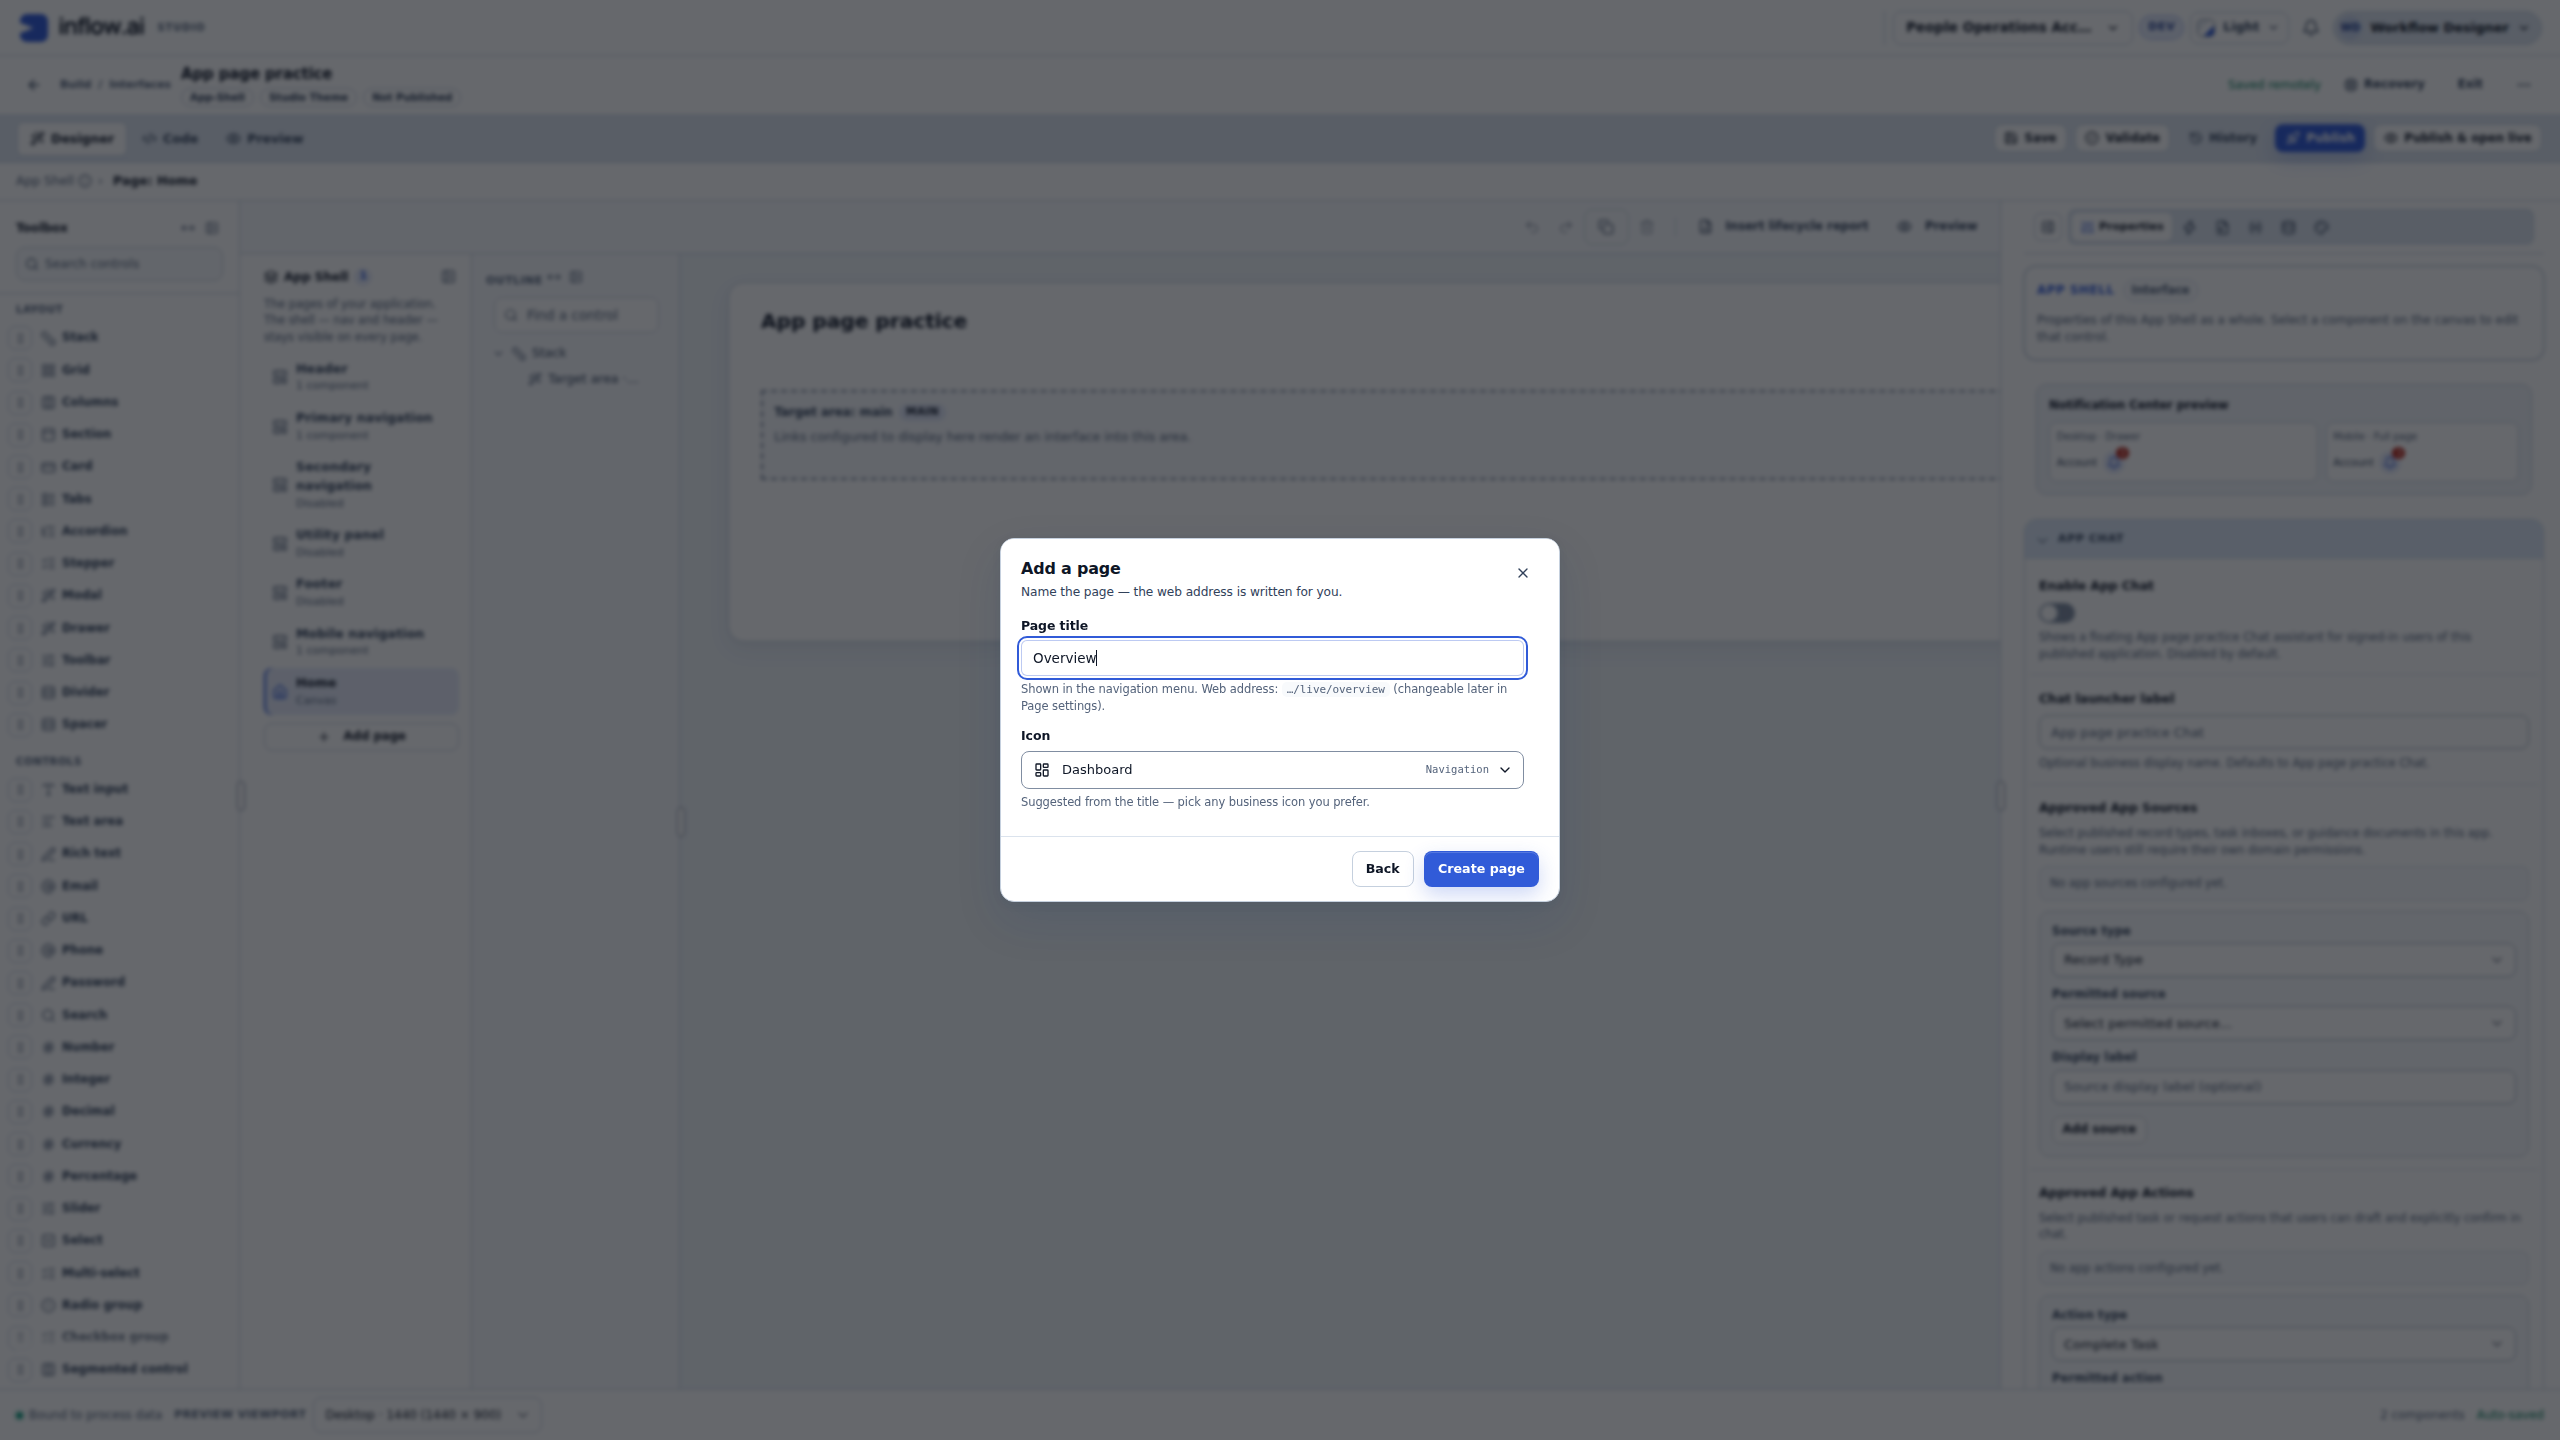
Choose Add page → Design a page. Enter Overview as the Page title. Read the proposed address ending in overview, then choose Create page. The new Overview entry becomes selected. You can inspect the address later in Page settings.
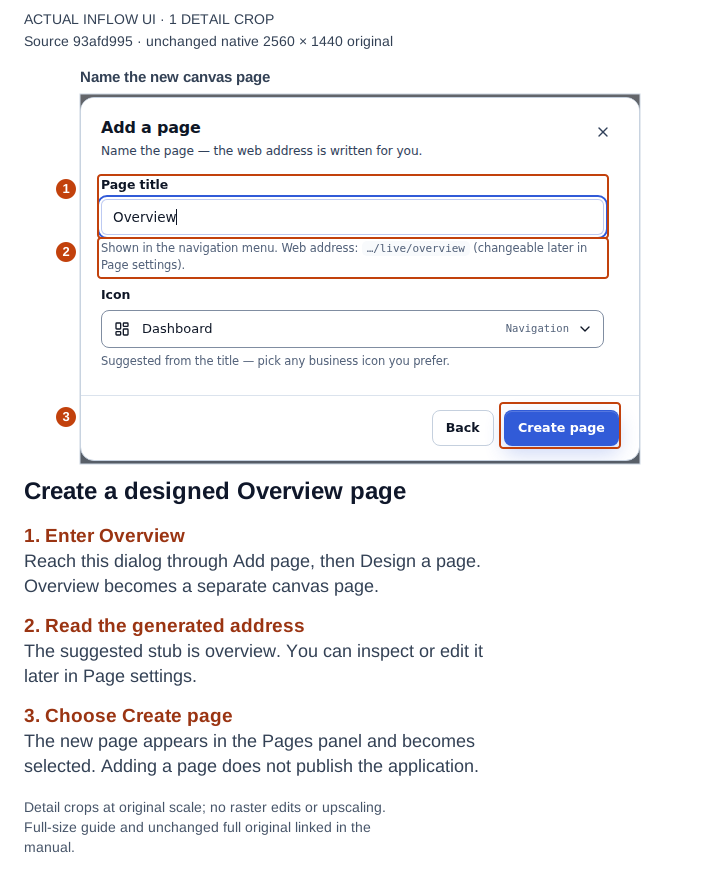
Open the unchanged native original.
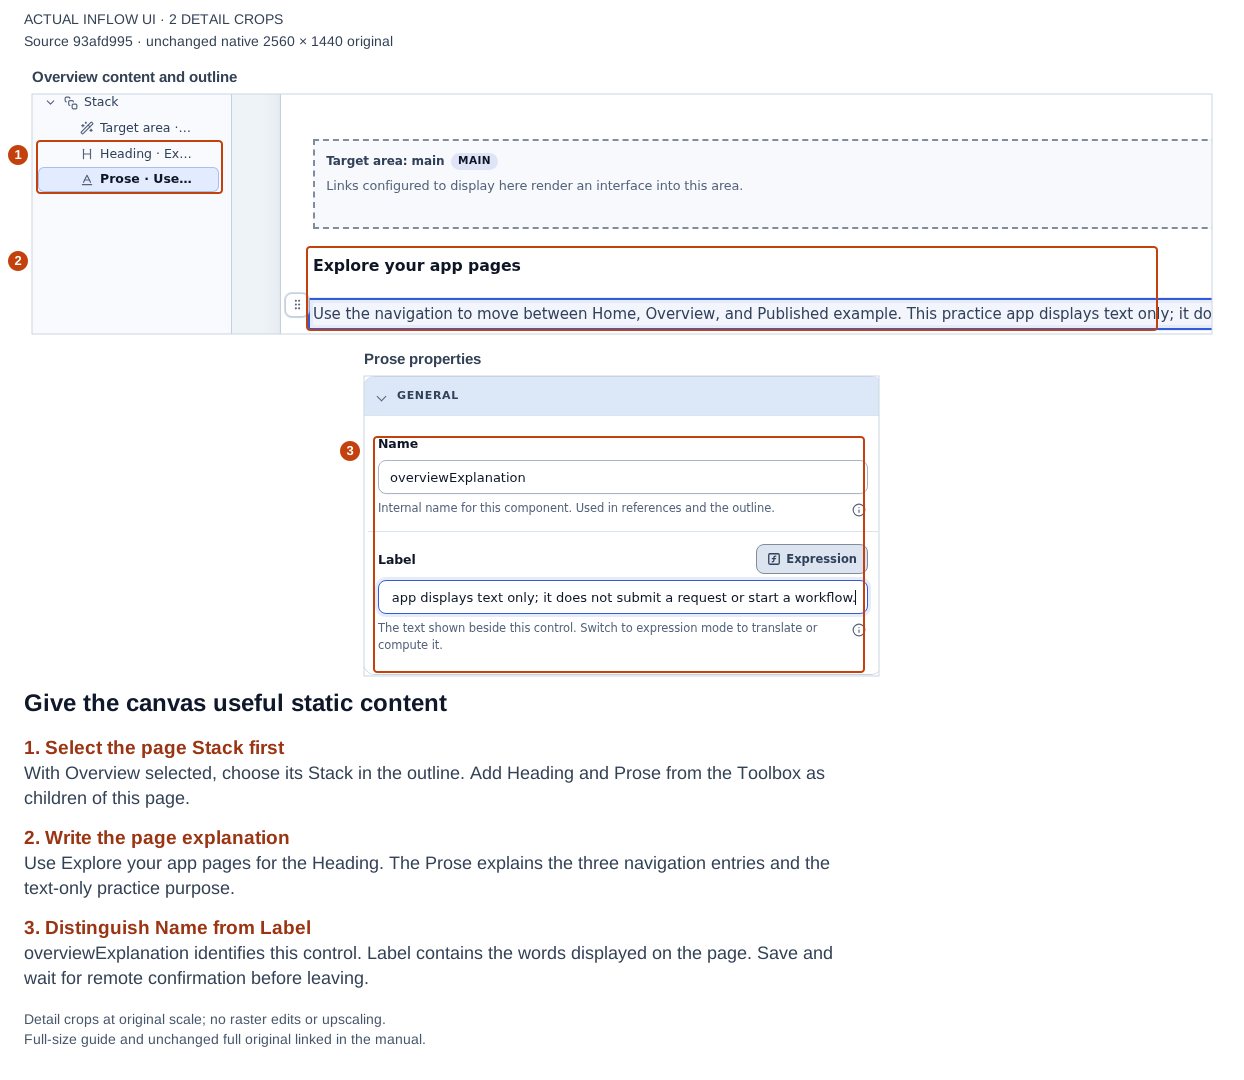
With Overview selected, choose its Stack in the outline. Add Heading from the Toolbox. In Properties set Name to overviewHeading and Label to Explore your app pages. Select the page Stack again before adding Prose, so the explanation is another child of the same page rather than an accidental selection elsewhere.
Set the Prose Name to overviewExplanation. Set its Label to:
Use the navigation to move between Home, Overview, and Published example. This practice app displays text only; it does not submit a request or start a workflow.
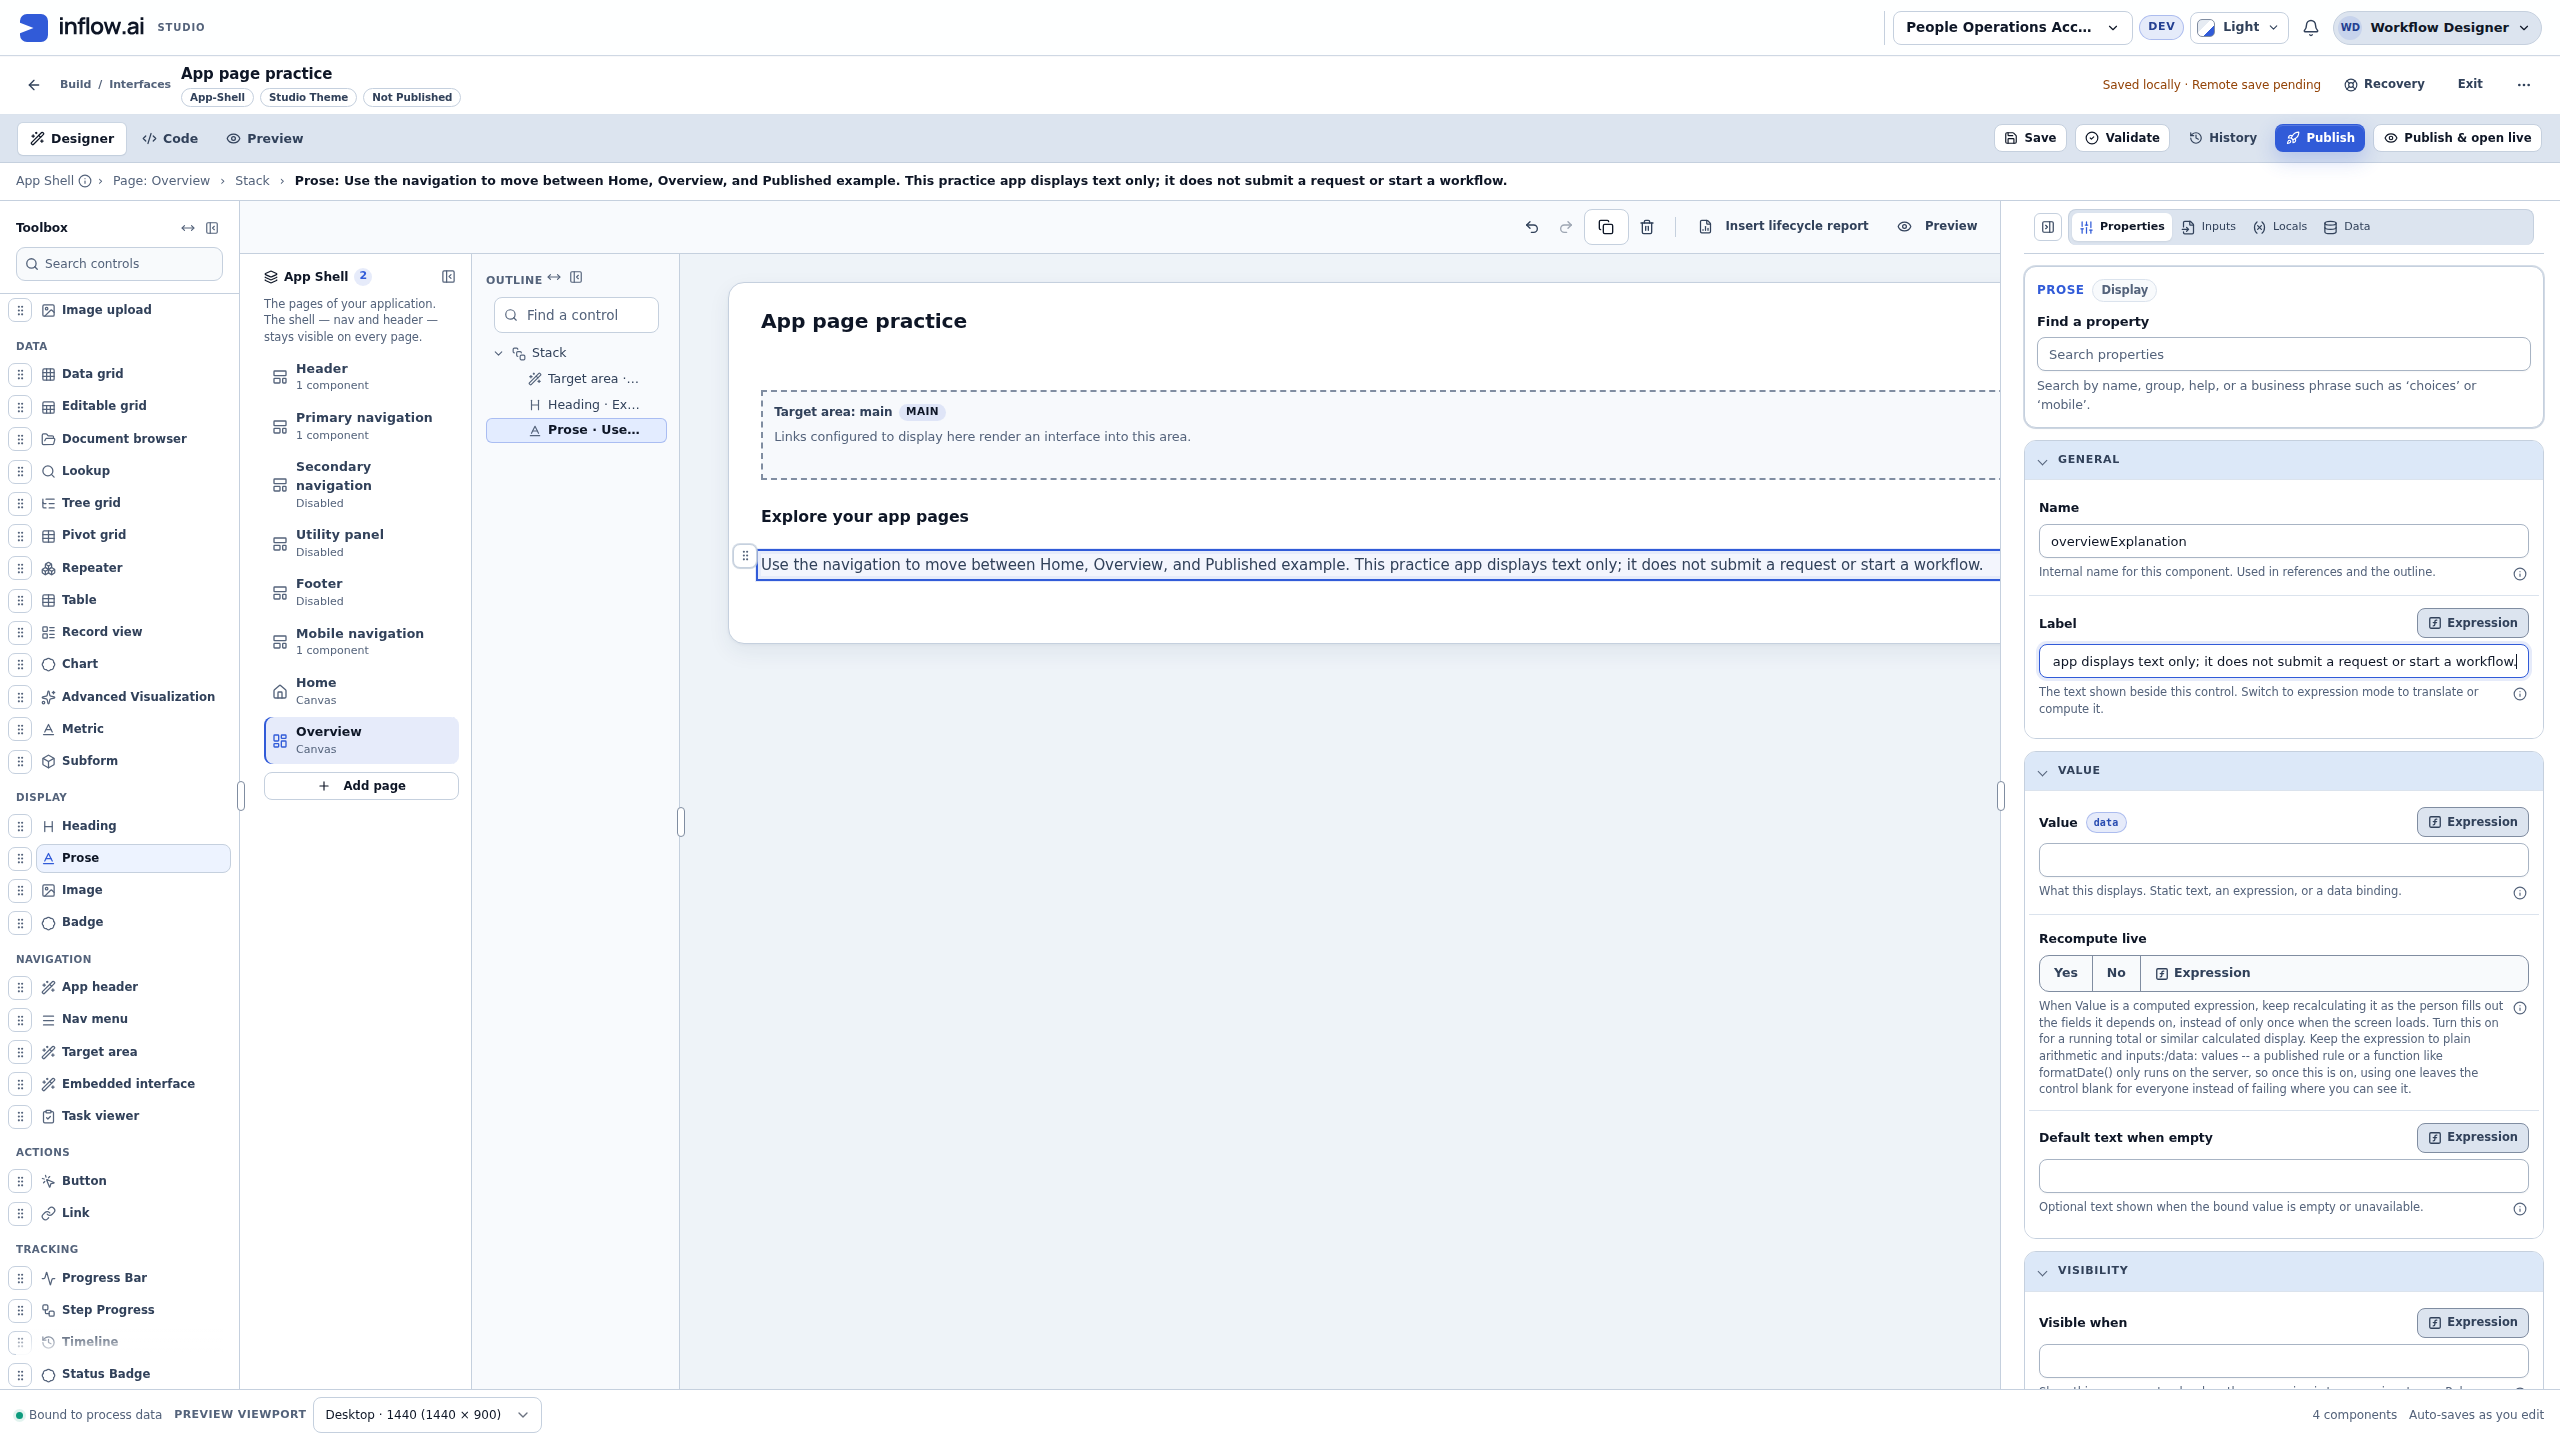
The Name identifies the control. The Label contains the words the reader sees. You do not need a business data binding or form input for this static explanation. Choose Save and wait for Saved remotely; a local-save or remote-pending message is not yet that confirmation.
This image records editing before remote save completes. The later reopen checks show the saved content. Open the unchanged native original.
5. Add a page that shows a published interface
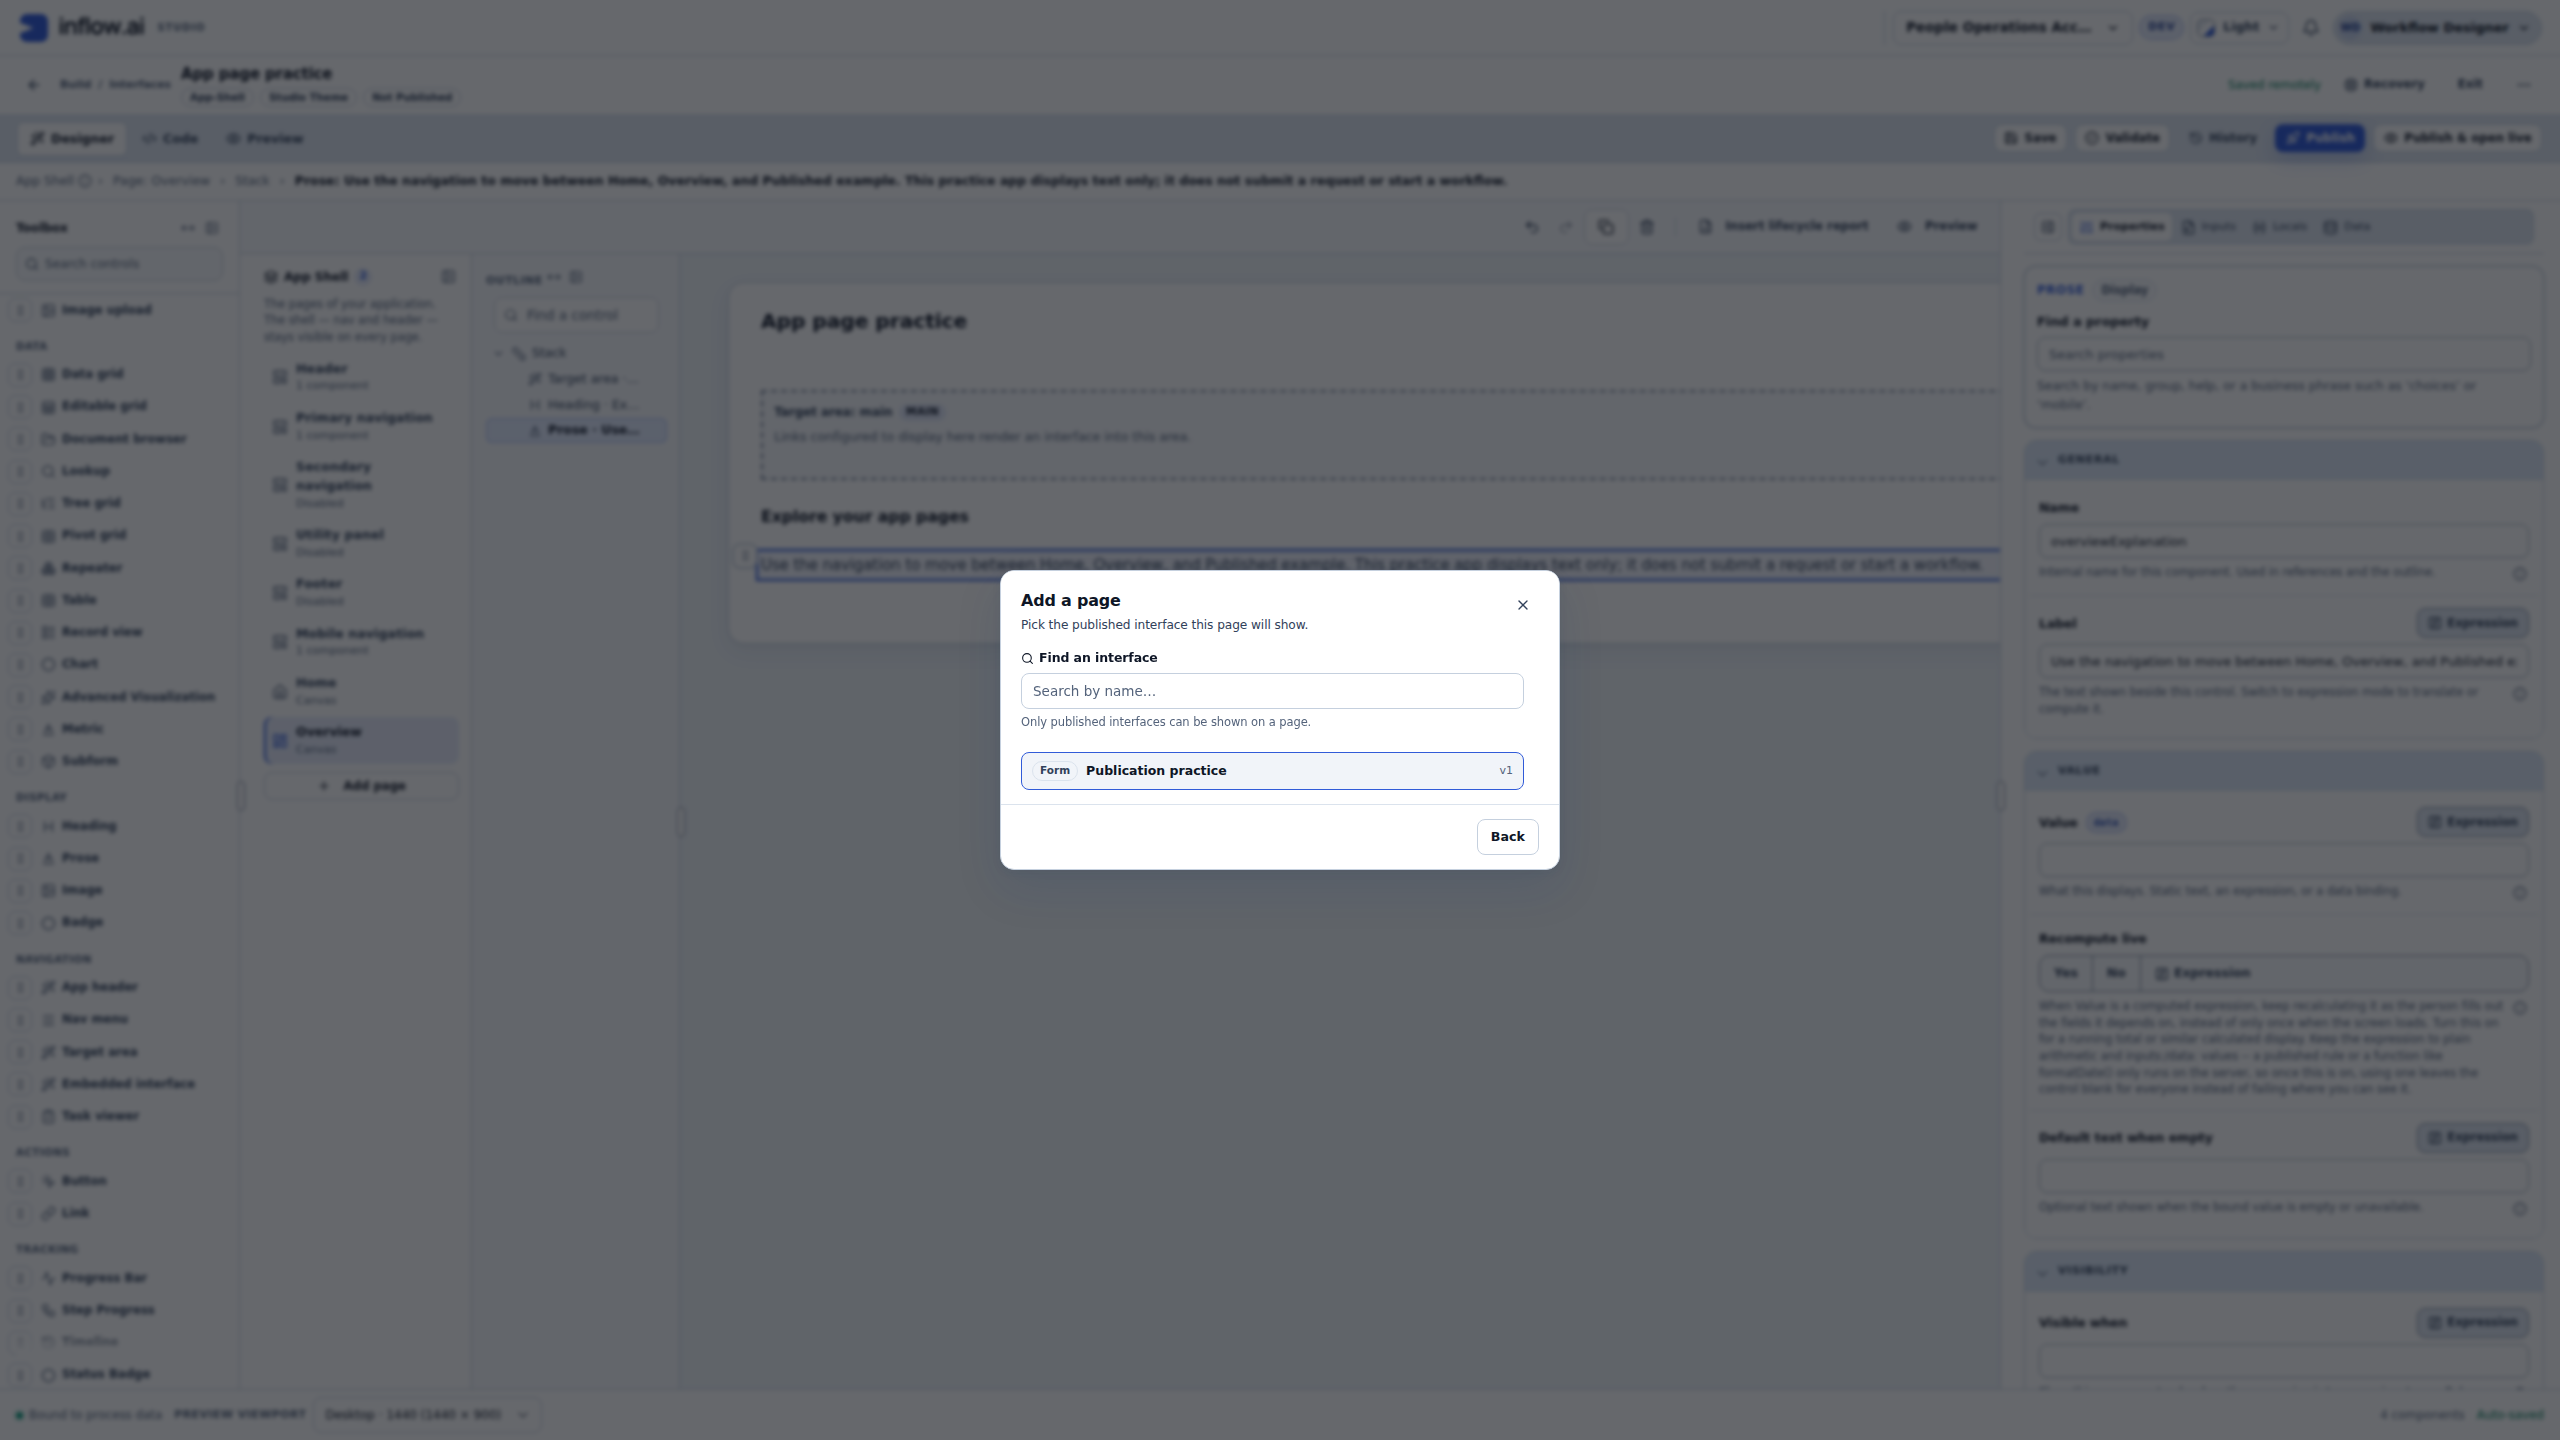
Choose Add page → Show an existing interface. The picker lists published interfaces available in this context. In the example, choose Publication practice v1. An unpublished draft will not appear merely because it has been saved. If your intended interface is missing, check the workspace, publication and permitted access with its owner; do not guess a free-typed key or borrow a different account.
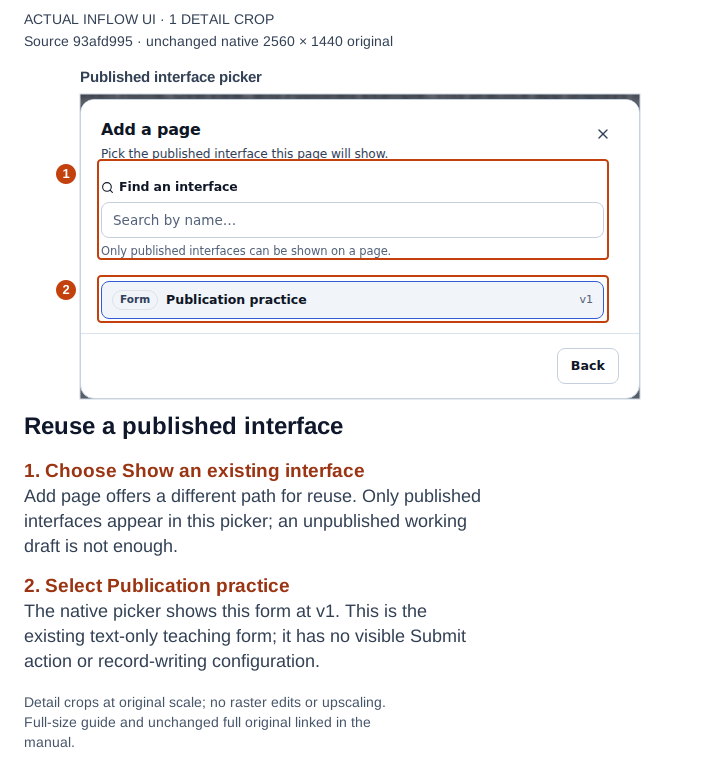
Open the unchanged native original.
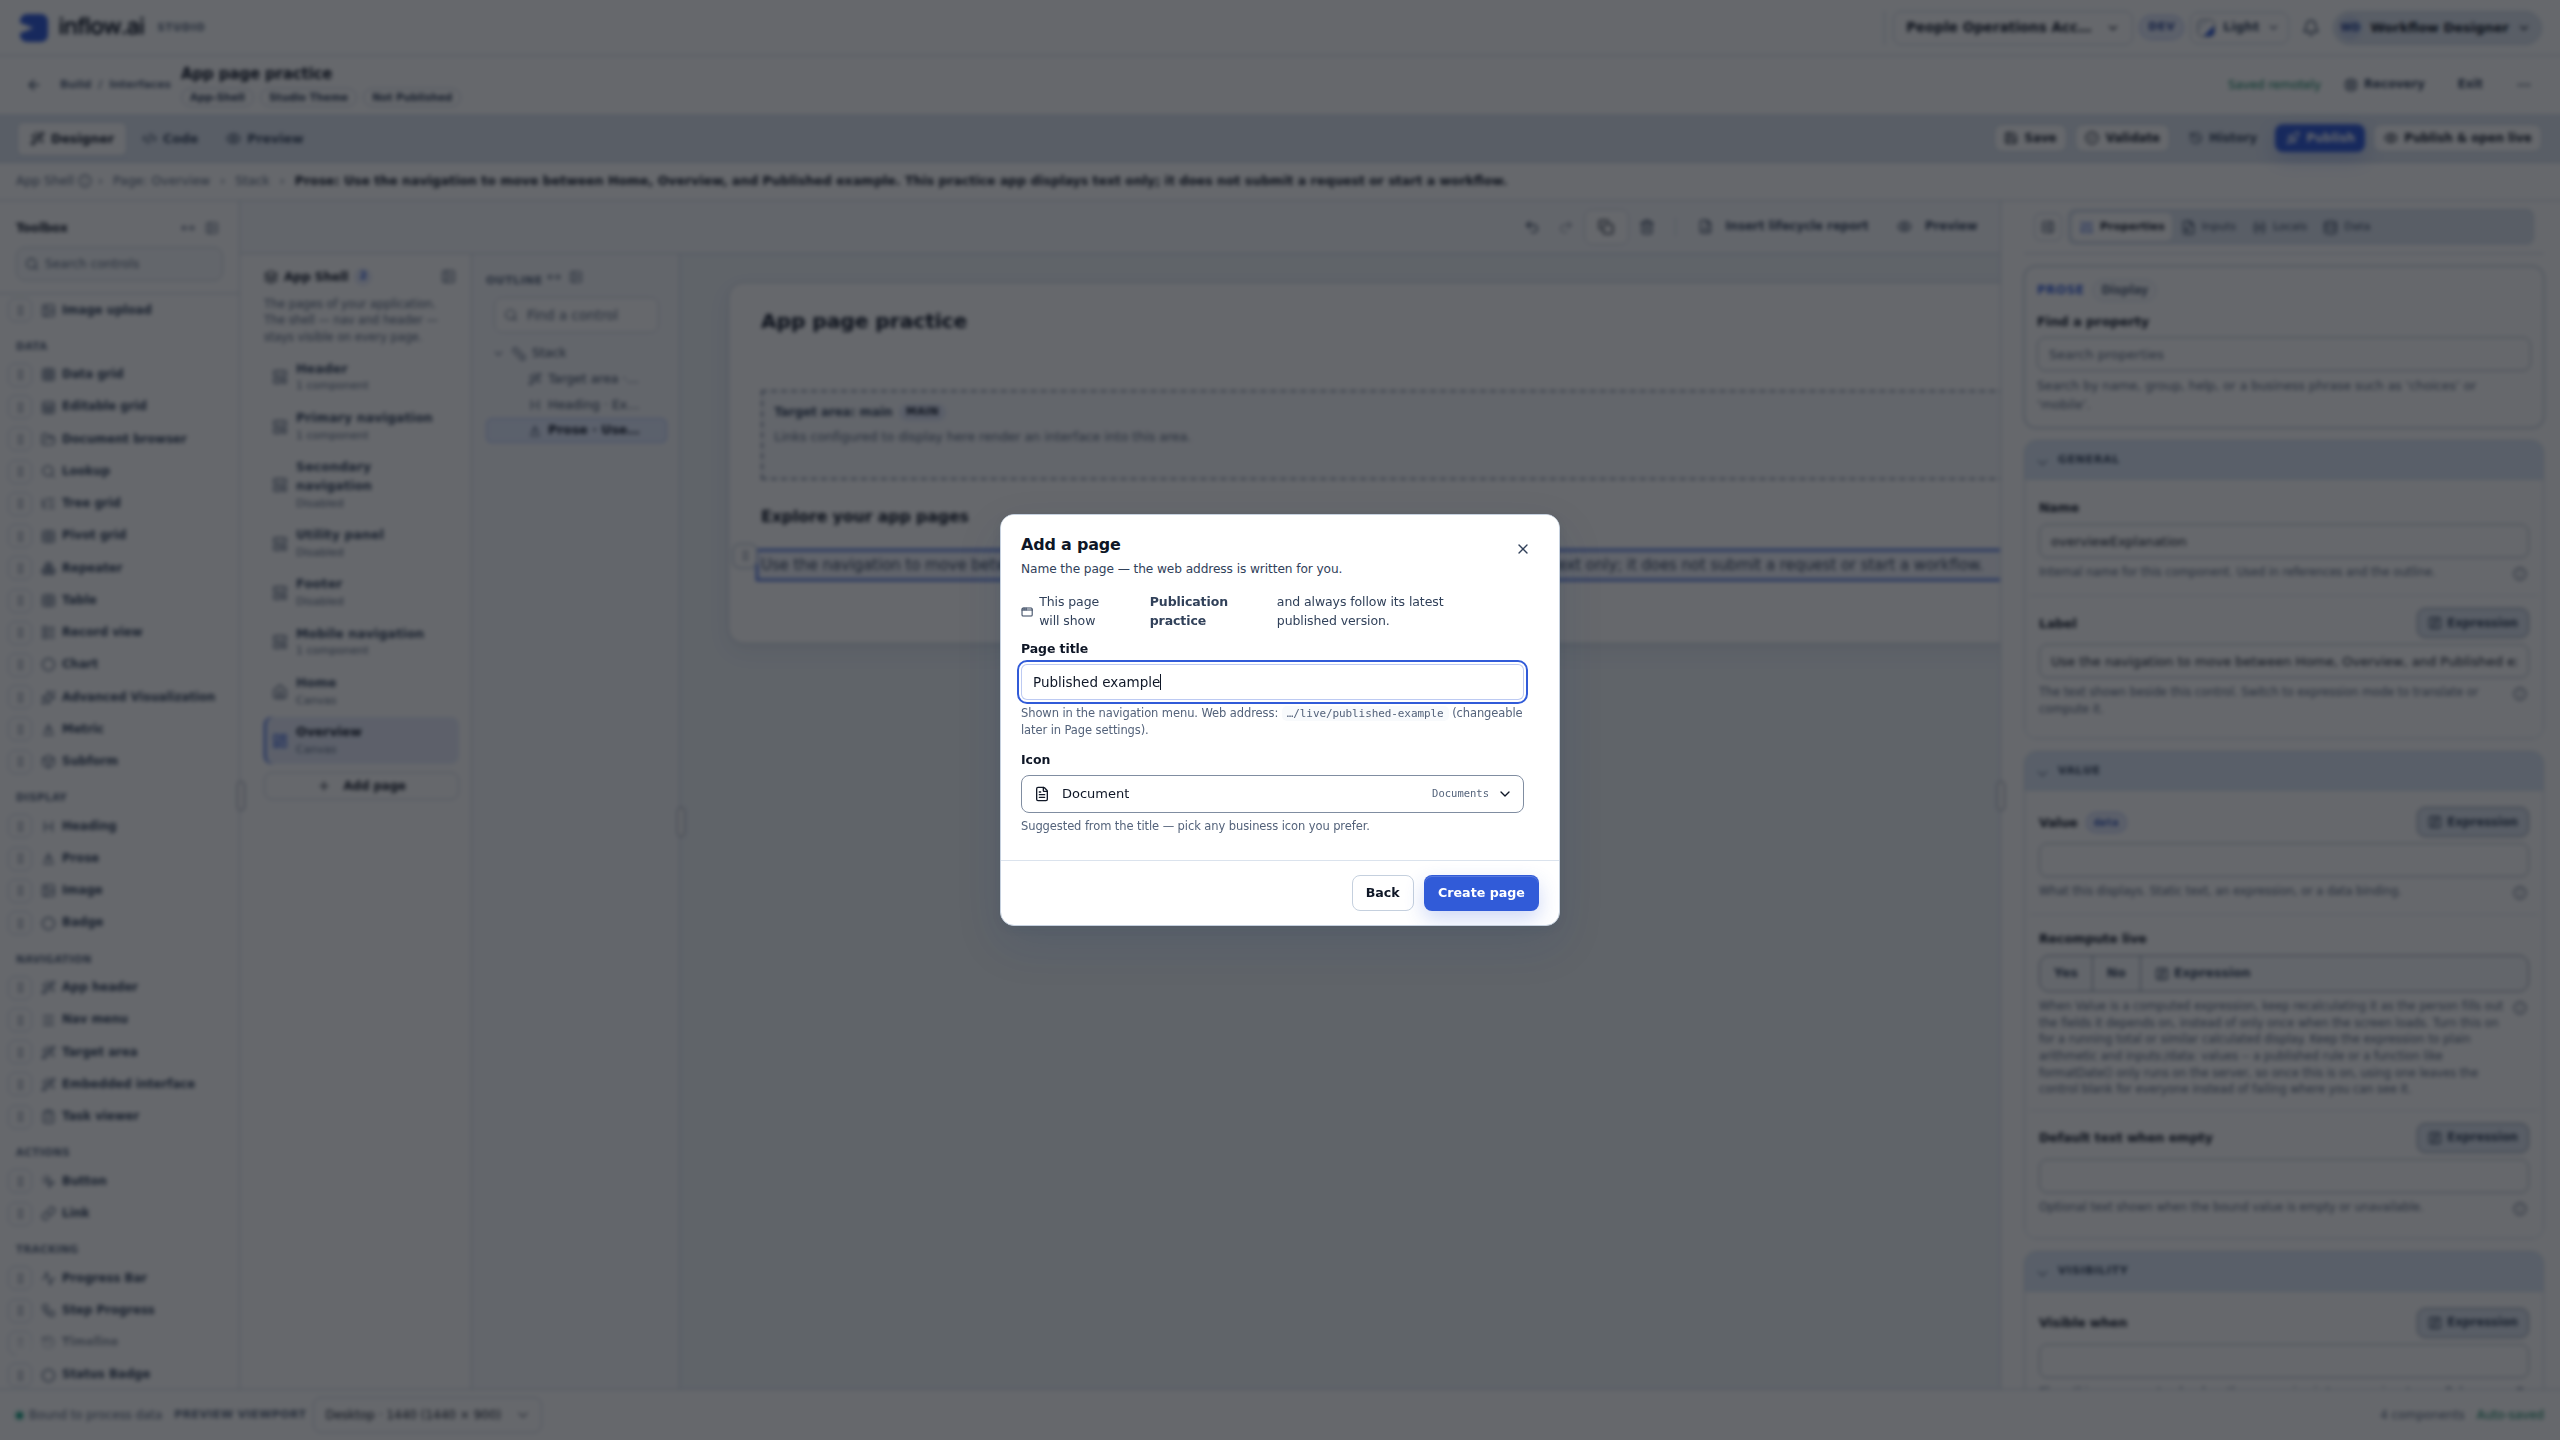
Change the Page title to Published example. This names the page's menu entry; it does not rename the underlying Publication practice form. Read the proposed published-example address, then choose Create page once.
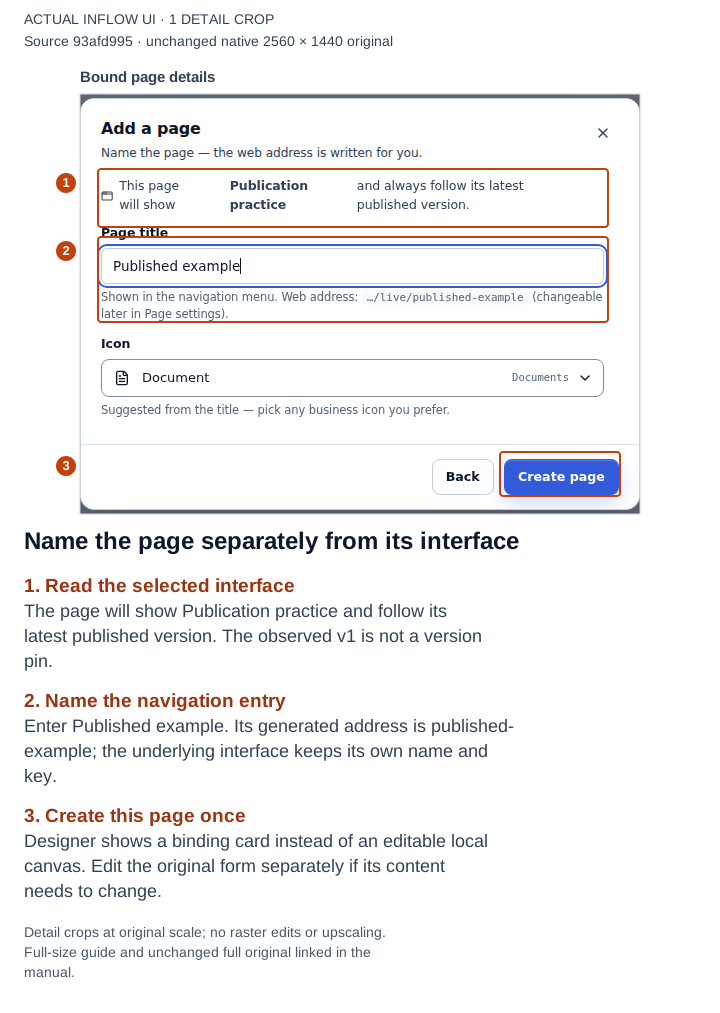
Open the unchanged native original.
Designer now shows This page shows Publication practice, rather than an editable local canvas. Use Page settings to inspect the title, URL stub, visibility and Interface to show. Keep the current mode and visibility in this exercise. Choose Cancel when inspecting without making a change.
The page follows the selected interface's latest published version. The v1 shown here describes the release available during the recording. It is not a version pin. Saving a later form draft does not change this page's published content; publishing a later form release can. Plan that form release with the app owner even when the shell itself needs no edit.
The visibility text also matters: hiding a menu entry with a condition does not grant or revoke authorization. The selected interface retains its own permissions. This designer's successful Preview does not establish what an employee or manager may access.
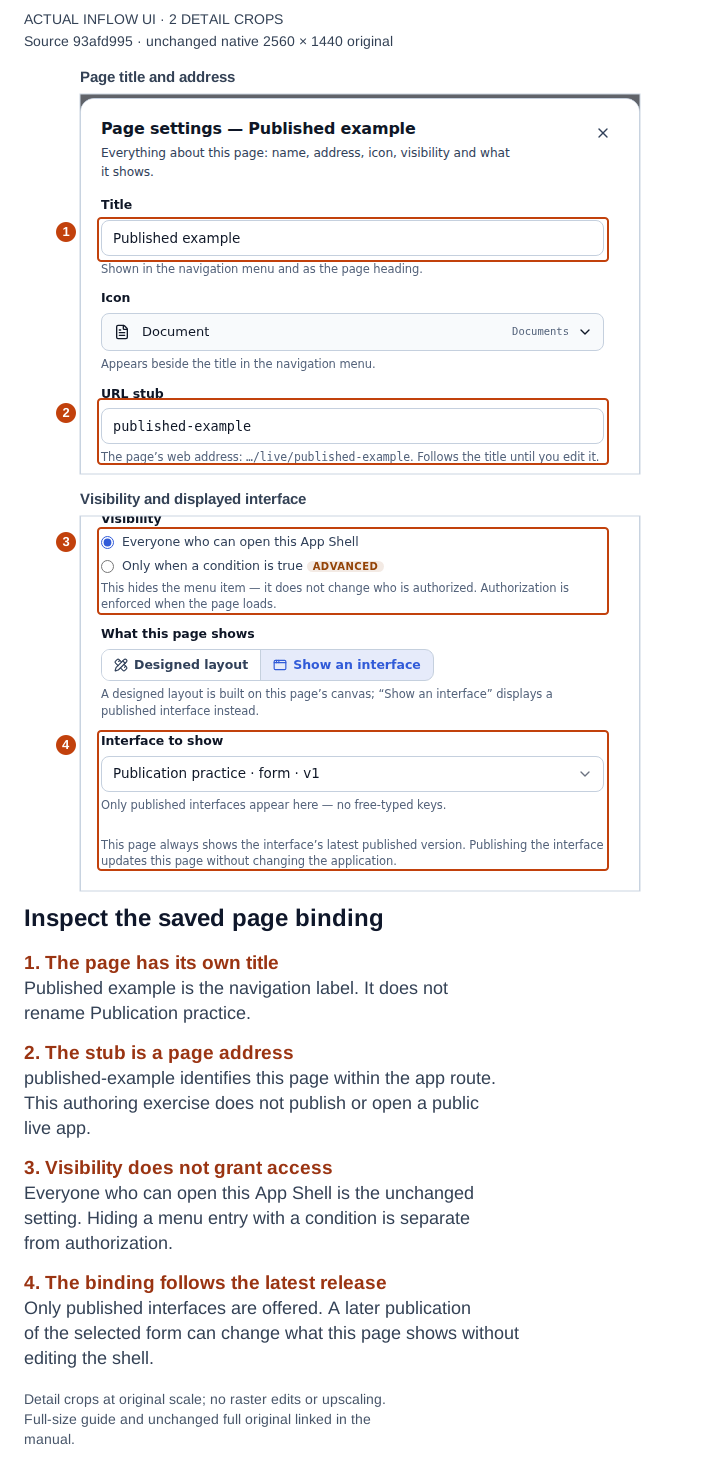
Settings were inspected again after reopening the saved draft. Open the unchanged native original.
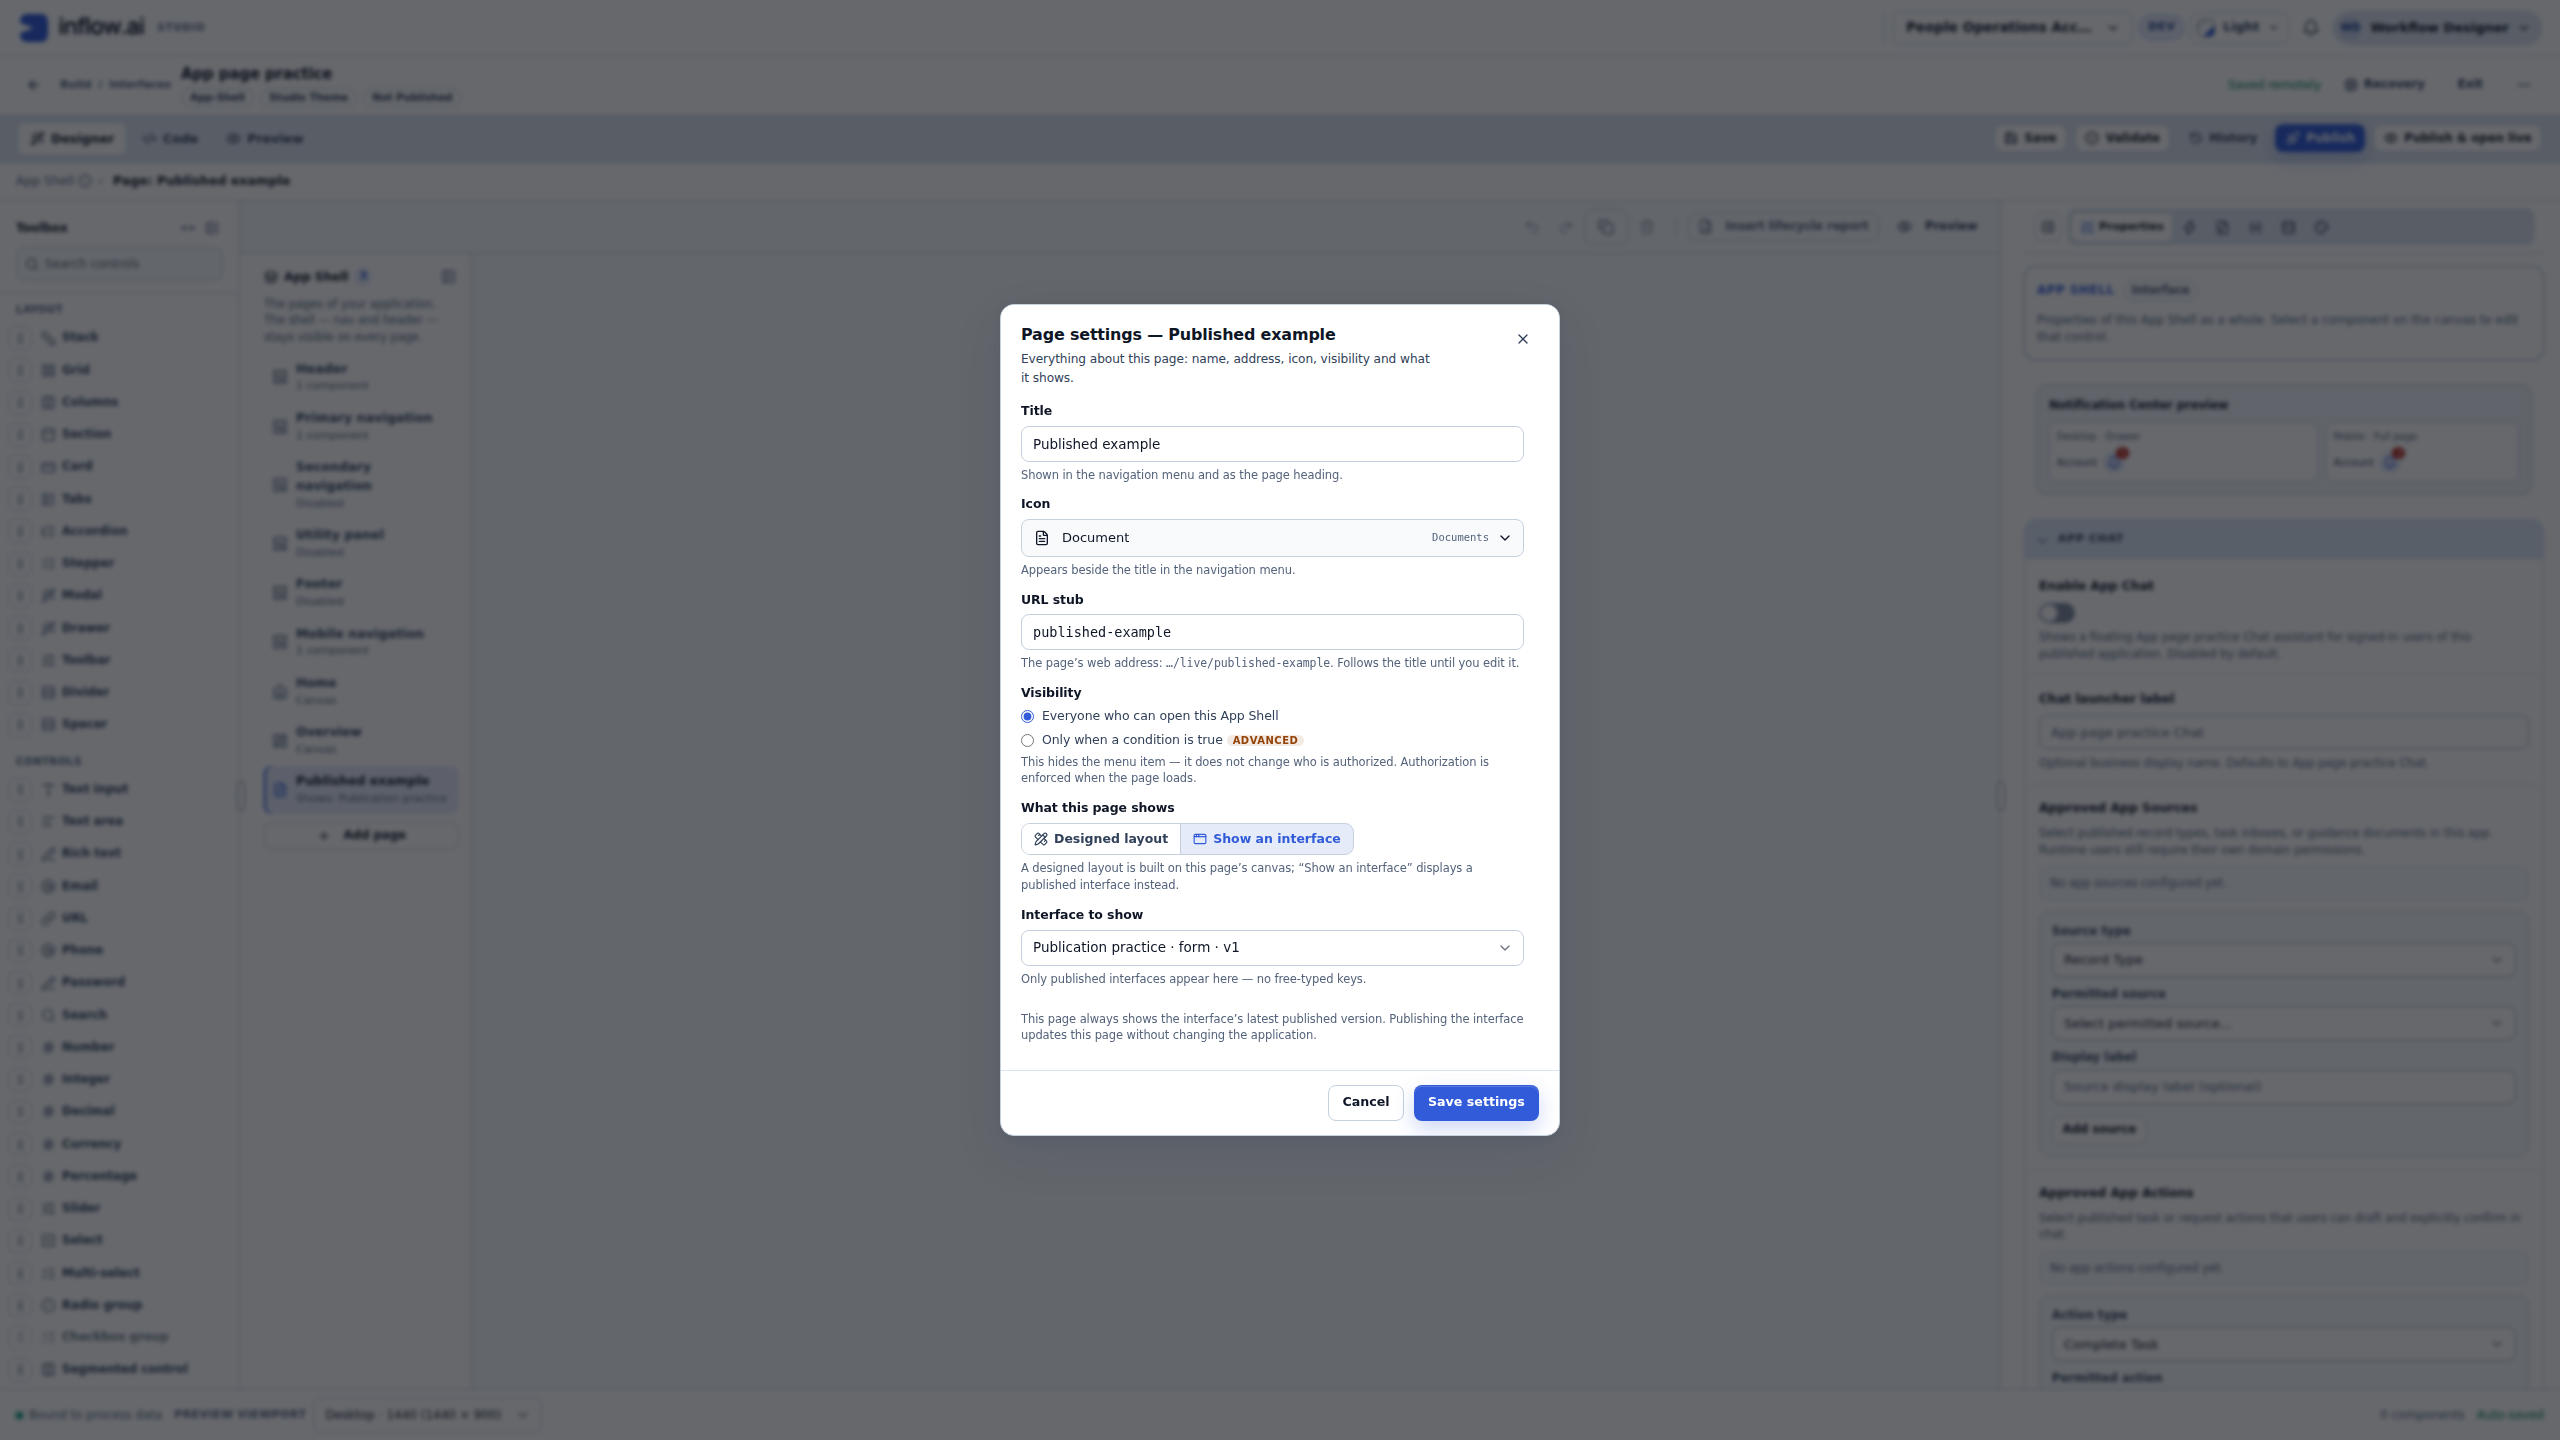
6. Save, reopen and navigate the result
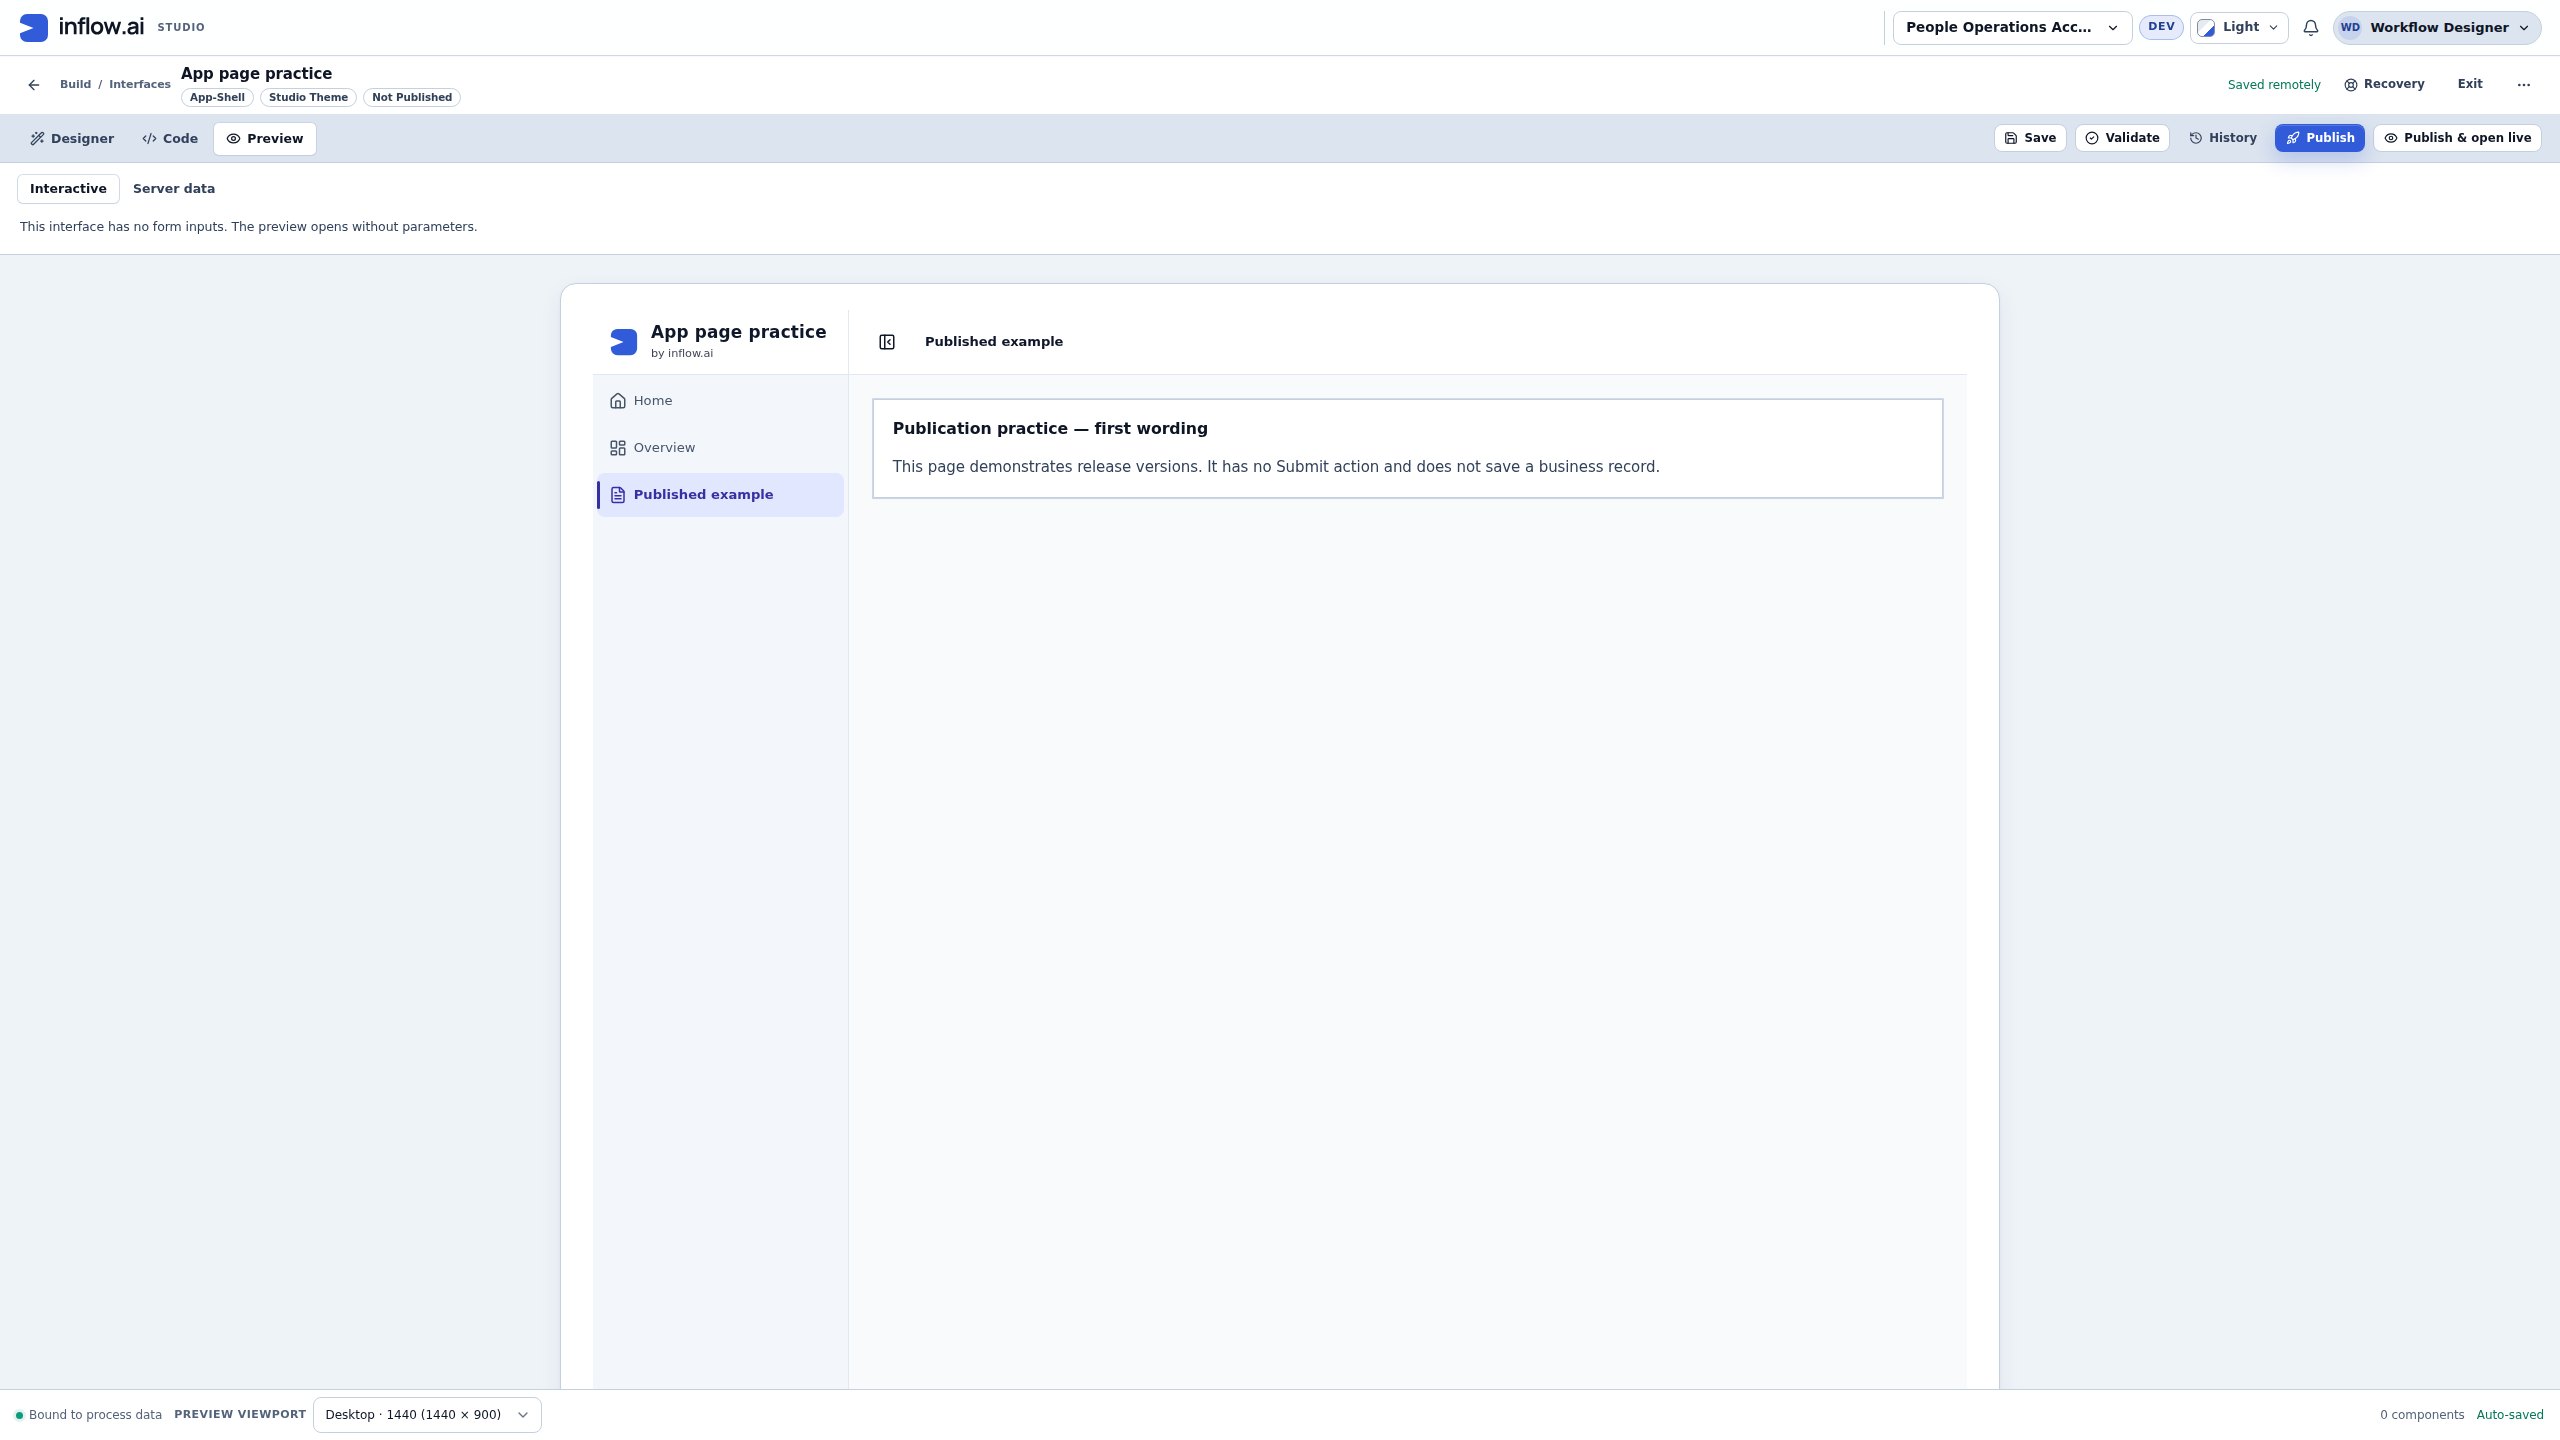
Save the shell and wait for remote confirmation. Reopen the same definition; do not create a replacement shell. Confirm that Home, Overview and Published example remain in the Pages panel. Then choose the top-level Preview tab and keep Interactive selected.
- Choose Home in the app menu. It is the original empty page.
- Choose Overview. Check for Explore your app pages and the complete explanation beneath it.
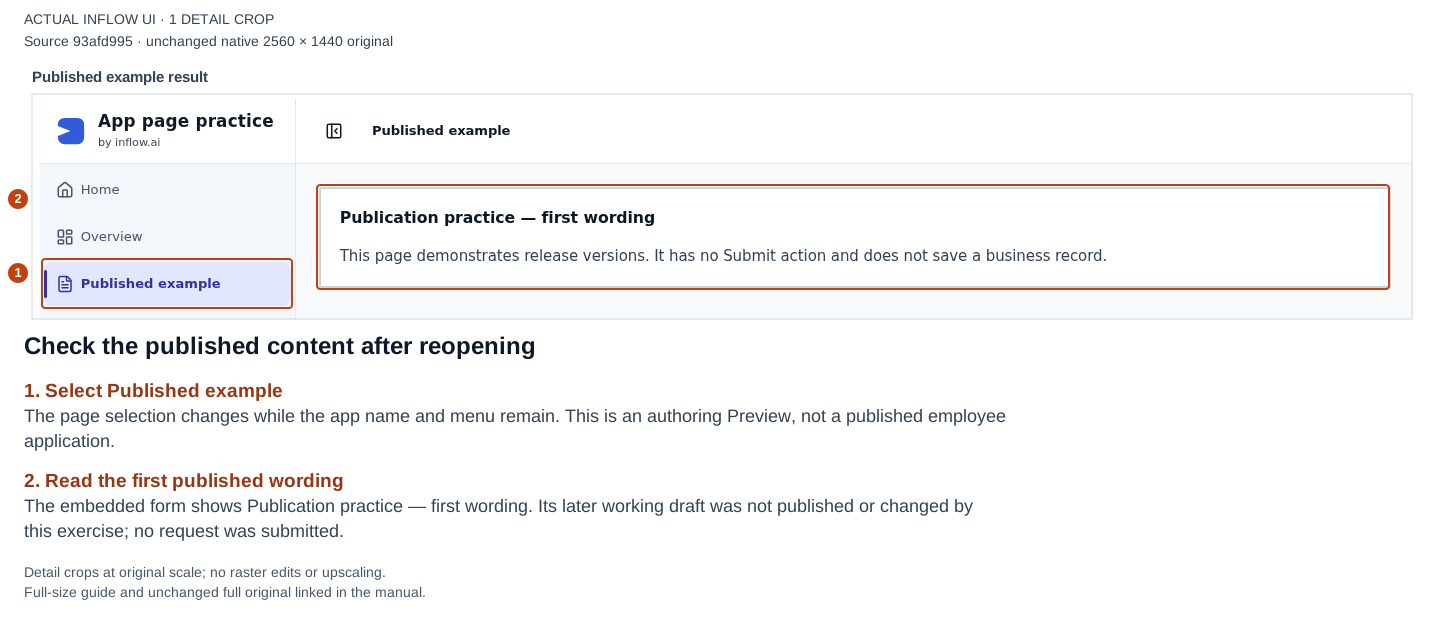
- Choose Published example. Check that the displayed form says Publication practice — first wording. The later working draft should not replace this published text.
- Return to Overview and confirm its content remains. The application name and navigation should stay visible while the page changes.
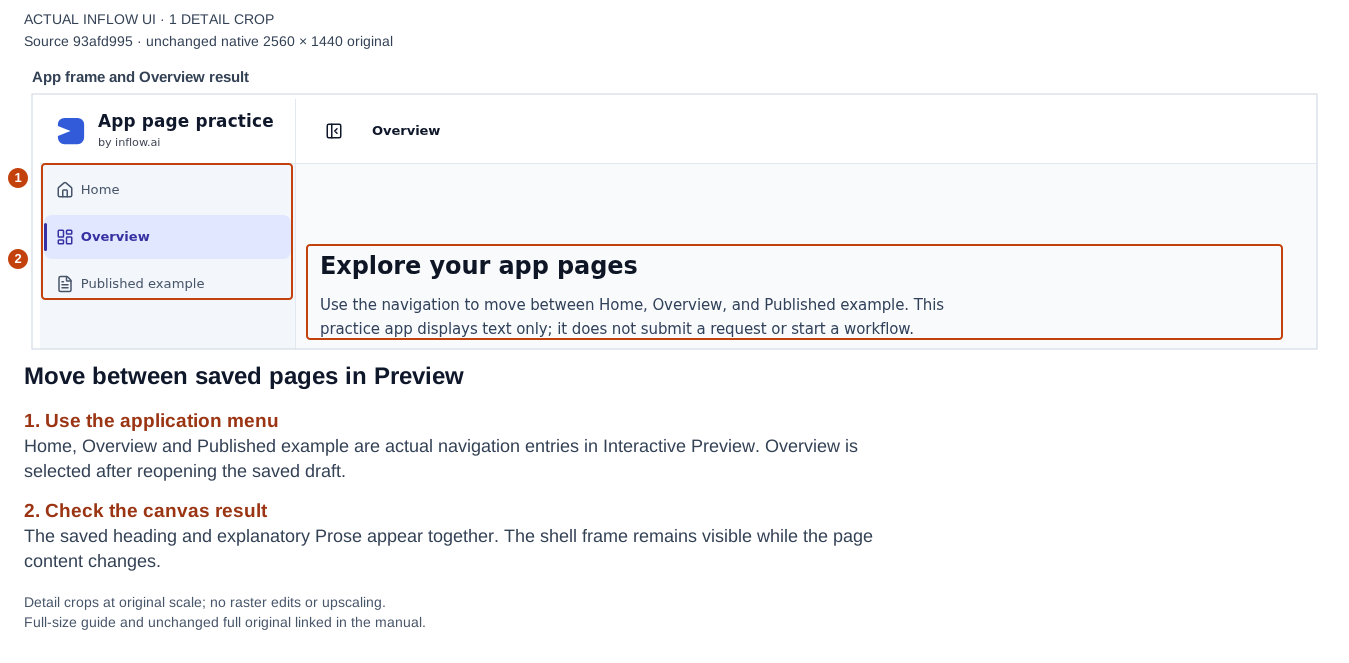
Open the unchanged native original.
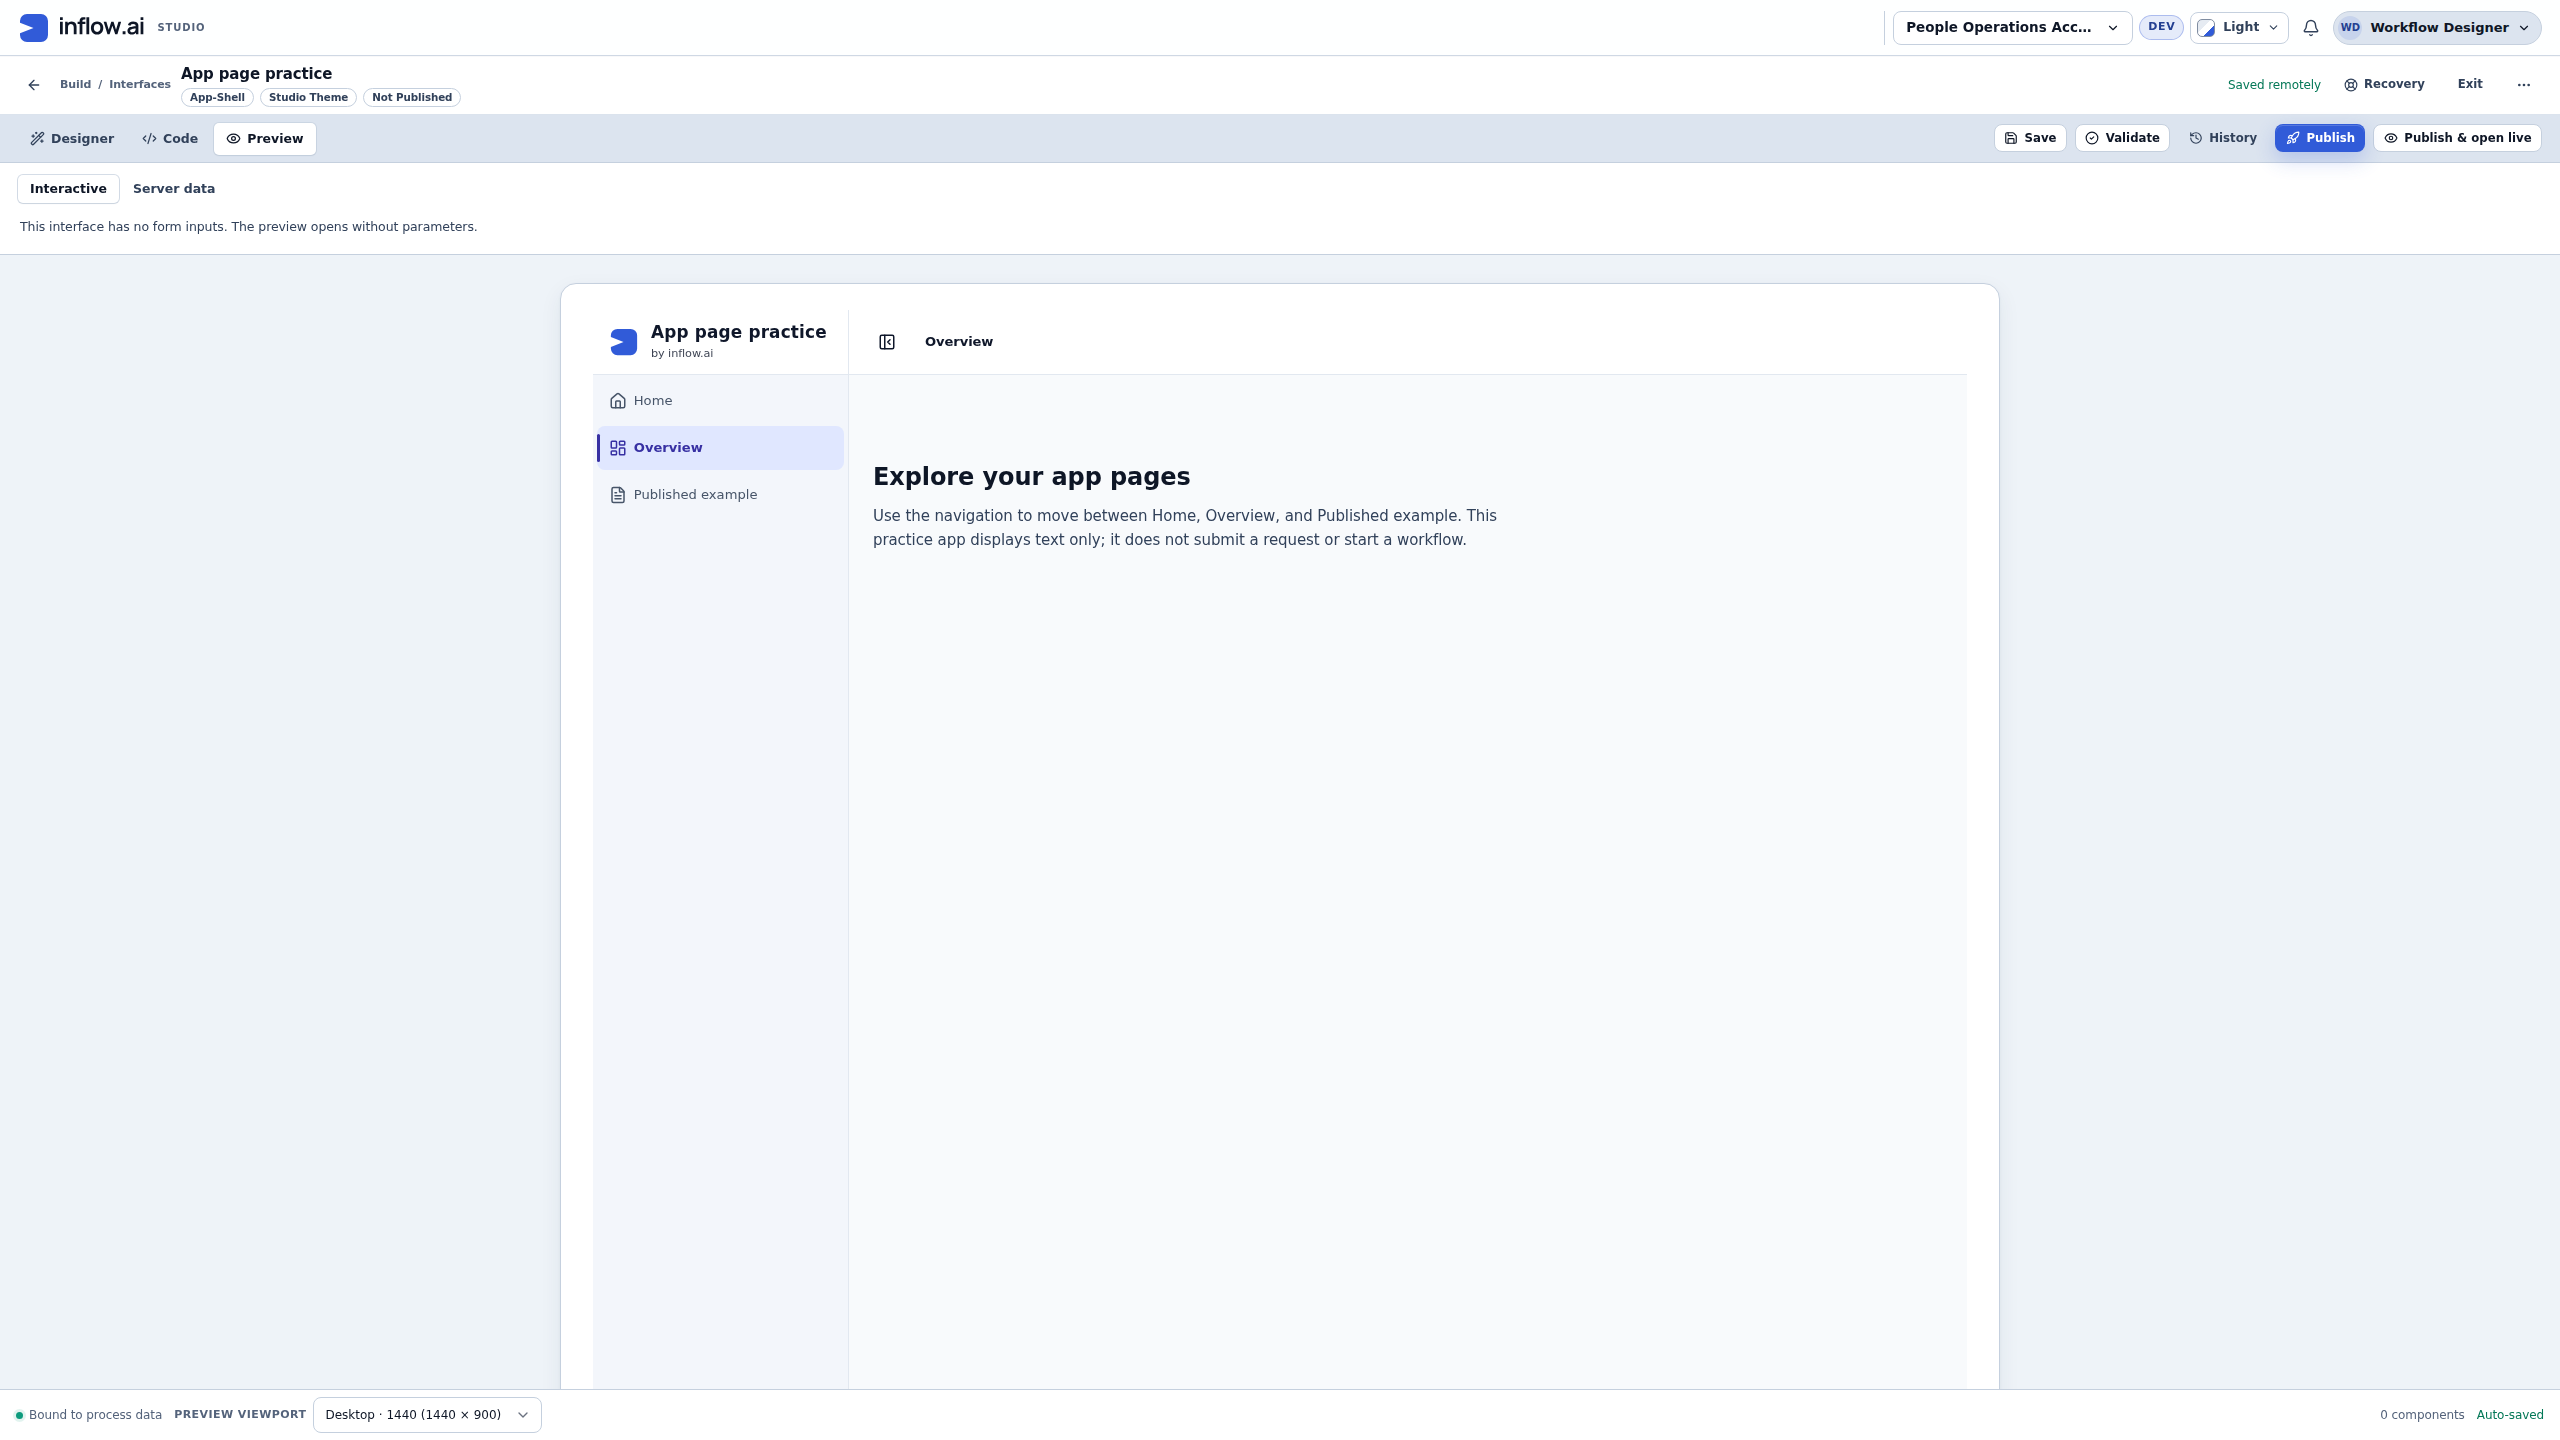
Open the unchanged native original.
During the recorded editing sequence, a Problems message said The selected components no longer exist. Select components again. after moving from the selected Overview control to the bound page. The draft had already been saved. Reopening that same shell cleared the message, and the pages and content persisted. If you encounter it, first confirm the save state and reopen the existing definition; do not delete the page or recreate the app to dismiss it. If it persists, keep the message and ask for support. This exercise records recovery, not a product fix for the message.
Practice checkpoint: a saved three-page App Shell draft, an editable Overview canvas, a separate bound interface page, and repeatable Interactive Preview navigation. Keep this shell unpublished for the practice. The complete Leave requests app still needs its employee form, workflow, manager form, release, ordinary-user access and end-to-end checks described in the rest of this course.
A page showing an existing interface uses that interface's current published release. Publishing a later employee-form change can therefore affect this page. That differs from a manager task already using the form version captured by its workflow.
Checkpoint: the app has meaningful named pages. A condition hiding a page is not a substitute for the administrator's application access review.
Milestone 7 — Build a separate manager decision form
The employee form collects a request. Sara needs another form that shows that request before she decides. The request details are read-only; only her approval answer and decision comment are editable. A Boolean is a Yes/No answer: true means the Approved checkbox is selected; false means it is clear.
- Create a new Form titled Manager leave decision in the appropriate placement.
- Open Inputs and choose Add input for each row below. Enter the exact Name, leave the name field to apply it, choose its Type and keep one value. Leave form Defaults empty. Keep approved Required off; the workflow supplies its genuine Boolean false starting value. Names identify the values the workflow maps; the labels below are the words Sara reads.
| Input Name | Form Type | Visible label | Used for |
|---|---|---|---|
requestId |
Text | Request reference | Request context |
employeeId |
Text | Employee number | Request context |
startDate |
Date | Start date | Request context |
endDate |
Date | End date | Request context |
requestedDays |
Decimal | Requested days | Request context |
reason |
Text | Reason for leave | Request context |
approved |
Boolean | Approved | Decision answer |
decisionComment |
Text | Decision comment | Decision answer |
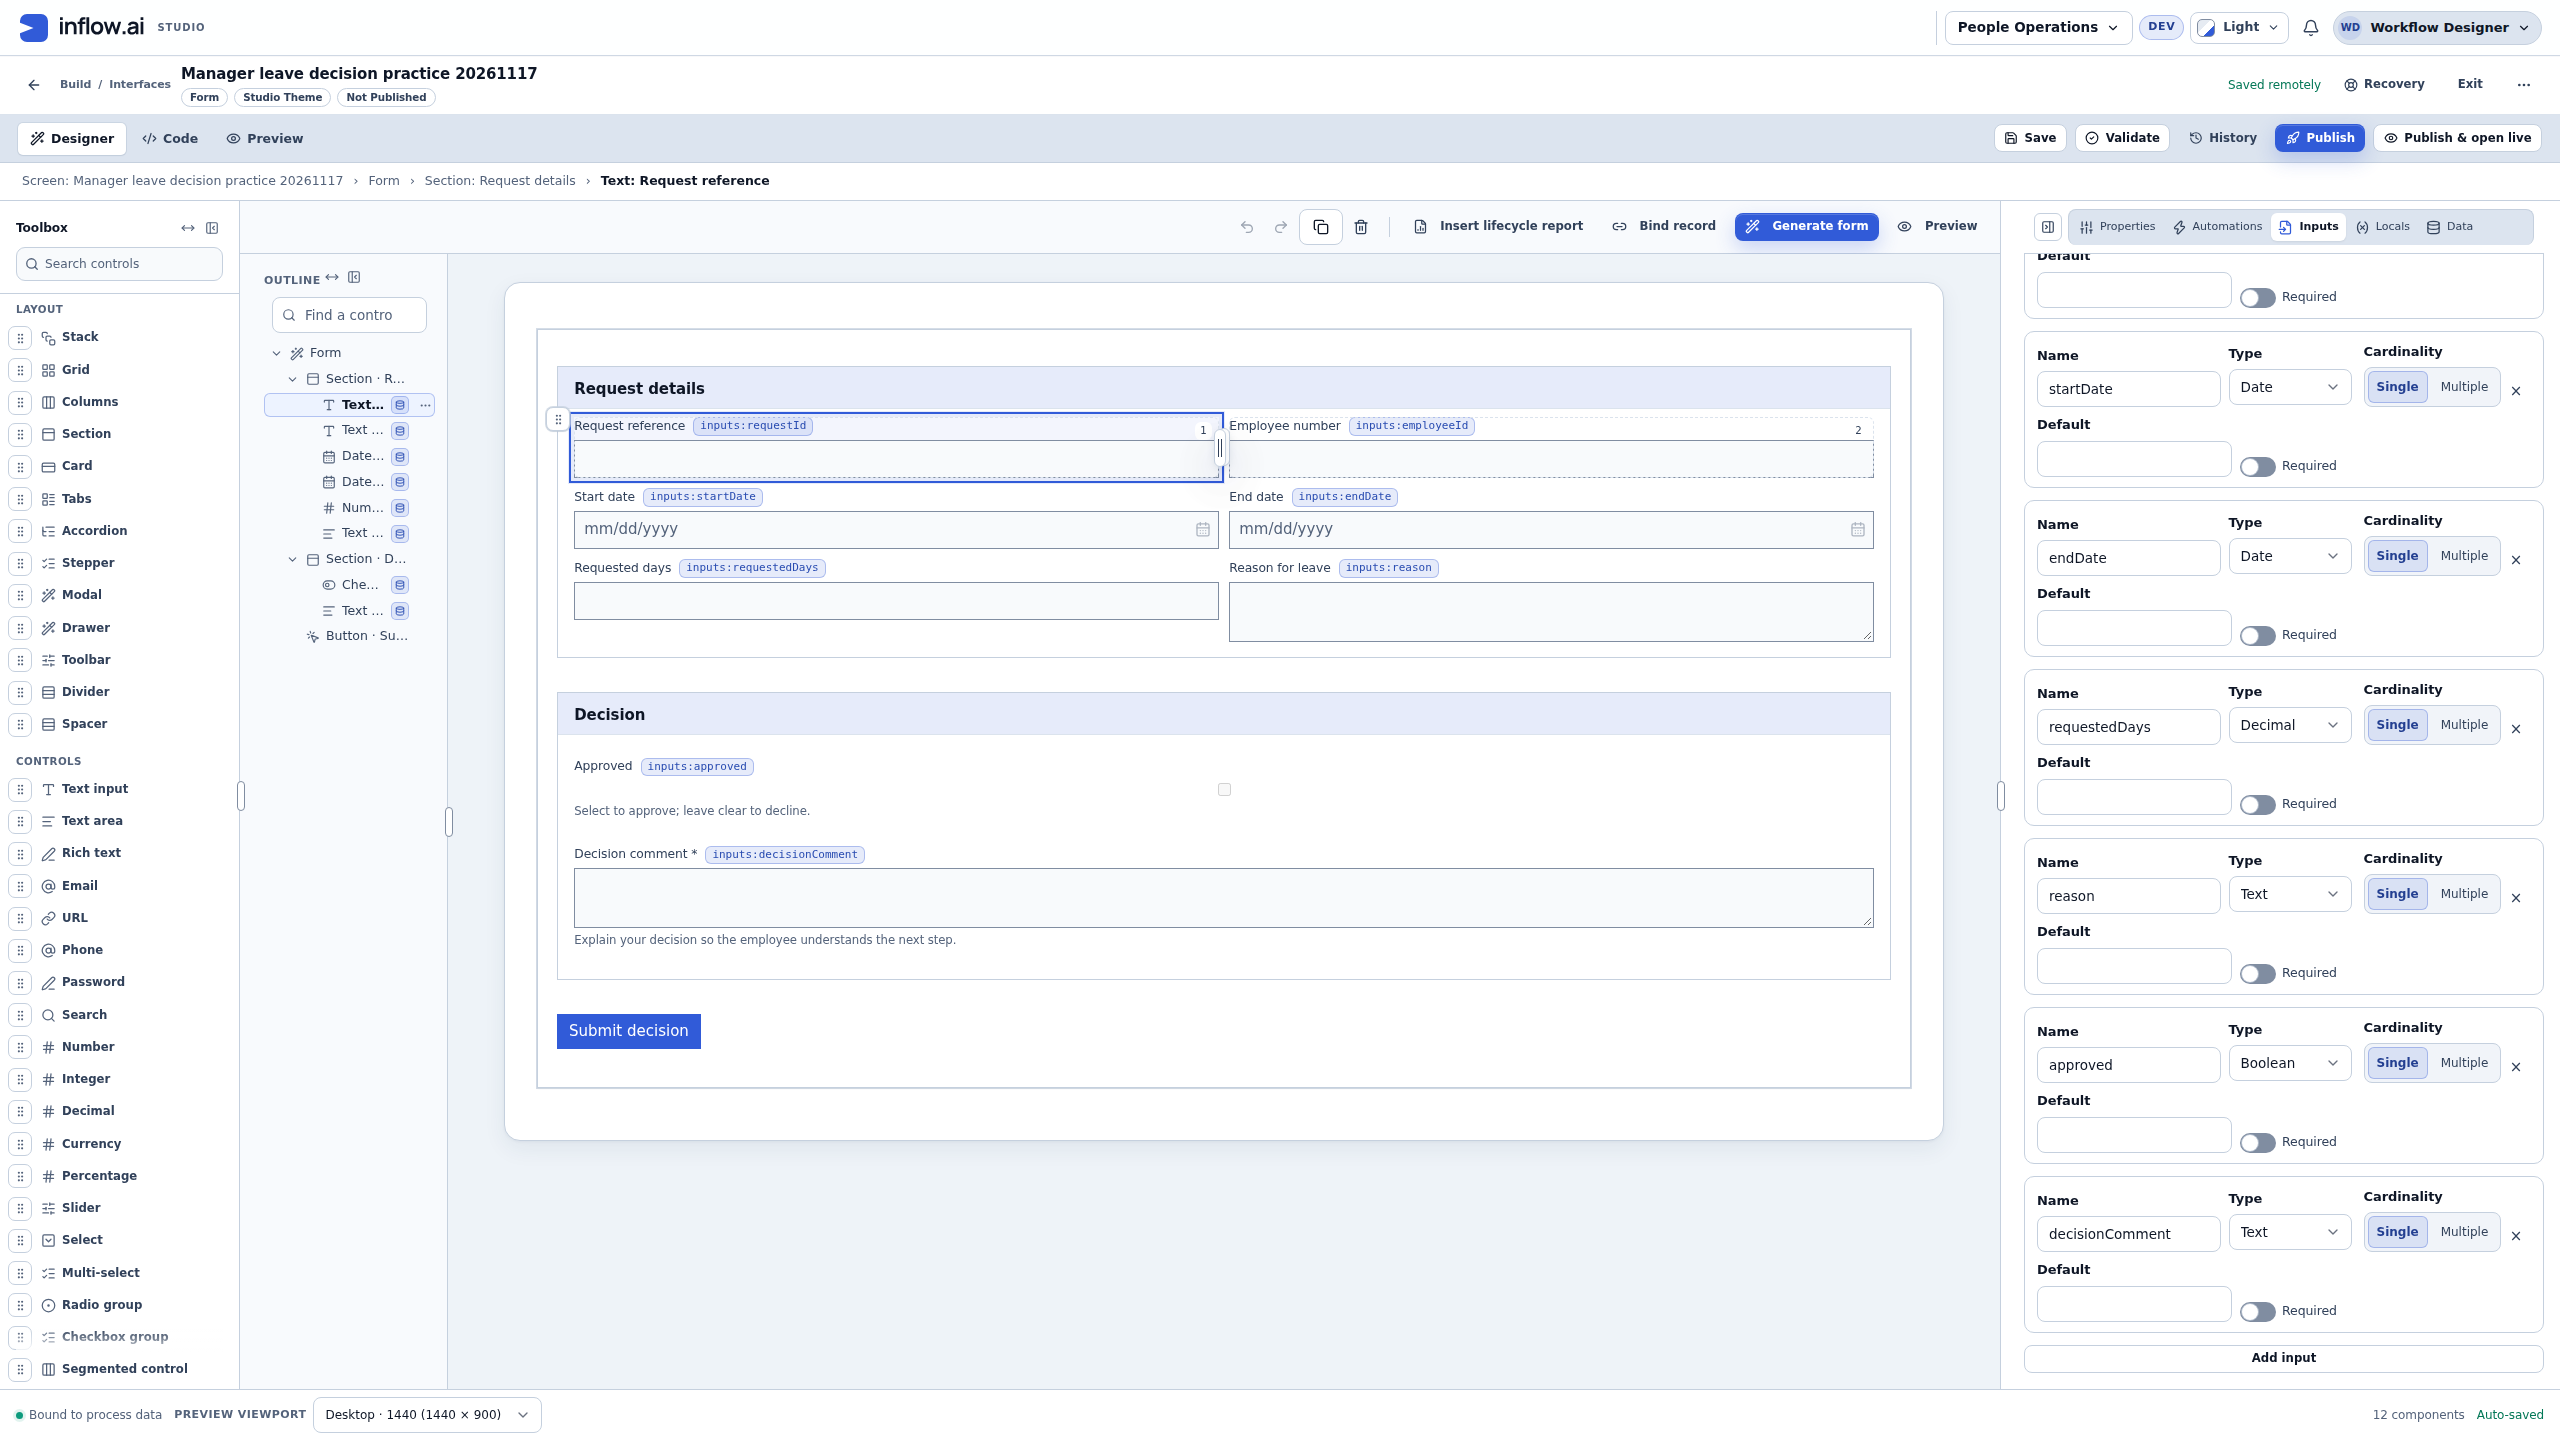
- Add a Section titled Request details. Add two Text input controls labelled Request reference and Employee number, two Date controls labelled Start date and End date, a Number control labelled Requested days, and a Text area labelled Reason for leave. For each, use Data Binding → Store value in to select its matching declared input: requestId, employeeId, startDate, endDate, requestedDays and reason respectively. For all six controls, set Behavior → Read only to Yes. Do not replace the real values with the fictional example as static text.
- Check the distinction between Employee number and the person using Inflow. The teaching employee number is M014, ordinary business Text supplied by the request. It does not identify an authenticated account or assign a task. Mohammad starts the real case through his normal login; the workflow lesson selects the actual Sara user in the authored task assignment. Do not turn M014 or the manager business number S002 into a guessed User value.
- Add a Checkbox labelled Approved and connect Store value in to approved. Add help: “Select to approve; leave clear to decline.” Add a TextArea labelled Decision comment, connected to decisionComment. Require a useful comment if that is the teaching policy. Leave these two controls editable.
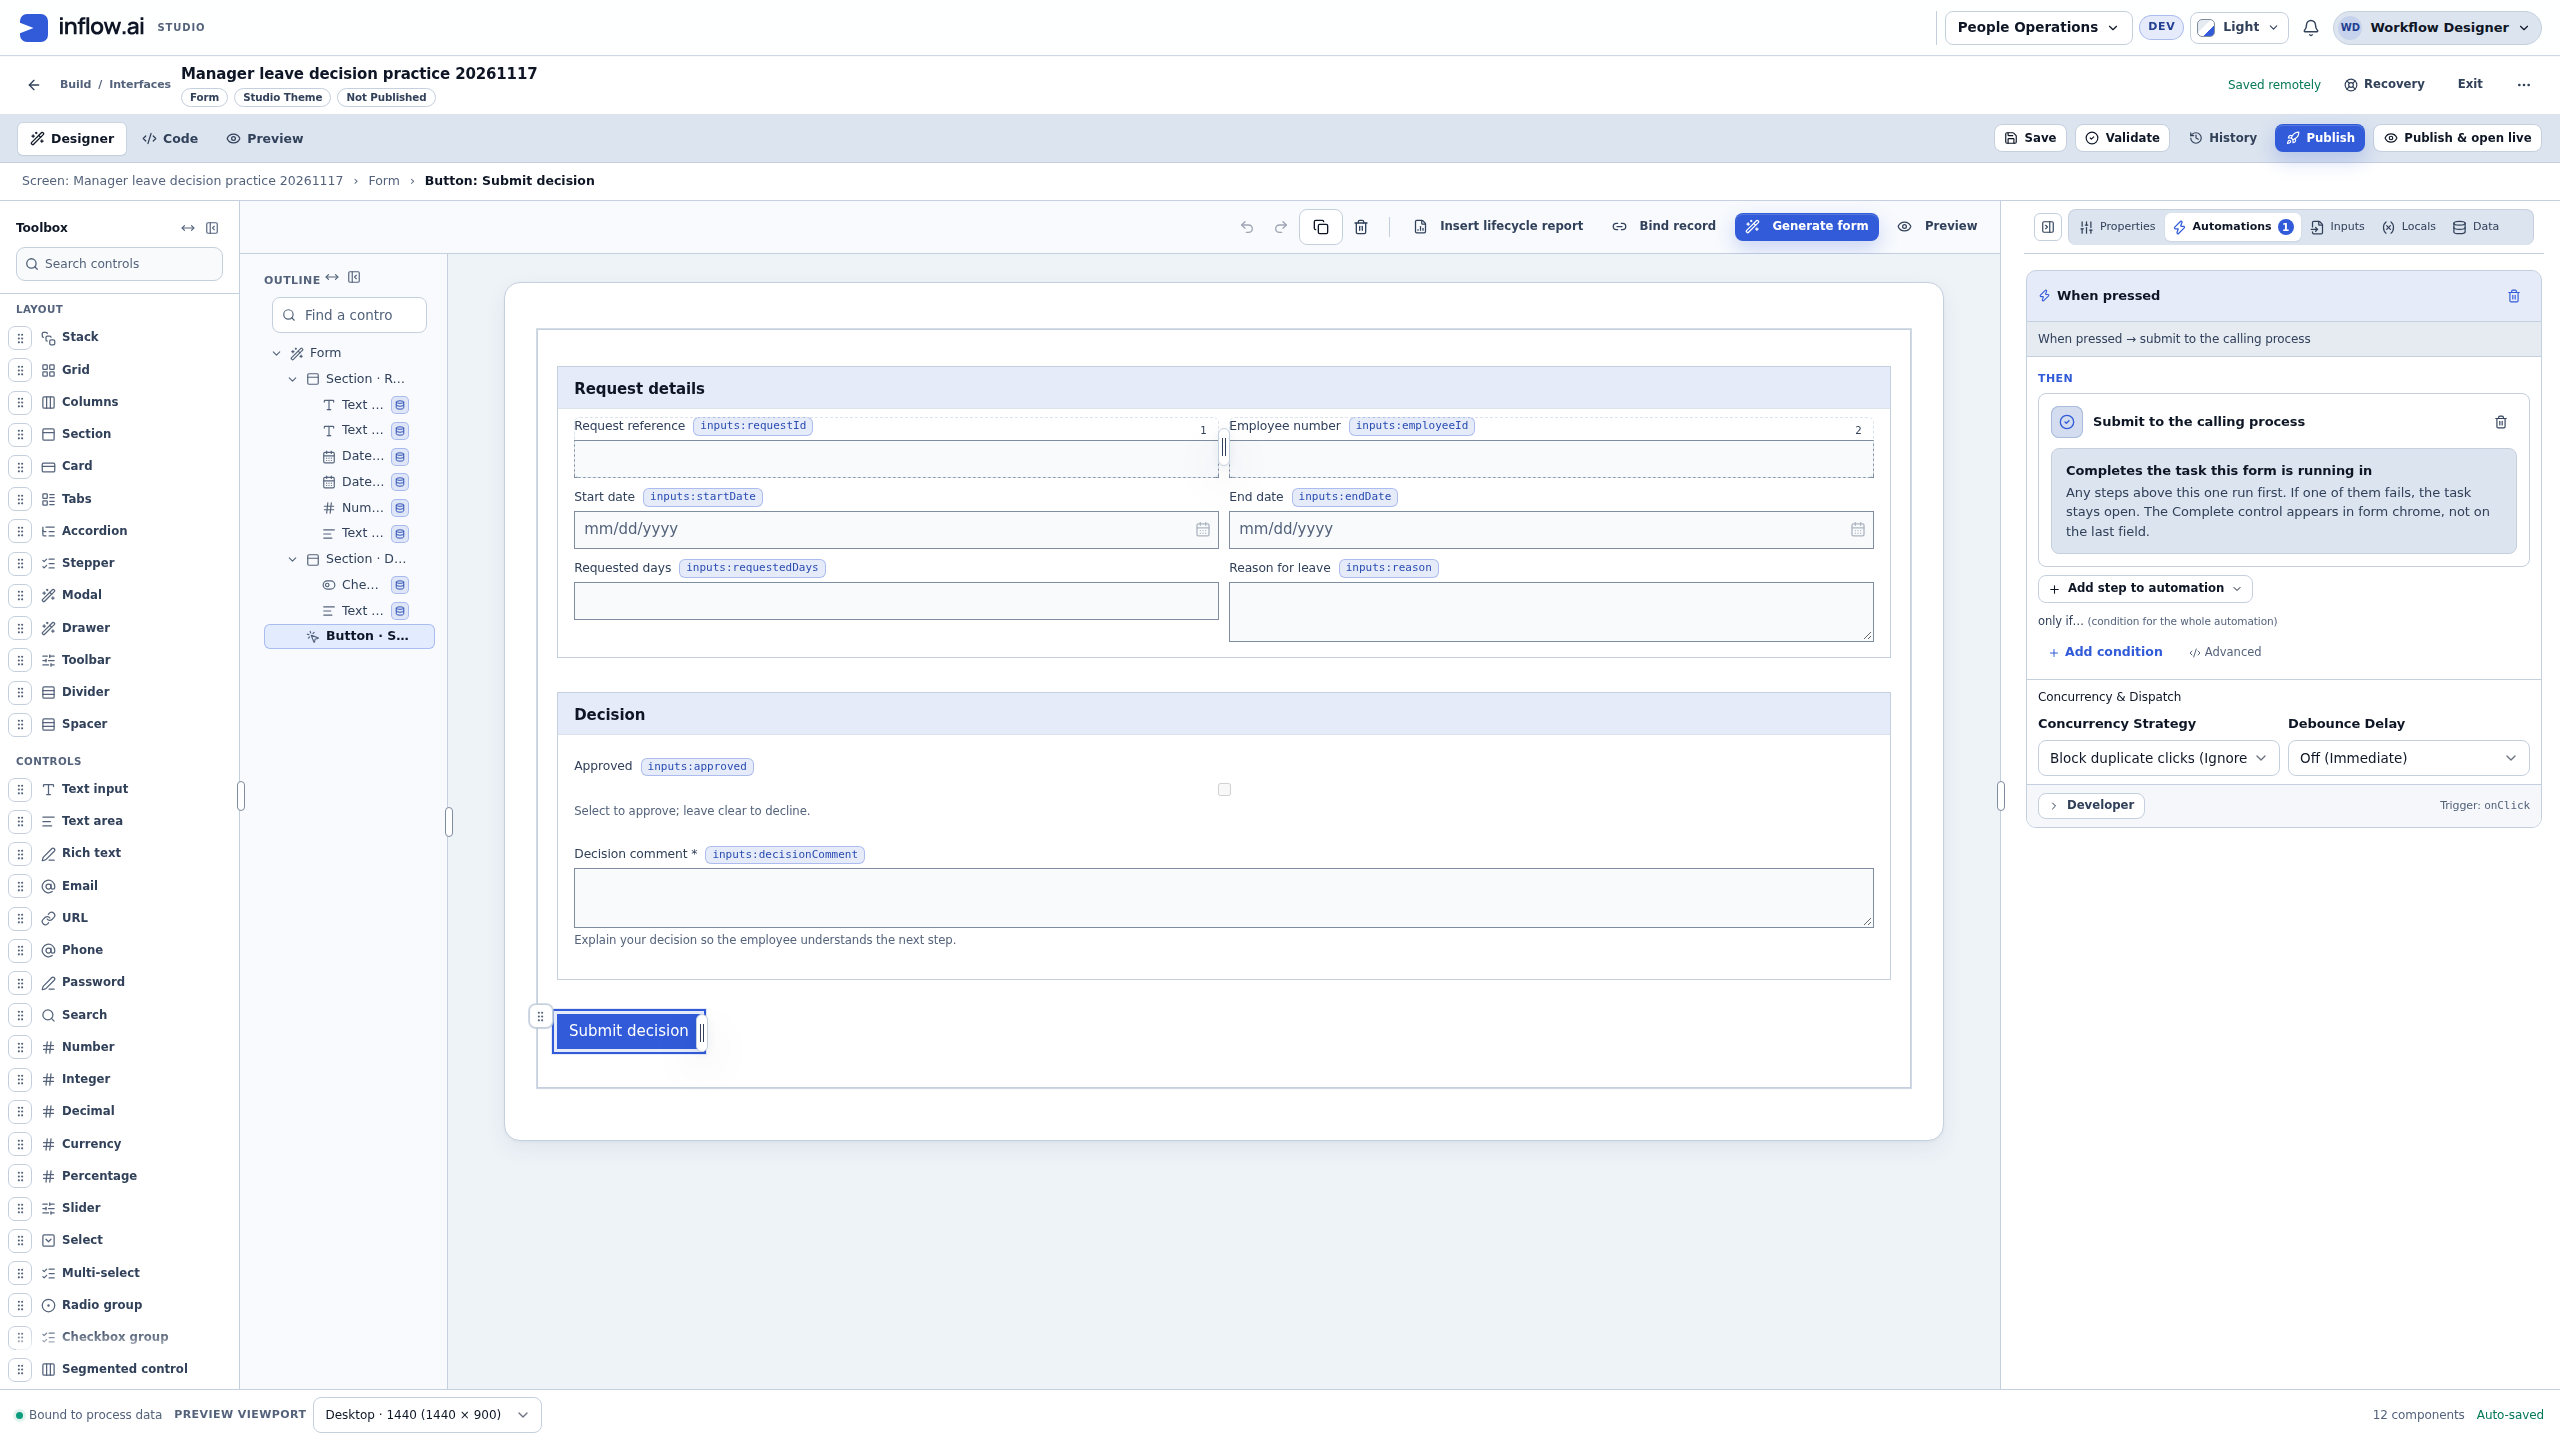
- Add a Button labelled Submit decision. In its Automations, choose Submit to the calling process for the deliberate action.
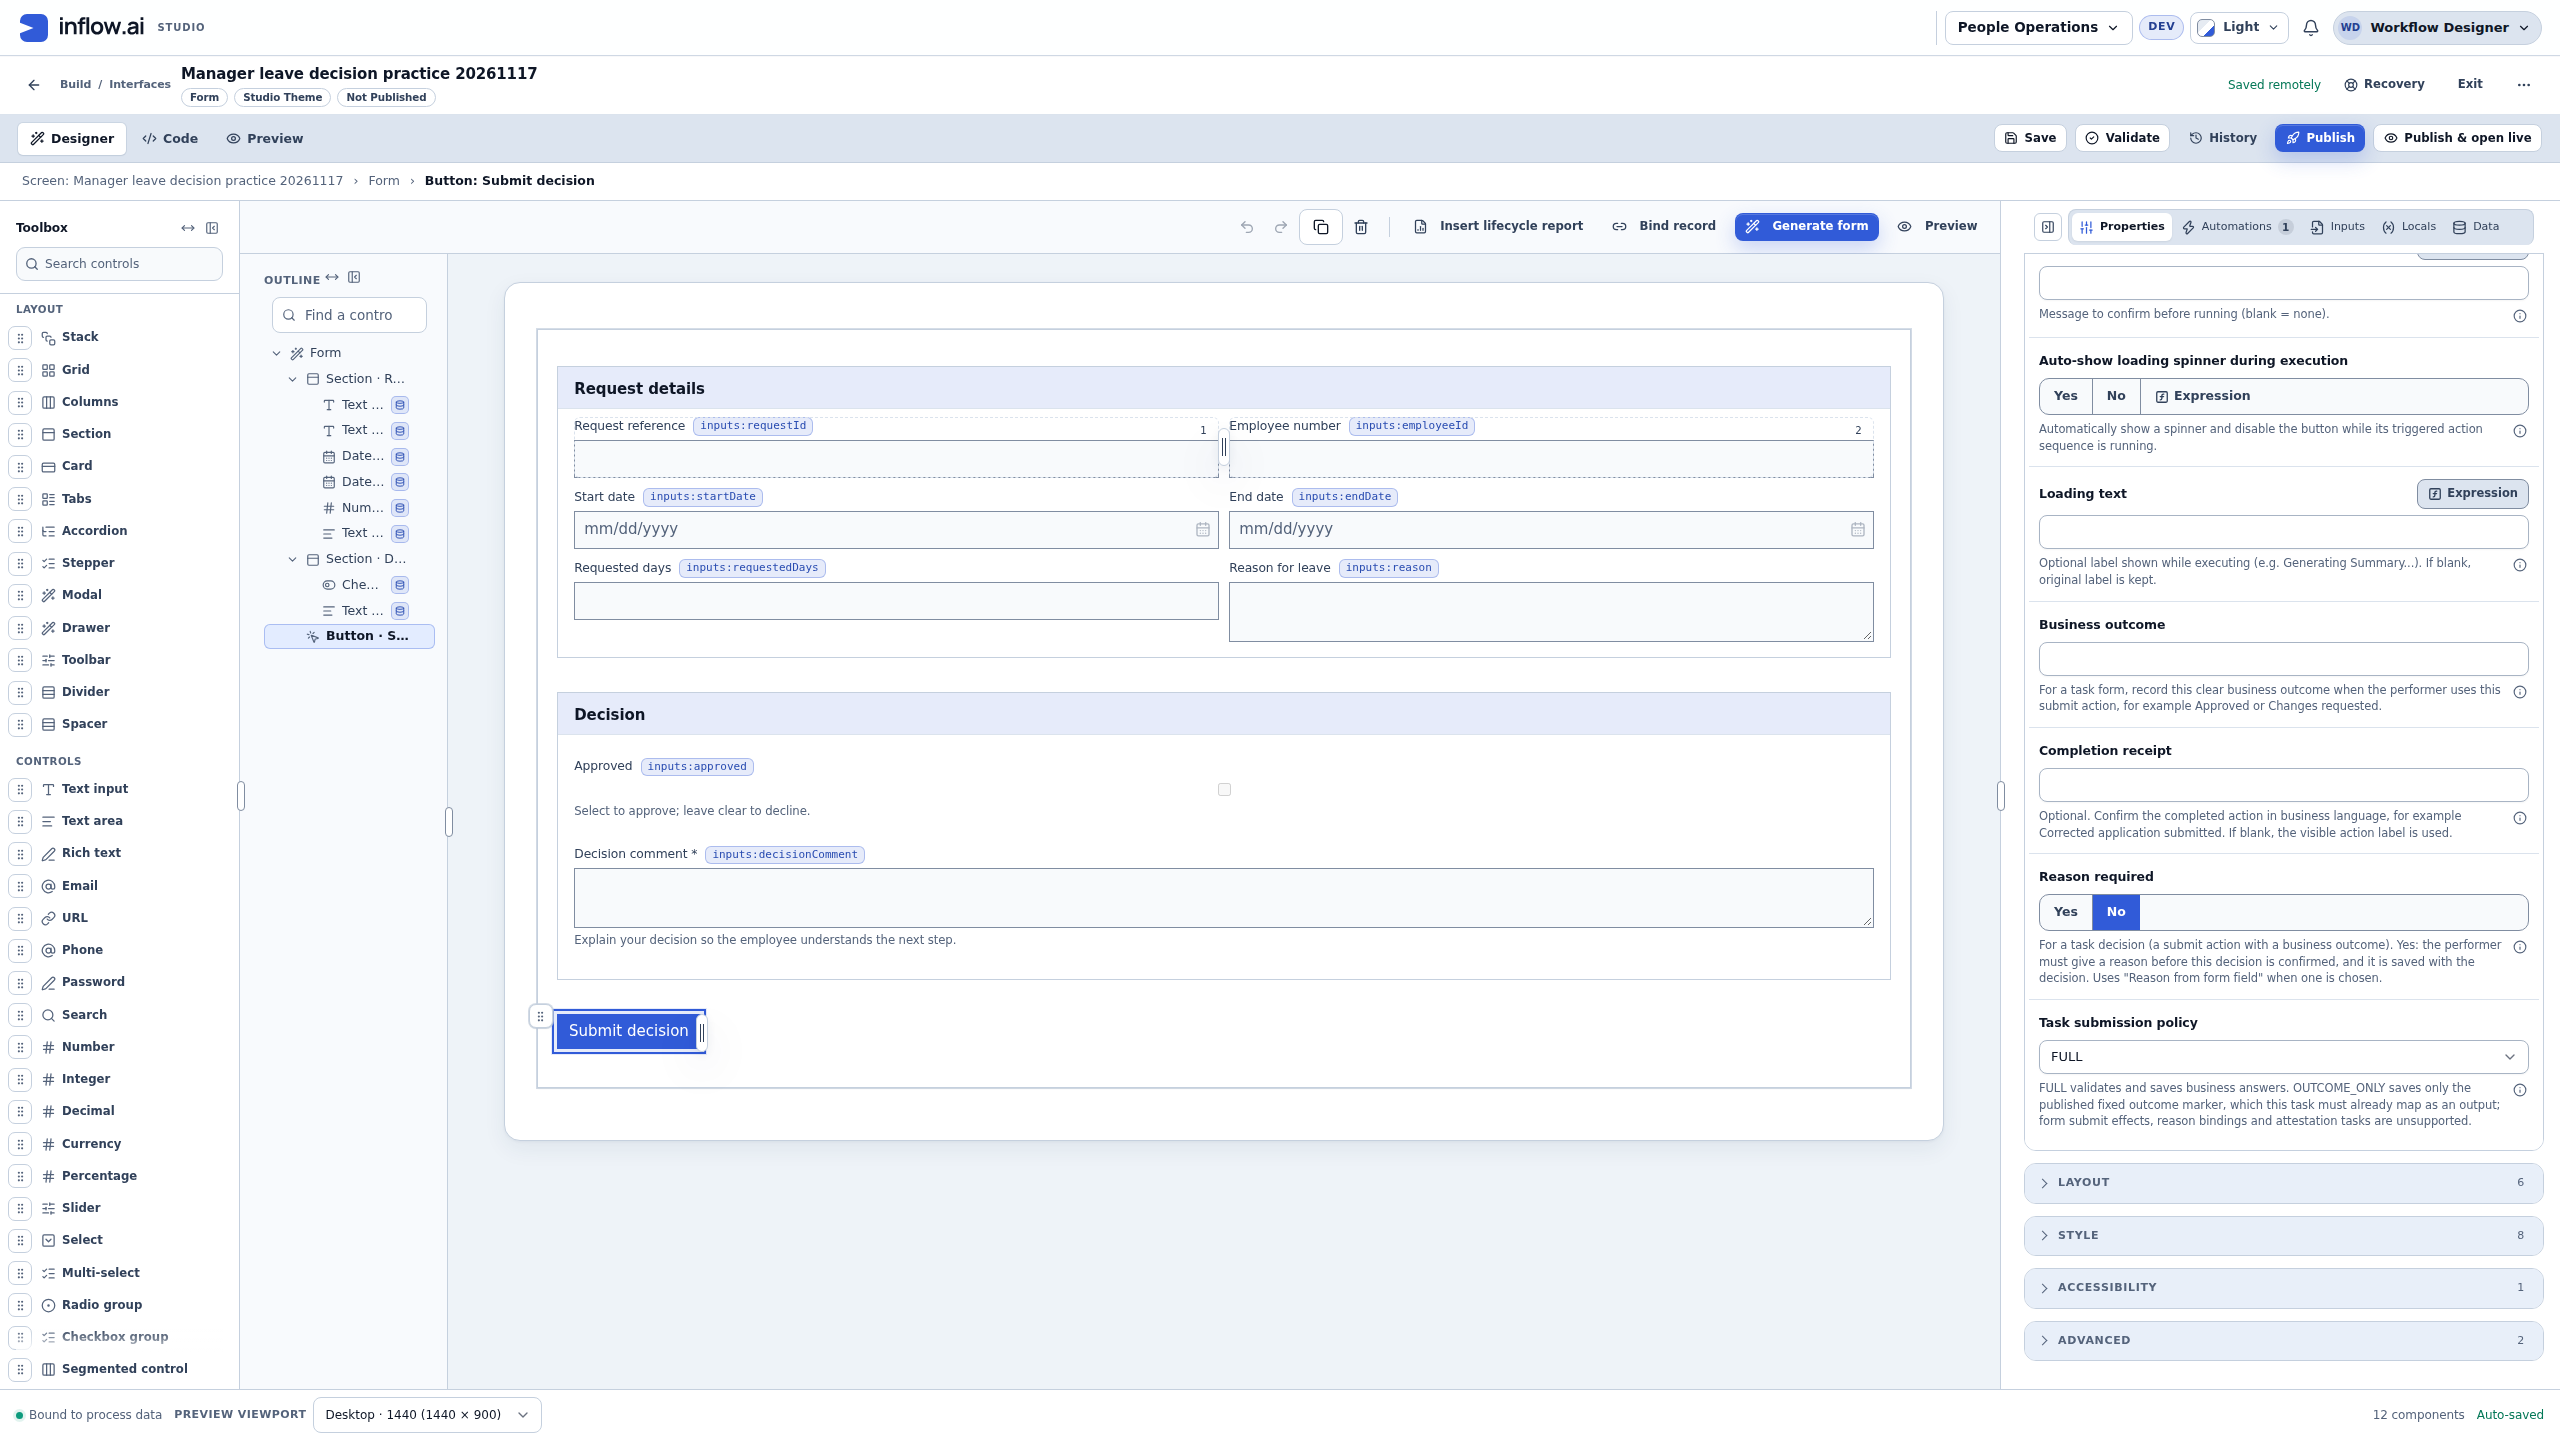
- In the Button's Properties, leave Business outcome blank and Reason from form field unbound. This is a generic Submit decision action: the checkbox and comment are ordinary form answers. Keep the full-answer submission behavior for this lesson.
- Save, validate and publish this manager form. Keep its visible name/version for the workflow lesson. In that lesson's Fill the form’s inputs, map requestId, employeeId, startDate, endDate, requestedDays and reason from the identically named case fields, plus approved from the Boolean case field. The case's Number requestedDays maps to this form's Decimal input; Decimal is the Form type choice for that numeric value. In Save the form’s outputs, map only approved and decisionComment back to their corresponding process fields. Do not add the six request-context fields as decision outputs.
- In the workflow's supported form test, check that the actual mapped reference, employee number, dates, days and employee reason appear before answering. Try to edit those six bound controls: they must remain read-only. If any context is blank or wrong, inspect that specific Fill the form’s inputs mapping and the original case input before republishing; do not make Sara re-enter the employee's request.
Do not require the Approved checkbox itself to be checked: a clear checkbox is the valid decline answer. The comment explains Sara's decision. In the workflow lesson, initialize the Boolean approved case field to false and choose that field in Fill the form’s inputs for the form’s approved answer. The workflow then uses the submitted Boolean answer to choose the appropriate path. Map decisionComment back as an ordinary Text answer as well. It is not automatically recorded as the activity’s decision reason. Do not add a fixed Approved/Declined business outcome to this generic submit button.
Checkpoint: a published manager form shows the request Sara must review and collects two well-understood decision answers. Continue with workflow milestones 1–4. In that lesson, choose this form through Bind a task form and map its declared context and answers to the case. A draft-only employee form is not a substitute.
Example — Inspect and publish the separate manager form
Nadia wants Sara to read Mohammad’s request before answering it. The eight declarations and two sections in milestone 7 provide that separation. The pictures below follow Manager leave decision practice 20261117 in the synthetic People Operations workspace; use your own intended name and available key.
This is builder preparation. The photographed form was loaded through the designer’s Code → Import JSON control, then inspected in Inputs, Properties, Automations and Preview. The no-code steps above create the same settings. These pictures show the resulting settings and local checks; they do not show Sara’s real task or prove ordinary-user access.
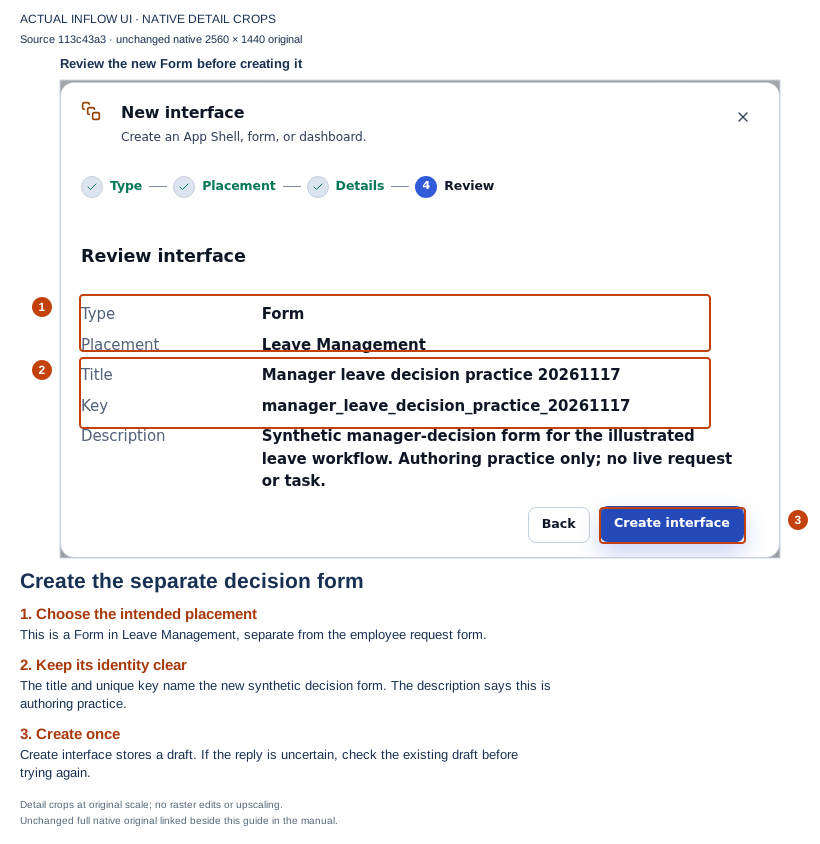
Before creation: the review names the new decision Form. Its synthetic description distinguishes this preparation from a live leave request. Open the unchanged native 2K screenshot.
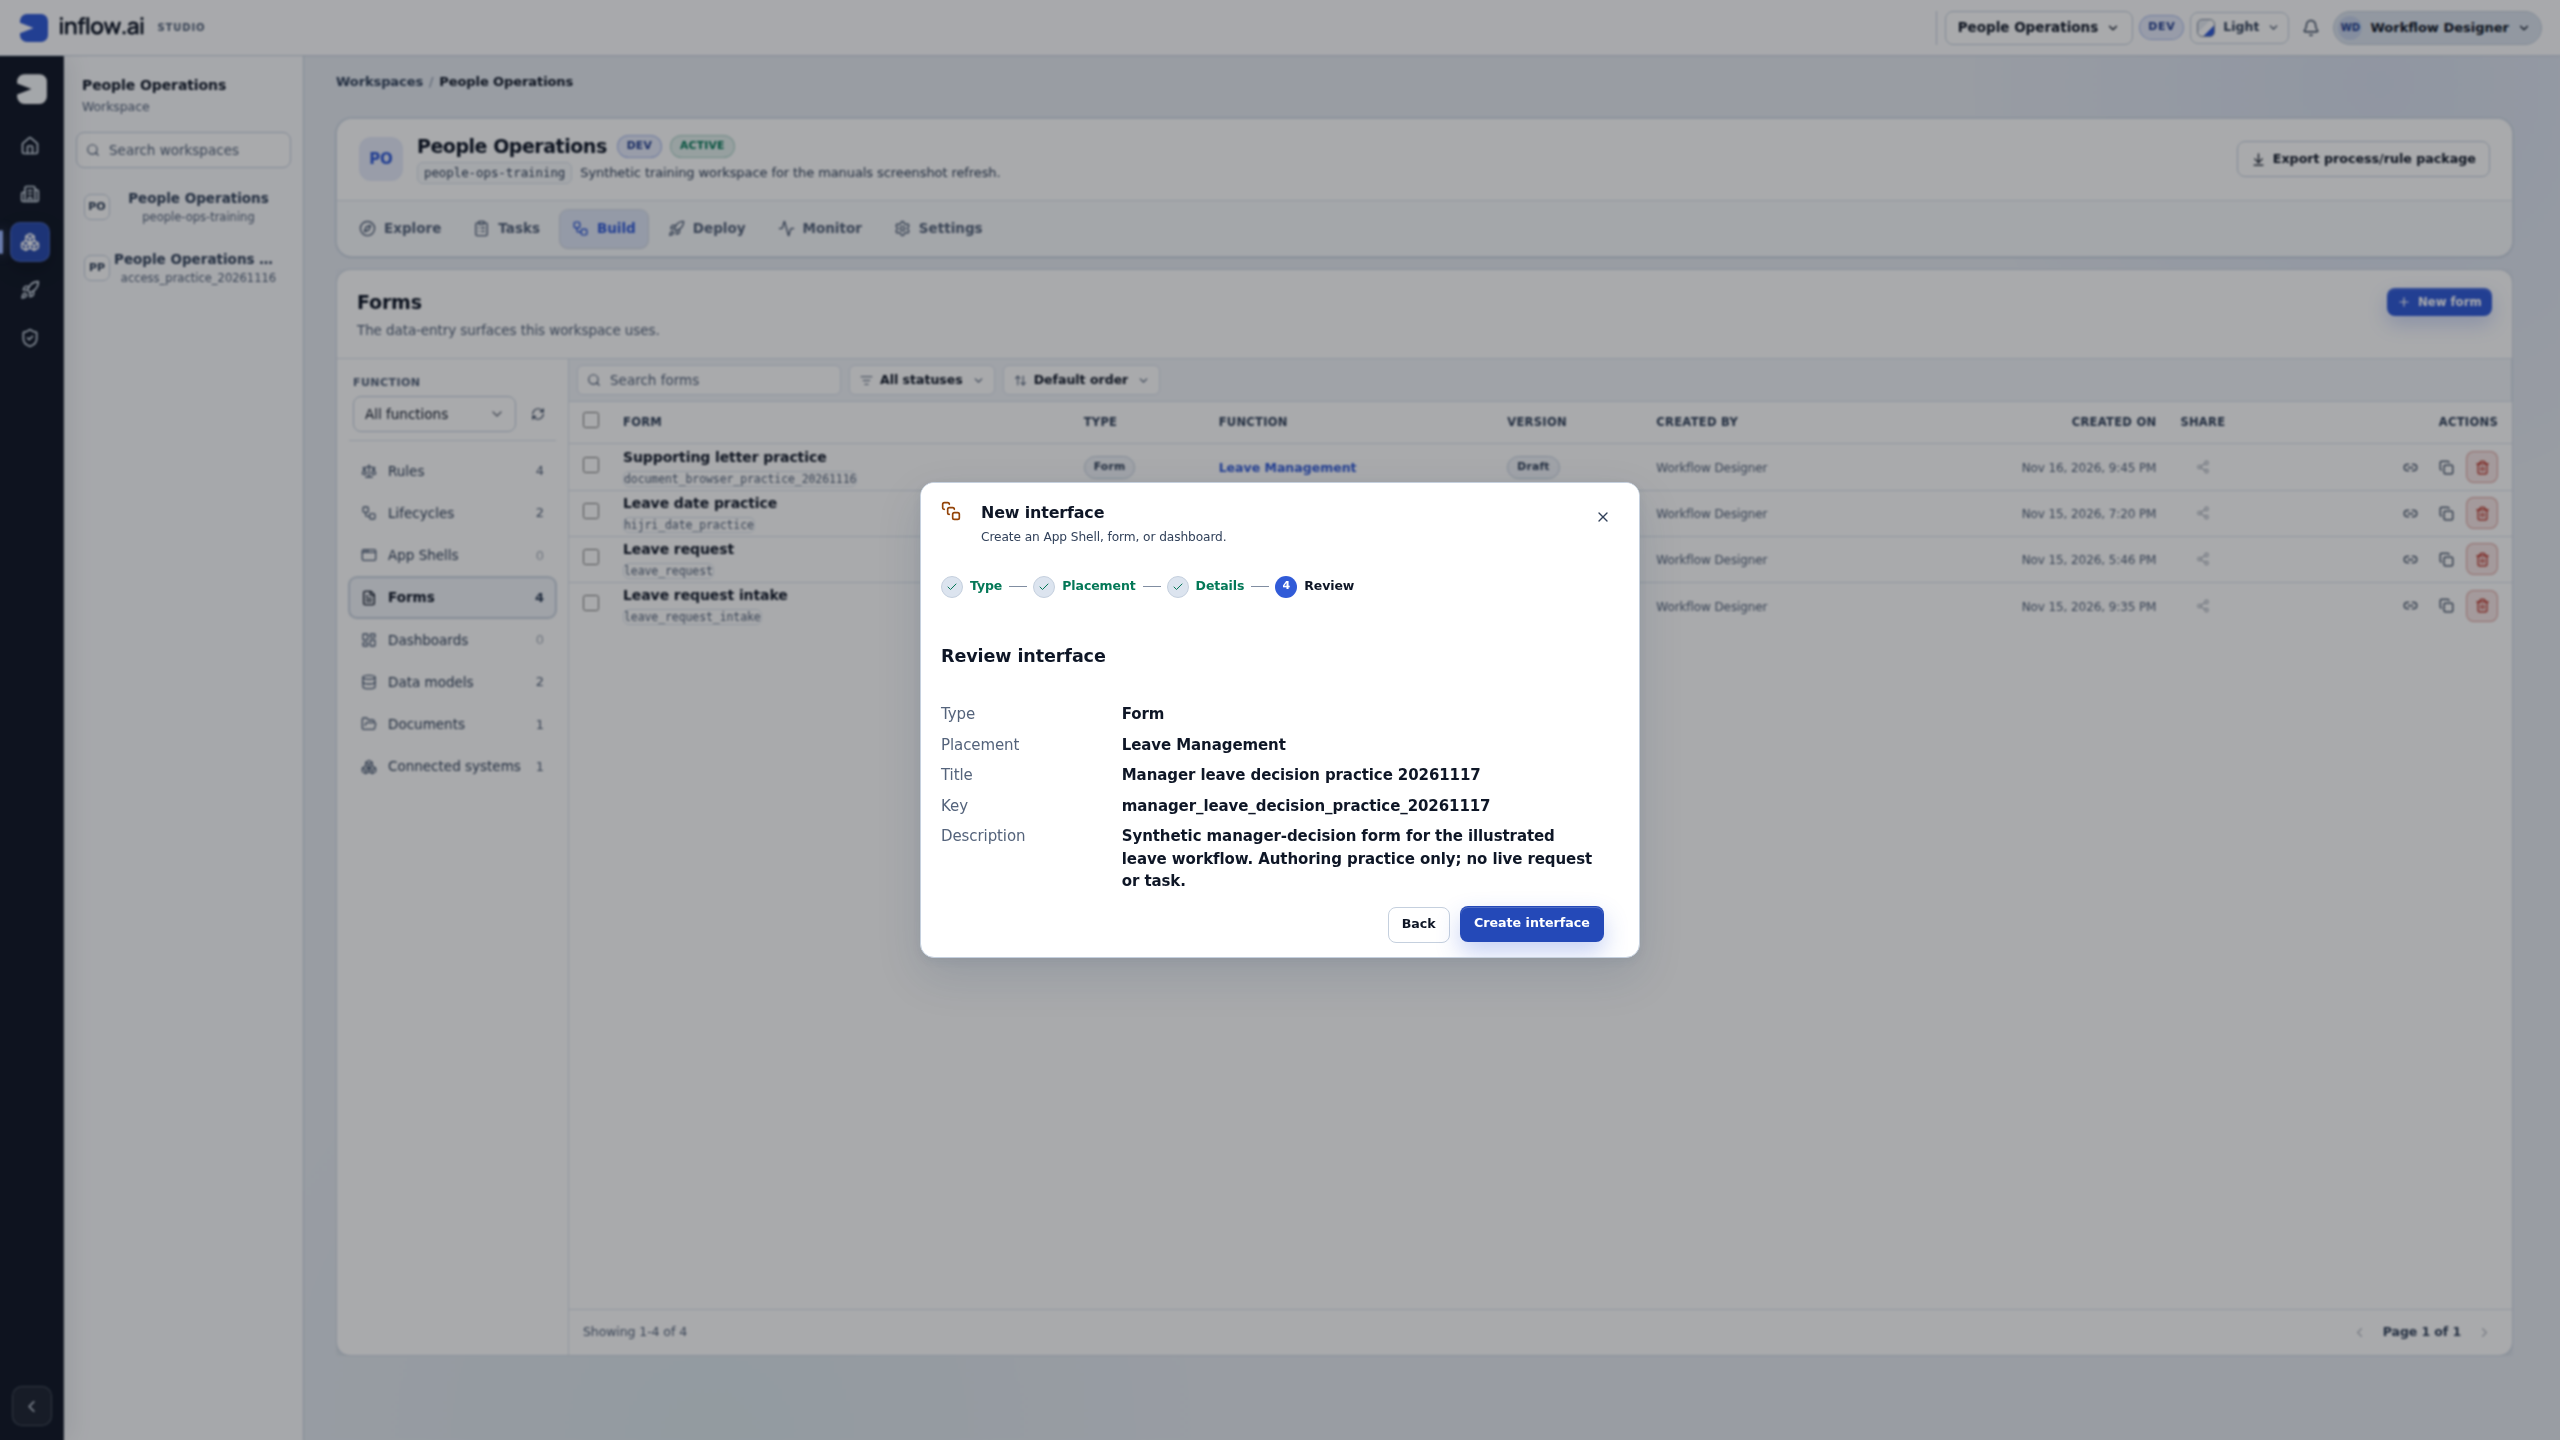
- Create the separate Form. From workspace Build → Forms → New form, choose Form, then the intended placement. Enter its title, a unique key and a useful description. At Review, read the type, placement and identity before choosing Create interface once. This creates a draft; it does not release the form. If the reply is uncertain, check that draft before creating another one.
- Inspect all eight Inputs. The six request-context names must match the worksheet above. approved is Boolean; decisionComment is Text. Each is Single, and the form Defaults remain empty. Keep approved’s declaration Required off. A form declaration and a control’s Required property are separate settings.
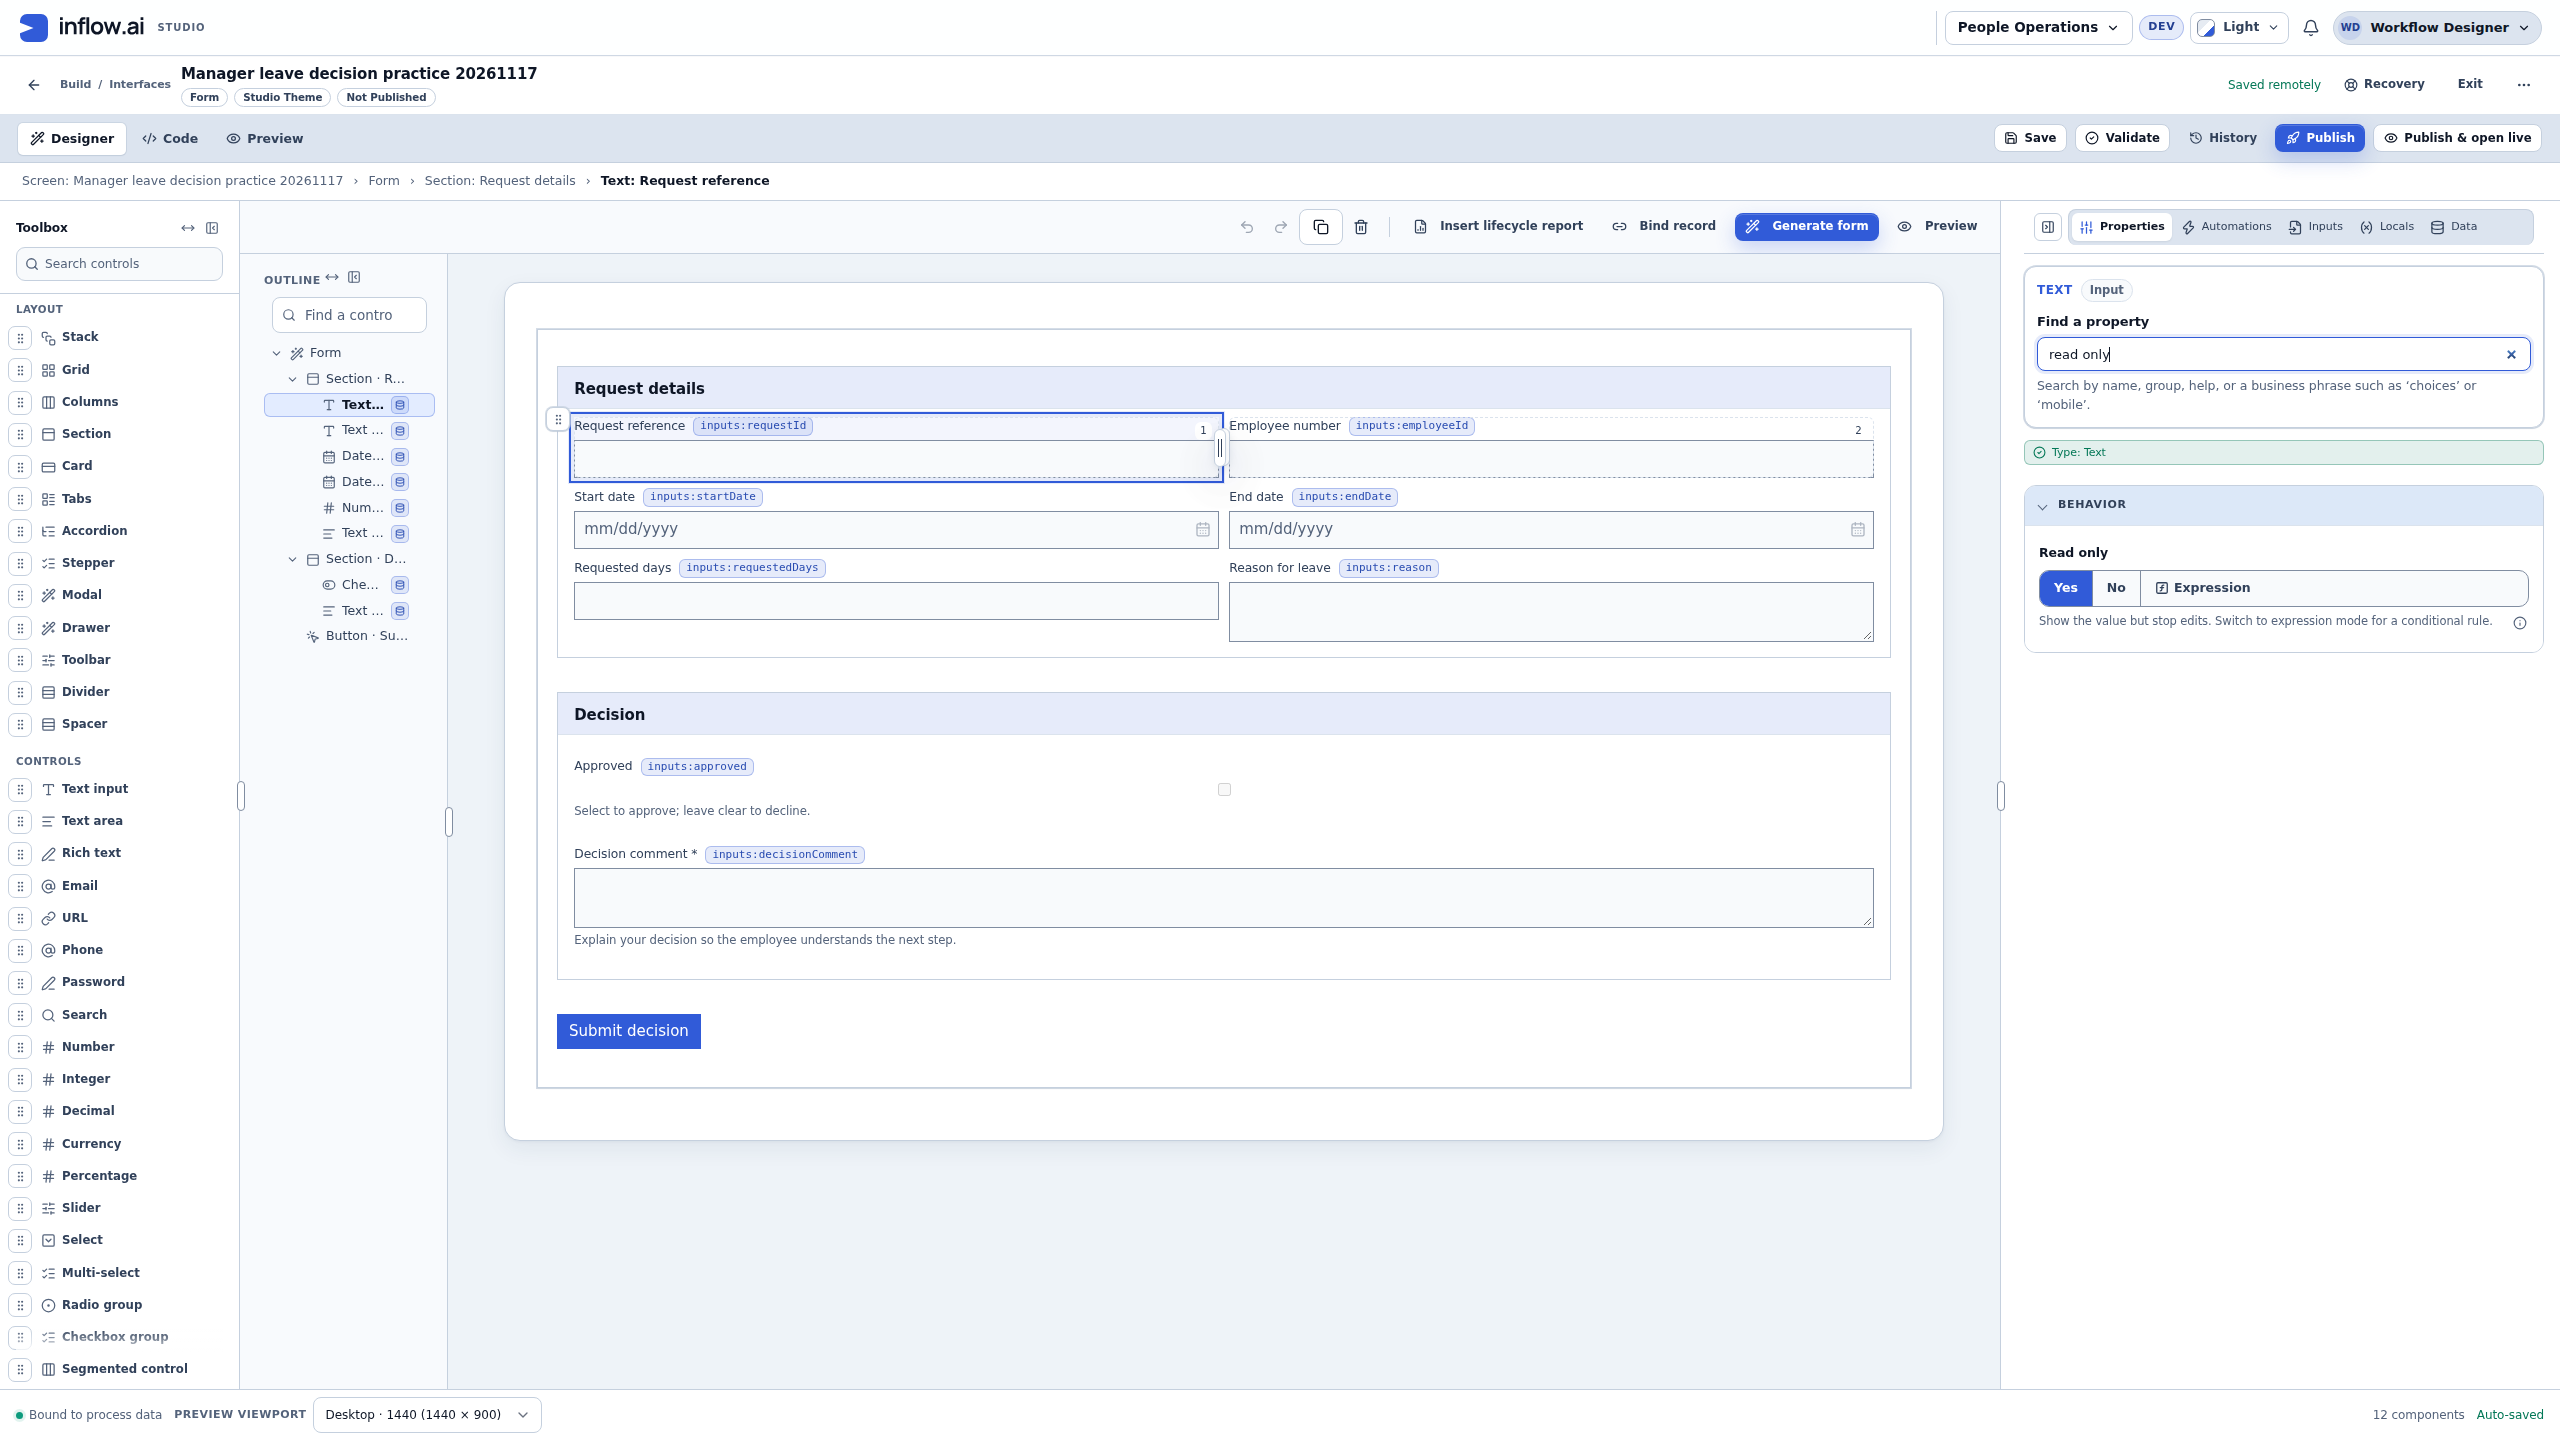
- Protect the request section from edits. Select Request reference. Confirm its binding is inputs:requestId, then find Read only in Properties and choose Yes. Repeat for employeeId, startDate, endDate, requestedDays and reason. The actual task must receive authorized context from its input mappings; making a control read-only does not give someone permission to read that context.
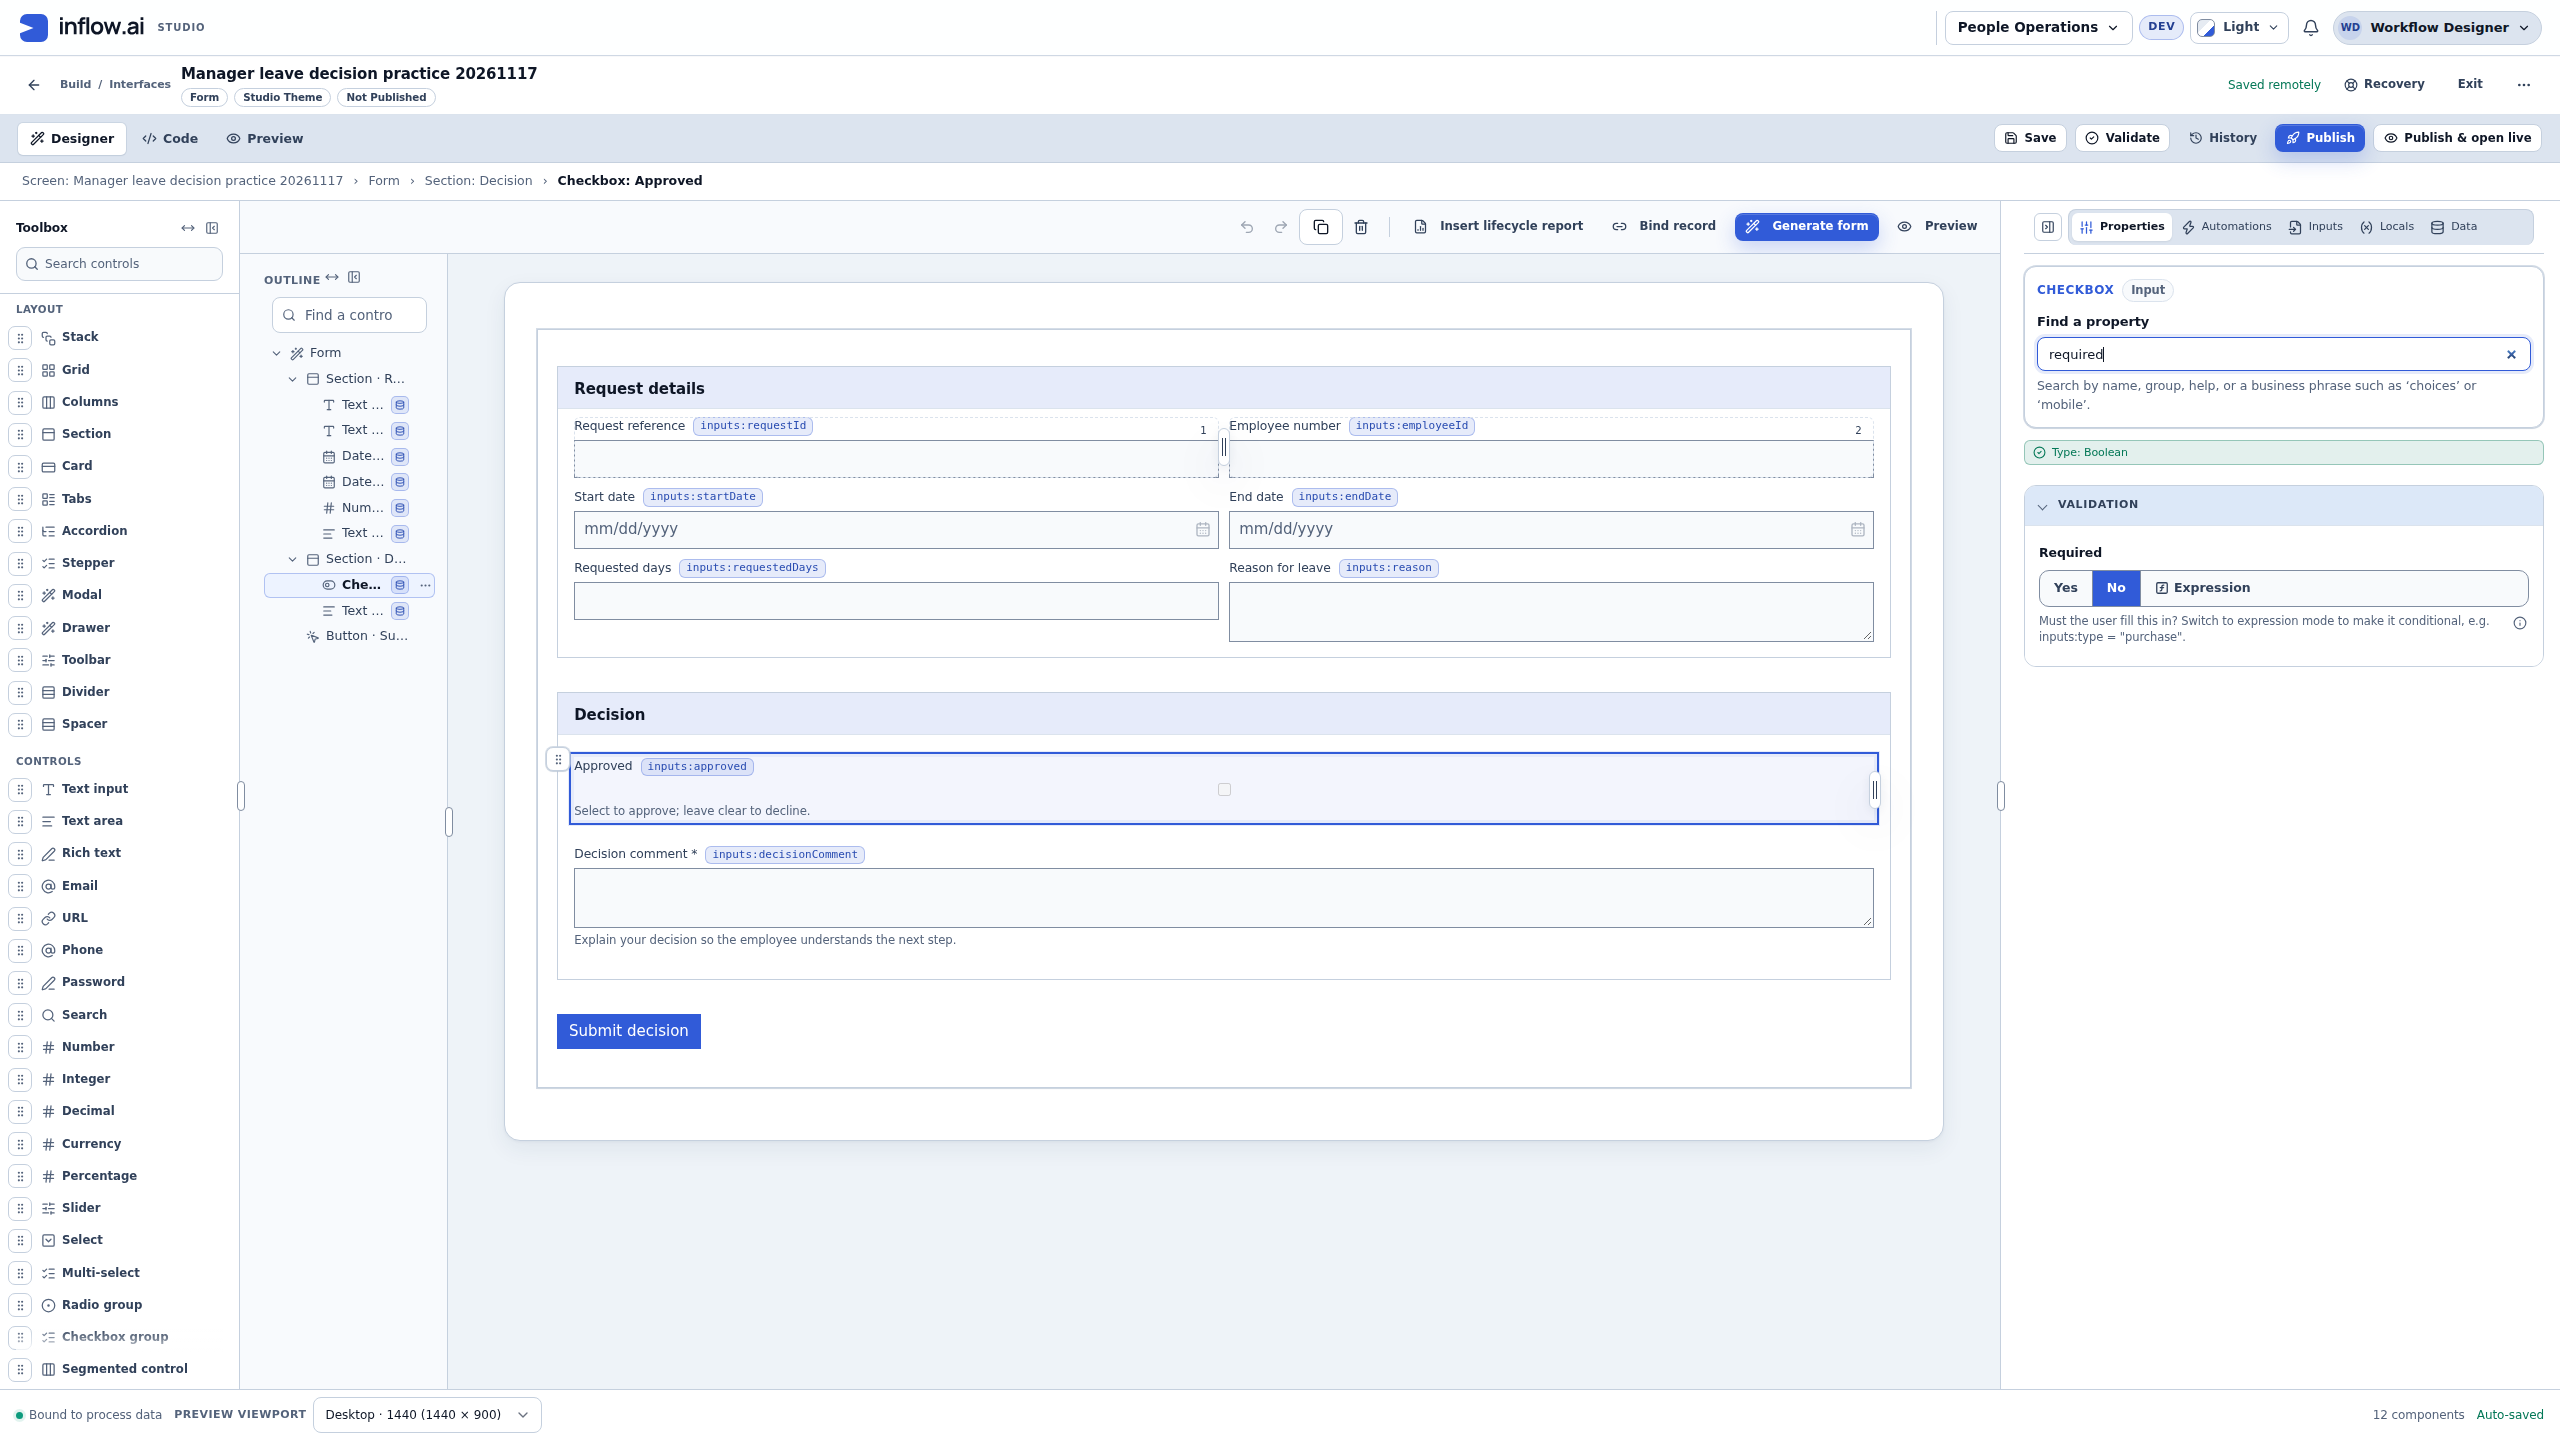
- Leave the checkbox optional. Select Approved. Confirm Store value in points to inputs:approved. Search Properties for Required and keep No selected. A clear checkbox is the valid no answer, not an incomplete approval. The process will supply a genuine Boolean false starting value through its mapping.
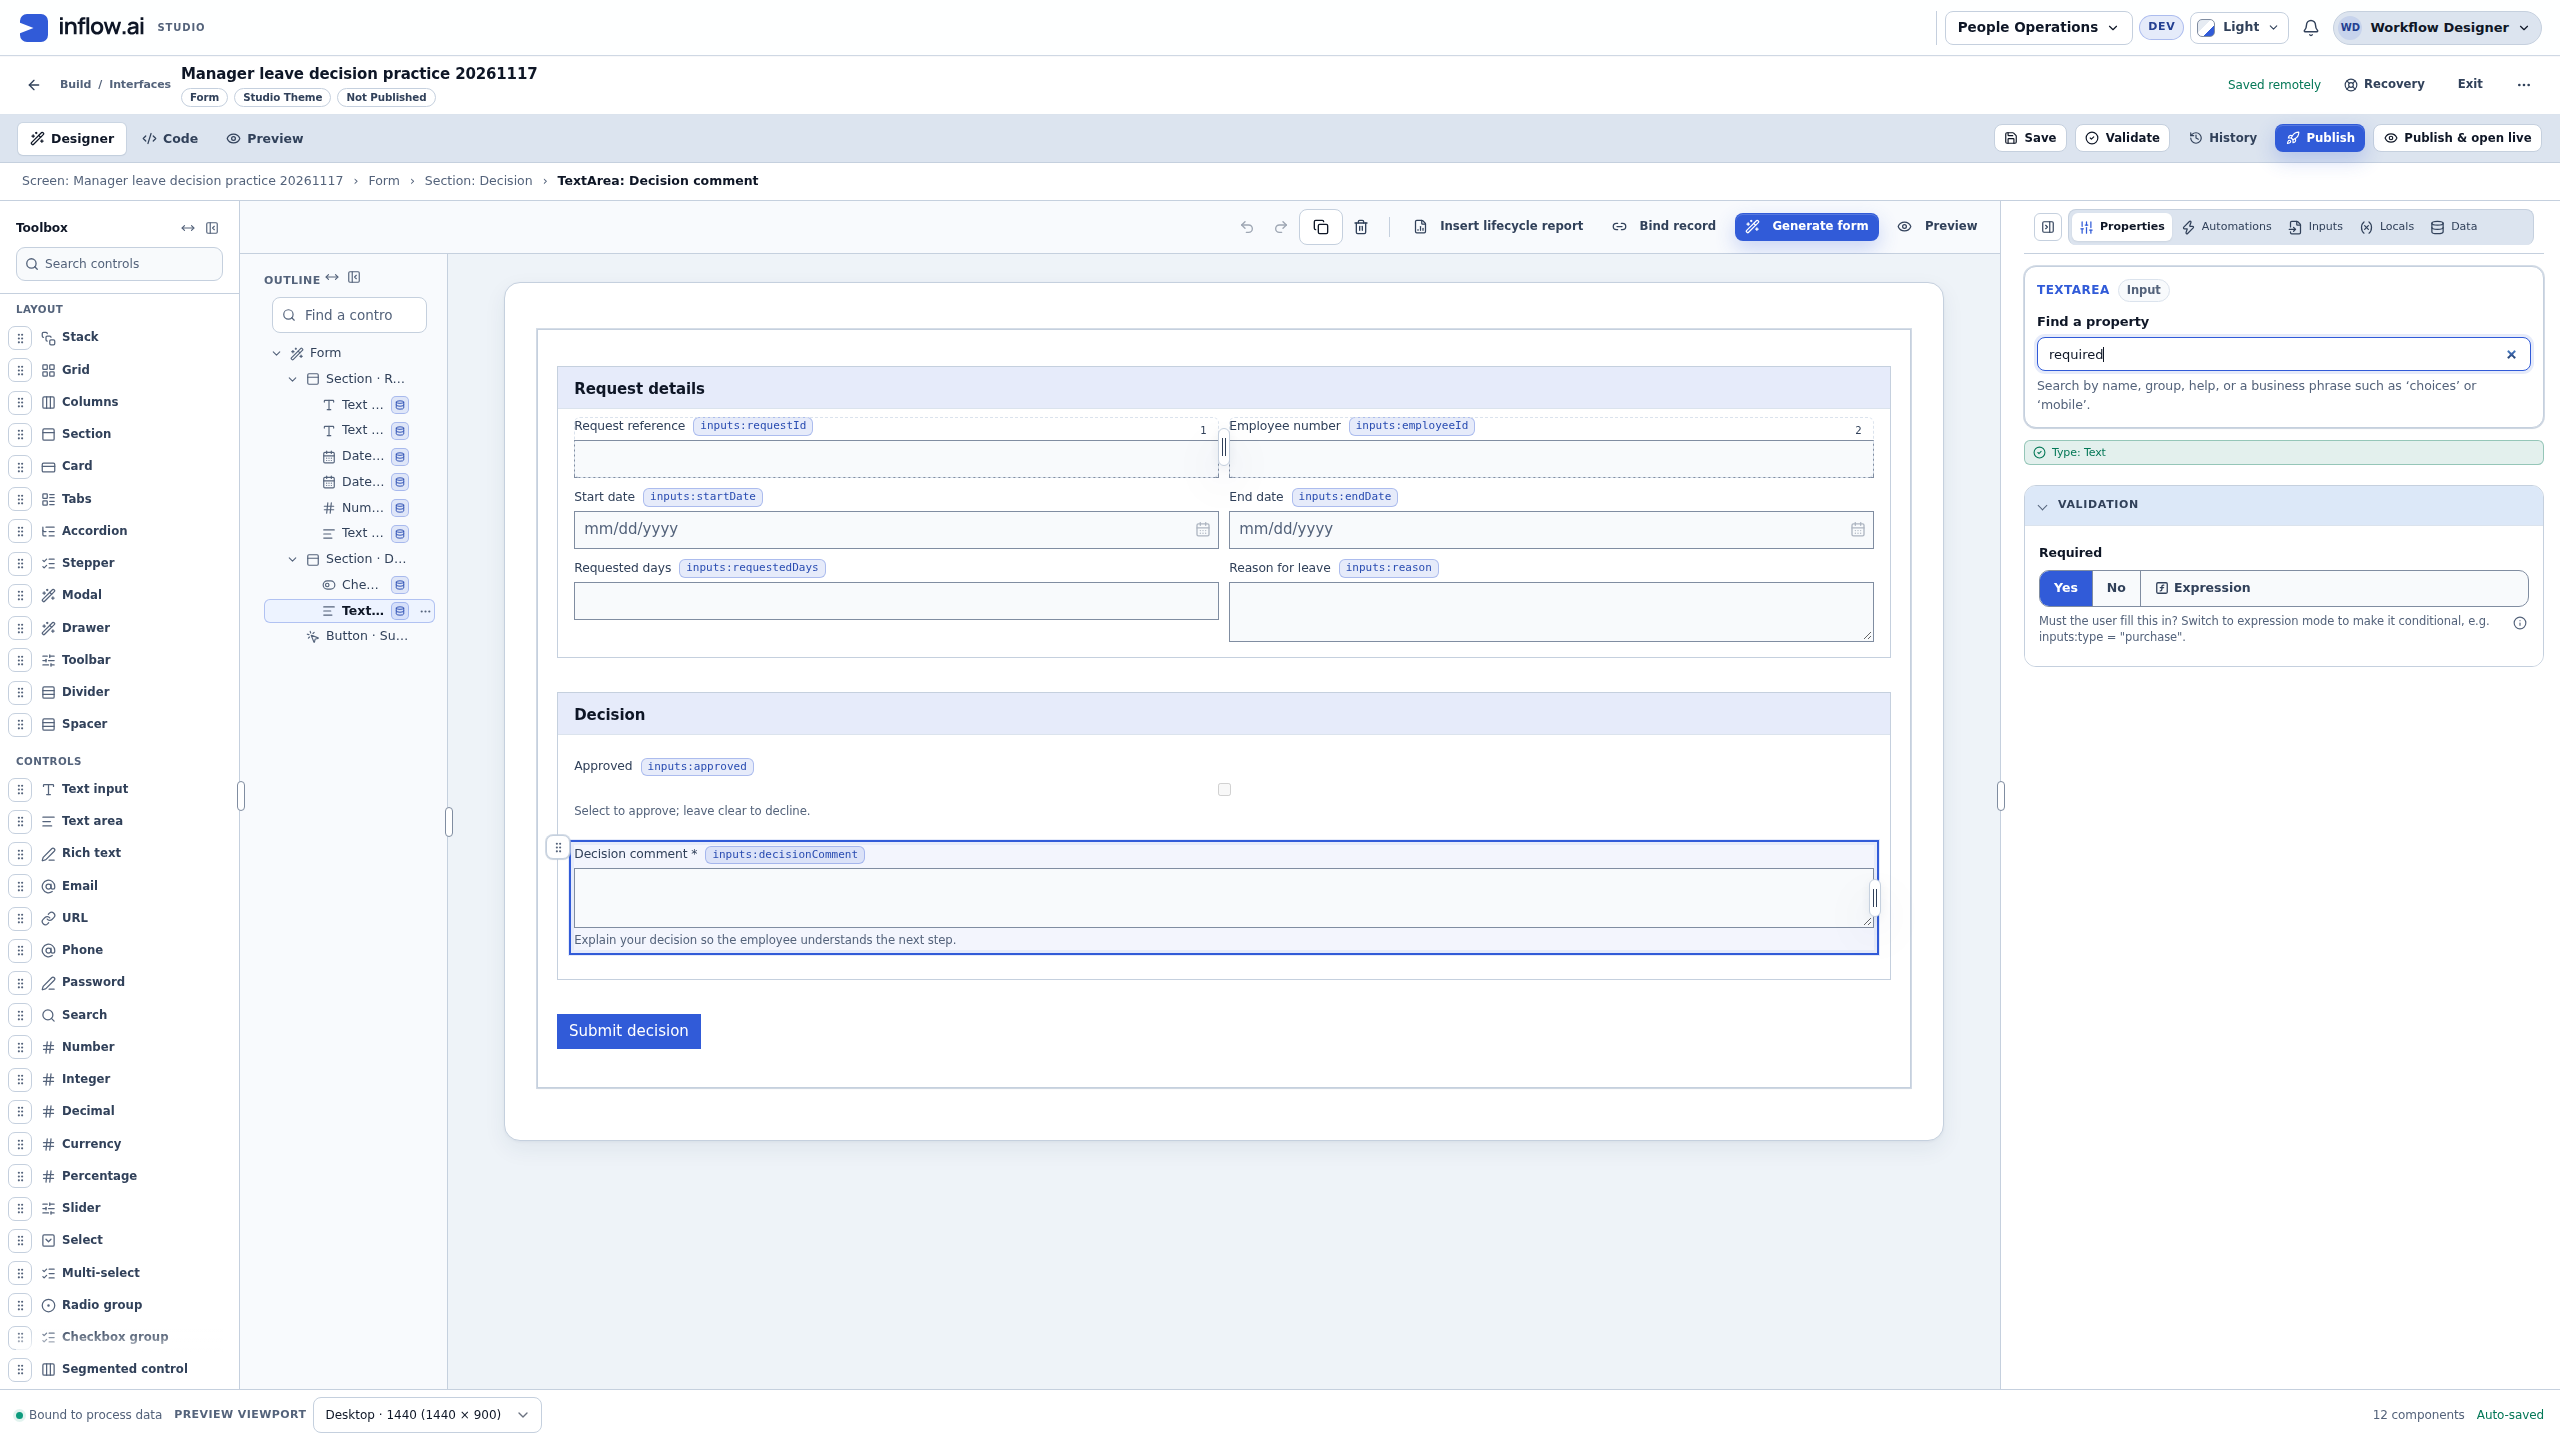
- Require the explanation control. Select Decision comment and confirm inputs:decisionComment. Its control Required setting is Yes for this exercise, while the declaration may remain optional. The manager types this answer; do not fill it with the employee’s reason or a canned decision.
- Inspect the submit action. Select Submit decision in the outline, then open Automations. There is one Submit to the calling process step. In Properties, leave Business outcome empty, leave Reason from form field unbound and keep FULL Task submission policy. The comment is an ordinary answer; it is not automatically the activity’s decision reason. Do not press the button during builder-only preparation.
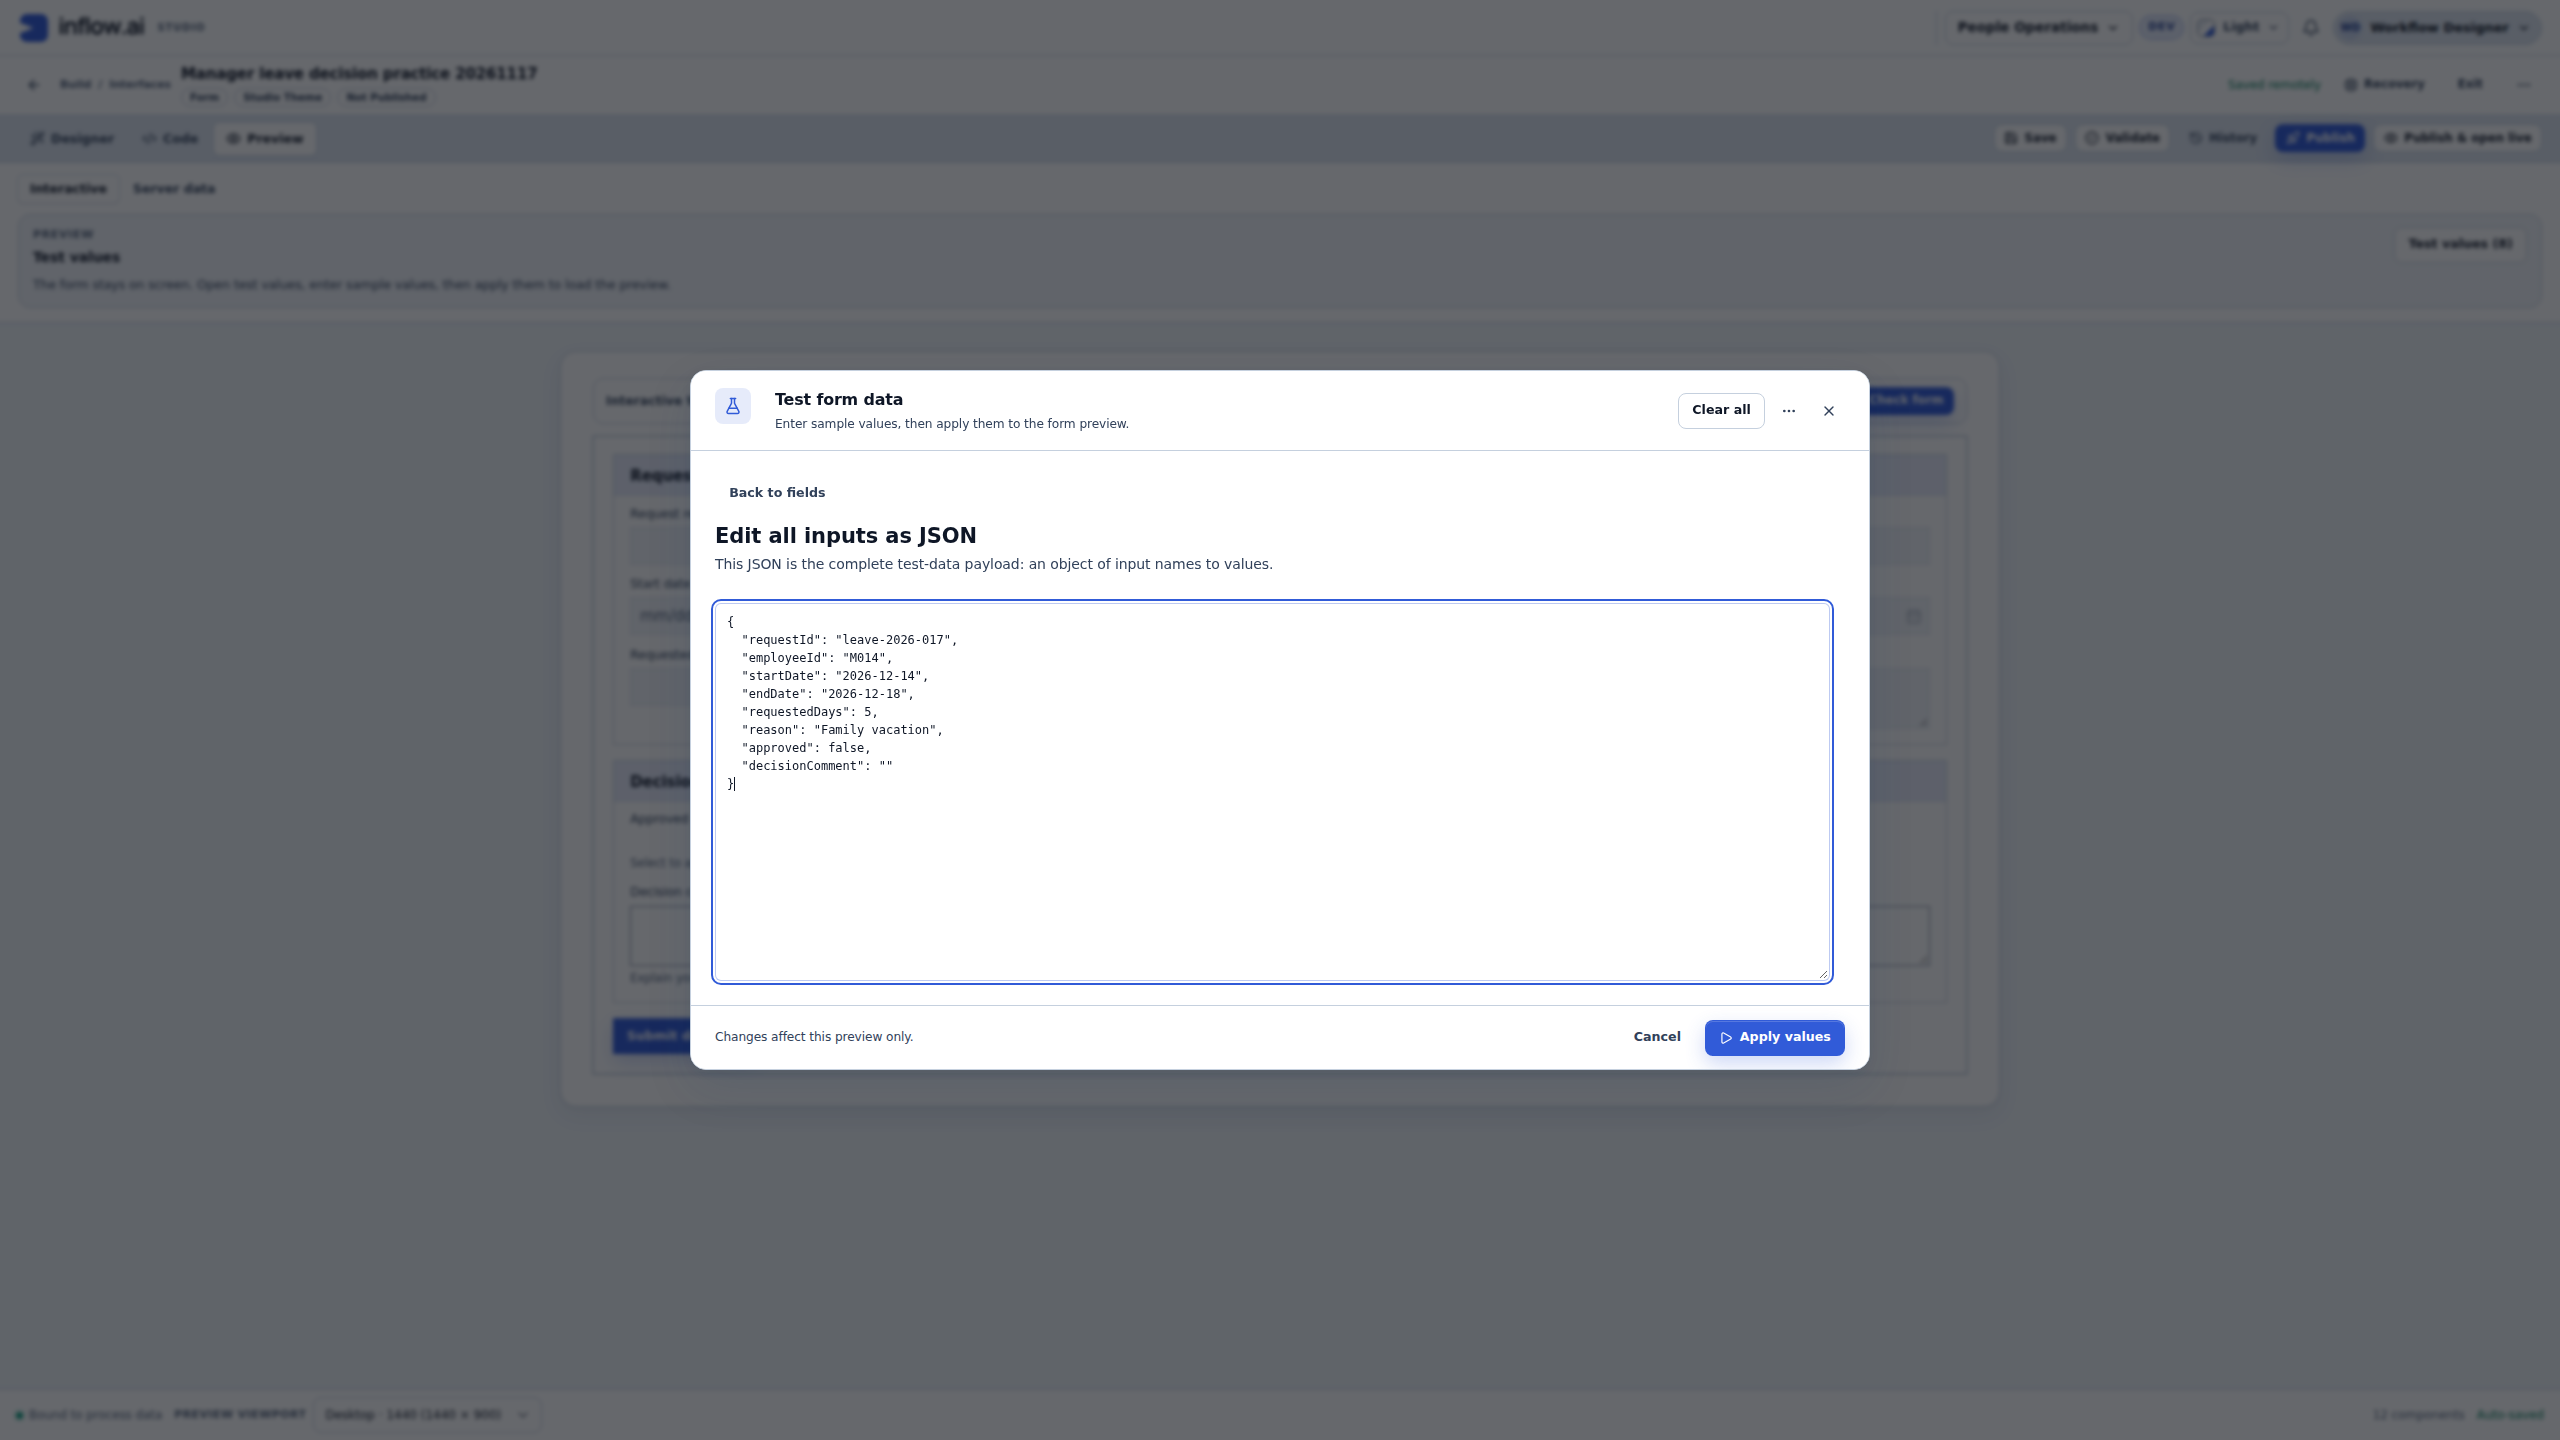
- Check the preview with fictional values. Open Preview → Interactive → Test values. Enter the request context using the typed fields. The More → Edit all inputs as JSON option also accepts the prepared test-value object linked below. Choose Apply values, then inspect the displayed dates, employee number and reason. These entries affect this preview only; they do not create or change a business record. Use Check form to find missing answers without submitting the task.
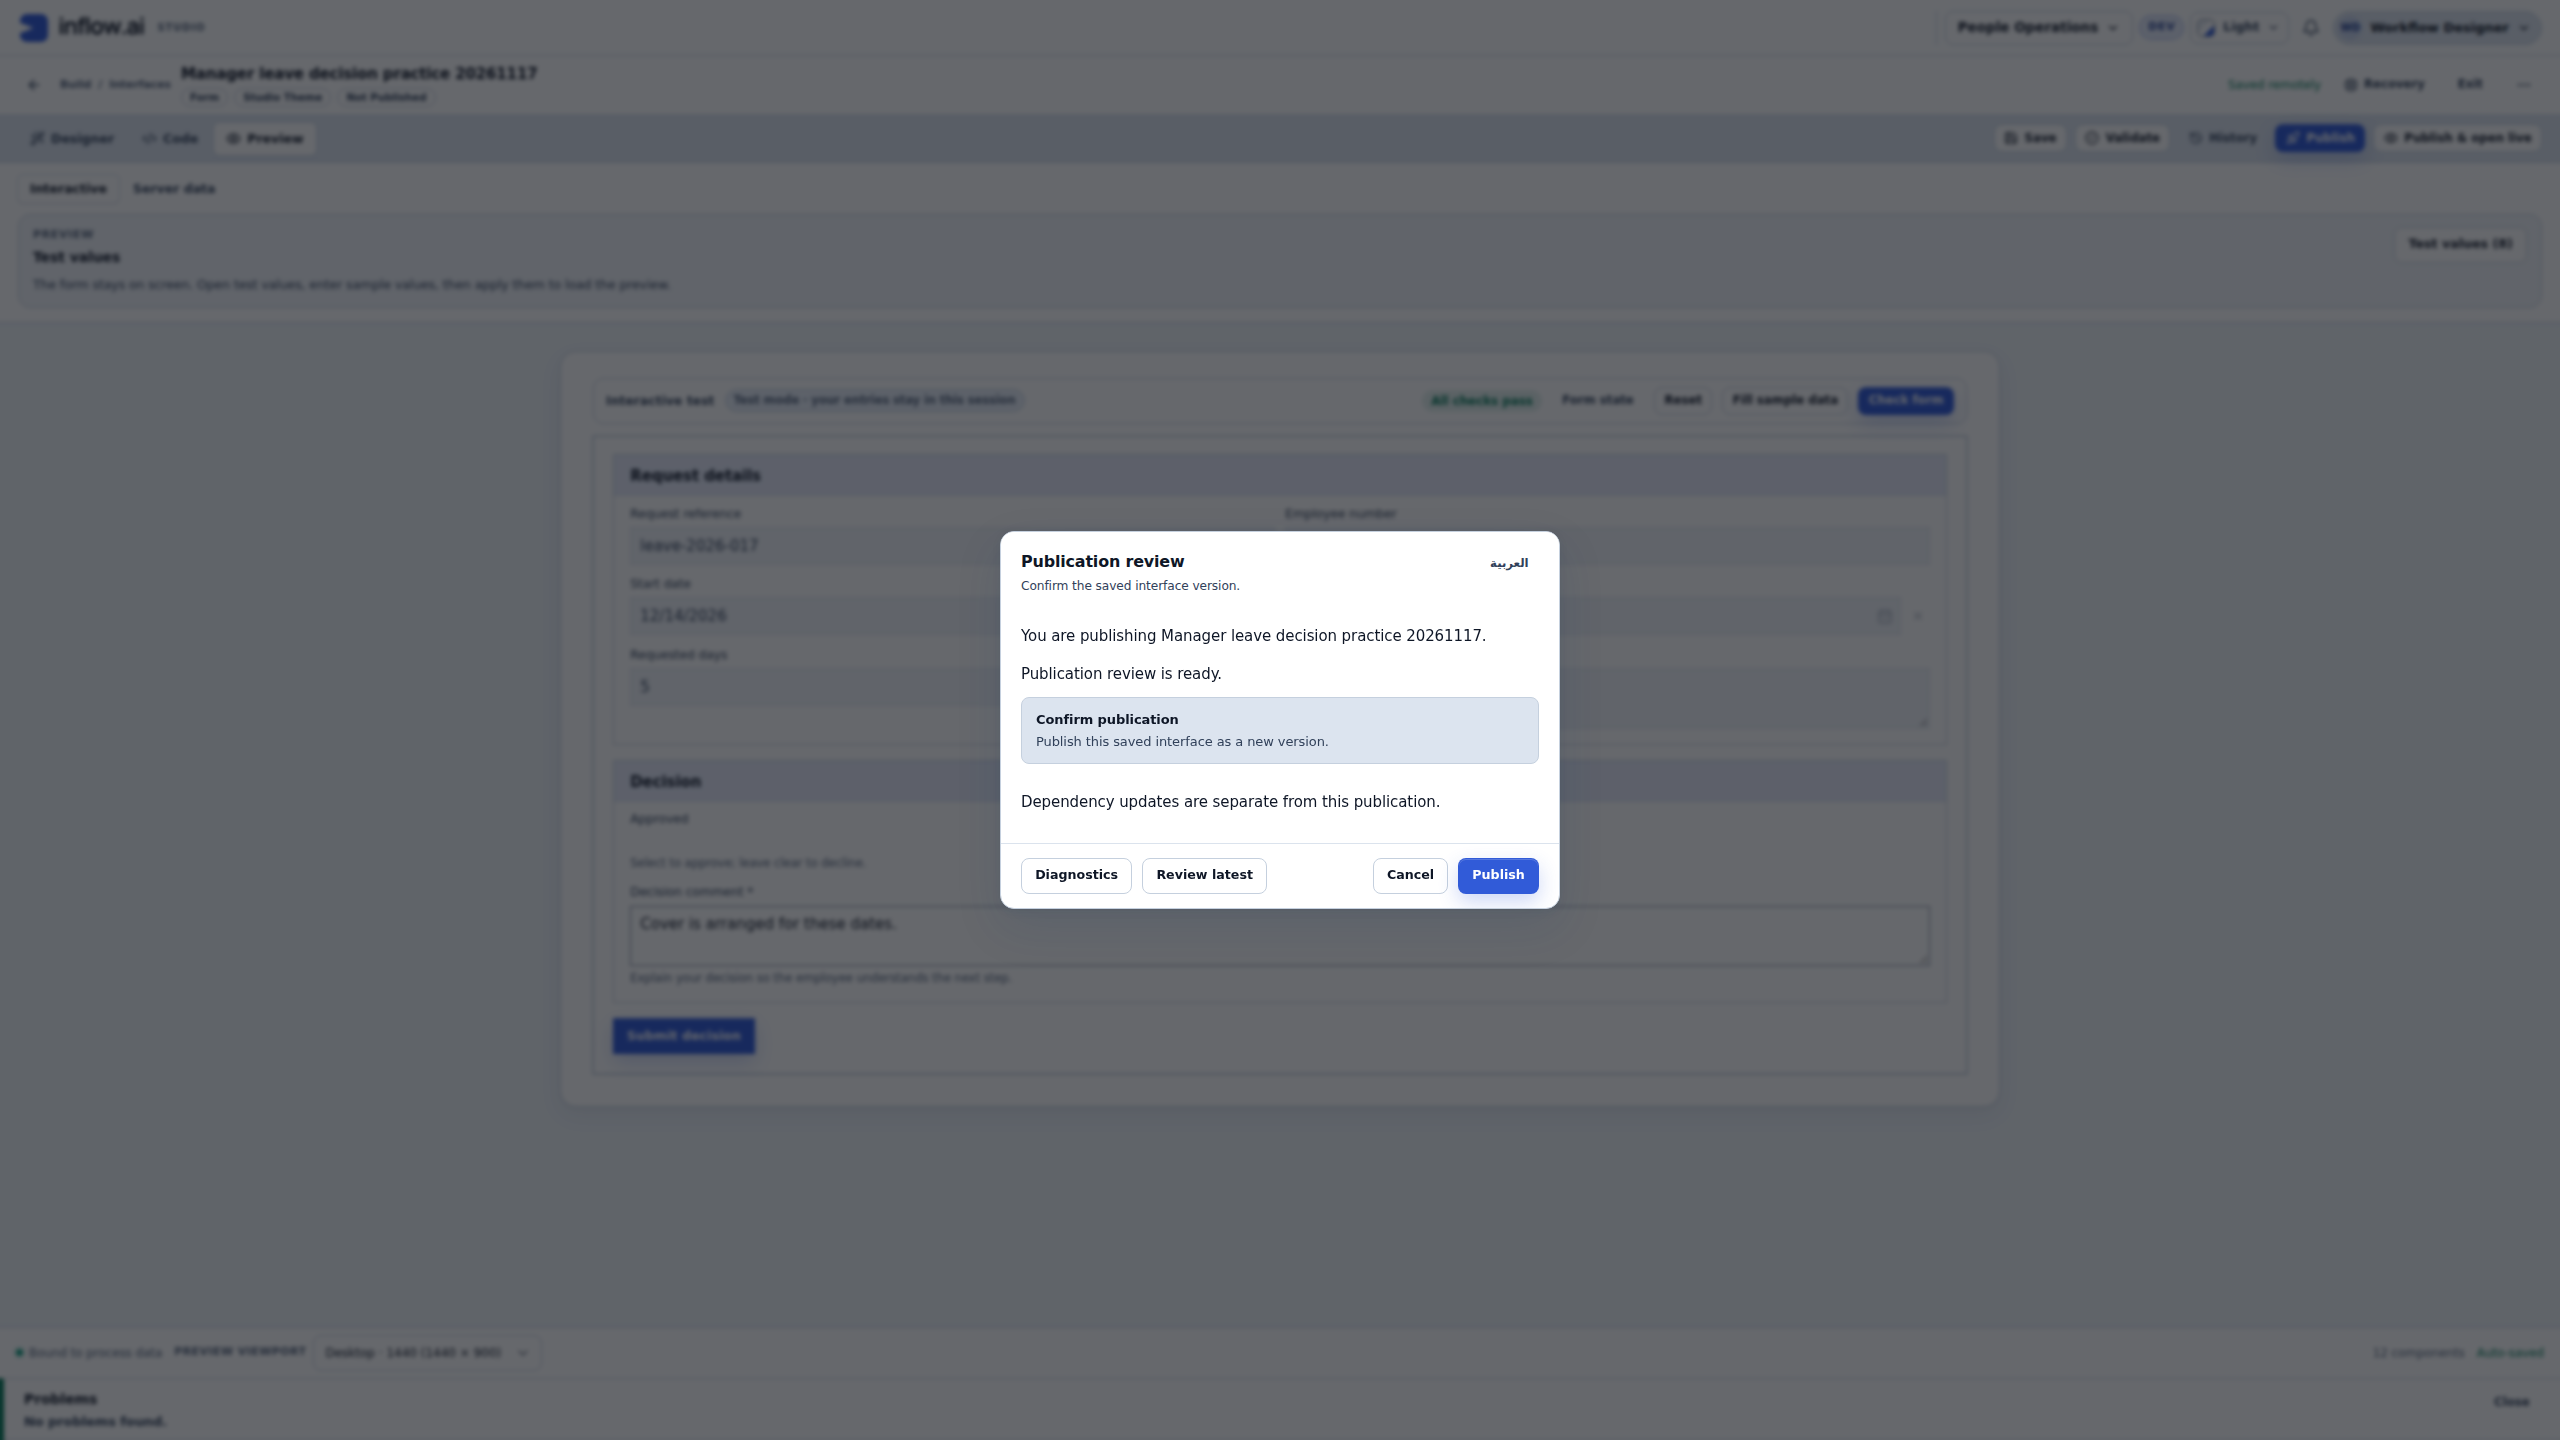
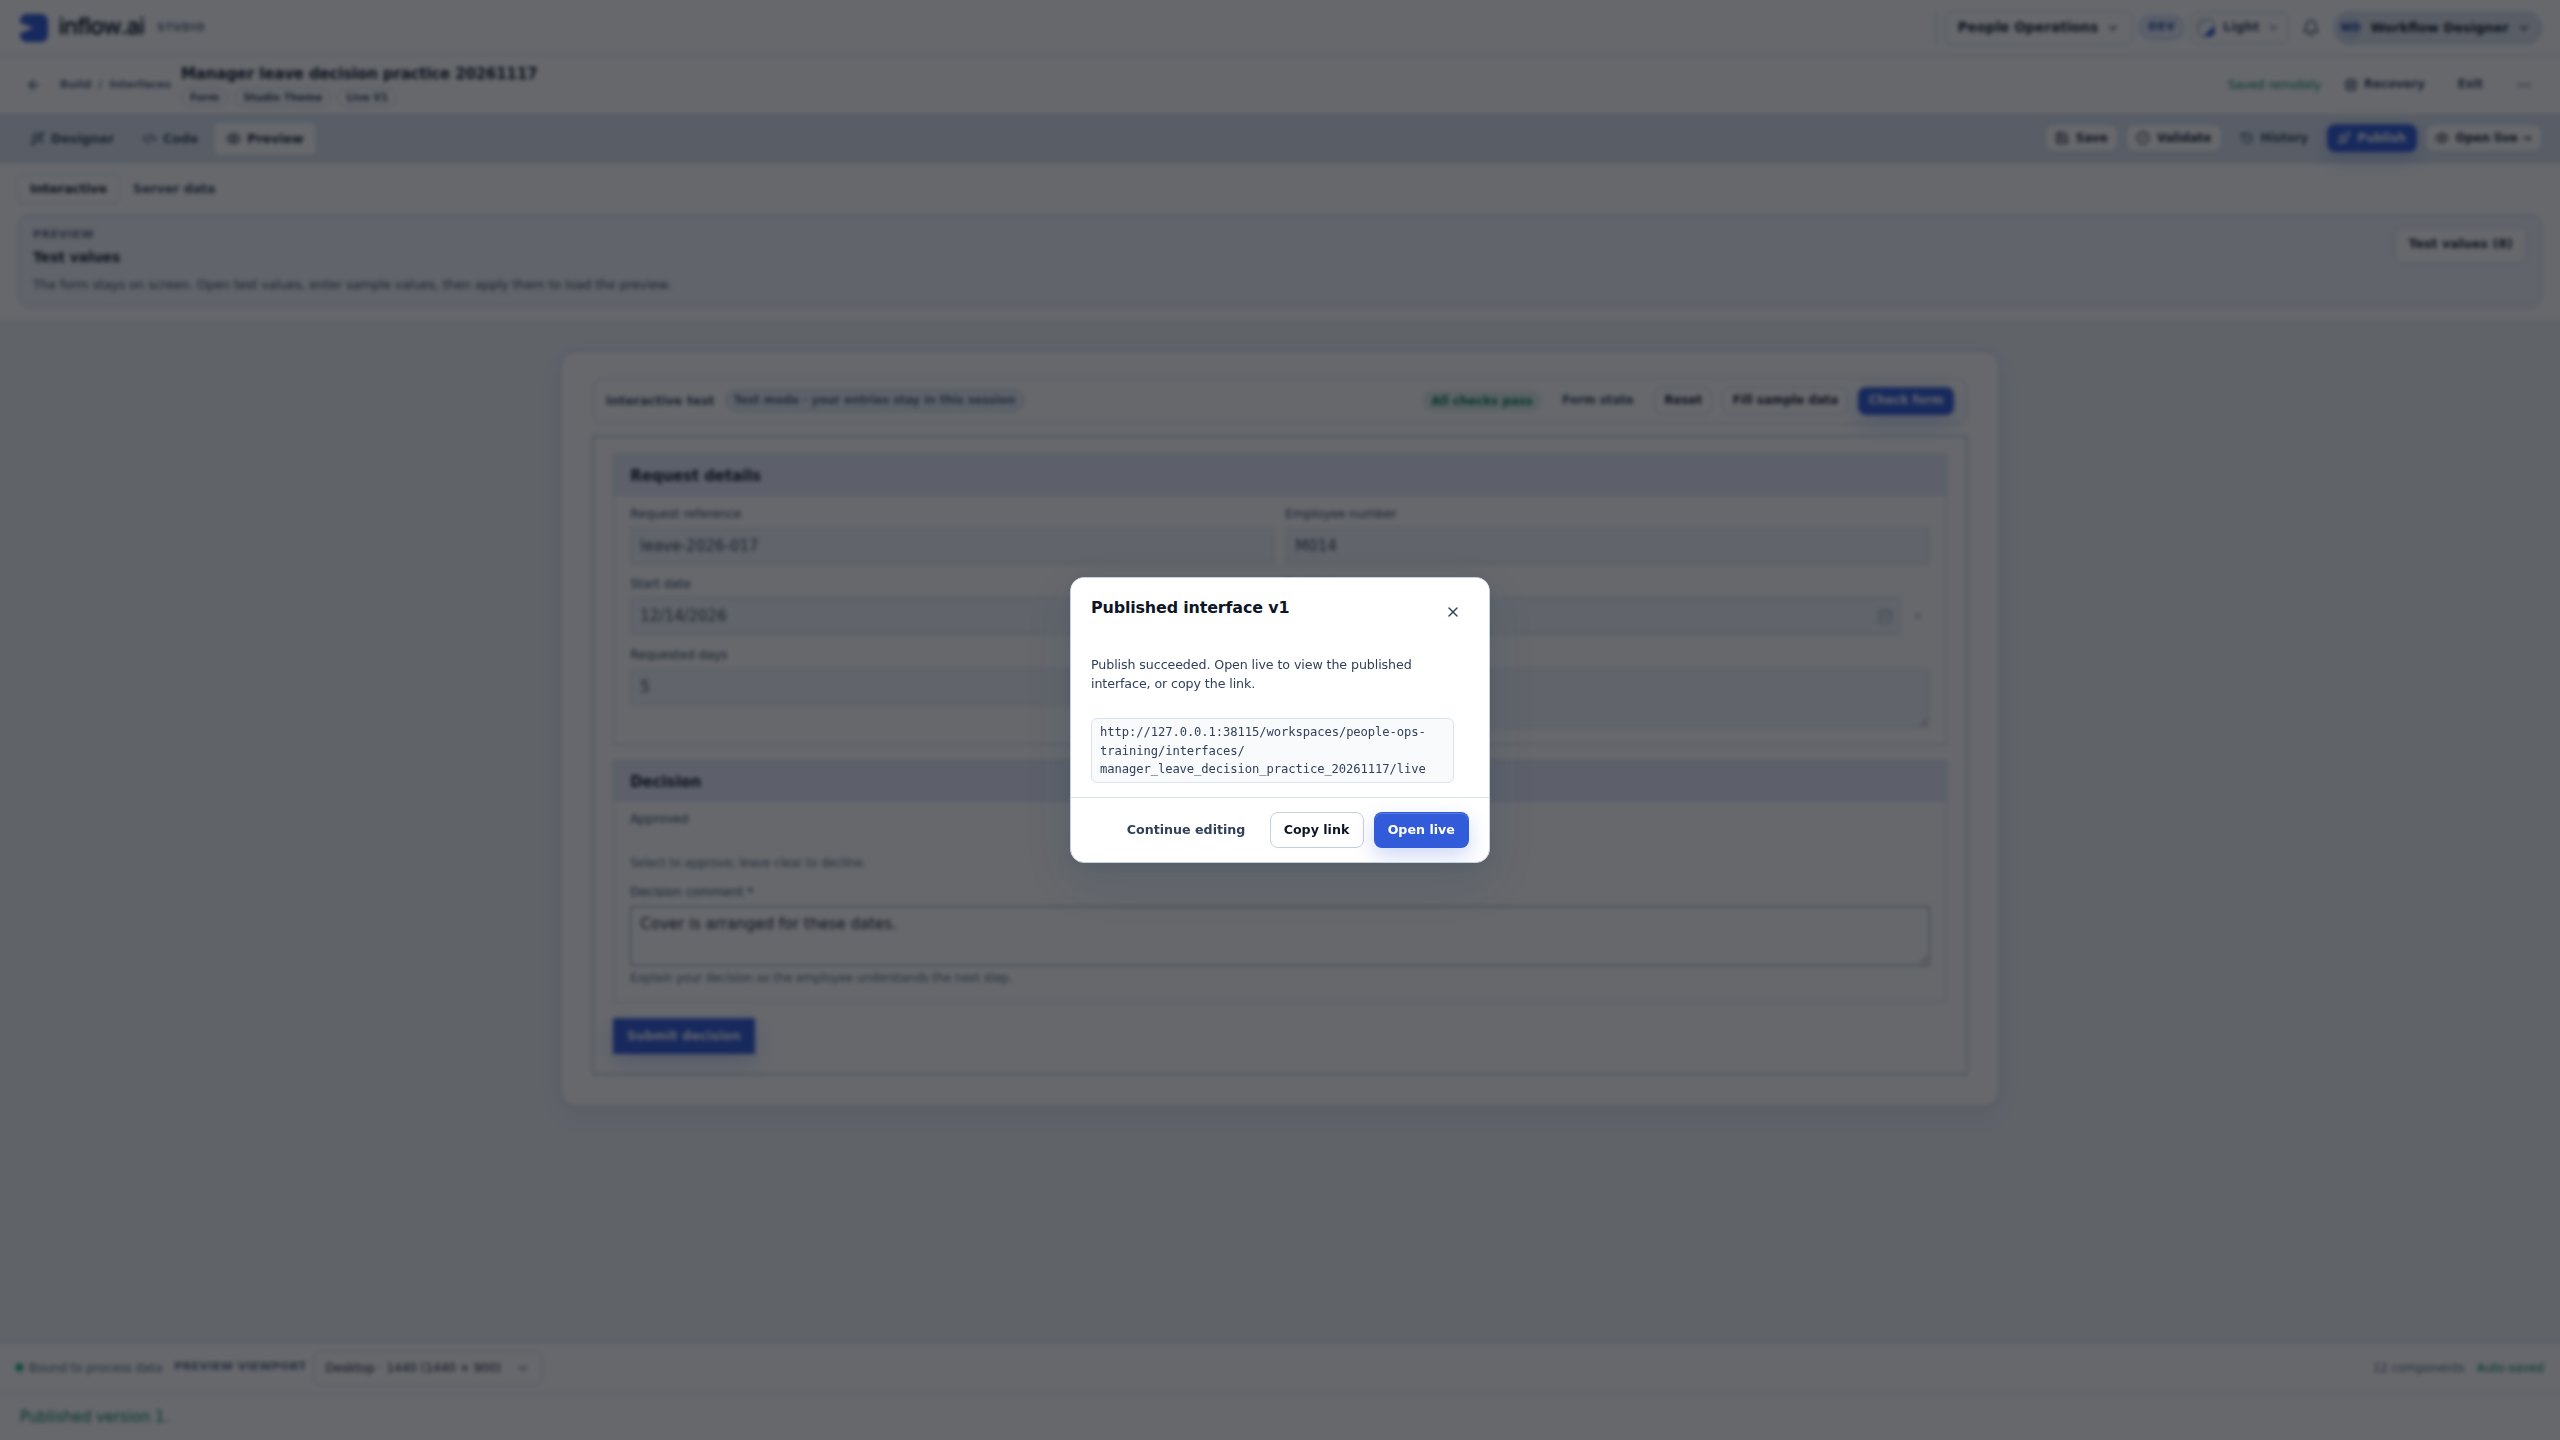
- Release the reviewed Form once. Save and wait for Saved remotely. Choose Validate and resolve any named problems. Choose Publish, read the exact form name in Publication review, then confirm Publish once. Read Published interface v1 (or the actual later version in your exercise). Continue editing returns to the same form. The process is a separate artifact: select this published form in the human task and complete the mappings and intended manager assignment before publishing that process.
The following is test data, not the interface document and not a saved leave record. In Test values, requestedDays is a number and approved is a Boolean. Keep those two values unquoted. Dates use the date format below in this JSON view; the visible date controls may format them for the current locale.
| Input | Fictional preview value | Value type |
|---|---|---|
| requestId | leave-2026-017 | Text |
| employeeId | M014 | Text |
| startDate | 2026-12-14 | Date |
| endDate | 2026-12-18 | Date |
| requestedDays | 5 | Number |
| reason | Family vacation | Text |
| approved | false, with Approved clear | Boolean |
| decisionComment | Leave empty for the missing-answer check | Text |
For Edit all inputs as JSON, open the prepared fictional preview values, copy the complete object and paste it into the dialog. Replace the current preview object rather than appending to it. Choose Apply values once, then compare the visible controls with this table. This example file contains test values only; it neither installs a form nor submits a leave request.
Read the input contract
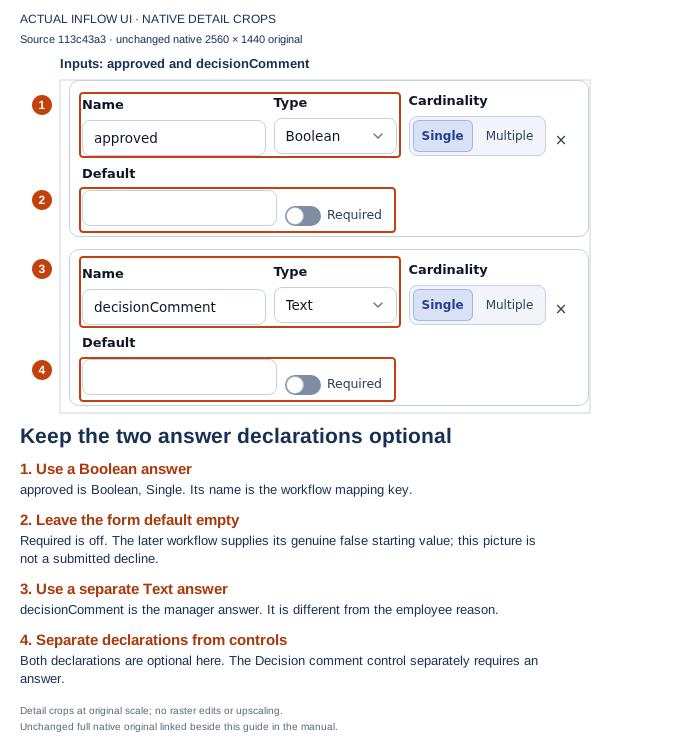
Input declarations: approved and decisionComment have different types and names. Scroll through the other six declarations as well. An optional declaration does not cancel a required answer control. Open the unchanged native 2K screenshot.
Inspect the request and answer controls
The canvas shows bindings beside the controls. Select a control before reading its Properties so that a similarly named setting on another control does not mislead you. The pictures deliberately filter Properties to the named setting; the filters do not change the stored form.
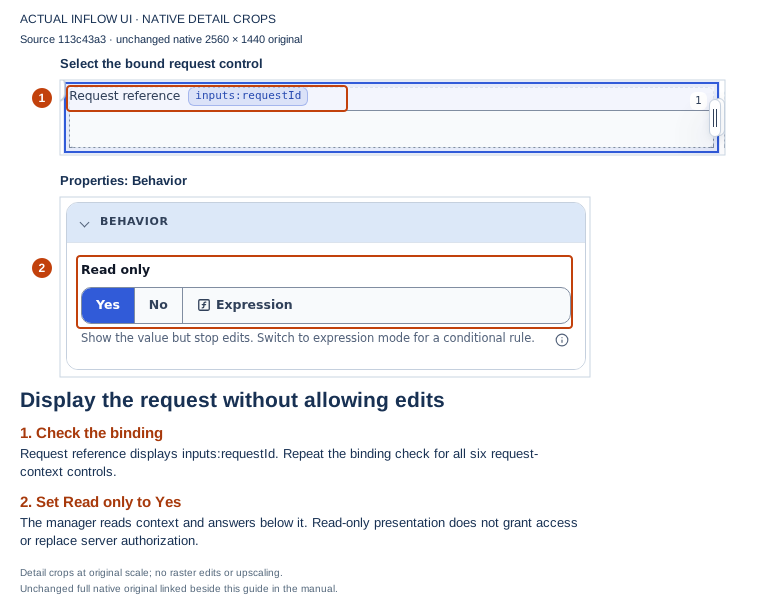
Read-only context: this selected request control shows its real binding and the Read only setting. The saved example applies the same read-only behavior to all six context controls. Open the unchanged native 2K screenshot.
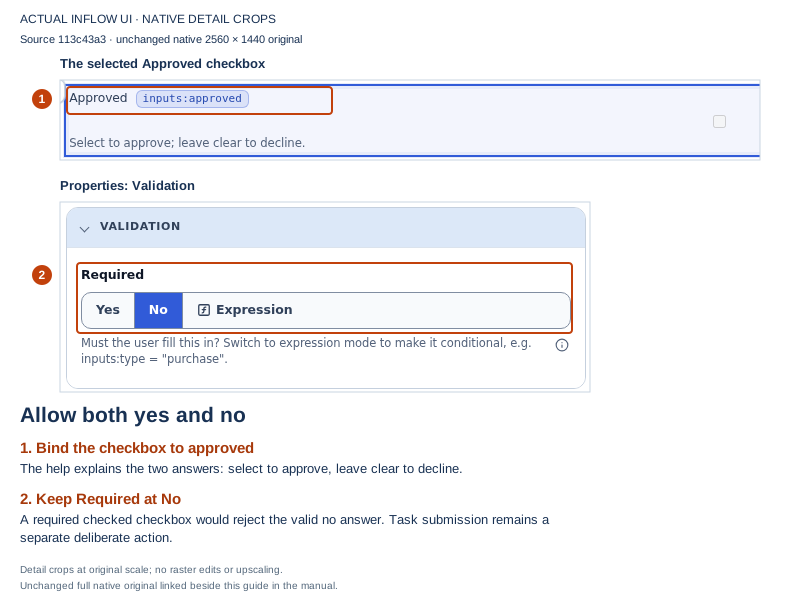
Both answers remain possible: Approved has Required set to No. The clear checkbox can represent a valid decline answer after the real task is deliberately submitted. Open the unchanged native 2K screenshot.
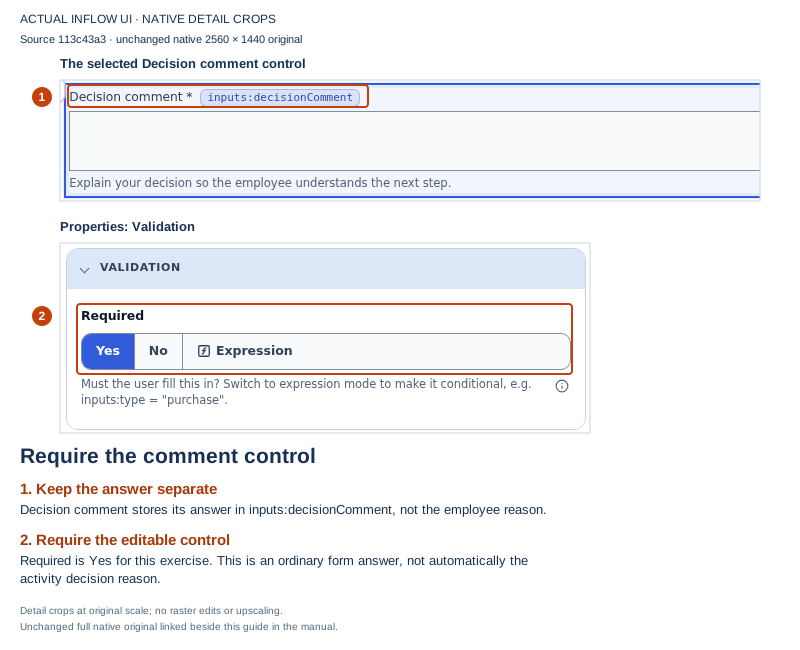
Require the explanation: the separate Decision comment control has Required set to Yes. It remains an ordinary form answer that the task’s output mapping must carry back. Open the unchanged native 2K screenshot.
Inspect what Submit decision will do
The automation describes a consequential action when this form is hosted in a real task. Its presence in the builder is a configuration inspection, not evidence that a task completed. Avoid adding a fixed Approved outcome to a generic button that also carries a no answer.
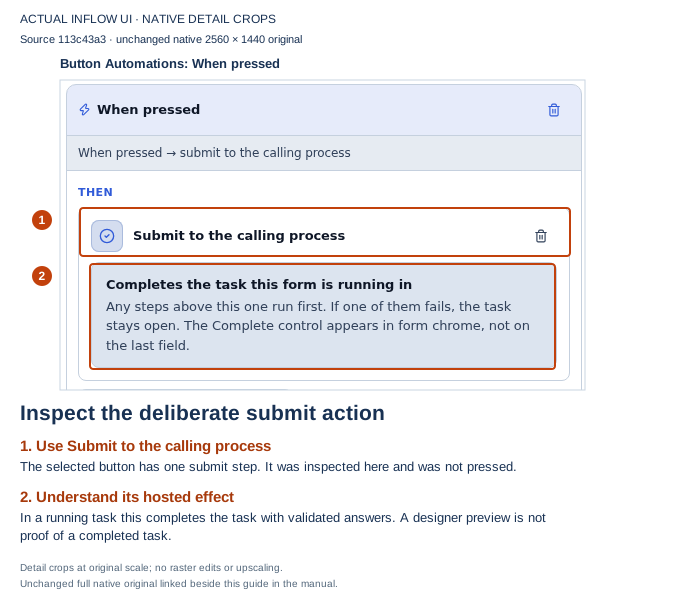
Inspect, then leave it unpressed: the authored automation submits to the calling process. Actual task assignment, allowed actions and submitted answer validation still apply in a task host. Open the unchanged native 2K screenshot.
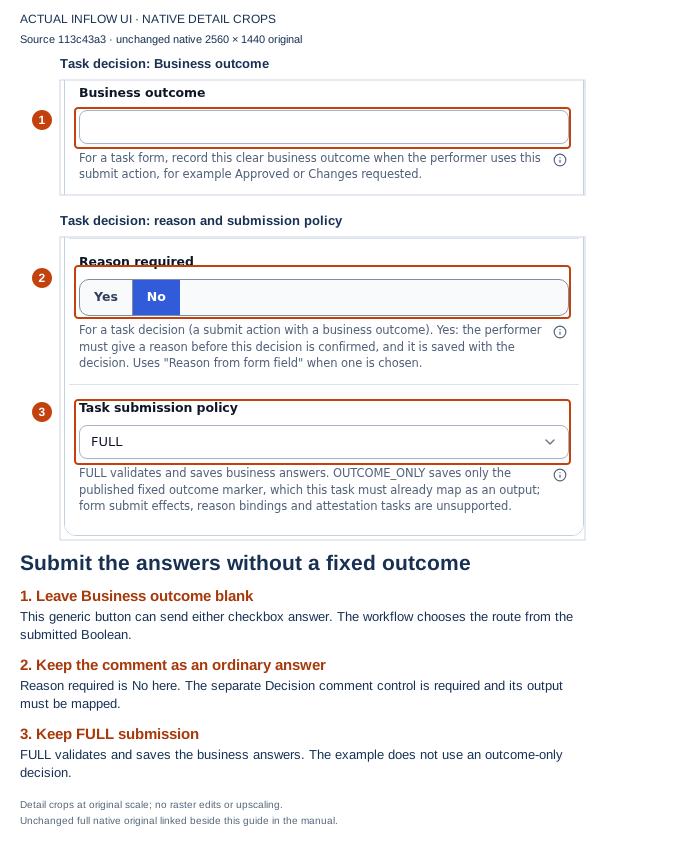
Send the business answers: FULL is selected and Business outcome is empty. Reason from form field is also unbound in this saved example. The required Decision comment control supplies an ordinary answer, not a fixed activity reason. Open the unchanged native 2K screenshot.
Load test values without starting work
In the pictured test-value dialog, Apply values loads the local preview. It is different from Submit decision. Keep the preview-only note in view when explaining the example to someone else. The workflow lesson’s illustrated answer checks show the missing-comment recovery and both checkbox values.
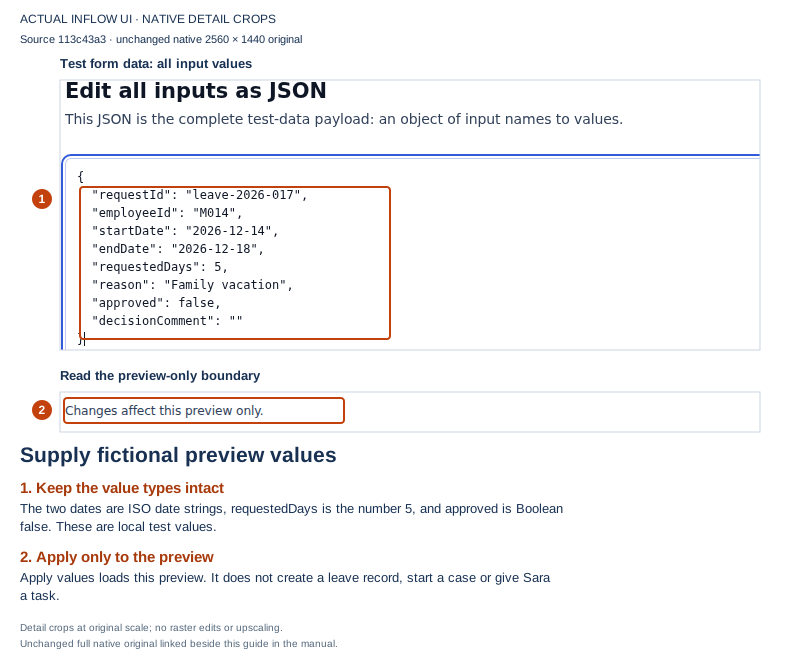
Local test values: this object describes one fictional request. It does not identify Mohammad’s authenticated account, choose Sara as the manager or create a task. Open the unchanged native 2K screenshot.
Read the review and the publication result separately
Validation and local Preview checks precede the normal publication review. Confirm only the current saved form you intend to release. If the response is uncertain, inspect the existing publication result and history before another attempt; a missing reply does not prove nothing was published.
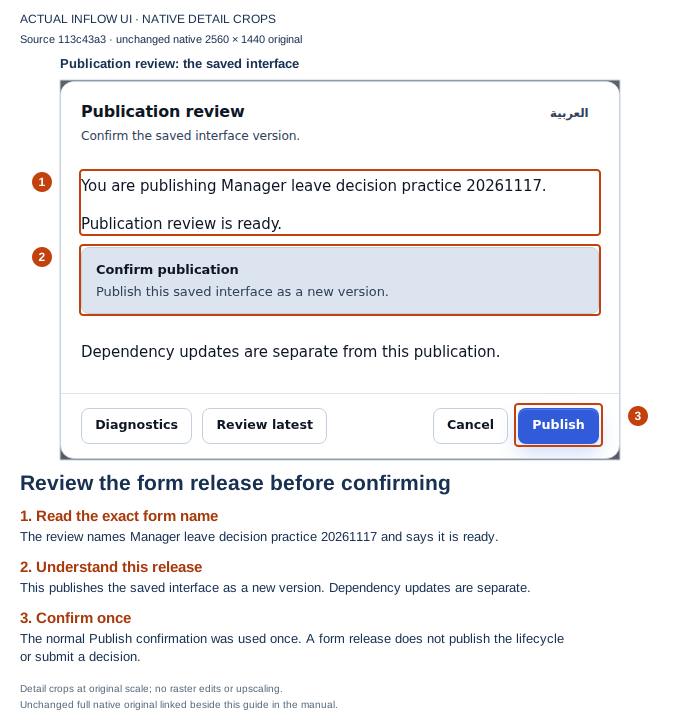
Before publication: read the exact form name and saved-interface review, then confirm once. This review concerns a Form, not publication of the parent lifecycle. Open the unchanged native 2K screenshot.
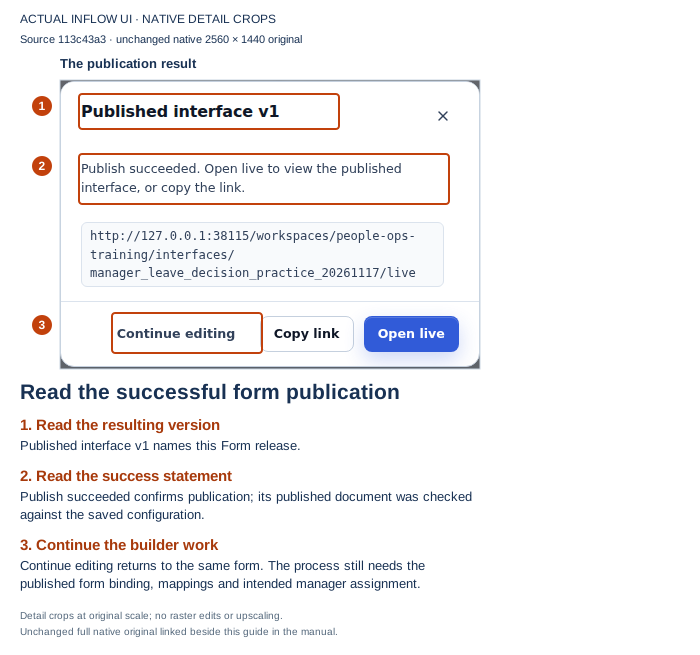
After publication: the example’s Form release succeeded as v1. Continue editing returns to the same definition. The link is a destination, not an access grant; selecting a manager and publishing a process remain separate work. Open the unchanged native 2K screenshot.
Practice checkpoint: the manager-decision Form is saved and published, with six read-only context controls and two editable answers. The screenshot exercise tested local form validation and the Form release. It did not submit either answer, publish a lifecycle, start a case, create a leave record or test employee/manager permissions. Return to the workflow lesson to bind this actual published version and map only approved and decisionComment as outputs.
Illustration provenance: these are unchanged native 2560×1440 captures from the ordinary builder session on build-start master 113c43a3, recorded 17 November 2026. Numbered guides use native-scale detail crops and vector marks; the full original is linked beside each. The technical companion remains separate.
Milestone 8 — Return and connect the published workflow
Complete workflow authoring, testing and publication before this step. You now have an actual workflow to choose. The generated employee form already holds the request fields; use those controls as the source rather than inventing another set of form inputs.
- Return to the employee form, select its intended submit control and open Automations.
- Add Start a lifecycle at the intended point after the successful record creation, retaining the request values until the start completes. In Published lifecycle, select the actual published Leave requests workflow. Read its pinned version.
- Inspect the published input rows. Required inputs appear directly; if Required values are missing appears, map the named rows. Expand Optional inputs to see the other declared inputs, including a reason that was declared optional. Required and optional describe whether a value must be supplied, not whether an existing employee answer should be discarded. If the action shows This lifecycle can't be started here yet. instead of input rows, the selected release uses a workflow design that this runtime cannot start yet. People who submit the published form see the same sentence (in Arabic in an Arabic app) and no case is created. Choose a release that starts here, or change the workflow and publish it again. People who may not start the lifecycle never see this sentence; they keep the usual not-available answer.
- For each row below, use its value picker and choose the matching generated control under Form Controls. The offered names are the controls' current visible labels: this lesson renamed the dates, days and reason in milestone 3. Inspect Store value in on the source control if two labels are similar. These generated Create controls hold the corresponding record field; they are not newly declared ri: form inputs.
The process input names and record field keys are separate declarations. Here requestId is the process input, while request_id is the model field. The picker connects the generated question to the correct source; do not rename the model key to imitate a process input.
| Published process input | Choose this generated form control | Source field |
|---|---|---|
requestId |
Request number / the generated request-reference control | record.request_id |
employeeId |
Employee business number | record.employee_id |
startDate |
Start date | record.start_date |
endDate |
End date | record.end_date |
requestedDays |
Requested days | record.requested_days |
reason |
Reason for leave | record.reason |
- In Business reference (optional), choose Open expression editor for business reference. In the offered variables, find and choose the same generated request-reference control by its current visible label, then save the expression. It reads the record.request_id value already entered by the employee, such as leave-2026-017. This makes that request number the started case's business reference as well as its requestId input; mapping the input alone does not set the case reference.
- Keep approved on its published Boolean false default and decisionComment for the manager's later answer. Do not add employee or managerUser start inputs. M014 and S002 remain business Text, not selectable directory users. The authenticated person who starts the case is its case starter; Sara's actual assignment was prepared in the workflow task's Assignment settings.
- Review the sequence and its success behavior. Keep the record create and workflow start intentional: do not reset the form's values before the start has used them. A record save alone does not start the workflow, and a workflow start alone does not perform an unconfigured record update.
- Save, validate, review and publish the revised employee form. When the ordinary-user test runs later, check the resulting case reference and six supplied values before Sara decides.
If a published input is absent, a control is unavailable in the picker or the type does not match, compare the released workflow and generated form with their owners. Repair the missing declaration or actual mapping before release. Do not pass guessed participant identities to make the start look complete.
Checkpoint: the employee's intended action can start the published workflow with the six scalar request values and a searchable request reference. Sara's review form can read those values through the task mappings prepared in the workflow lesson.
Milestone 9 — Build the assigned-task page
Prepare this page before the final application access review. It can be configured without creating a new case; an actual task appears only after the workflow assigns one to the signed-in person.
- In Build → Forms → New form, create a Form named My leave review tasks. Use the same intended business-function placement as the app.
- In its Inputs tab, choose Add input. Set Name to taskId and Type to Text, with one value. Leave Default empty and Required off. This answer will hold the task selected from the list; nobody types a task number into it.
- In Designer, select the Form's layout and add a Data grid. Set its title to My assigned tasks and save the draft.
- Select the grid and choose Connect data. In the source picker, choose My assigned tasks. This source means open tasks assigned to the current signed-in user; it does not mean all tasks in the organization.
- Continue through the preview/field steps. Keep Id, Runtime task name (the task’s name) and Status in the selected fields. The Id is the task's identity, not the leave request reference. Keep the protected row identity and choose the final Connect data button when the review is correct.
- After connecting, set the grid’s Title to Task. In Actions, set Selection mode to Single, then choose the suggested selectedTask under Local result name. This picker offers a source/title-derived name rather than arbitrary text. With the title Task, that suggestion is selectedTask. The grid keeps the selected record, including its Id, in that local result.
- Open the grid's Automations. Under When the selection changes, add Set a field. Choose the declared taskId input as Field. Open the Value formula editor and enter locals:selectedTask.id.
- Add one Task viewer beside the grid under the same Form layout, not inside the grid. In its Task id expression editor, select the declared taskId input or enter ri:taskId. Choose Perform for this manager-work page.
- Save, validate and publish My leave review tasks. In the App Shell's Pages panel, add a page using Show an existing interface, choose this published form and title the page My review tasks. Save, validate and publish the shell.
The two short formulas connect the pieces. locals:selectedTask.id reads the Id of the one record selected in the grid; ri:taskId reads the page input that the automation filled. They do not manufacture an identity or grant access. Before the first task is selected, the viewer shows its empty state. After it opens a task, clearing the input or losing that row does not necessarily clear the viewer: its mounted session keeps the current task. Selecting a different task ID points the viewer at that task, subject to its normal access check. Do not use deselection as a way to close or reset unfinished work; use the full task page for its saved-answer and resume controls.
Once the workflow has created Sara's teaching task, check this page in current published Live using Sara's normal account. Select the task with the grid's single-selection control. The expected result is that its task details and the published manager decision form appear beside the list. Confirm that it is the same task shown in the normal task view. If the list is legitimately empty before a task is assigned, create no sample row and enter no guessed task number.
If the source is unavailable, ask the administrator about this workspace's task access. Keep the task's own form and eligible participant rules. Respect the viewer's unfinished-work warning; an embedded viewer does not promise the full task page's answer-draft saving features.
Checkpoint: the published app contains a concrete current-user task list and selected-task viewer. Include this page, the selected workflow/form and the intended task access in identity milestone 6, then continue with workflow milestones 5–8.
Milestone 10 — Check the two business outcomes
This stage follows the workflow tutorial's milestones 5–8. Reuse the actual request and tasks created there; do not submit or decide on leave-2026-017 again.
Example 1: inspect Sara's approved teaching request
- If the application includes a permitted request-detail/history page, sign in as Mohammad and read the existing leave-2026-017 request there. Do not create another row. If no such page is configured, have the authorized application/workflow owner verify the permitted record or case result through their normal readback route; do not infer that Overview or New request exposes history.
- Sign in as Sara and use the ordinary permitted completed-task/history or case-result route available in this application to review the result. The My review tasks page is sourced from open tasks assigned to the current user, so the completed task is expected to disappear from that list.
- Compare the details with the approved result already produced in the workflow lesson. Do not recreate the request or widen the open-task source to make a completed item reappear.
- Check the resulting case path and any separately configured record-status update through an actually permitted view or the authorized owner's normal readback route.
Example 2: inspect a declined request
Use the separate permitted request and task created by the workflow lesson's decline exercise. Do not reopen a completed task as if it were fresh. If the App Shell has no configured request-history page, have its authorized owner use the normal case/record readback route to verify the decline path and any configured record effect.
The two examples preserve the difference between a stored request, a case and a completed task. If an outcome is unclear, check the existing task/result before submitting again. Finish the identity lesson's final role checks so the employee and manager experience is reviewed separately.
Optional milestone 11 — Add chat to this application
The employee and manager can use the ordinary pages without chat. Enable chat in this App Shell when the project has approved the sources and actions it should offer. This is the application's own assistant, named Leave requests Chat by default. It is separate from the consultant's Ask Inflow experience.
Nadia chooses what the app may use
- Open the Leave requests App Shell in Designer. Select the interface itself so the Properties panel shows the whole App Shell, rather than an individual page control.
- Find Enable App Chat in Properties and turn it on. Leave Chat launcher label empty to use Leave requests Chat, or enter the agreed business label.
- Under Approved App Sources, choose the intended kind and an offered published source, then choose Add source. For the teaching app, select the actual Leave request record type, the permitted task inbox and published leave guidance only when those sources are prepared and offered. A similarly named item from another workspace is not a substitute.
- Review each source's allowed operations. A newly added task inbox includes ACT by default. For a questions-and-summaries-only setup, clear ACT on that inbox and keep only the approved reading/summarizing operations; leaving Approved App Actions empty by itself does not make the inbox read-only. Enable ACT only when the app deliberately supports task decisions/comments, with the user's normal task permissions and explicit confirmation. For a record source, review Allowed fields with the data owner and enter the explicit approved field names. Leaving the list empty removes this app-specific field restriction; it does not mean that no fields are allowed. The user's ordinary readable-field permissions and disclosure rules still apply. Keep an explicit list when the app should expose a smaller set of request information. An app source narrows the assistant's scope. It does not give Mohammad access to Sara's records or tasks.
- Under Approved App Actions, choose an offered published action only if the teaching app should support it, then choose Add action. Reading request information does not require enabling record updates. Start with questions and add deliberate task decisions or request creation when their normal forms, permissions and published actions are ready.
- Save, validate, review and publish the App Shell. Saving the draft alone does not change the released app.
The source picker reflects what this App Shell is connected to, as well as your permissions. Connect the intended record or guidance source to this App Shell's data first; adding a source only to a form displayed on a page does not necessarily make it an App Shell data source. Existing page-interface bindings supply the relevant interface/form choices. The offered Assigned Tasks Inbox depends on task permission. These are not organization-wide catalogs of every published item.
| Source kind in the picker | Business meaning |
|---|---|
| RECORD_TYPE | Records from a connected business type, such as Leave request. |
| TASK_INBOX | Tasks available to the current person, such as Assigned Tasks Inbox. |
| GUIDANCE_DOCUMENT | An explicitly connected guidance document. |
| PROCESS_GUIDANCE | Guidance for an explicitly connected process. |
| INTERFACE_HELP | Help for a connected page interface. |
If a source or action is absent from its picker, ask its owner to check the App Shell's connected data/page bindings, publication and your scoped access. Do not enter a guessed reference or broaden a user's permissions to fill the list. If the settings themselves are absent, have the application administrator check your current configuration permission.
Choose the right kind of evidence for each question
App Chat combines two different ways of finding information. The distinction helps consultants configure sources and teach users when to open a cited result:
| User question | Appropriate App Chat source | What to verify in the answer |
|---|---|---|
| “What does our leave policy say about notice?” | Published Guidance document, process guidance or interface help that the App Shell owner explicitly connected. | Read the cited passage and confirm it is the published guidance for this application. A policy passage does not prove what happened to a particular request. |
| “What is the status of my request 017?” | The connected Leave request record source. | Check the cited live record, its current status and the fields the signed-in user may read. If it is unavailable, use the ordinary permitted request page or ask its owner. |
| “How many requests are waiting for review?” | A connected record source whose approved operations include AGGREGATE, if that source offers it. | Check that the returned total is based on the currently permitted matching records and fields, and open the cited result if the answer supplies one. Do not estimate a total by counting excerpts from a guidance document. |
| Sara asks, “What am I working on?” in her own signed-in session. | The App Shell's Assigned Tasks Inbox, which lists work available to the current signed-in person. | Verify the task appears in Sara's ordinary permitted work view. A consultant cannot choose a different user's inbox, and a question or known request number does not make another person's task readable. |
The App Shell's approved source list narrows where the assistant may look; the signed-in person's current row, field and task permissions still govern what may be disclosed. The explicit Allowed fields list narrows record fields when one is configured. The empty list removes that App-Shell-specific field list only; source disclosure rules and the person's normal access still apply. Exact totals require an approved aggregate operation and permitted fields; the assistant must not invent a count from partial results. Published guidance is searched for relevant evidence, then checked against its current access before it is used. If the answer has no usable evidence, conflicting passages, or an unavailable source, do not fill the gap with a confident guess or an older conversation. Open the ordinary permitted page or ask the source owner.
For record questions, a tool-capable model can choose a schema-valid search or exact aggregate from the user's ordinary wording. The server validates the bound source, operation, field, operator and declared values before reading. Text filters such as pending can match a stored Pending case-insensitively; for free-text category fields with no declared value list, the model may be shown a few short recurring values found in that actor's readable rows. That lookup is bounded, so if it cannot establish every spelling, App Chat must withhold an exact count or aggregate and mark a search possibly incomplete. If the current conversation leaves two readings equally likely, App Chat asks which field or value the person means; when the context makes the intended subject clear, it answers with a brief stated assumption instead of asking the person to repeat it. Search output is bounded and may indicate that more matching rows exist; use a permitted exact count for the total. A total is available only when the source allows AGGREGATE and the selected data are readable and disclosable. If routing refuses the tool-calling capability before a provider call, App Chat falls back to its existing conservative query path. A model's first reply may instead be plain or unfinished when it does not follow the tool protocol; a repeat refusal pauses tool use and sends that turn through the conservative path. Neither a partial result nor a fallback path proves a complete search.
When a person asks App Chat to prepare a task decision or other configured action, the tool can only prepare a proposal. The person must inspect the exact target, action and required inputs and explicitly confirm. A chat sentence such as “approve it” or a generated recap does not complete the business action. Confirm only when the proposal matches the intended task and the controls are available; otherwise use the ordinary permitted task form and verify the resulting task state.
Action follow-ups use a stricter target rule than ordinary record questions. When a current record is open, “Approve this request” can refer to that record only when the configured action applies to it. If it does not, the target remains unresolved; App Chat does not switch to an earlier answer or another task. For “approve it” after an answer about one record, a task action may match Sara's own open task through access-checked lookup results from bound READ sources. The task card must carry an identifying value: a record key, a declared unique field, or an auto-numbered field, and the value must be readable and AI-disclosable. A shared employee name, number of days, or status is not enough, even if it happens to match only one visible record. If the identifying value is missing, the lookup is ambiguous, or the source cannot complete the check, App Chat leaves the task unlinked. That missing link does not prove that no related record exists; Sara opens the ordinary permitted page or chooses the intended task herself. The server resolves links from permitted card values, never from the assistant's wording.
When the action proposal is still ambiguous, check its target selector. If each candidate has a safe display label, the card offers a selector with those names, such as Leave request · LR-017 (Mohammad) and Leave request · LR-021 (Huda). Sara reads the labels and selects the exact task she intends before reviewing the rest of the proposal. The app may omit a key or name when it is not safe to disclose. If any candidate lacks a safe label, the card blocks selection and confirmation; Sara names the intended request more precisely or opens it through the ordinary app. She then prepares a fresh proposal and checks its target, action and required inputs. A label identifies a candidate; it does not grant access or approve anything.
If App Chat cannot finish checking access to evidence for an answer, it may show This took too long to check. Nothing was changed. Try again. This is a timeout, not a report that access changed. The answer was withheld. Depending on when the recheck timed out, the AI provider may already have received the turn, even though its answer was not shown. Wait briefly and retry the same question once. If the timeout repeats, open the ordinary permitted record or task view, or ask the source owner to check availability. Do not rely on an older answer as current evidence or submit a task action because the response was delayed. A genuine access denial is reported separately.
| Sara's task list and record link | Result |
|---|---|
| One linked task in a complete list | App Chat can prepare the draft for that task. |
| More than one linked task | Sara chooses among the linked tasks. |
| One linked task but the list may be incomplete | Sara still chooses it; visible does not mean unique. |
| No link returned by the lookups | The ordinary open-task candidate rule applies; older answers remain out of scope. An ambiguous or unavailable source does not prove that no matching task exists. |
If a previous answer already contains an action-applicable task, that direct target rule applies first. If it contains one record and no directly applicable target, the task/record link may narrow the open-task candidates as above. App Chat asks Sara to choose when more than one candidate remains and does not assume a single visible task is the only one when the task list is partial. Sara verifies the exact proposed task before confirming; the server rechecks current authorization before preparing the draft.
When Mohammad follows “How many pending Leave requests can I read?” with “Which one has the longest leave?”, remember that the count answer is only a scalar. App Chat makes a new bounded search against the same connected Leave request source and keeps the validated Pending filter only if the earlier answer is still allowed. This applies to both the tool-calling and conservative keyword paths. The new read checks Mohammad's current row and field access and answers from the rows it actually returns. If fewer results are available or the search is incomplete, it says the comparison covers only those returned rows. The second answer cites only the records it names; the old count does not authorize a new source or a record Mohammad cannot read.
If the preceding answer was withheld or refused, or did not save a validated filter, App Chat does not reconstruct one from old chat wording; Mohammad should ask the complete question again. If he names a new category such as Approved, that value starts a new question and the old Pending filter is not silently carried along. An unavailable or revoked result never widens the search.
Practise “my requests” separately from “my approval tasks”
Use two ordinary, authorized teaching sessions: Sara as a manager who also submits leave, and Mohammad as a requester. These examples are practice prompts, not captured provider responses. Use synthetic records whose normal access you have already checked.
- In Sara's session, ask “What is waiting for my approval?” Compare any cited task evidence with her ordinary permitted work view. If the listing is partial or unavailable, keep that limitation in the explanation. Do not call the result an organization-wide total.
- Still as Sara, ask “Is my leave request still awaiting approval?” Then ask about its actual business reference, such as LR-1005. These questions require the permitted request record, even though Sara also has approval tasks. Her own work queue is not evidence of the status of a request she submitted.
- In Mohammad's own session, ask about his intended request. An empty approval inbox does not prove that his request has no pending approval. Check its ordinary permitted record page. The word my does not create an ownership filter; the ordinary row policy must supply any required restriction.
- Try كم من طلباتي بانتظار الموافقة؟ in the app's Arabic configuration. Check the request identity and scope. Queue wording describes a state; it does not confirm a task decision.
- For every answer, identify whether the evidence is a task, a request record or an aggregate. If that remains unclear, ask a narrower question and use the ordinary permitted page before relying on the result.
For a manager who also submits requests, current Chat can still send the manager's open-task context during an own-request question. This practice distinguishes what evidence the answer needs; it does not prove that the assistant excludes unrelated task context. Verify the named request in its ordinary permitted record view before accepting its status, even when no task chip is shown.
Next, read a response with a limitation. An unsupported salary answer can have no source chips when App Chat recognizes the refusal, even if its explanation mentions an earlier leave request. Chip suppression is not guaranteed for every wording, and a remaining leave citation does not support salary information. A current permitted answer that LR-1005 is pending can keep its request citation while adding that salary is not included; that chip supports the request facts only. A successful search returning zero rejected requests can be a data answer rather than a refusal, but its scope and completeness still matter. These outcomes are different from a source outage and from permission denial; do not infer the cause from a missing chip alone.
For the full worked examples, use Ask App: requests, queues and answer limits and its Arabic guidance. After a grounded answer, even one with a caveat, an approval follow-up still prepares only a proposal. Inspect the exact task, record and inputs before explicitly confirming. A not-applicable answer without a proposal has no source chips and does not say an action ran; use the ordinary task/form path. Preserve an uncertain operation and use Check status instead of preparing a duplicate.
Review a conversational action proposal
This is separate from the Review decision card in Sara's task journey below. When the App Shell owner enables a published action such as creating or updating a record, submitting a form, or starting a process, a request to perform it can produce a review proposal. Preparing the proposal does not change the record or start the process. The stored proposal is bound to the signed-in person, workspace, published App Shell version, target and target revision. Before confirmation, Inflow checks that scope and revision again and accepts only fields declared by the published action. If the target or publication changed, review a fresh proposal; do not confirm a stale one.
Confirmed conversational actions are recorded in the App Chat action audit. Inflow applies its disclosure and sensitive-value rules: prohibited fields or sensitive values are omitted or redacted, and an audit can retain a field name without its value. The audit entry is not by itself proof that the requested business result occurred; check the action result. Action preparation and confirmation have per-person, per-workspace request limits. If confirmation returns Not sent. Nothing was changed. Try again., the server reports that the action was not dispatched and the same proposal remains available; recheck its target and values, then retry only if they are still intended. If the panel says Outcome not confirmed, the request may already have been sent. Choose Check status, then read the task or record and its receipt before deciding what to do next. For an unchanged task-comment proposal, the same stable operation identity recovers the existing comment instead of appending a duplicate; never change its text or target while the result is uncertain. Do not treat an uncertain result as a no-op or repeat the confirmation blindly. These stored-proposal, field-filtering, audit and rate-limit rules describe this conversational action path; the task decision card has its own confirmation and reconciliation behavior.
After a confirmed conversational task decision or comment, the receipt uses words instead of an internal ID. In an English shell, for example, Approved: Huda Nasser · Approve leave request or Comment added: Huda Nasser · Approve leave request identifies what happened and the task in human terms. When the App Shell locale starts with ar, the outcome word is Arabic: تمت الموافقة: Huda Nasser · Approve leave request or أُضيف تعليق: Huda Nasser · Approve leave request. The person's name and task label remain as authored; a custom action label is not translated. Other locales, including a missing locale, keep the English outcome words. The receipt label is not the business record itself, so Sara still checks the authoritative task state.
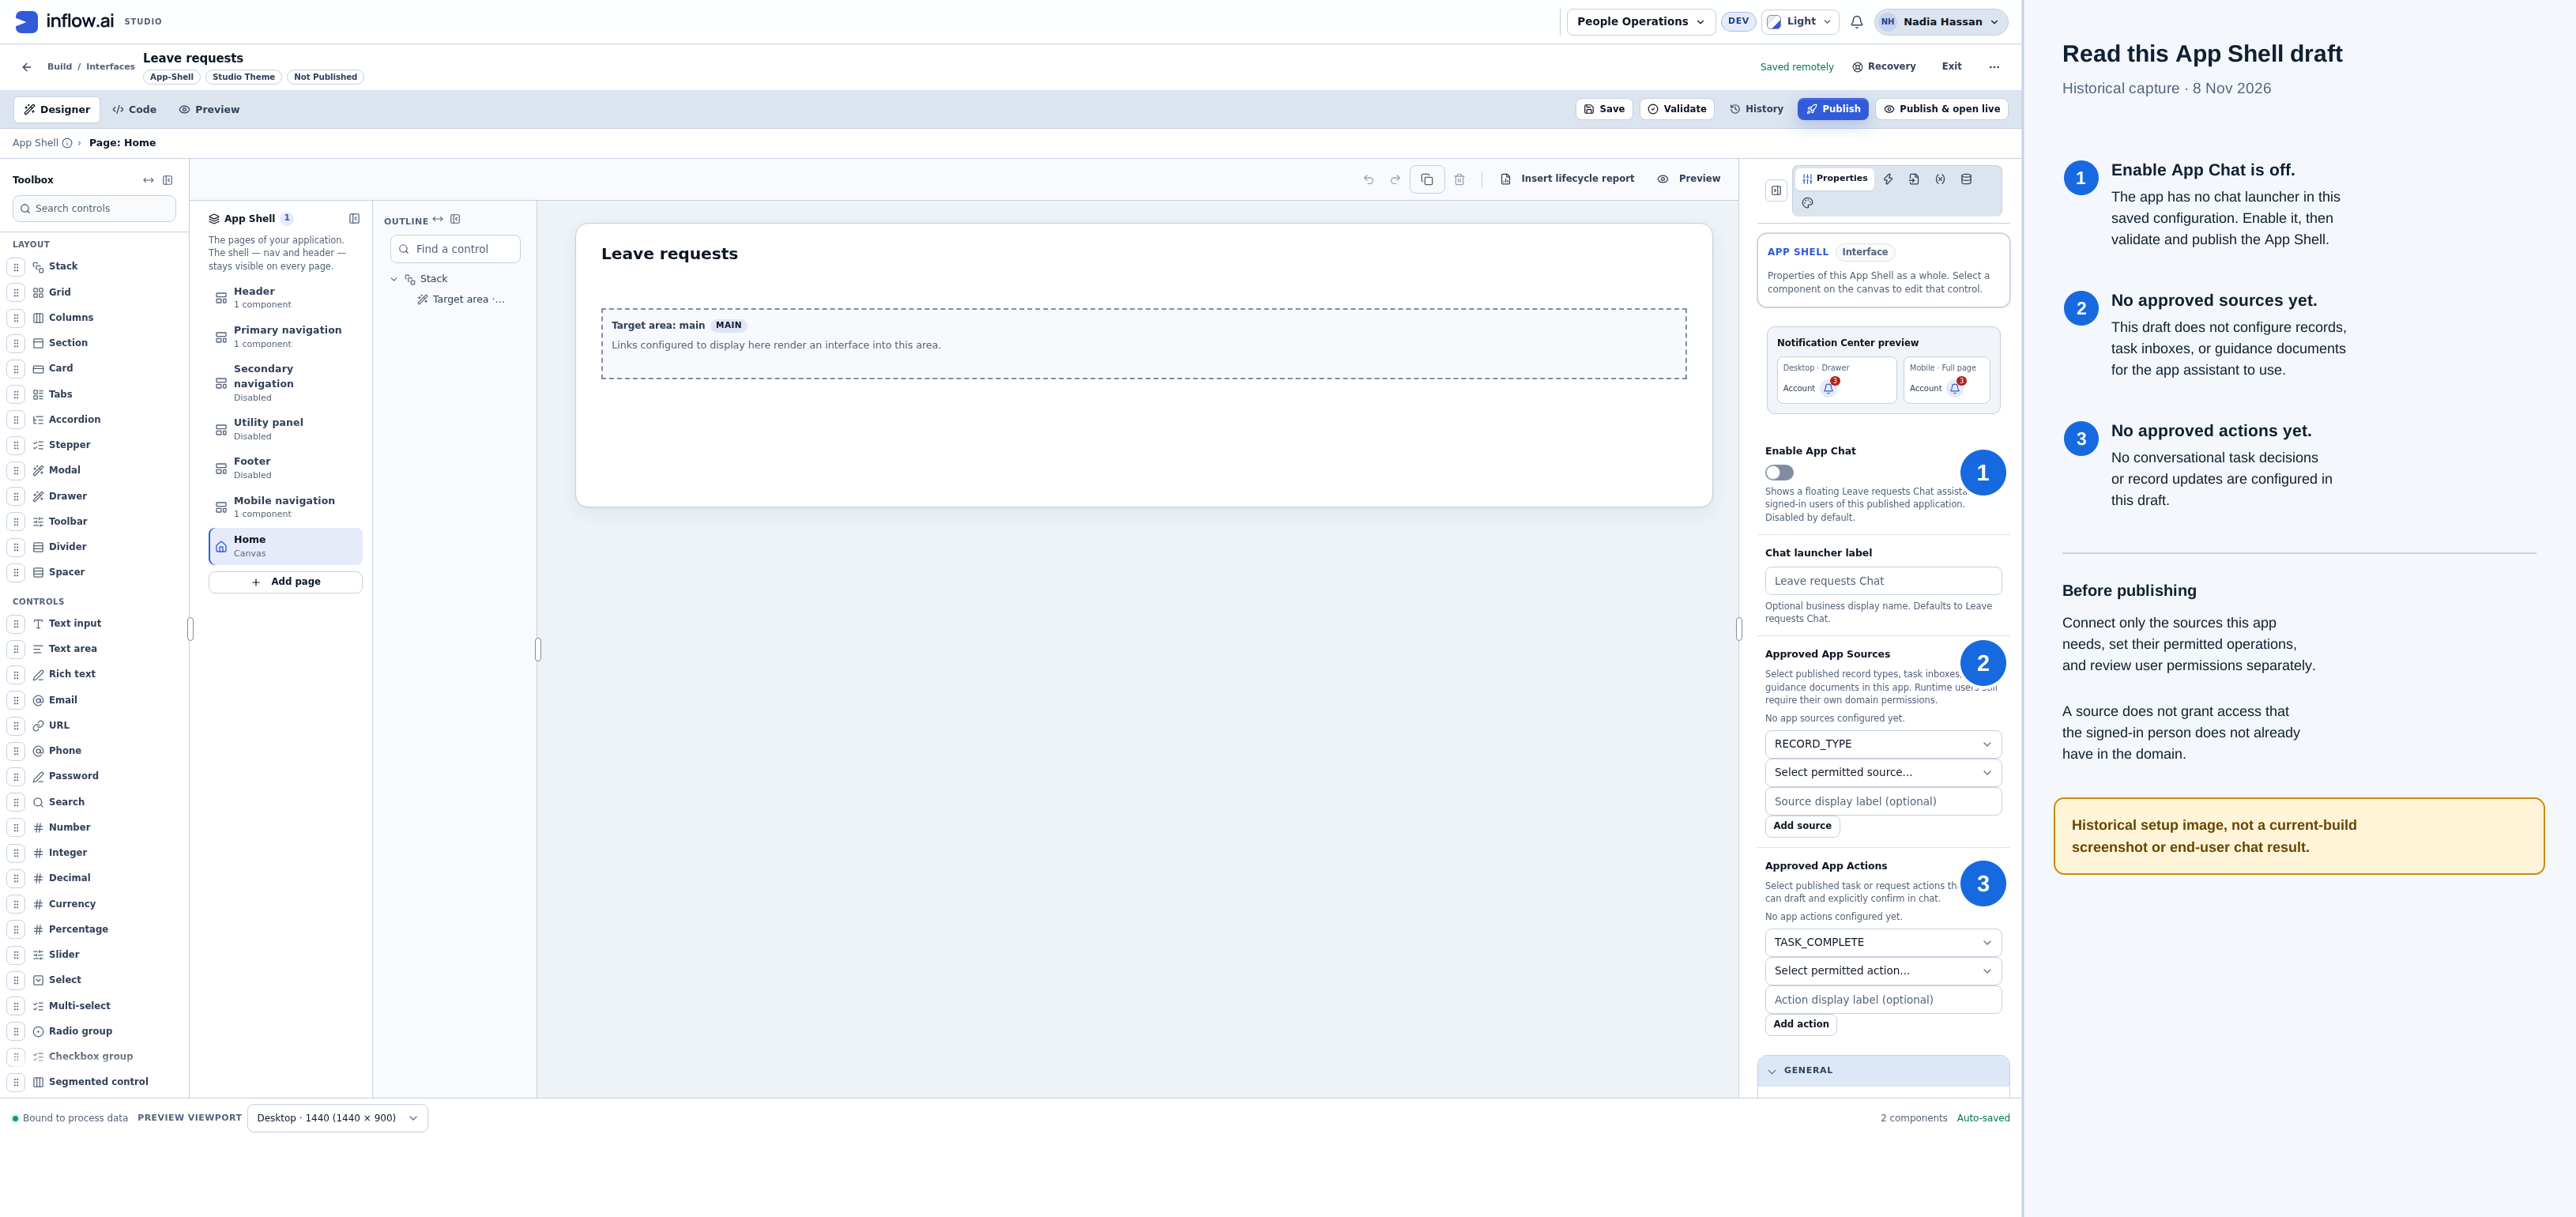
Historical visual guide composed from the unchanged 8 November 2026 UI capture, source dac13e8 (build 86667d68). It explains a disabled, unconfigured draft; it is not current-build evidence or an end-user chat result.
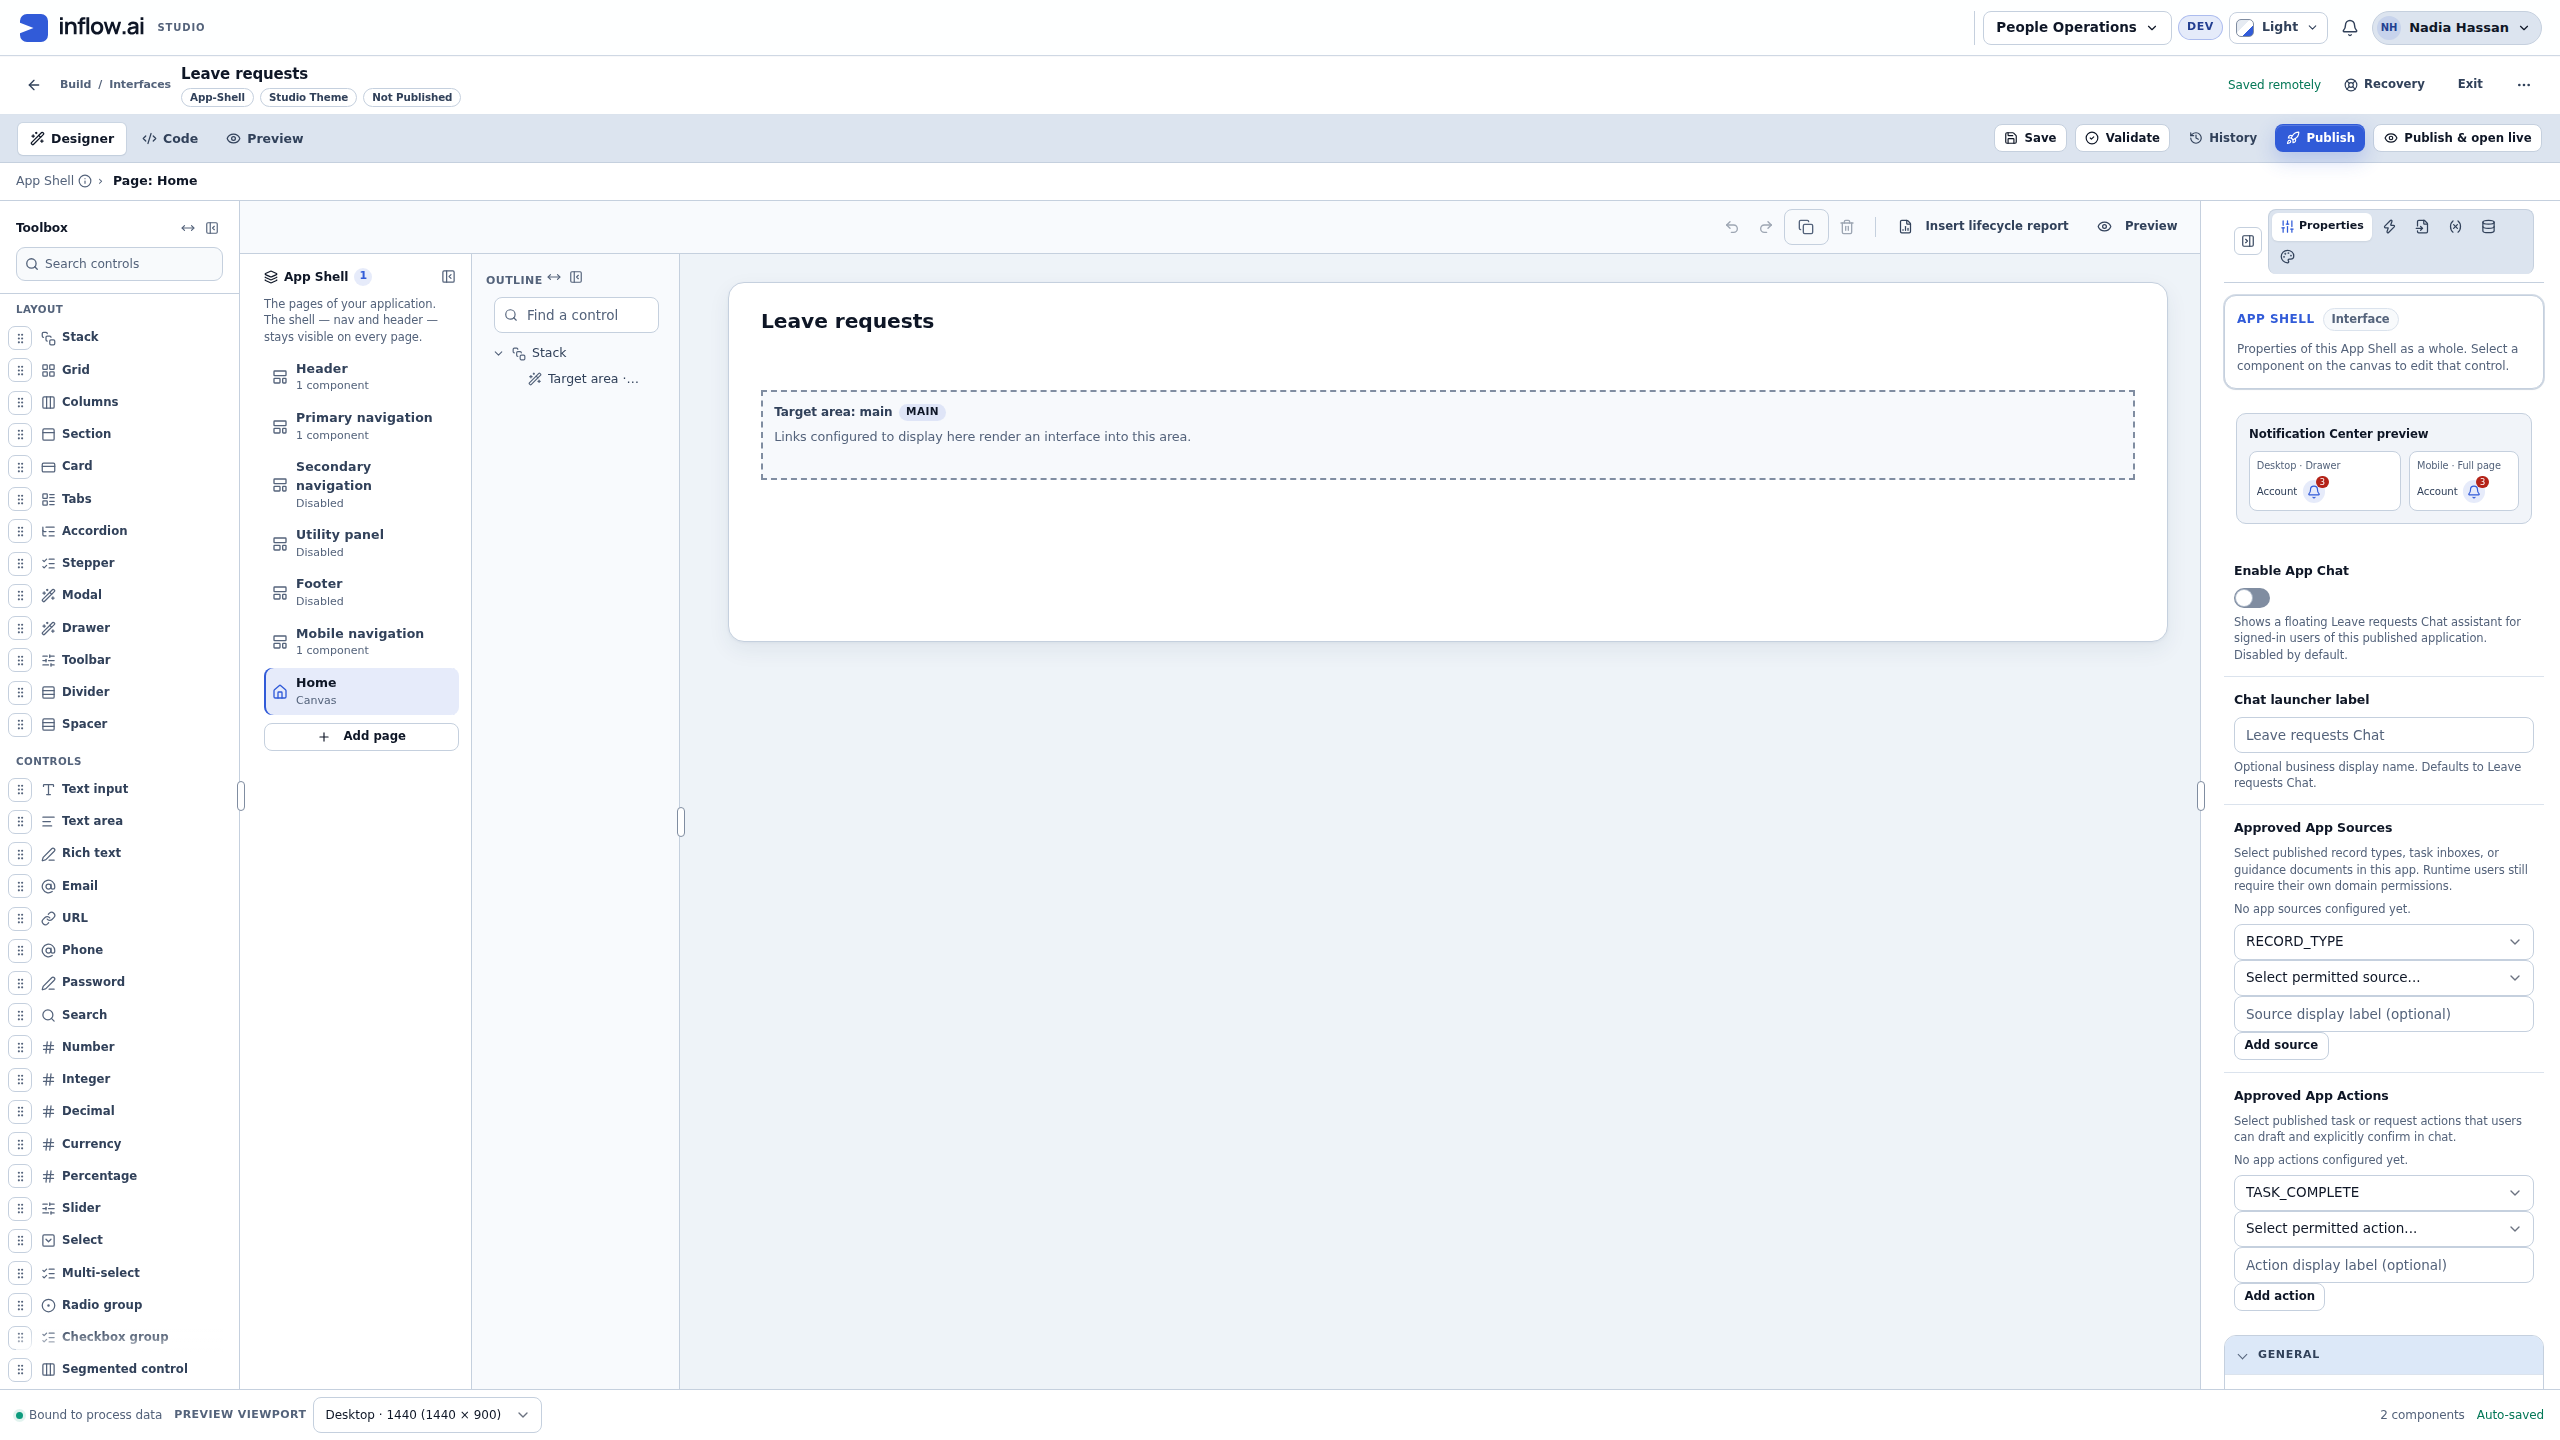
Find the setting: select the App Shell itself. Enable App Chat, Chat launcher label, Approved App Sources and Approved App Actions appear together in Properties. The grey launcher-label example is a placeholder until you enter a label.
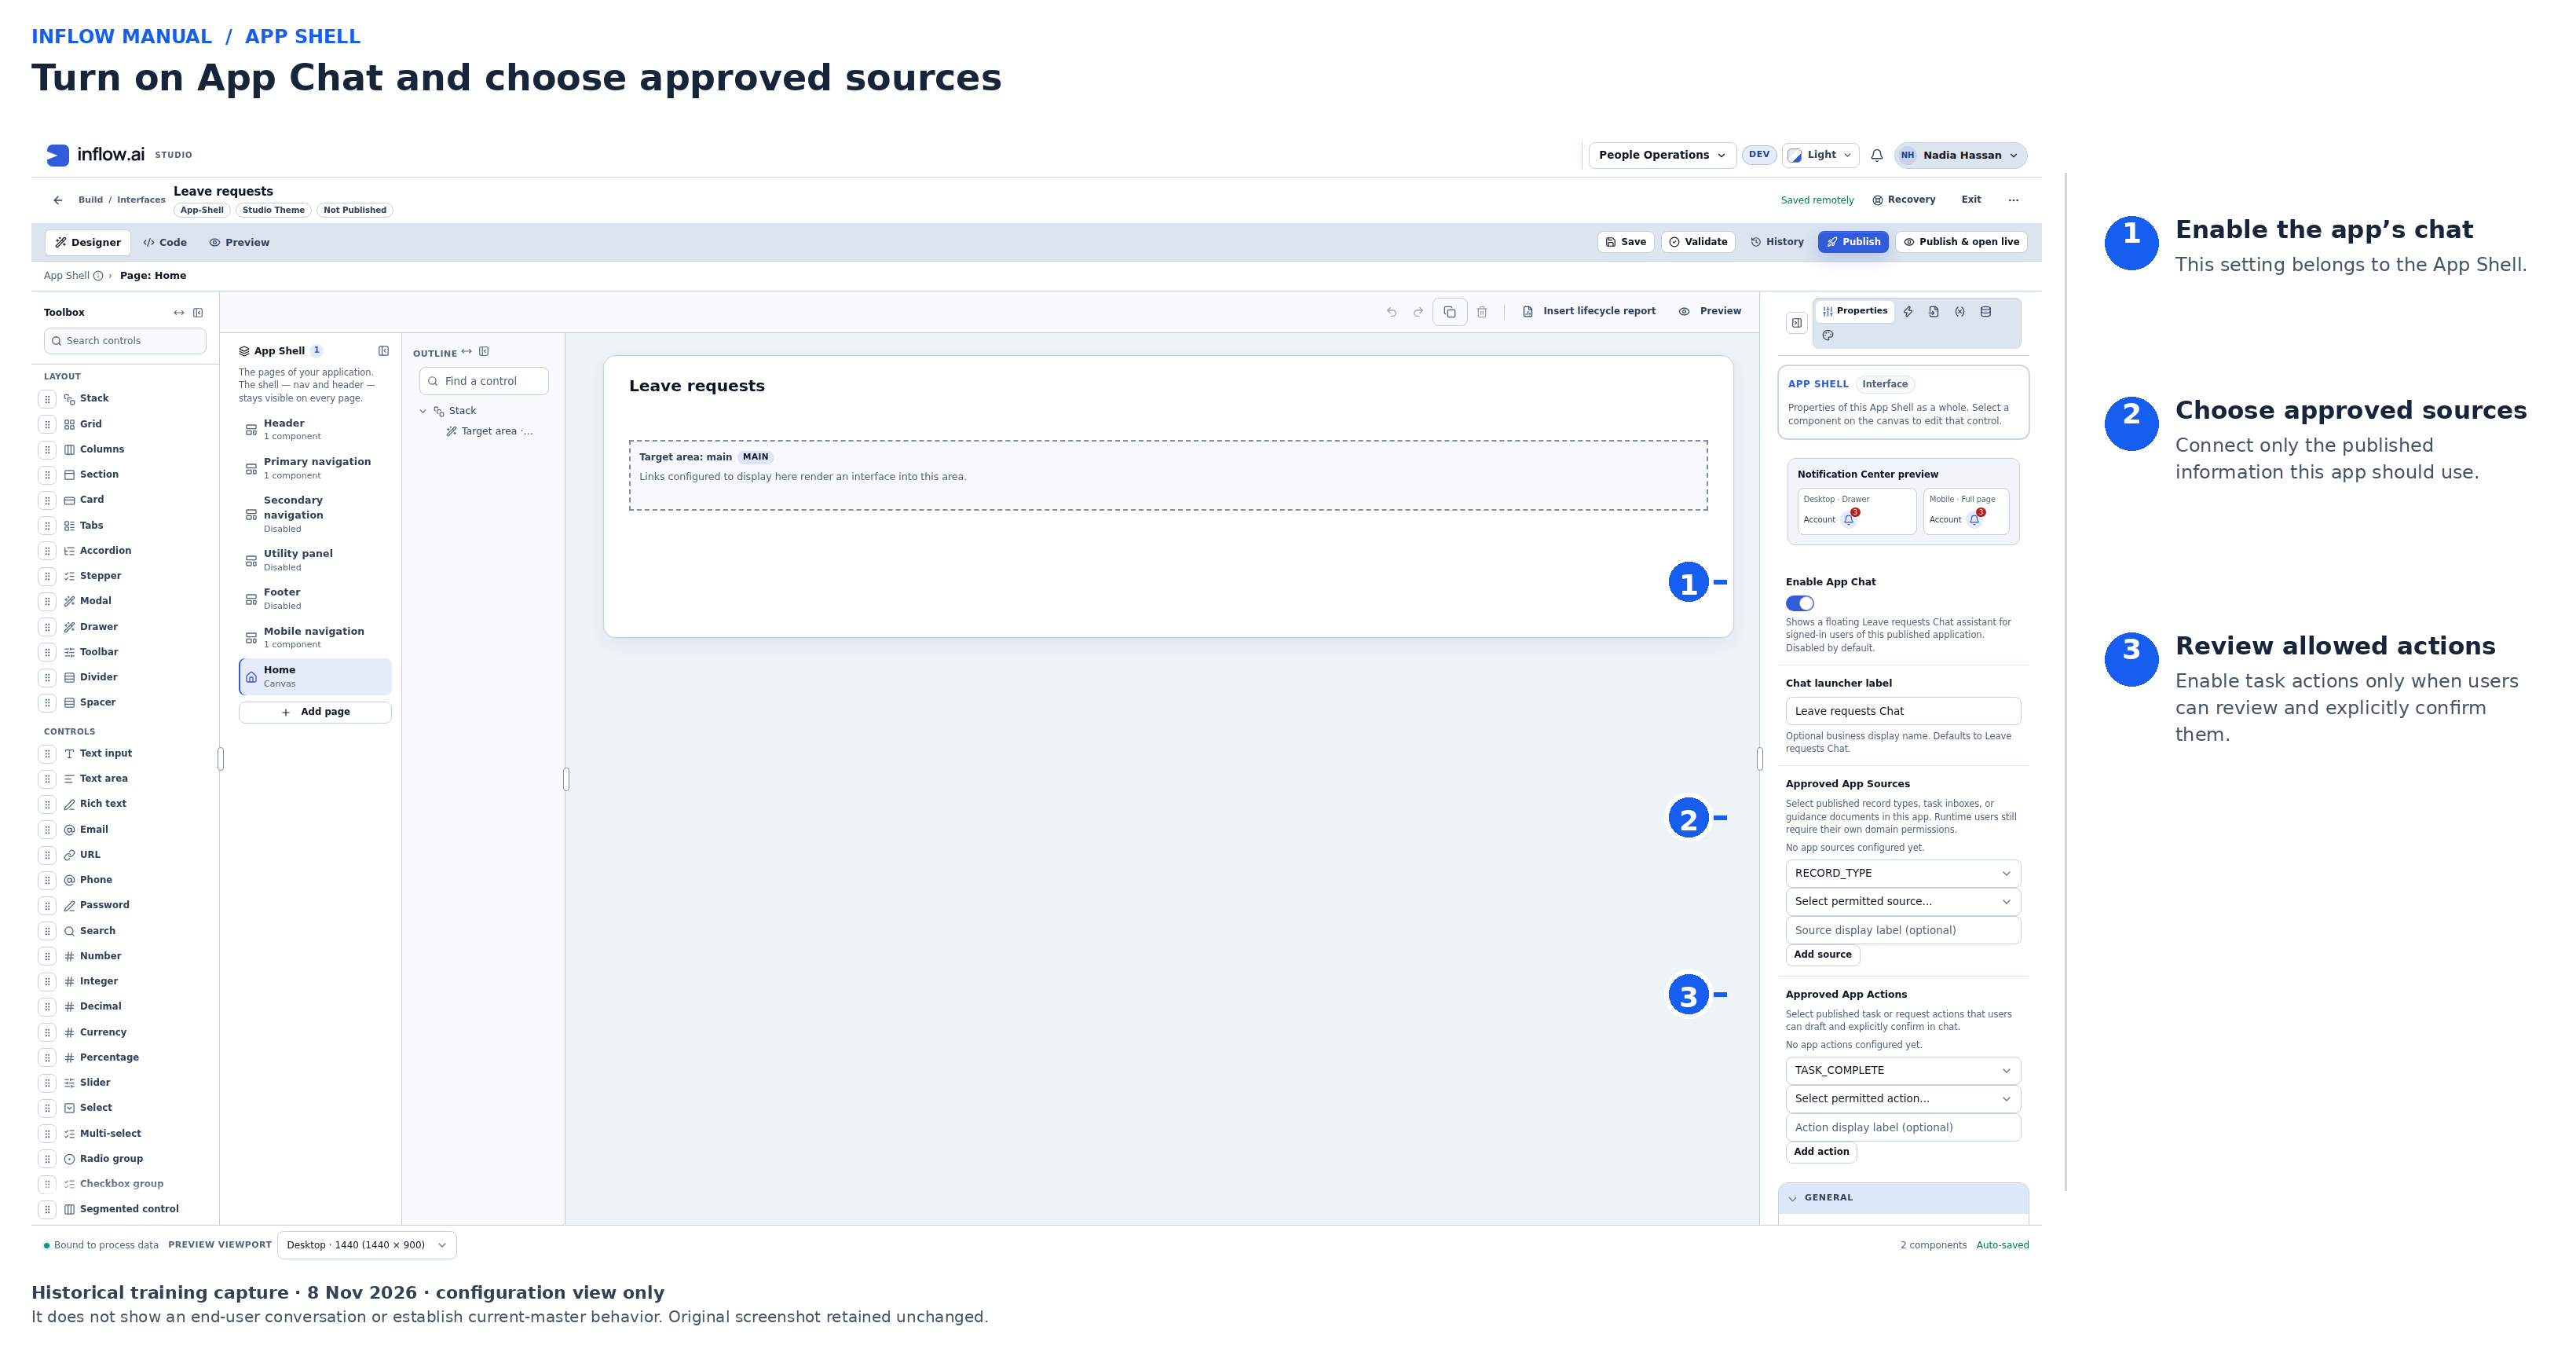
Visual guide composed from the unchanged 8 November 2026 screenshot (source dac13e8, build 86667d68). The numbered markers and legend explain where each setting appears; the saved draft has no sources or actions. This historical configuration view is not current-build evidence or a working end-user chat demonstration.
Check the saved draft: the switch and entered label remain after saving and reopening. This figure has no approved sources or actions yet. Configure the intended connections before publication; it does not show a working record answer or completed task.
Mohammad asks about his request
Mohammad signs in normally and opens the published app. He chooses its floating Leave requests Chat button and asks, “What is the status of leave-2026-017?” The answer should refer to a request he is currently allowed to read. If the answer includes a source chip and it has a permitted destination, he selects it to open the cited record. If no destination is available, he uses the ordinary permitted request page or asks its owner. If he asks a policy question, such as “What information must I include in a leave request?”, he checks the cited published guidance as well.
An answer about the employee's records and an explanation of policy are different kinds of evidence. A policy paragraph does not establish the current status of a request. A named source is not a promise that everyone in the app may open it. When information is unavailable, use the ordinary permitted page or ask the owner rather than treating an invented answer as a result.
Opening or closing the panel should keep the current page and any unsaved form answers. Moving between pages in this application should retain the conversation. Changing applications, workspaces, released publication or signed-in identity starts a different context; do not rely on the previous conversation as authority for the new one.
Sara reviews a task in the conversation
Once the actual workflow assigns Sara a task, a task badge may appear on the chat launcher without opening the panel or interrupting her form. Sara opens chat and reads the request summary: the employee, dates, requested days, reason and the decision she is being asked to make. She checks that the summary refers to the intended request and that any extra fields or attachment references have been reviewed.
When Sara asks Chat to help with that decision, the panel can show short progress cues such as Finding the task…, Checking allowed decisions… and Preparing the action…. These describe the server's current step; they do not mean a decision has been made. The proposal then names the action and the person/request it concerns, shows the permitted task and linked-record details, and offers the action-specific button (for example, Approve leave). If the action asks for a comment, Sara can review and enter it on that card. She can open the linked record to check it, then decide whether to confirm. The card does not show internal task or proposal IDs.
After Sara confirms, the chat replaces Check the details, then confirm below with a success receipt that says what happened, who did it and when. When a linked record is available, the receipt includes an Open action that checks her current access again. While confirmation is in progress, the action cannot be cancelled from the card. If the result is uncertain, she uses Check status and the ordinary task/record view before considering another action; she does not confirm a second time just because the response was interrupted. A short greeting such as “Thanks” can receive a quick reply without reading her task or records.
What Sara sees in the task area: the launcher badge reports the tasks currently available to her in this App Shell. If the server returned a capped page without an exact total, the count has a + (for example, 5+); it is not an exact organization-wide total. In the open panel, Your tasks expands the current person's list. Sara can leave it folded while reading the conversation, then choose Show to review the available cards. The panel loads the first page and offers Load more tasks when more are available.
When Sara asks a question about her open tasks, App Chat can identify a task with the linked case's business reference or title when the task-list read has already established that she may see that case. For example, she might see LR-2002 · Approve leave request · Omar Saleh. The case reference comes first, followed by the task name; an AI-disclosable task subject may follow. If she can see the task but not its case, if the case has no safe label, or if the lookup cannot establish a visible reference, the task name remains without that reference. The internal process-instance ID is never a substitute. A missing case label does not prove that the task is unlinked, and a label does not expand Sara's access.
An answer's compact source chip may name the person a task is about when that subject value is permitted for AI disclosure. It is an evidence label, not a complete task list or a task count; multiple tasks from one inbox with the same label may appear as one chip. Sara uses the exact card and its current details to identify a task before deciding.
Example — one task cannot refresh: Sara opens Your tasks and sees fictional requests leave-2026-017 and leave-2026-022. While the panel refreshes the first request's details, the server refuses that individual request with 401, 403 or 404. The first card is removed; the second card remains. Sara uses only the task that is still available to her and does not follow a copied old link to recover the removed card.
If the request for the task list itself is refused with 401, 403 or 404, the panel clears the list. Sara treats this as unavailable task data and asks the application owner if she needs help; an empty list after a refusal does not establish that no task exists. On a transient task-list refresh failure, such as a network error or server error, the panel keeps its previous cards and says Some tasks could not be refreshed. Showing the last loaded list. A partial server listing has a separate notice: Some tasks could not be loaded right now. The ones that loaded are shown here.
An individual task's detail, form or draft can also fail to refresh temporarily. Its previous card may remain visible without either section notice. Sara treats that card as possibly stale, waits for refresh to recover, and checks current details before confirming a decision. If the result of a submission is uncertain, she uses Reconcile status when offered and checks the server result before retrying. None of these states proves that no other task exists.
After Sara completes a task in this panel, its card moves below Done just now for the open panel session and no longer counts as open. This is a short-lived receipt, not a search of historical or organization-wide tasks. Sara can still check the ordinary task page for the durable business result.
Sara opens the whole task inside the app
Each task card in the panel offers Open task page. The task opens inside the application: the app's header, navigation and chat panel stay, and the page body shows the task. Tasks opened from the app's own task lists (an Open task link set to open as a page) and from the notification bell open the same way. The address stays on the app page, with the task added (?shellTask=…), so Sara can copy the link or reload. Back to {page}, or the browser's Back button, returns to the page she was on. Opening another task while one is open (for example from the bell) replaces the open one, so Back to {page} still returns to the page, never to the task that was open before.
The in-app task view shows what a decision needs, as the Studio task page does:
- the task's name, priority, due date and who holds it;
- the request facts as values (for example employee, days, dates and remaining balance);
- Your decision also updates Leave request LR-1007, with what each decision changes on the linked record. The decision buttons stay inactive until this note has loaded, so Sara always sees the effect before she decides. While it loads, one line above the buttons is held; a task whose decisions change no record keeps that line, so its buttons do not move;
- the decision buttons, and Comments and Activity, where she can add a comment.
A completed task shows What was requested (its place is held while the form is read) and What was decided: the decision, who decided and when, the change to the linked record (for example "Leave request LR-1005 · Status Pending → Approved") and the comment given with it.
In an Arabic application every word the product writes on this view is Arabic and the view reads right to left. Words the author wrote read in Arabic where the designer translated them: the task name (the lifecycle step's Arabic task name), the decision buttons (the form button's Arabic label), the request facts of model fields with their value labels, the record type in the record change, and the impact note. Numbers and dates read in Arabic-Indic digits; identifiers such as LR-1006 stay as stored. A word without a translation stays as written. See Example — An Arabic app end to end in the data-model publishing manual. While the task opens, the view shows its own frame (a header and reserved cards) instead of a blank page. A task that opens quickly shows no frame at all; a slow one adds the still-working line after 10 seconds, in the app's language.
Controls Sara may not use are not shown. Someone who may not decide the task sees no decision buttons and no impact note. A task she may not read shows only the neutral "This is not available to you", with the way back. If her access is withdrawn while she decides, the note and the decisions go. The server still checks every read and every decision.
If chat supports the task's required controls, Sara first selects the offered task action. Under Review your decision: she reads the selected action and fills its Required input (...) fields, including the decision reason when required. She checks the target and answers, then chooses Confirm [action label], using the actual label shown. A summary or a typed “approve” is not, by itself, proof that the task completed. She checks the actual completion result and the corresponding ordinary task view. If a required control needs the full form, she chooses Open full task form and completes it there.
Use separate teaching tasks for approval and decline. An unchecked Boolean can be a valid false answer; do not turn it into a missing answer or silently change it to true. If the task changed while Sara was deciding, she reloads the current details and reselects a decision that is still available. If a response is uncertain, she chooses Reconcile status when offered and checks the server result before considering any further action.
Recover when chat or a task result is unclear
- If an answer says coverage is partial or sources conflict, read the note and compare the cited items. Do not present an incomplete total or pick one conflicting statement without checking the permitted record or published guidance.
- If chat says this App Shell was updated, first read any unsaved-work warning. Save or finish answers through the supported route if it is available, or preserve them through the owner's approved process before refreshing. Do not assume that reload retains unfinished form answers. Then use the current published version and recheck the page and source chips; an older conversation is not permission to use a source that is no longer available.
- A long question may be refused; keep each message under 8,000 characters and ask one focused question. A chat failure alone does not submit the page form. If the normal page remains available, use it for the business work and keep unfinished answers before reloading; a shared service failure may also affect the page. A missing chat answer is not a completed business action.
- When confirming a conversational action proposal, the confirmation can create or update a record or start a process. If the response is interrupted or says the result is uncertain, check the ordinary permitted record, task or process/case view, or the authoritative receipt for that action before confirming again. A process may not have produced a human task or record yet. If no permitted view or receipt establishes the outcome, leave it unresolved and ask the action owner before retrying. Do not treat the assistant's sentence as a receipt.
- For Sara's task decision, use Reconcile status when the task card offers it. If the task changed or was reassigned, refresh its current details and choose an action that is still available. A comment records discussion; it does not itself decide or complete the task.
App Chat checks its source access again when it reuses a saved answer. If permission changes, an earlier answer may no longer appear with its source. Open the ordinary page only if it remains available to the signed-in person; do not use an old chat answer, copied link or another employee's account to work around the current access decision.
Check the boundaries before handover
| Check | Expected experience |
|---|---|
| Chat disabled in the published shell | No chat launcher appears; the ordinary app still works. |
| Chat enabled for the released app | Its configured launcher appears for permitted signed-in users. |
| Mohammad asks about his permitted request | The answer links to evidence he can currently open. |
| Mohammad asks for a record or task outside his access | Chat does not expose the hidden information or grant access. |
| Sara reviews an eligible task | The request details are readable before she decides. |
| An action is proposed | Sara reviews and explicitly confirms the intended action; the real result is checked. |
| A task requires an unsupported control | The ordinary task form provides the supported completion route. |
| A cited item becomes unavailable | The app uses its neutral unavailable state; an old chat answer is not an access bypass. |
| Chat cannot answer because a dependency is unavailable | The notice is truthful and the ordinary permitted pages remain usable. |
Checkpoint: the published app has a clearly named, optional chat entry point, an intentionally limited source/action scope, and separate normal-user checks for Mohammad and Sara. Provider configuration and any live AI exercise require the project's existing authorized setup; enabling the switch alone does not establish a working answer.
Continue
Use the handover checklist for wording, validation, small-screen and normal-user checks. Add an optional AI summary only after the basic request and decision flow is understood. The former engineering walkthrough remains in the optional technical tutorial.