Prepare users and groups for an application
Your application needs to know who is signing in and what work each person may do. Users are individual accounts. Groups collect people with a shared need, such as employees who use the leave application. A person's displayed name is not a permission.
This guide is for consultants working with an authorized identity administrator. If you do not see the administration controls, ask that administrator to perform the setup. You can still prepare the people-and-roles worksheet.
Plan the people before changing settings
| Person | Business responsibility | Intended experience |
|---|---|---|
| Nadia | Build and maintain the application. | Studio and the required project access. |
| Mohammad | Submit his leave request. | The published employee application. |
| Sara | Review a request assigned to her. | The published app and her eligible manager task. |
Use fictional people in a learning environment. If you send a welcome message, use a real approved test-mail destination supplied by your administrator. An example address in a manual is not a working mailbox.
Create a normal application user
- Open Authorization → Users & groups and the Users list.
- Search for the intended person first. Match the account using its username or another approved identity detail, not just its display name.
- If the correct account already exists, open it and verify its identity details. Skip steps 4–8; continue to Create an employee group and add people and add this existing account where approved. Do not open New user for a person who already has the right account.
- Only when no matching account exists and you are authorized to create it, choose New user. In Identity, enter the available required name and username fields. Check the displayed name suggested by the form.
- Continue through Contact. Enter the approved email or other required contact information. Follow the validation messages beside the actual fields.
- In Organization, complete the fields your organization uses. If a Manager field is available and appropriate, select Sara's real account through the picker rather than typing a free-text name and treating it as authority.
- In Access, choose the normal account and sign-in setup agreed with the administrator. An employee does not need an administrator account to request leave.
- On Review, read the whole account summary. Choose Create user and wait for the saved result.
- Read the welcome-message result. Follow the approved password or company-sign-in setup privately. Do not put passwords or setup links in the project notes.
What you should see: one saved account for the intended person. The account may still need to finish its sign-in setup. A failed welcome message is not proof that account creation failed; check the saved result before creating the person again.
Create an employee group and add people
- Open Users & groups → Groups.
- Search for the intended group by its name and short key. If it exists, open that group and skip step 3. If it does not exist, and a new ordinary group is needed and you may create it, choose New group.
- For a new group only, enter a clear name such as Leave employees, review its short key and description, then complete the group's supported creation steps. Do not create a second group to work around a matching existing group.
- Select the existing or newly created group and inspect its current members before changing it.
- If Mohammad's actual account is not already a member and the approved arrangement requires it, choose Add members, find that account, select it and confirm Add members. If already present, keep it and do not add it again.
- Read the resulting membership. If the group inherits other members through a hierarchy, inspect the effective membership when that view is available to you.
- Create Leave managers only if no suitable existing group exists and creation is authorized; otherwise select the existing group. Add Sara only if she is not already a member and that matches the intended business arrangement.
What you should see: named people in the intended groups. Creating a group or adding a member does not automatically give that group application access, workspace editing rights or every approval task.
Worked example — verify the saved employee and manager groups
Use the saved membership as a checkpoint before asking the application owner to review access. This example uses Manuals Demo Employee and Manuals Demo Manager, two fictional ordinary accounts prepared separately. The administrator adds each existing account to its own teaching group. The group views below are also used in the companion identity tutorial; here they explain how to read and hand off the membership result.
| Field | Value to record in this example |
|---|---|
| Employee account | Manuals Demo Employee, username cf3_manual_employee_20261117 |
| Employee group | Manuals Demo Employees, key cf3_manual_demo_employees_20261117 |
| Manager account | Manuals Demo Manager, username cf3_manual_manager_20261117 |
| Manager group | Manuals Demo Managers, key cf3_manual_demo_managers_20261117 |
| Direct members shown | One in each group at this checkpoint. |
| Next owner checks | Published application access and actual workflow task assignment, reviewed separately. |
A display name helps a person recognize an account. A username identifies the account used for sign-in. The group key identifies the group. A business employee number stored in a leave request is another value again: typing that number into a form does not select the workflow's actual manager account. Keep these distinctions in the worksheet, without passwords or setup links.
Check the employee membership
- In Authorization → Users & groups → Groups, select Manuals Demo Employees. Match both its name and key before changing anything.
- Open Members and locate Manuals Demo Employee. Match the row's username to the intended existing account. If a similarly named person is listed, resolve the identity before adding or removing a member.
- Read Members (1) as this group's current direct-member result. If inheritance matters, inspect Effective through the supported view. A count or an unopened tab does not explain every inherited policy.
- Read Permissions (0) as the direct-permissions tab shown here. Do not interpret zero as a complete effective-access verdict, a denial of every application, or a reason to add broad workspace permissions.
- If the save response was uncertain, refresh and read this same membership before choosing Add members again. Keep the successful membership checkpoint even if the later application-access step needs more work.
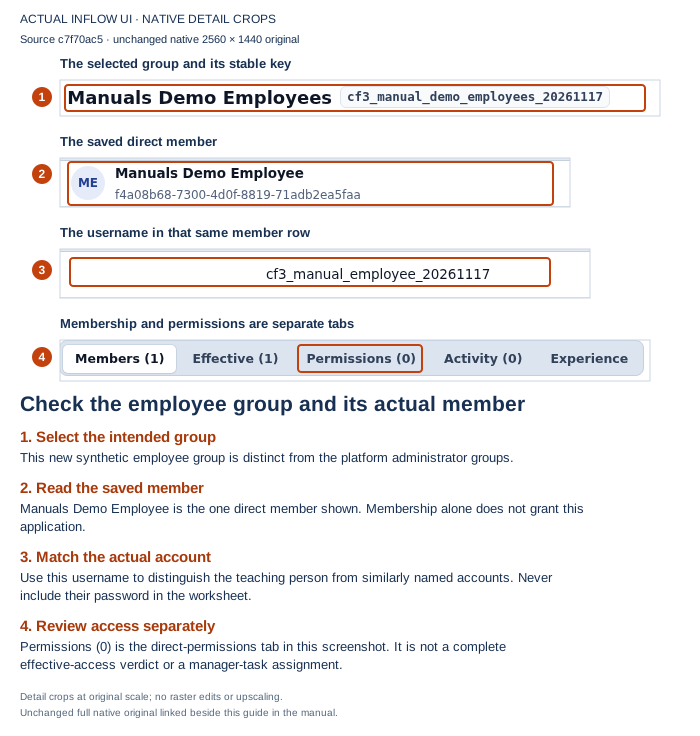
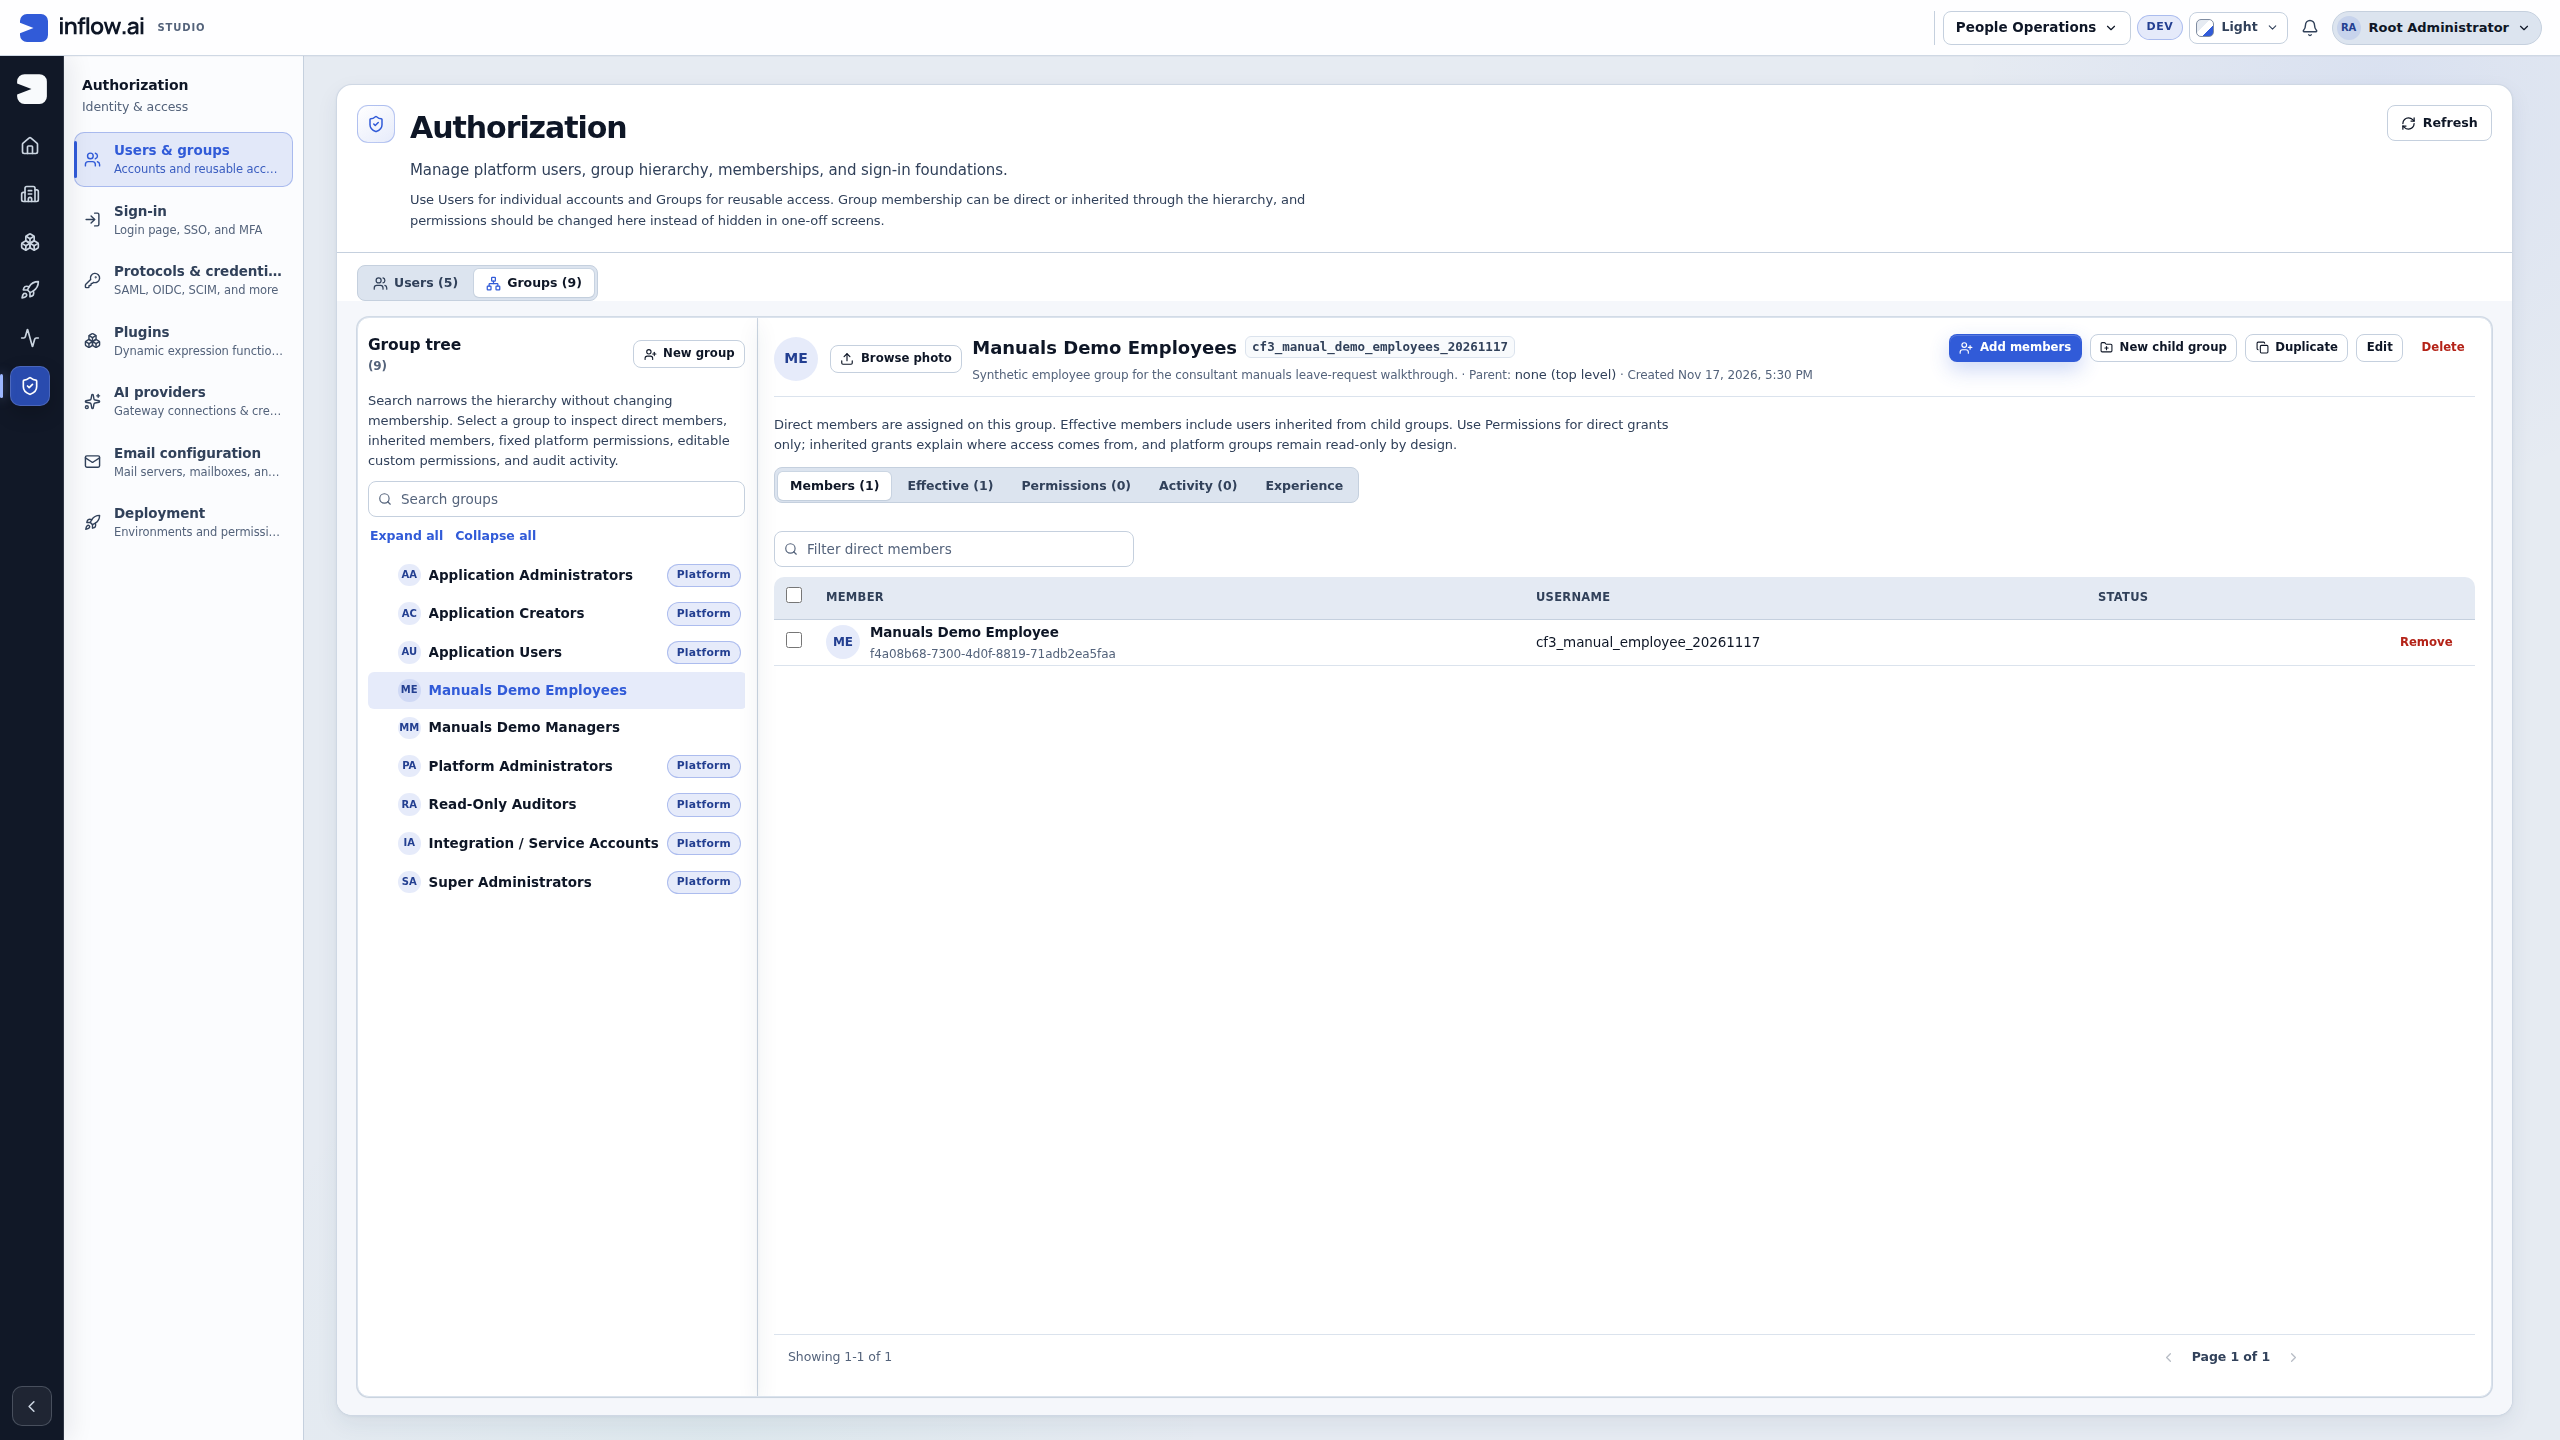
Figure 1. The saved Employees group contains the intended employee account. The numbered native detail crops connect the group, member and username without shrinking the full administration screen. This is administrator setup; ordinary sign-in is a separate check. Open the unchanged full 2560 × 1440 original.
Check the manager membership independently
- Select Manuals Demo Managers and match its own key. Do not assume that creating the employee group also prepared the manager group.
- Check Manuals Demo Manager and its actual username in Members. The example has one direct member; a real group may have a different approved membership.
- Record this membership result, then hand off the intended published application and manager-task design to their owners. A group named Managers does not assign every manager task to its members.
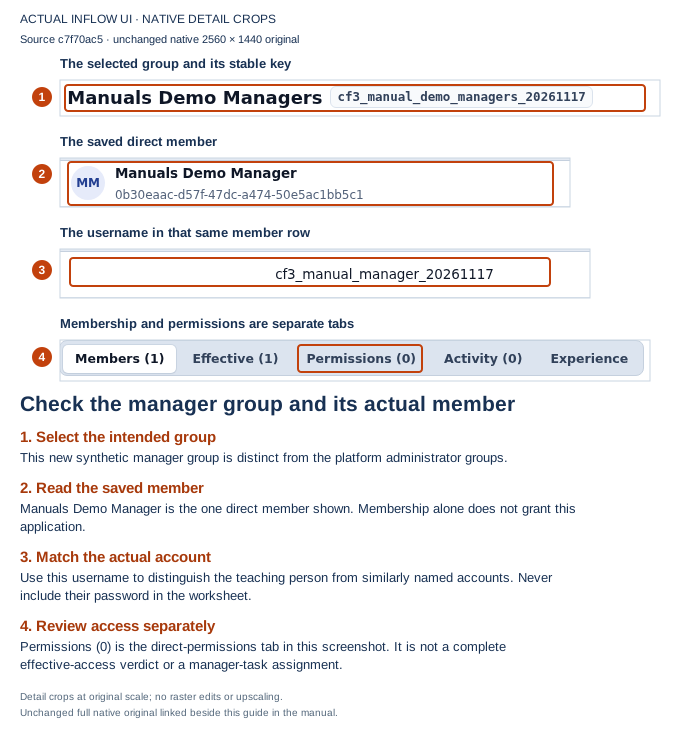
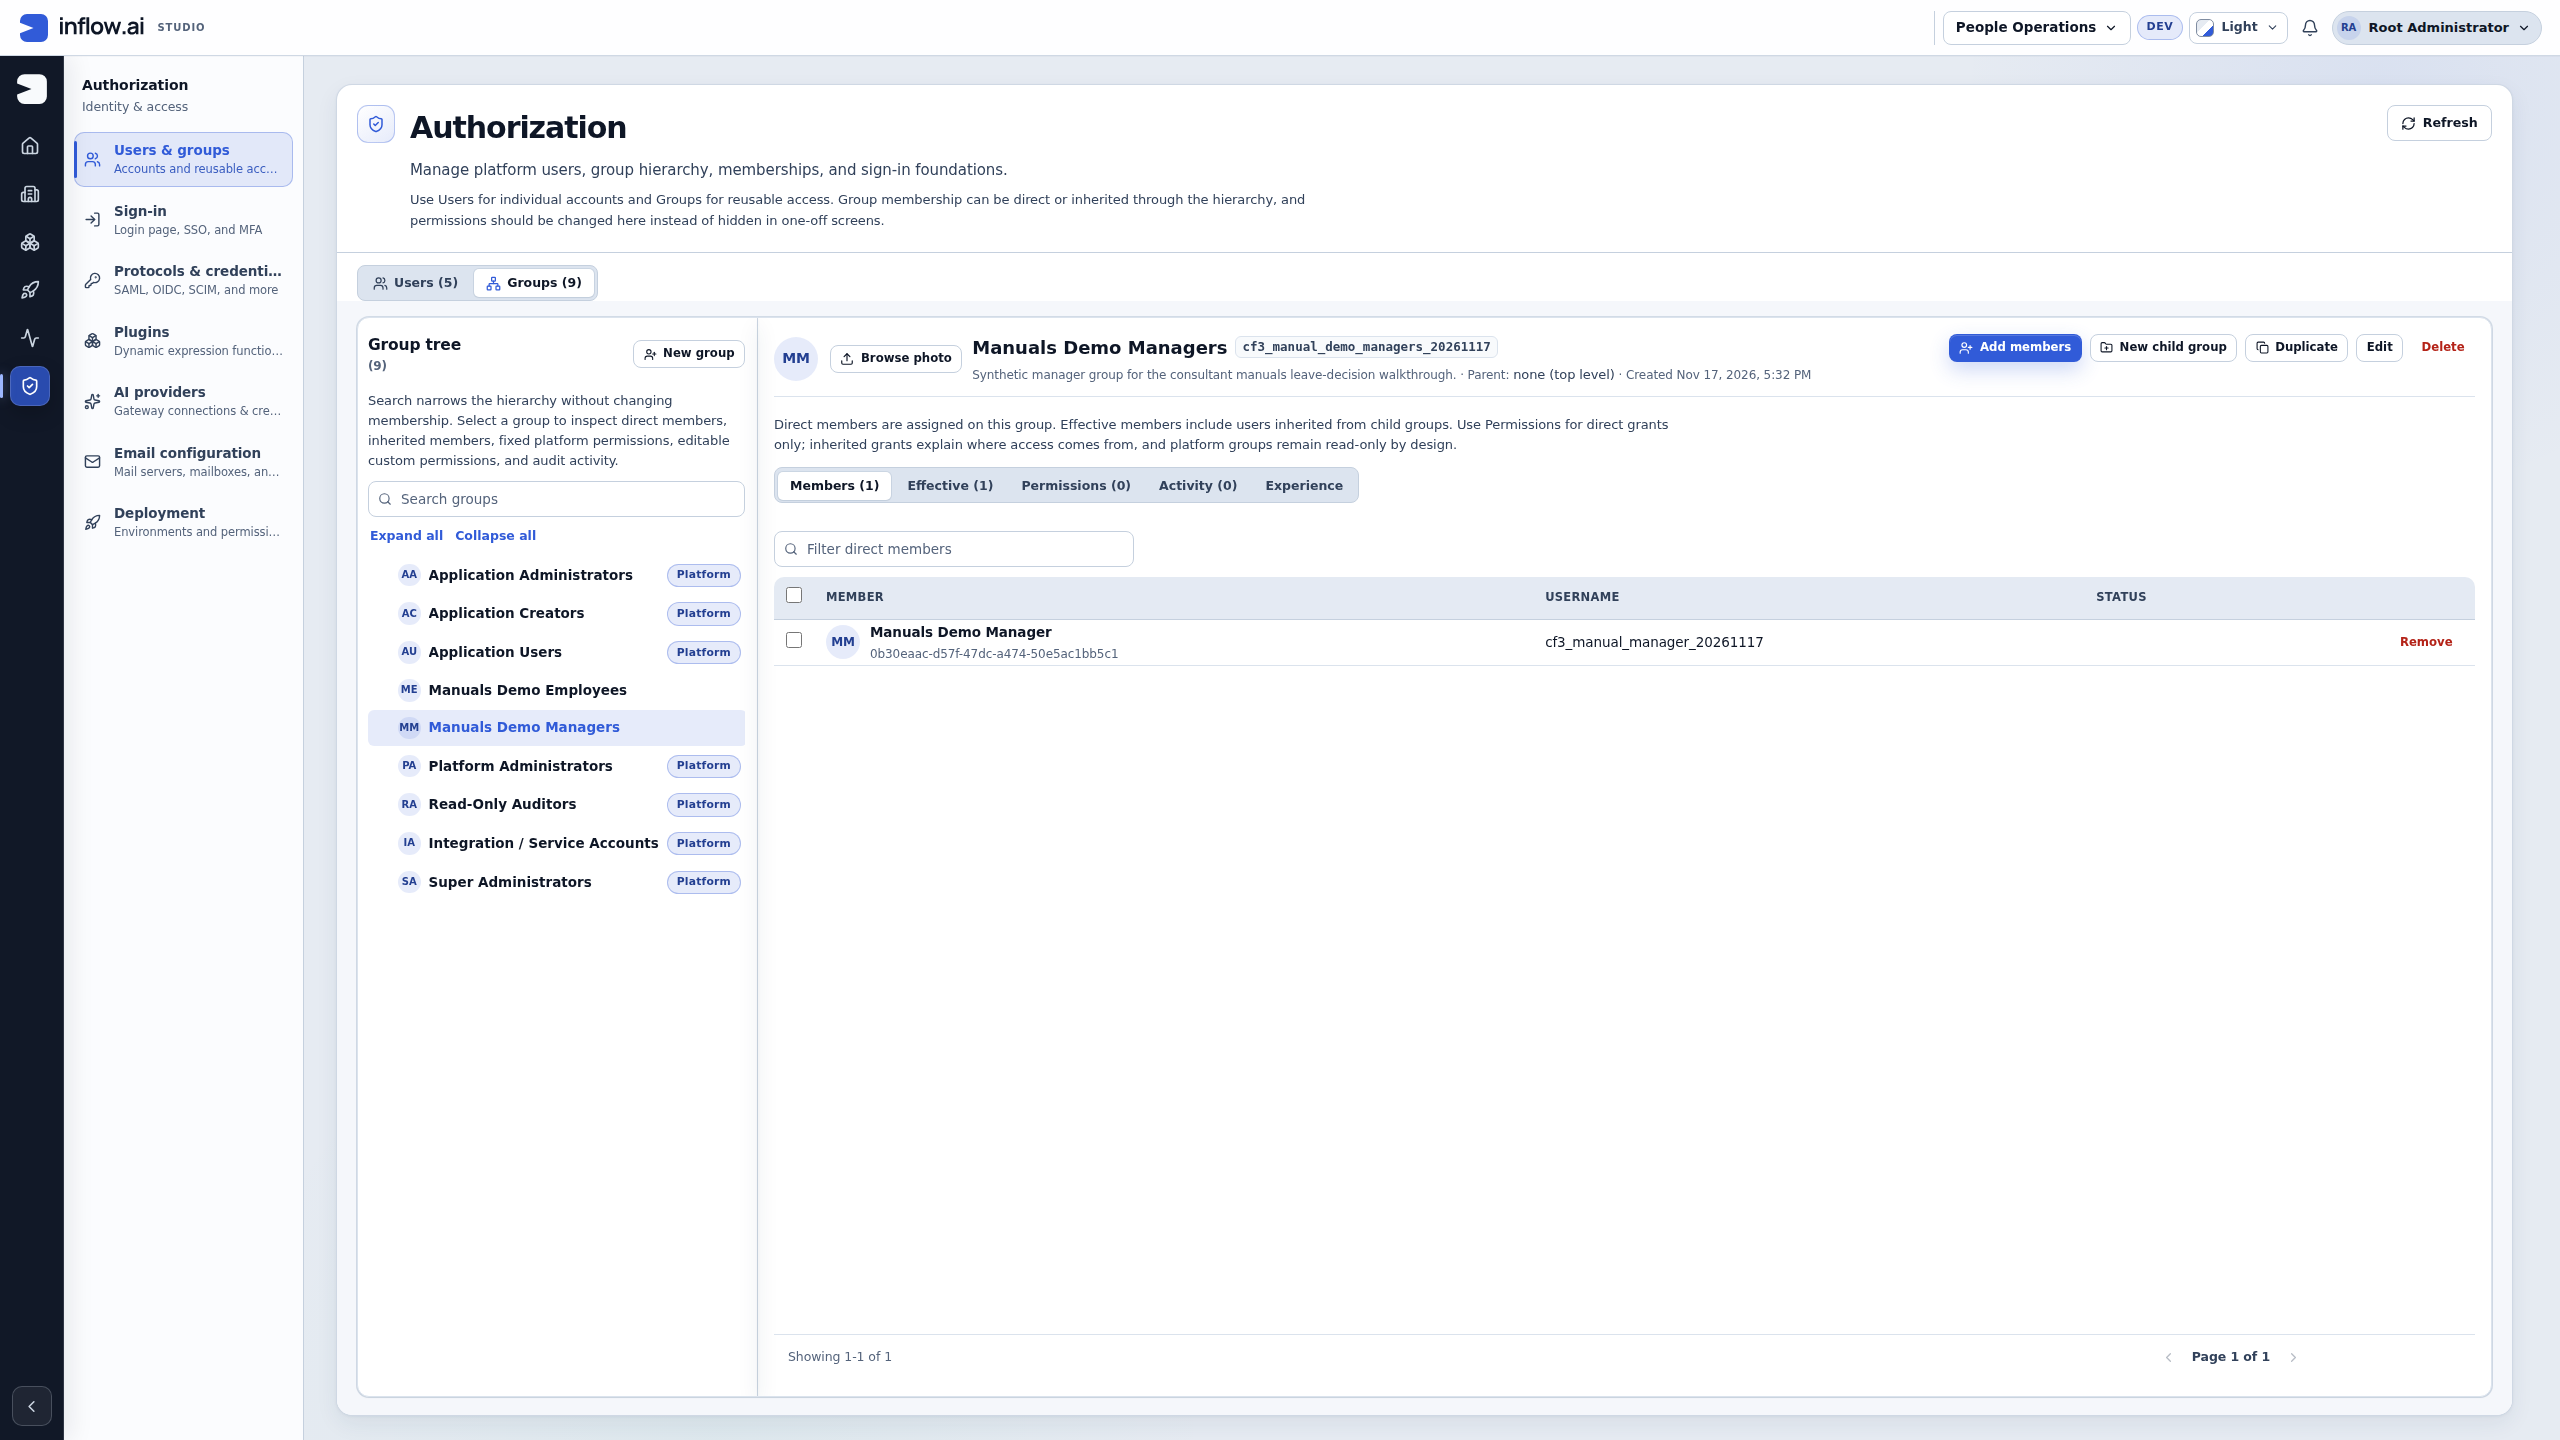
Figure 2. The separate Managers group contains the manager account. The displayed count and Permissions (0) describe this captured setup only. They do not prove that a request exists, that a task has been offered, or that the manager may approve it. Open the unchanged full 2560 × 1440 original.
Hand off a useful result to the application owner
Give the owner the workspace, both actual usernames and groups, and the intended published application and entry page. Ask them to confirm the saved application contribution for each group through application access. A Home choice and a Studio policy are separate decisions; changing the Home does not grant record or task access.
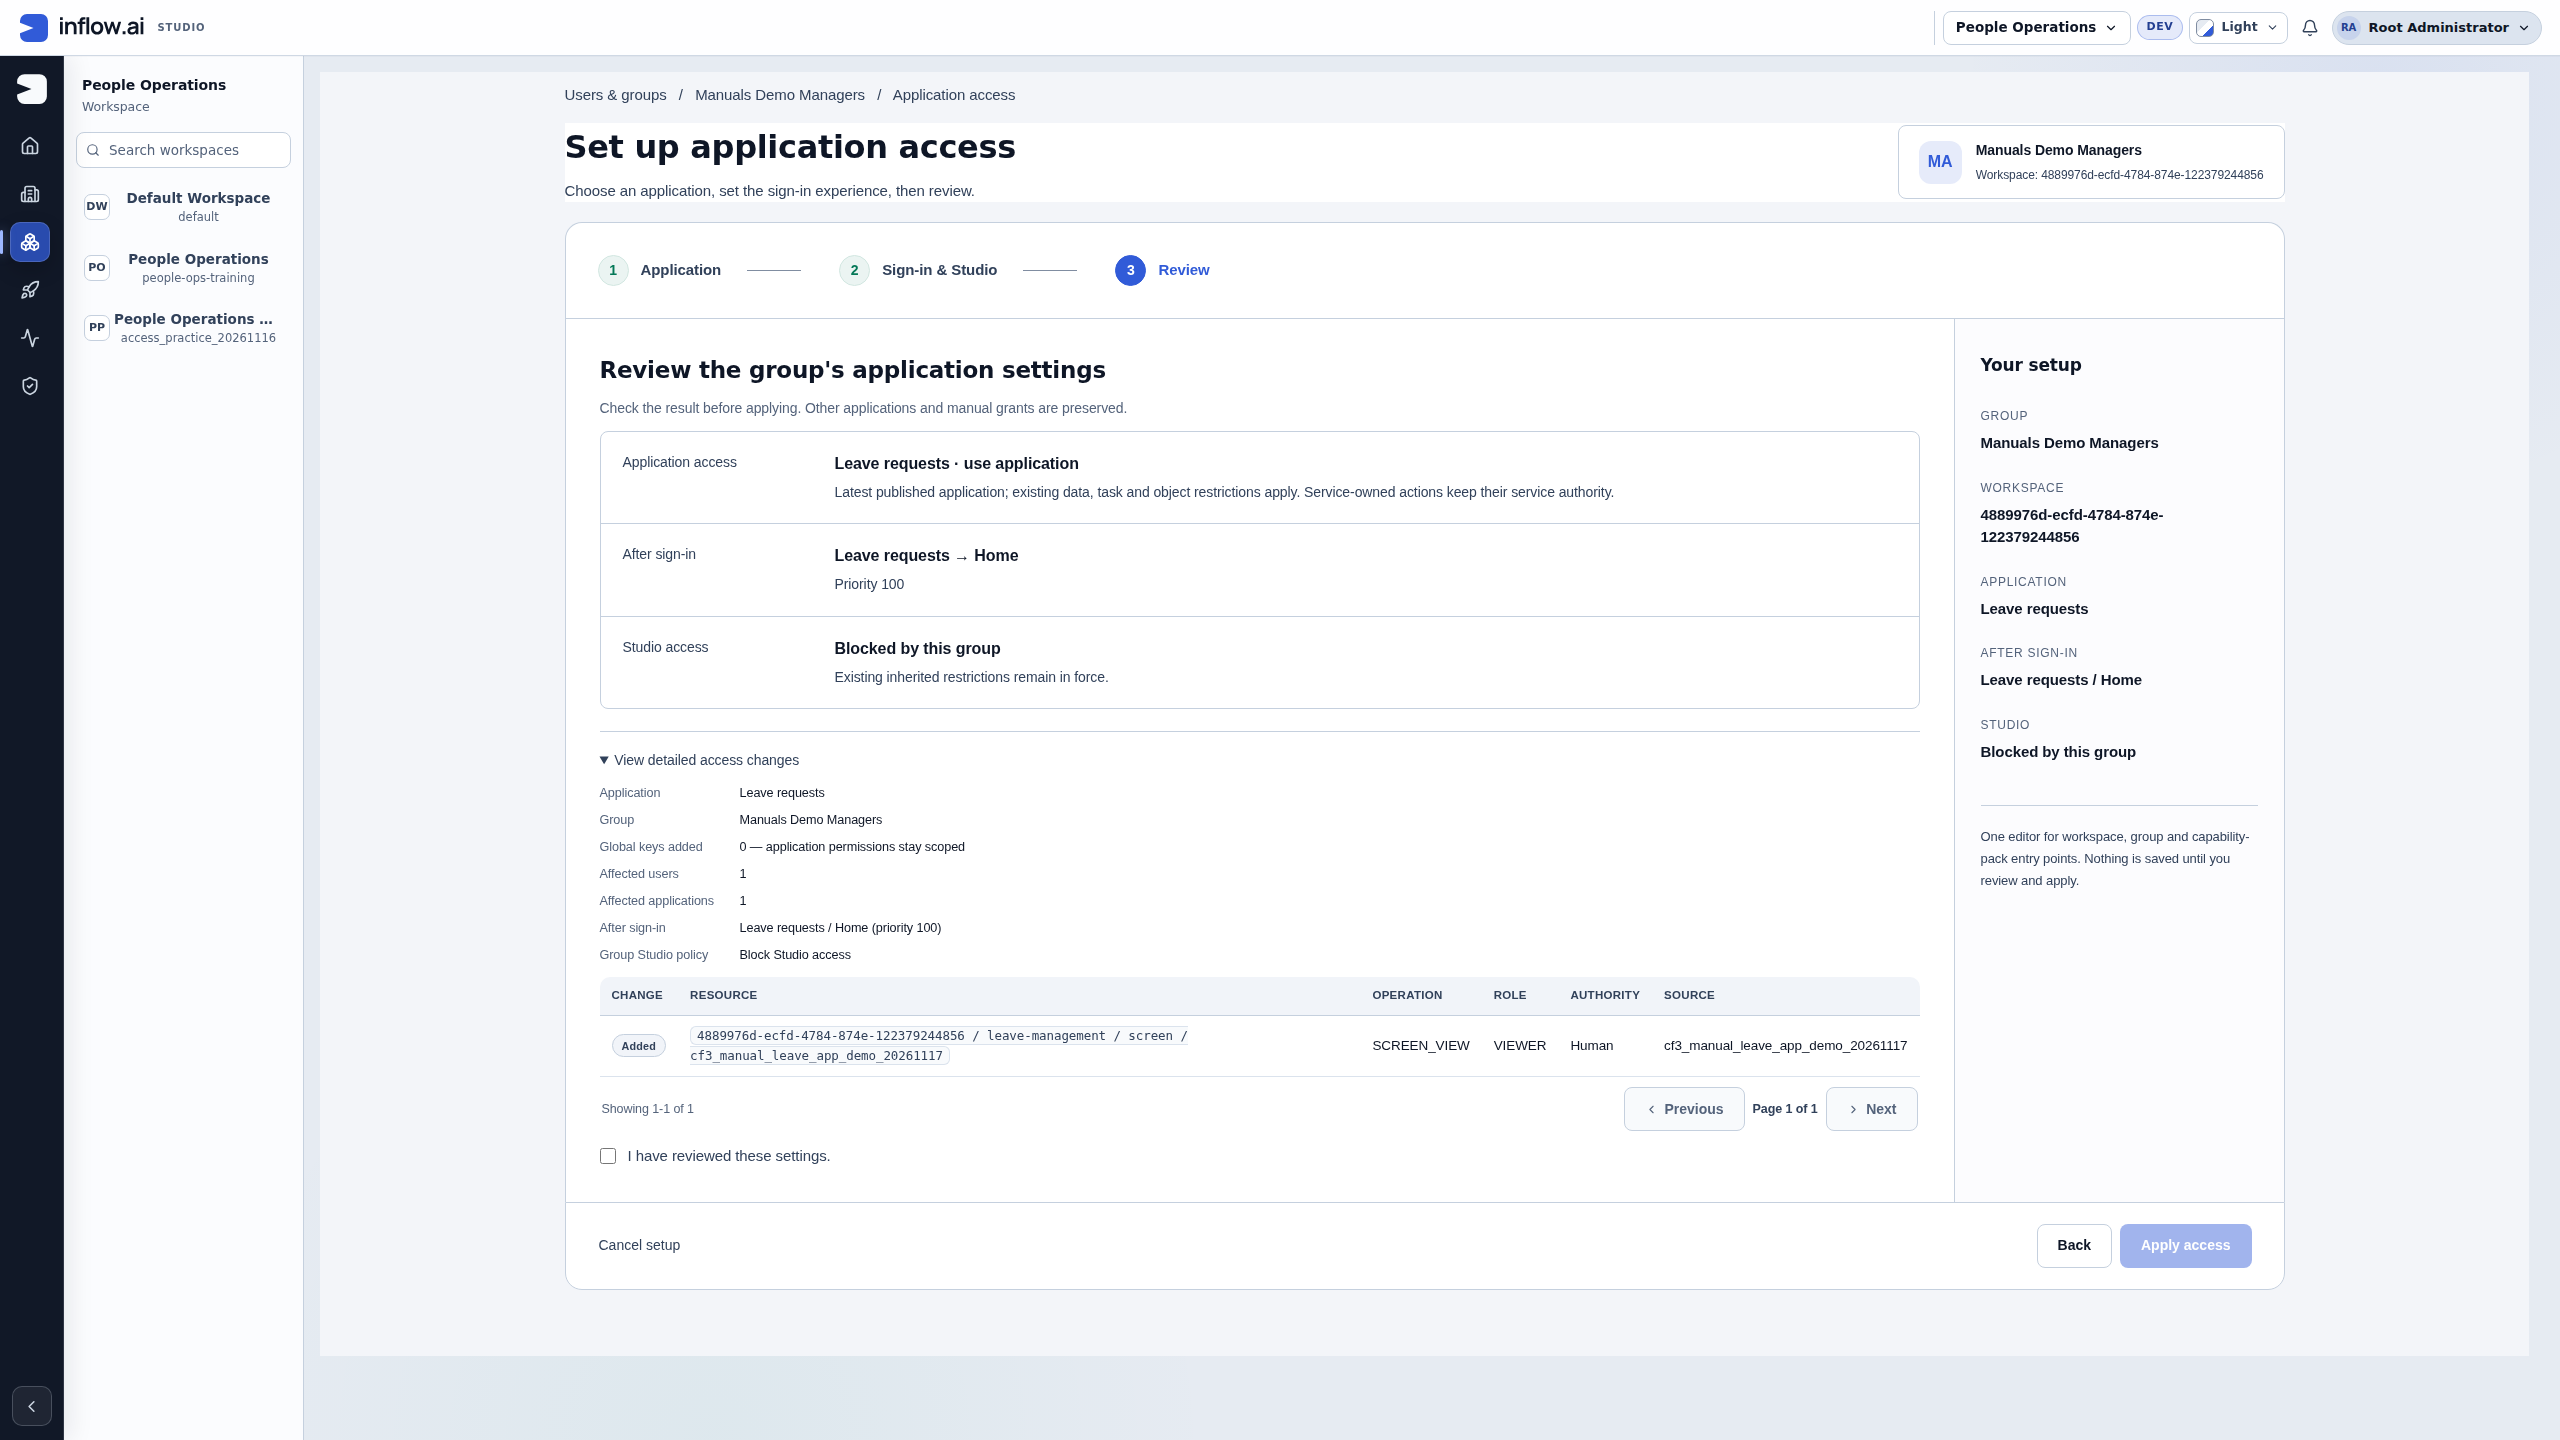
The next screen helps the application owner keep that handoff concrete. In this example, the Managers group already has its saved member; the administrator is now reviewing access to Leave requests. Read the chosen application, Home and Studio policy separately from the member list. Review the exact scope and affected users before confirming.
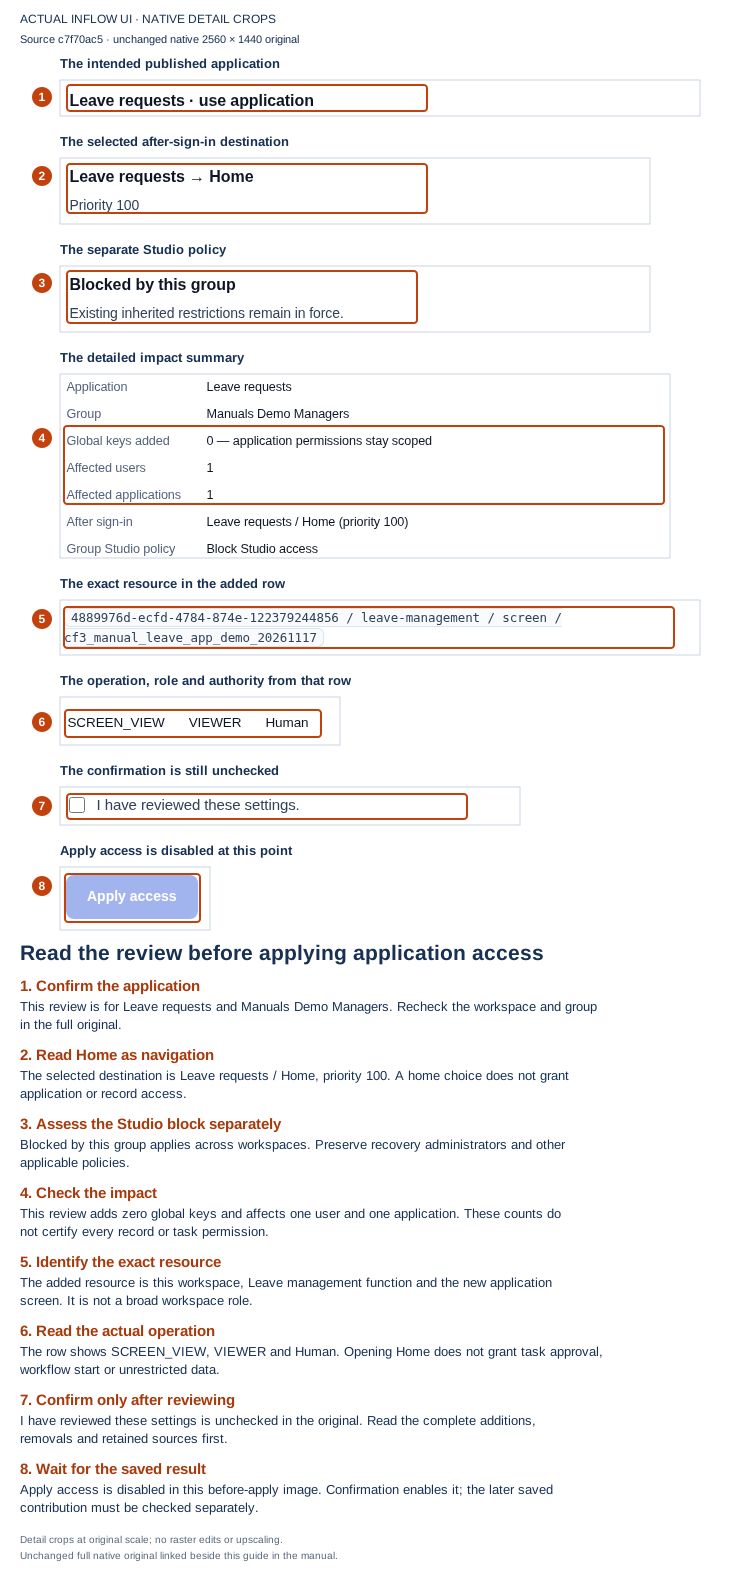
Figure 3. Membership is the earlier saved result; application access is a separate configuration review. Here I have reviewed these settings is still unchecked and Apply access is disabled. This picture does not prove a saved grant. Read the complete review, confirm only the intended changes, and check the saved result through the application's authorized setup. Assess the Studio block across workspaces and preserve recovery administrators. Open the unchanged full 2560 × 1440 original.
If the new manager is absent from the workflow's user picker, follow the early Home checkpoint. The supported order prepares a minimal published Home and reviews each group's narrow application contribution before selecting the active ordinary manager. After the real forms and workflow/task pages are added, review both groups' application dependencies again. Do not give the manager a builder role to make the picker list them.
For example, the administrator can report: “The employee and manager accounts each appear once in their intended group. Application access is the next owner's check.” That report is more useful than “the users are ready” when sign-in, publication or task assignment has not yet been checked. If the app later opens but an assigned task is unavailable, investigate that task's state and access with the workflow owner; do not recreate the person or repeat the membership change.
These three unchanged native originals were captured on 17 November 2026 from compiled and served revision c7f70ac5. They document the saved group setup and the separate before-apply application-access review. Account creation, deactivation, forced password change, directory visibility and the complete leave business journey are separate procedures and are not demonstrated by these screenshots.
Keep three decisions separate
Membership: who belongs to Employees or Managers? Set this in the group.
Application use: which released application may the group use? Review this through application access.
Business assignment: who may handle this request's manager task? Configure and check this in the workflow. A profile's manager relationship can be useful input when the workflow explicitly uses it; it is not a substitute for task assignment.
Profile visibility: who can find the person in people directories, pickers and member lists? An identity administrator can restrict a profile to administrators. This does not decide who may use the application, read business records, or receive a task.
Use a joiner, mover and leaver review
Identity setup is easier to audit when each change answers a specific work event. Before editing, record the person's account identity, the requester's reason, the effective date, the groups and application involved, and the owner who can confirm the result. Keep passwords, recovery codes and setup links out of that worksheet.
| Work event | Review | Make the change at | Confirm afterward |
|---|---|---|---|
| Joiner | Does the person already have an account? Which employee or manager group is required? | The account and relevant group; application use is reviewed separately. | Account exists once, intended membership is visible, and the ordinary user can complete the approved sign-in setup. |
| Mover | Which old team, new team, applications and open tasks are affected? Which fields are directory-managed? | Change only the organization fields and group memberships the authorized owner controls. | New group membership is correct; unintended old membership is reviewed; app access and open task assignment are checked with their owners. |
| Leaver | Who owns account deactivation, retained records and task reassignment? Are other groups or app grants independent? | An authorized identity administrator deactivates the exact account, then asks the relevant owners to review tasks, grants and records separately. | The account shows Inactive. Open tasks, independent group/app grants and retained records each have a separate owner-reviewed outcome. |
This table is a coordination aid, not permission to deactivate an account or delete business data. Follow the identity and records owners' lifecycle procedures. A group removal can leave a direct or inherited grant, while a group that is still present can be blocked by a more specific policy. Check effective access when that check is available.
Deactivate an ordinary leaver account
Use this individual-account procedure only when the identity administrator has the approved leaver request and authority to act. Practice with a synthetic ordinary account in the admitted training environment. Never use your own account, a service account, or a protected administrator as the example target.
- Open Authorization → Users & groups → Users. Search by the account's actual username or another approved identity detail; a display-name match alone is not enough.
- Open the matching row and check the profile's username and available identity details against the approved request. Confirm the account is currently Active and is the intended ordinary test account.
- In the profile drawer, read the action before selecting it. Deactivate changes this one account immediately; this individual action does not open a second confirmation dialog. If the control is unavailable or the target is your own account, stop and ask the identity owner to resolve the correct authorized path.
- Wait for the result and read the profile status. Confirm the account now shows Inactive. The button may now say Activate, so do not click it as a retry.
- If the user list was filtered to Active only and the row is no longer visible, change Filter users by status to All statuses or Inactive, then reopen the same account and verify its username and badge.
- Record the account-status result without credentials or setup links. Ask the workflow owner to review open tasks; ask application and group owners to inspect separate grants; ask the records owner to preserve or transfer required business records under the retention policy.
If the result is uncertain: if the drawer reports an error or you lose the response, first refresh/read the account's current status and verify the username. If it is Inactive, do not repeat the action. If it still appears Active, ask the identity owner to confirm whether the update was accepted before taking another action. Never infer that a task was reassigned, application grants were removed, records were deleted, or existing sign-in sessions were revoked by the status badge alone.
Check: the exact approved account reads Inactive. This proves the account-status change shown by this screen; it is not proof of the separate task, grant, record-retention or session outcomes.
Example: deactivate Mohammad's approved teaching account
The identity owner approves deactivation of the synthetic Mohammad account after the teaching exercise. The administrator opens Users, searches using the exact username on the approved request, and checks the profile's username and current Active status before acting. The administrator selects Deactivate once, waits for the update, then verifies Inactive. If the list hides the account because Active only is selected, the administrator switches to All statuses and reopens that same username. If the response was lost, the administrator reads status before doing anything else.
The account-status result closes only that step. Inflow's deactivation routine also ends the person's existing login sessions and revokes MCP tokens tied to those ended sessions; an Inactive badge confirms the account status, not what a specific browser displayed or an individual session receipt. The workflow owner separately identifies any open tasks, the application/group owners review each independent access source, and the records owner confirms retention or transfer. Deactivation does not itself reassign tasks, remove unrelated grants, or decide how records are retained.
Require a local account to change its password at next sign-in
Use this action only for an approved password-change request and an account that has an Inflow-managed local password. It is a forced-change control, not a way to choose a replacement password or recover an account that cannot authenticate. A company-managed sign-in or service account follows its identity-source owner's route.
- Open Authorization → Users & groups → Users. Search for the exact approved ordinary account and check its username and identity details. Use a separate synthetic local account for training; do not reset a shared actor used by another exercise, and do not reset your own account.
- Open the profile and choose More actions → Reset password only when that action is available for this account. If the menu item is missing, do not try a different account or API path to make it appear; ask the identity owner to confirm the account's sign-in source and your authority.
- Read the Reset password confirmation. It says that the person must choose a new password the next time they sign in, that every existing session ends, and that the current password is not shown or changed. This is not a generated password or a message containing one.
- Confirm only when the approved request names this exact target and the session interruption is intended. Wait for the saved account result.
- Reopen or refresh the same profile and read its Password change required status. Do not ask the person to send you their old or new password. Give them the approved private route to sign in and complete the required change.
- If the status already says Password change required before you start, the menu action is disabled because the requirement is already present. Record that state and coordinate with the account owner instead of repeating the reset.
If the response is uncertain: reload the same account and check its password-change status before trying again. If the status is required, stop; if it is not required, ask the identity owner to confirm whether the request reached the account before taking another action. Do not confuse Reset password with deactivation, account creation, a welcome message, an emailed recovery link, or a credential you can deliver to the user.
Example: require a separate synthetic account to change its password
An approved security exercise asks the identity administrator to require a password change for a dedicated synthetic Local account. The administrator verifies the account's username and local sign-in type, opens its profile and reads the confirmation before proceeding. After confirming, the administrator checks that the profile says Password change required and reports only that state. The account owner completes the next sign-in privately. If the test actor already has that status, the exercise records the existing state and does not reset again.
Restrict directory visibility for one account
Use profile visibility when an approved identity policy says that a person's profile should not appear in other non-administrators' people directories, pickers or member lists. It is a listing control, not a broad privacy or business-access switch.
- In Authorization → Users & groups → Users, search for the exact approved account, open its profile and read Profile visible to before changing it.
- If the current value is Everyone and the approved change is to restrict the listing, choose More actions → Show profile to administrators only once.
- Wait for the profile update and confirm Profile visible to → Administrators only on the same account.
- If the response is missing or unclear, reload the same profile and read Profile visible to before choosing another action. The menu label changes to Show profile to everyone after restriction; selecting it reverses the change.
- Record the approved visibility result without adding another grant or changing account status. The person can still see their own profile, and existing process references can still resolve them. Application permissions, record authorization, task assignment and directory visibility are separate decisions.
Example: hide a synthetic profile from people pickers
An approved exercise uses a separate synthetic account whose profile should be limited to identity administrators in directories. The identity administrator checks the exact username and current Everyone setting, selects Show profile to administrators only, and then reads Administrators only from the saved profile. This change does not remove the synthetic account from a workflow assignment or decide whether it has access to a leave request. If another owner reports an unexpected business-access result, investigate that record, application or task boundary separately instead of reversing profile visibility.
Worked example: move Sara from recruiting to leave management
Suppose Sara changes teams and should review leave requests. First find the existing Sara account by its actual username or email; do not create a new account from a matching display name. Ask the identity owner which organization fields are directory-managed. Then compare her existing group membership with the requested new membership. Preserve any unrelated membership until its owner confirms it is no longer required.
The identity administrator updates only the fields they own and adds or removes the appropriate group memberships. The workspace owner separately confirms that the group has the intended application arrangement. The workflow owner checks whether Sara may receive new manager tasks and what to do with any tasks already assigned to her. Finally, test the released experience with Sara's normal account if an authorized test account and environment are available.
The review is complete only when each boundary has its own result: directory/account status, group membership, application use and task assignment. “Sara is in Leave managers” proves only the membership part. If an owner cannot confirm one of the other parts, record it as unresolved and continue the independent parts of the move.
Worked example: preserve a clean employee handoff
For Mohammad's first day, prepare the approved identity and test-mail destination before opening New user. Check for an existing account, then complete only the required fields the administrator owns. On Review, compare the username, contact information, organization fields and sign-in method against the request. After creation, read the saved-account result first and the welcome-delivery result second; these are separate outcomes.
Next, add Mohammad's existing account to the intended employee group and inspect the resulting membership. Ask the application owner to review access to the published app and starting page. When Mohammad can sign in, check the ordinary employee journey: the intended app appears, the request form is available, and unrelated Studio or manager controls remain unavailable. Do not use an administrator's session to infer what Mohammad can see.
If account creation succeeded but welcome delivery failed, keep the account and resolve the approved delivery or sign-in setup with its owner. If membership succeeded but the app is absent, continue at the application-access boundary. If the app opens but a record or task is unavailable, continue with that record or workflow owner. Do not repeat earlier successful changes to address a later boundary.
Read the membership result carefully
Group views distinguish direct members from effective members inherited through the group hierarchy. A person can appear in the effective list without being a direct member of the selected group. Search filters the visible list; it does not change membership. Before removing or adding someone, confirm whether the action applies to the selected group's direct membership and whether a parent/child group explains the effective result.
Use Permissions to review direct grants on a group and read inherited grants as their source information. Platform groups may be fixed or read-only. Do not copy an inherited permission into a direct grant just to make the row look explicit; that creates a separate policy that can persist after the original inheritance changes. For workspace, function and object access, follow the workspace security guide.
Example: welcome Mohammad without making him a builder
The identity administrator creates Mohammad as an ordinary user and adds him to Leave employees. Nadia gives the administrator the published application's name and intended entry page after the app is ready. The administrator reviews that group's application use separately.
Mohammad then signs in normally and opens the employee app. He does not need Nadia's credentials or the ability to edit rules. If he cannot see the app, the team checks the saved group/application arrangement instead of promoting his account to an administrator.
If the welcome email failed, the administrator checks the existing account and the approved delivery setup. They do not repeatedly create accounts or share a generated password in a team chat.
Example: Sara changes teams
Sara moves from one business team to another. The administrator opens the existing account and reviews its organization fields and groups. They change only the information and membership that the move actually requires.
Nadia then checks the leave application's relevant access and how future manager tasks are assigned. Existing tasks may need a legitimate task reassignment; changing a profile field is not a promise that every old task has moved automatically.
If the account is managed by an external directory, the team checks which information must be corrected there. Repeatedly changing a read-only directory-owned field in Inflow is not a useful repair.
Common mistakes
| Problem | Useful next step |
|---|---|
| A username or email is already in use. | Find the existing account and confirm which person it belongs to. |
| A field is not editable. | Ask who owns that identity information and use the supported owner workflow. |
| The person exists but cannot sign in. | Check account state and the chosen sign-in method with the identity administrator. |
| A group member cannot open the app. | Review application access; membership alone does not grant it. |
| A manager cannot complete a task. | Check the actual task assignment, task state and current access. |
| You received no save confirmation. | Read the existing account or membership before repeating the change. |
| Sara appears as an effective member but not a direct member. | Inspect the group hierarchy and source before changing membership. |
| A group permission is shown as inherited. | Follow the displayed source; do not duplicate it as a new direct grant without an explicit need. |
| A person moved teams but old tasks remain. | Ask the workflow owner to review open task assignment separately from group membership. |
Continue
Follow the identity and permissions tutorial for the staged People Operations setup. For company-managed login, read external sign-in.
Further reading
Optional technical reference — detailed contracts and implementation information for your administrator or developer. You do not need it to follow this lesson.