Prepare the people who will build and use Leave requests
Nadia builds the application. Mohammad requests leave. Sara reviews the request assigned to her. This tutorial prepares their accounts, groups and access without turning the employee and manager into application builders.
You will return to this tutorial after creating the application. Complete stages 1–4 first. Stage 5 tells you where to build next, including an early Home-only access checkpoint when a new manager must appear in the assignee picker. Stage 6 reviews the finished application's access; stage 7 checks the ordinary user experience.
Before you begin
Use the development environment agreed with your administrator and fictional teaching data. The identity administrator may be a different person from Nadia. Some steps require that administrator's controls. If you do not have those rights, prepare the worksheet and work with the owner.
| Story item | Meaning |
|---|---|
| People Operations | The workspace for the teaching application. |
| Leave requests | The published application you will build. |
| Nadia | The consultant who builds it. |
| Mohammad | An ordinary employee account. |
| Sara | An ordinary manager account, selected for the relevant task. |
| Employees / Managers | The intended groups for the two kinds of application use. Use agreed real groups in the test environment. |
These labels explain the story. Select the actual person or group through the UI instead of assuming that typing a name creates an account or grants access.
Stage 1 — Create or select People Operations
- Open Workspaces and find the agreed project. If it does not exist and you may create it, choose New workspace.
- In Basics, enter People Operations, review the key
people-opsand write a short description of the leave application. - On Structure, choose an appropriate template and review Business functions. Use an agreed function such as Leave management for related assets.
- On Security, add only the intended builder/reviewer people and roles.
- On Review, check the details and choose Create Workspace. Open it after creation.
Check: you are in the correct development workspace. No leave model, employee form or manager workflow has been created merely by making the project.
If it fails: check whether the workspace already exists, whether its key is available and whether you may create it. Do not reuse a production project or another team's workspace just because its name is similar.
Stage 2 — Prepare Mohammad and Sara as ordinary users
- Ask the identity administrator to open Authorization → Users & groups → Users.
- Search for the approved test people. If a new account is needed, choose New user.
- Complete the actual Identity, Contact, Organization and Access steps. Use the approved test-mail and normal sign-in arrangement supplied by the administrator.
- Review the account and choose Create user. Read both the saved-account and welcome-message results.
- Prepare Sara and Mohammad separately. Keep their passwords and any setup links private.
- If the profile offers a Manager field and your design uses it, choose Sara's actual account as Mohammad's manager. Otherwise the workflow can use its separately selected manager input; do not invent an identity field.
Check: the two people can finish their intended normal sign-in setup. Neither needs to be an administrator to use a released app or an eligible task.
If it fails: investigate the existing account or failed welcome setup with the administrator. Do not repeatedly create the same person or share a privileged login to continue.
Stage 3 — Prepare the two intended groups
- Open Users & groups → Groups with the authorized administrator.
- Select the agreed employee group, or use New group to create an ordinary teaching group where permitted. Do the same for the manager group.
- Select the employee group and choose Add members. Add Mohammad's actual account.
- Select the manager group and add Sara's actual account.
- Read the membership result, including inherited membership where relevant and visible.
Check: the intended people belong to the intended groups. A group name is an organizing label, not an automatic grant of application use or every manager task.
If it fails: use the supported owner process for a protected or externally managed group. Do not alter an administrator group or make membership open to conceal a setup problem.
Worked example: verify each saved membership
The screenshots below use Manuals Demo Employee and Manuals Demo Manager as the two fictional ordinary people. Their group names and usernames differ from the story names Mohammad and Sara; use the actual accounts created for your teaching environment.
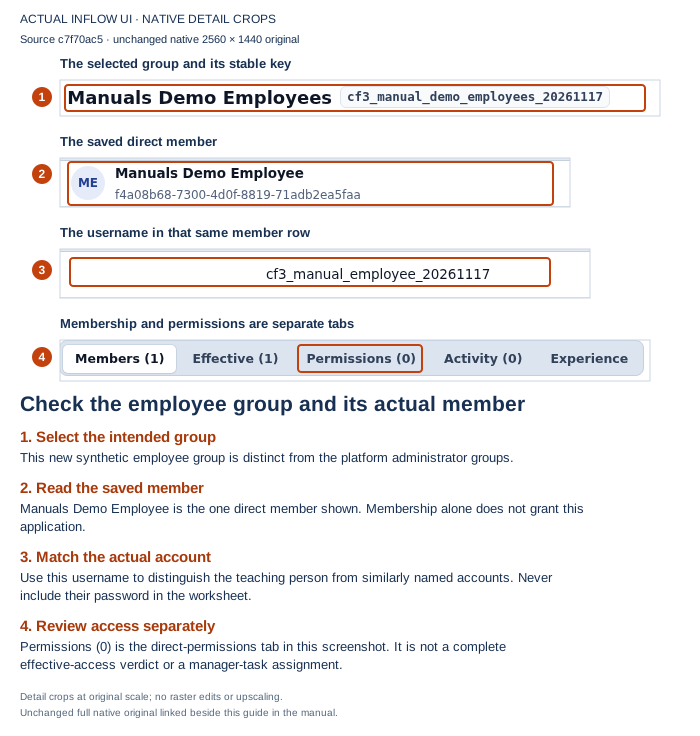
Figure 1. The authorized administrator has selected Manuals Demo Employees. Members (1) shows Manuals Demo Employee and the matching username. Membership is saved, but this screen does not grant application use. Open the unchanged full 2560 × 1440 screenshot.
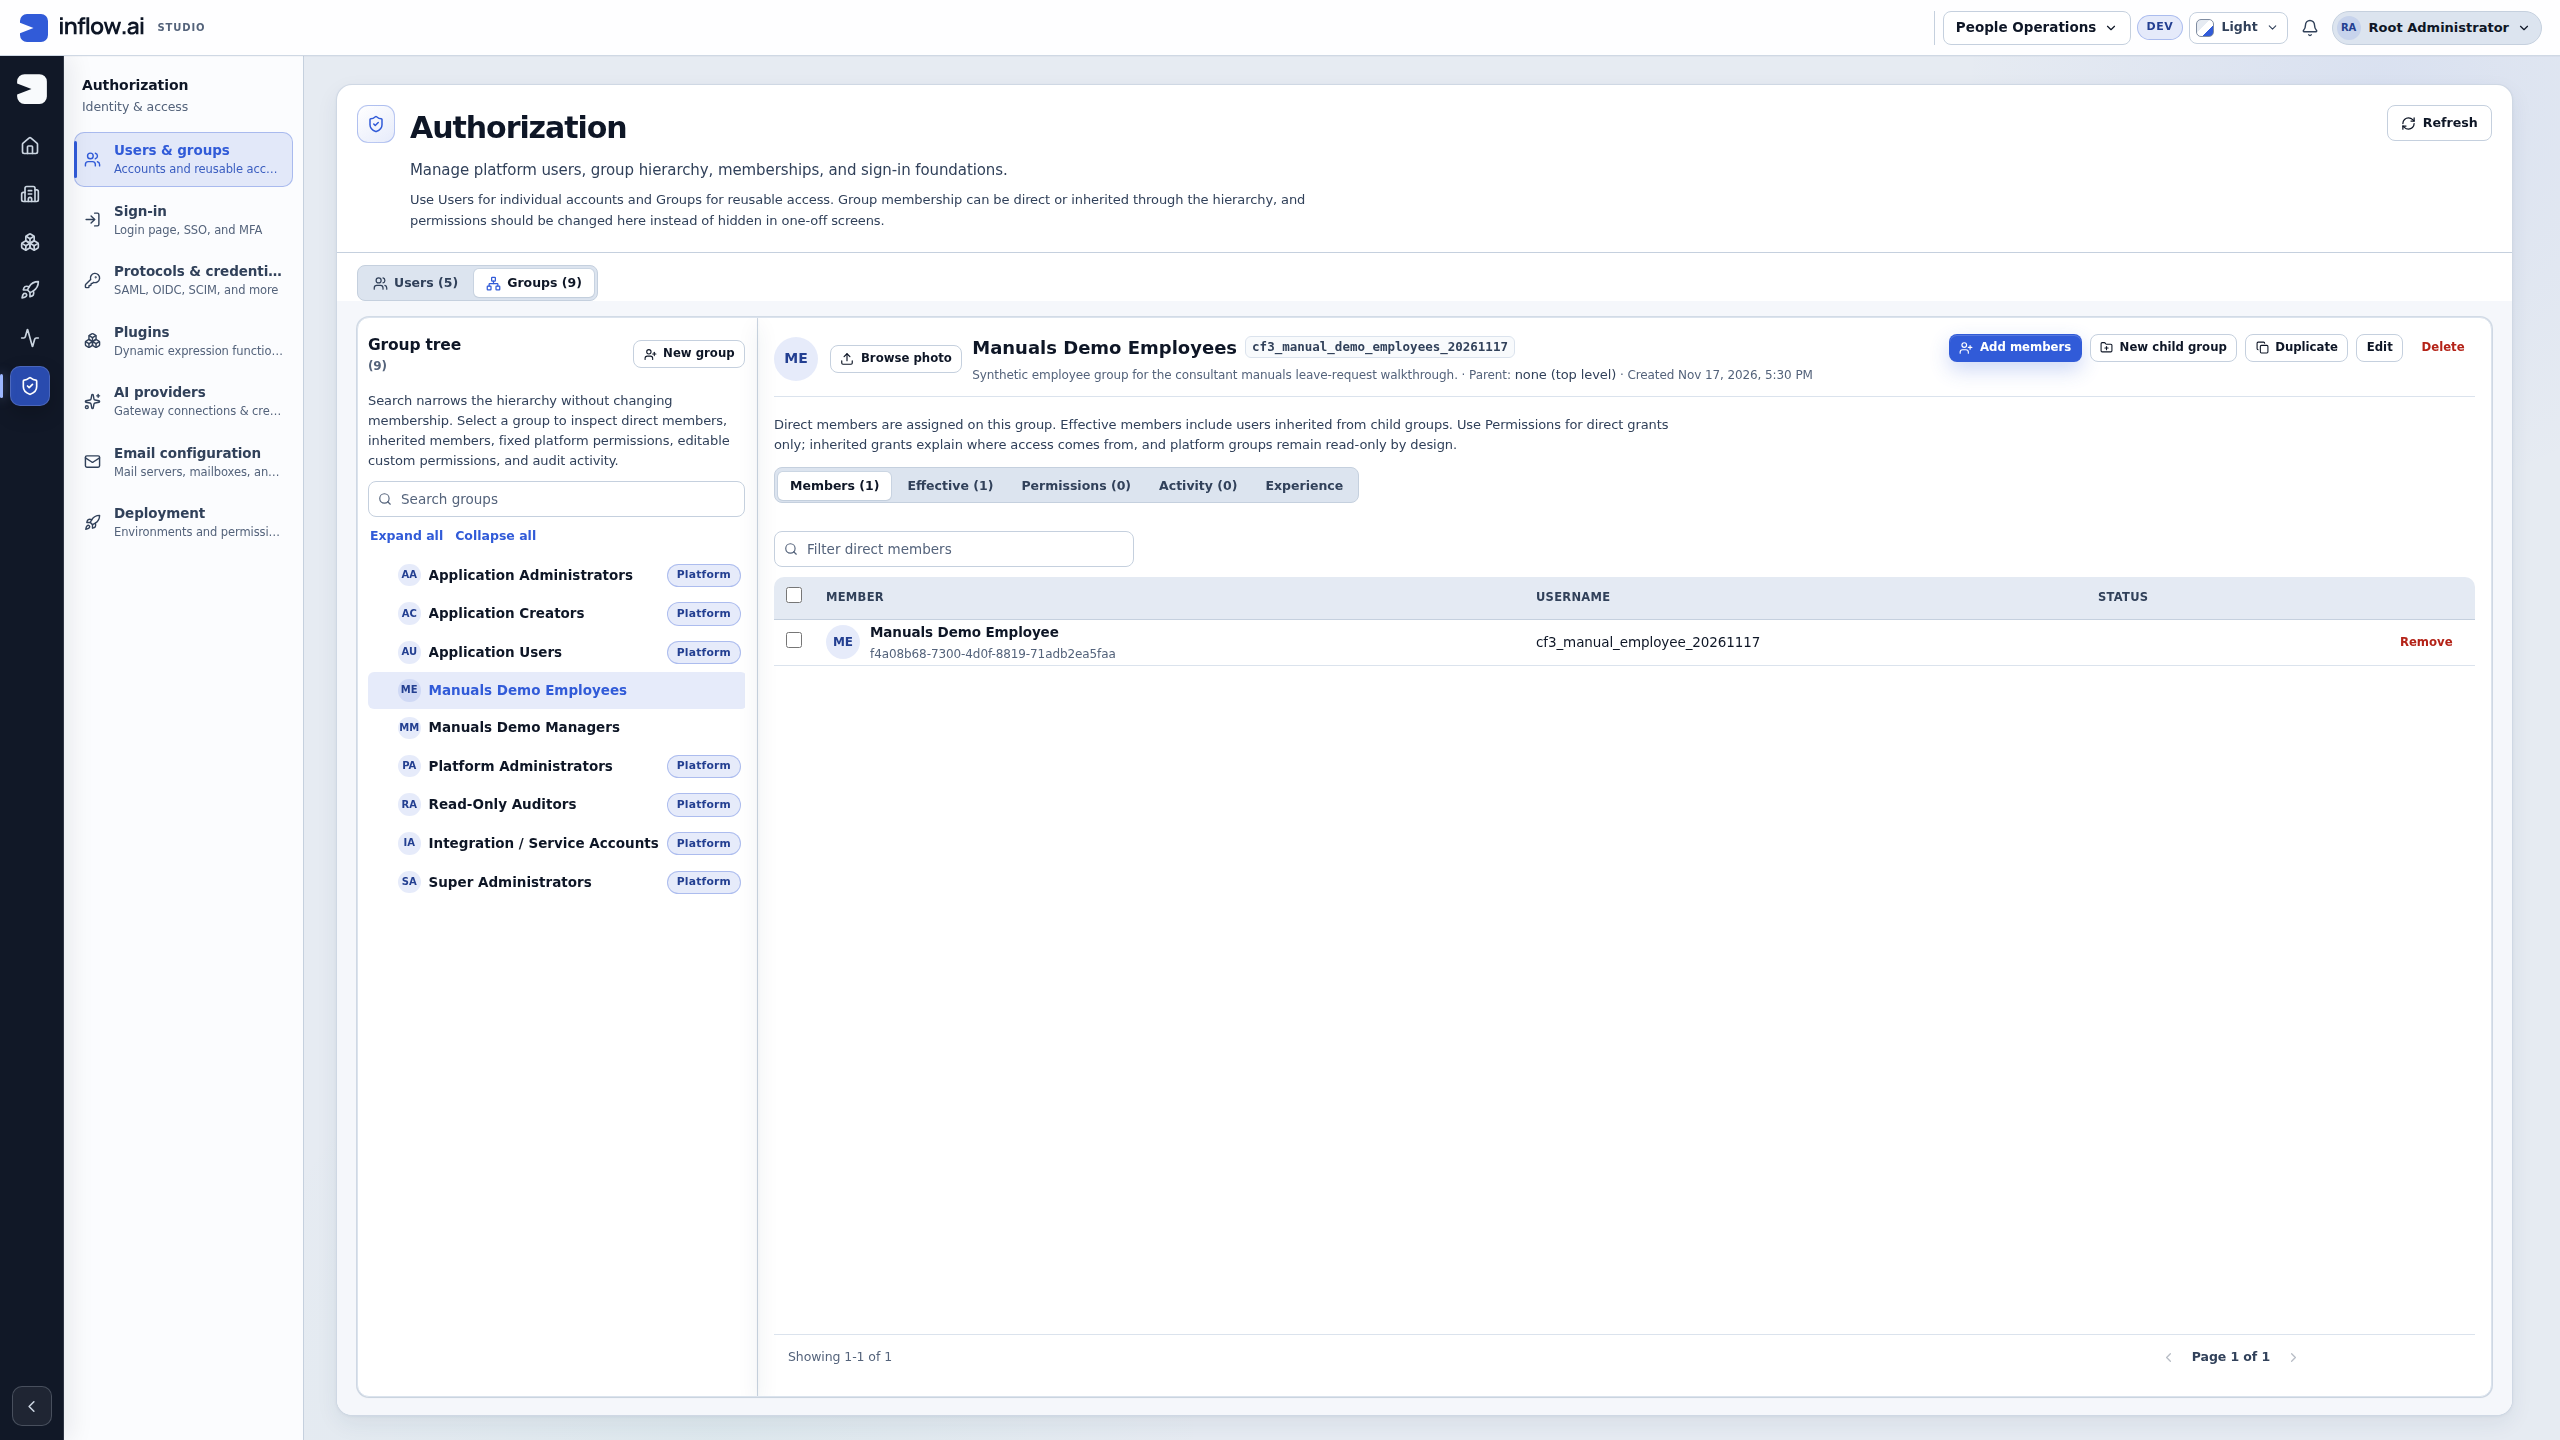
Repeat the check for the manager group rather than assuming that creating both groups added both people. Distinguish the member's display name, username and stable identifier when two accounts have similar names.
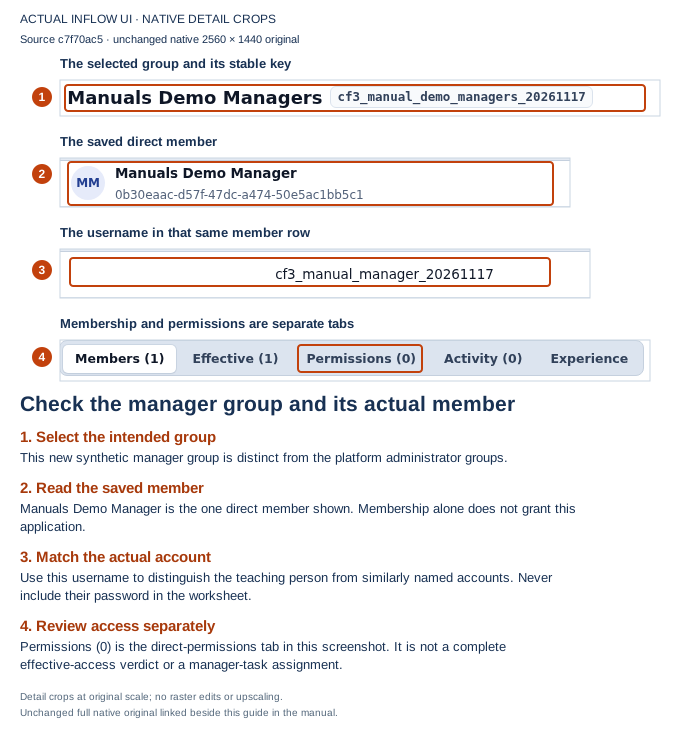
Figure 2. Manuals Demo Managers contains Manuals Demo Manager. Permissions (0) is the direct-permissions tab shown here; it is not a complete effective-access verdict. The group name does not assign or approve a leave task. Open the unchanged full 2560 × 1440 screenshot.
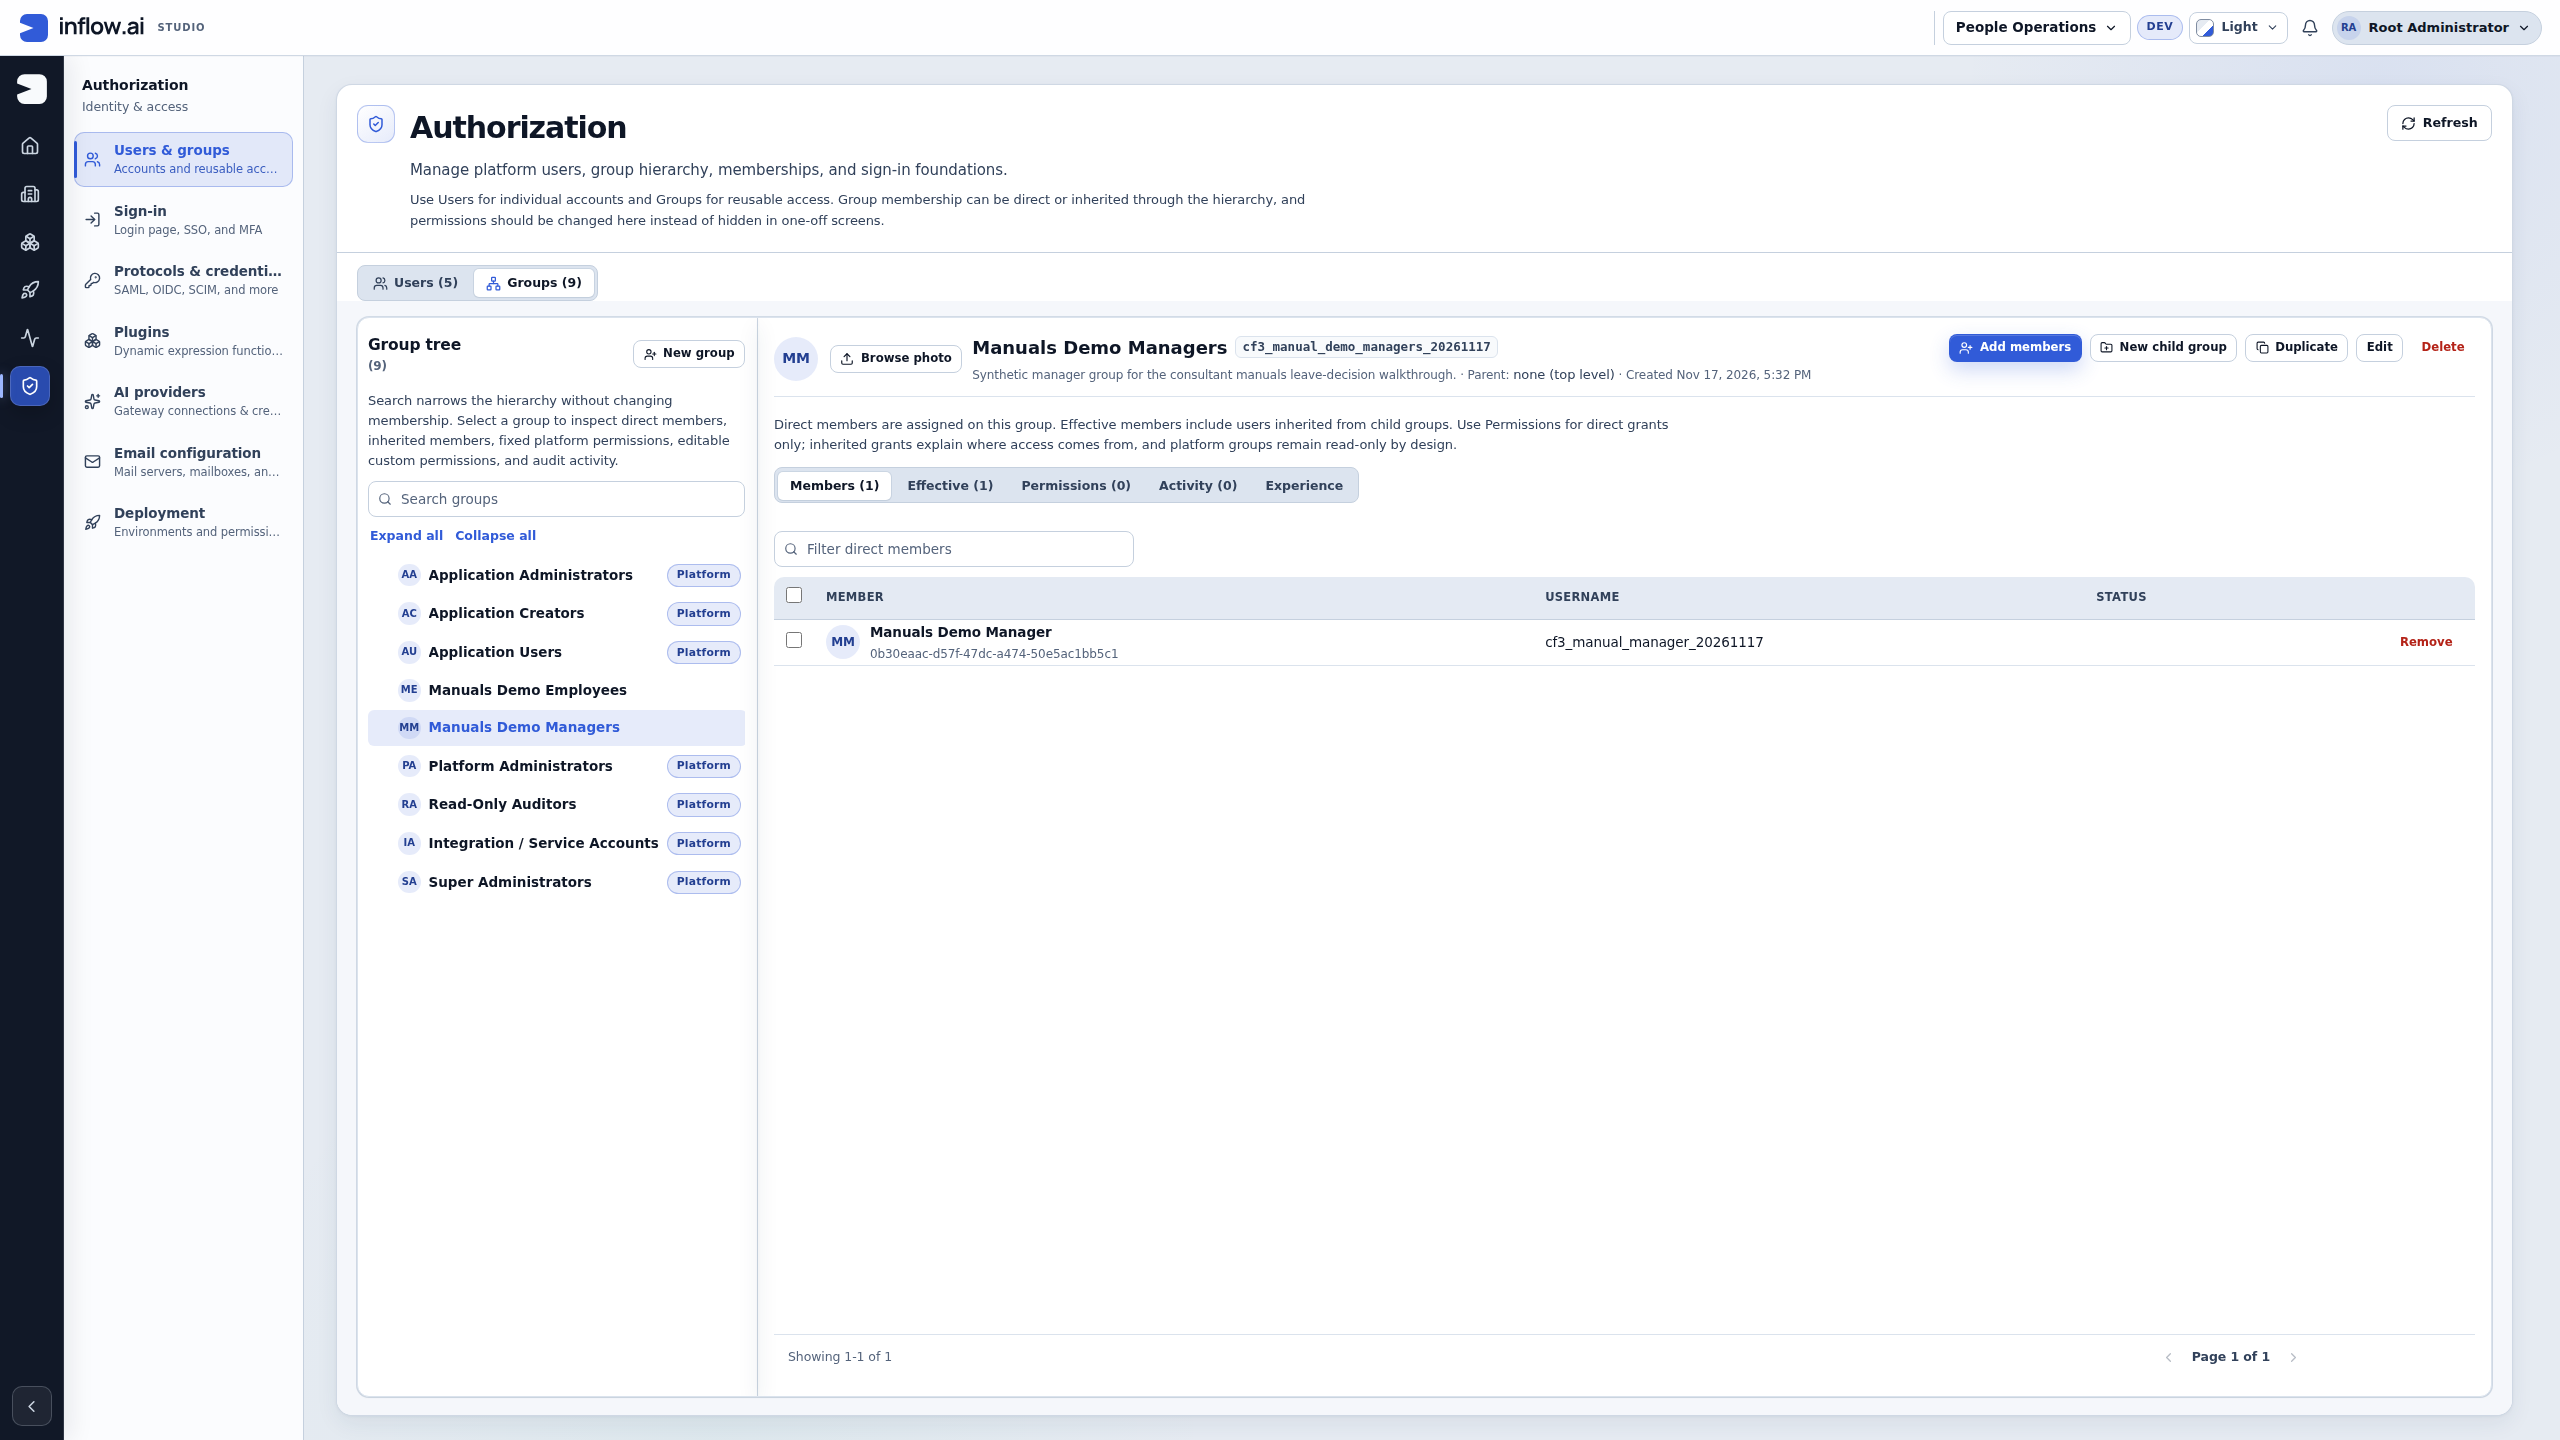
Keep a short worksheet: workspace, employee username and group, manager username and group, intended published application, and intended Home page. Keep passwords and setup links out of it. The administrator's account visible in the full originals is performing identity setup; it is not the account used for the ordinary application checks later in this lesson.
Stage 4 — Give Nadia the builder access she needs
- Return to People Operations → Security with the workspace owner.
- Review Nadia's current role and any access inherited from groups.
- Use Add grant and Set role only for the required builder scope. Review the Leave management function separately if its access differs.
- Save the setting and use Check access, when available to the owner, to inspect Nadia's effective result.
- Keep Mohammad and Sara's future application use separate from builder access. Do not add a high workspace role just to make a business page appear.
Check: Nadia can build the intended application work. The employee and manager remain ordinary users. Additional information, document and task restrictions still apply.
If it fails: the owner resolves the actual missing scope or unavailable policy. Removing one access entry is not proof that every other source disappeared.
Stage 5 — Build the application, then return here
This stage is a reading route. It deliberately stops before the ordinary employee and manager run:
- Complete leave data and rules.
- Complete App Shell and interfaces, stages/milestones 1–7: build the employee form, application pages and separate published manager decision form.
- If Sara is a newly created ordinary user with no existing workspace admission, complete the early Home checkpoint below before selecting her in the workflow's assignee picker.
- Complete vacation workflow, stages/milestones 1–4: create the process, choose the published manager form, select Sara's actual eligible account, test it and publish the workflow.
- Return to the App Shell tutorial's stages/milestones 8–9 to configure the actual process start and native task host. Authoring that task host does not require an existing customer task.
- Return here for stage 6 and review the completed application's dependencies for both groups before Mohammad starts the real teaching request.
Check: you have actual published artifacts with supported connections. A record is business information; a case is a running request; a task is work for a person. Creating one does not automatically create all the others.
If it fails: follow the specific lesson for the missing artifact. Do not skip the manager form or replace the required task/action configuration with a broad access grant.
Early Home checkpoint for newly created ordinary users
A new account can exist and belong to Managers without yet being eligible for the workspace's assignee picker. If searching the exact account returns No matches, check the person's current workspace admission and the application setup. A group label alone is insufficient.
For a new teaching application, use this order:
- Prepare a minimal Home page in the intended Leave requests App Shell. Add a clear fictional-training heading and text. Save, validate and publish this small application through the normal publisher flow. It does not need to start a case or contain a task yet.
- Have the authorized administrator review the Employees group's application access to that published app and Home. Deliberately choose its sign-in destination and separate Studio policy; confirm and apply the reviewed settings. Repeat for Managers. See the illustrated application access example.
- Check the saved result for each group. This narrow application contribution admits the active group member to the workspace's supported user directory. It does not assign a task, confer unrestricted record access, or establish that every workflow start or decision is permitted.
- Return to the workflow's user picker and search Sara's actual account again. Select that eligible account for the intended task. Do not give her a broad workspace editor role merely to make the picker list her.
- Finish the actual forms, workflow and task pages. Publish the completed App Shell and repeat stage 6's access review for both groups. The Home-only review did not include dependencies that were not yet present.
In the captured example, both new accounts were initially absent from the workflow picker. After their two groups received the reviewed Home-only application contribution, the actual new manager appeared and was selected in the new workflow. No case was started by that setup. This is a useful ordering checkpoint when preparing a new environment; it does not replace checking the full employee-to-manager run.
Stage 6 — Review the finished application's access
- In the intended workspace's Security area, open Application access → Manage application access. The group administration surface can also open the supported setup for a selected group.
- Choose the intended Employees group and the published Leave requests application.
- Continue through Sign-in & Studio. Review application use, choose the intended starting page where appropriate, and treat Studio access as a separate decision.
- Continue to Review. Read the actual additions, removals and retained sources. Resolve an unavailable dependency with the application owner.
- Confirm the reviewed changes and choose Apply access. Read the saved result.
- Repeat the appropriate review for Managers. A different group name alone does not assign a manager task.
Check: each group has a deliberate saved application arrangement. The starting page is navigation; task eligibility and record/document access still protect the actual work.
If it fails: choose Review again after a stale or expired review. Preserve recovery administrator access. If a required dependency cannot be included, correct the actual application setup rather than silently broadening permissions.
Stage 7 — Check the employee and manager experience
This stage follows workflow milestones 5–8 and interface milestone 10, which already create and decide on the approved and declined teaching requests. Reuse those results; this access check must not submit leave-2026-017 or decide on its completed task again.
- Sign in normally as Mohammad and open the intended employee application. If a permitted request-detail/history page is configured, read the existing request there. If the app has no such page, ask the authorized owner to verify the record/case result through the normal permitted readback route; do not infer that the New request page exposes history.
- Sign in normally as Sara. Open the published My review tasks page. It lists open work assigned to Sara, so a completed task is expected not to appear there. Do not widen the source or recreate the request to make it reappear.
- If a separate permitted completed-task/history route exists, use it to review the existing task result. Otherwise, have the authorized workflow owner verify the completion receipt through their normal access.
- Check the intended restriction: Mohammad does not gain the ability to edit the application or handle unrelated manager work. Use only the actual user-facing controls and permitted views.
- If an item becomes unavailable, check the legitimate access or task state with its owner. Do not replace the normal user with an administrator for the user-facing check.
Check: both people can use only the prepared application capabilities. The already-completed record/case/task results are read back through an actually available permitted route; this stage performs no new submission or decision.
If it fails: write the person's intended role, the page/action, the non-secret message and what you expected. Ask the responsible application, access or identity owner to resolve that boundary. A working administrator session is not proof that an employee's setup is correct.
A smaller checkpoint: ordinary manager entry before the business run
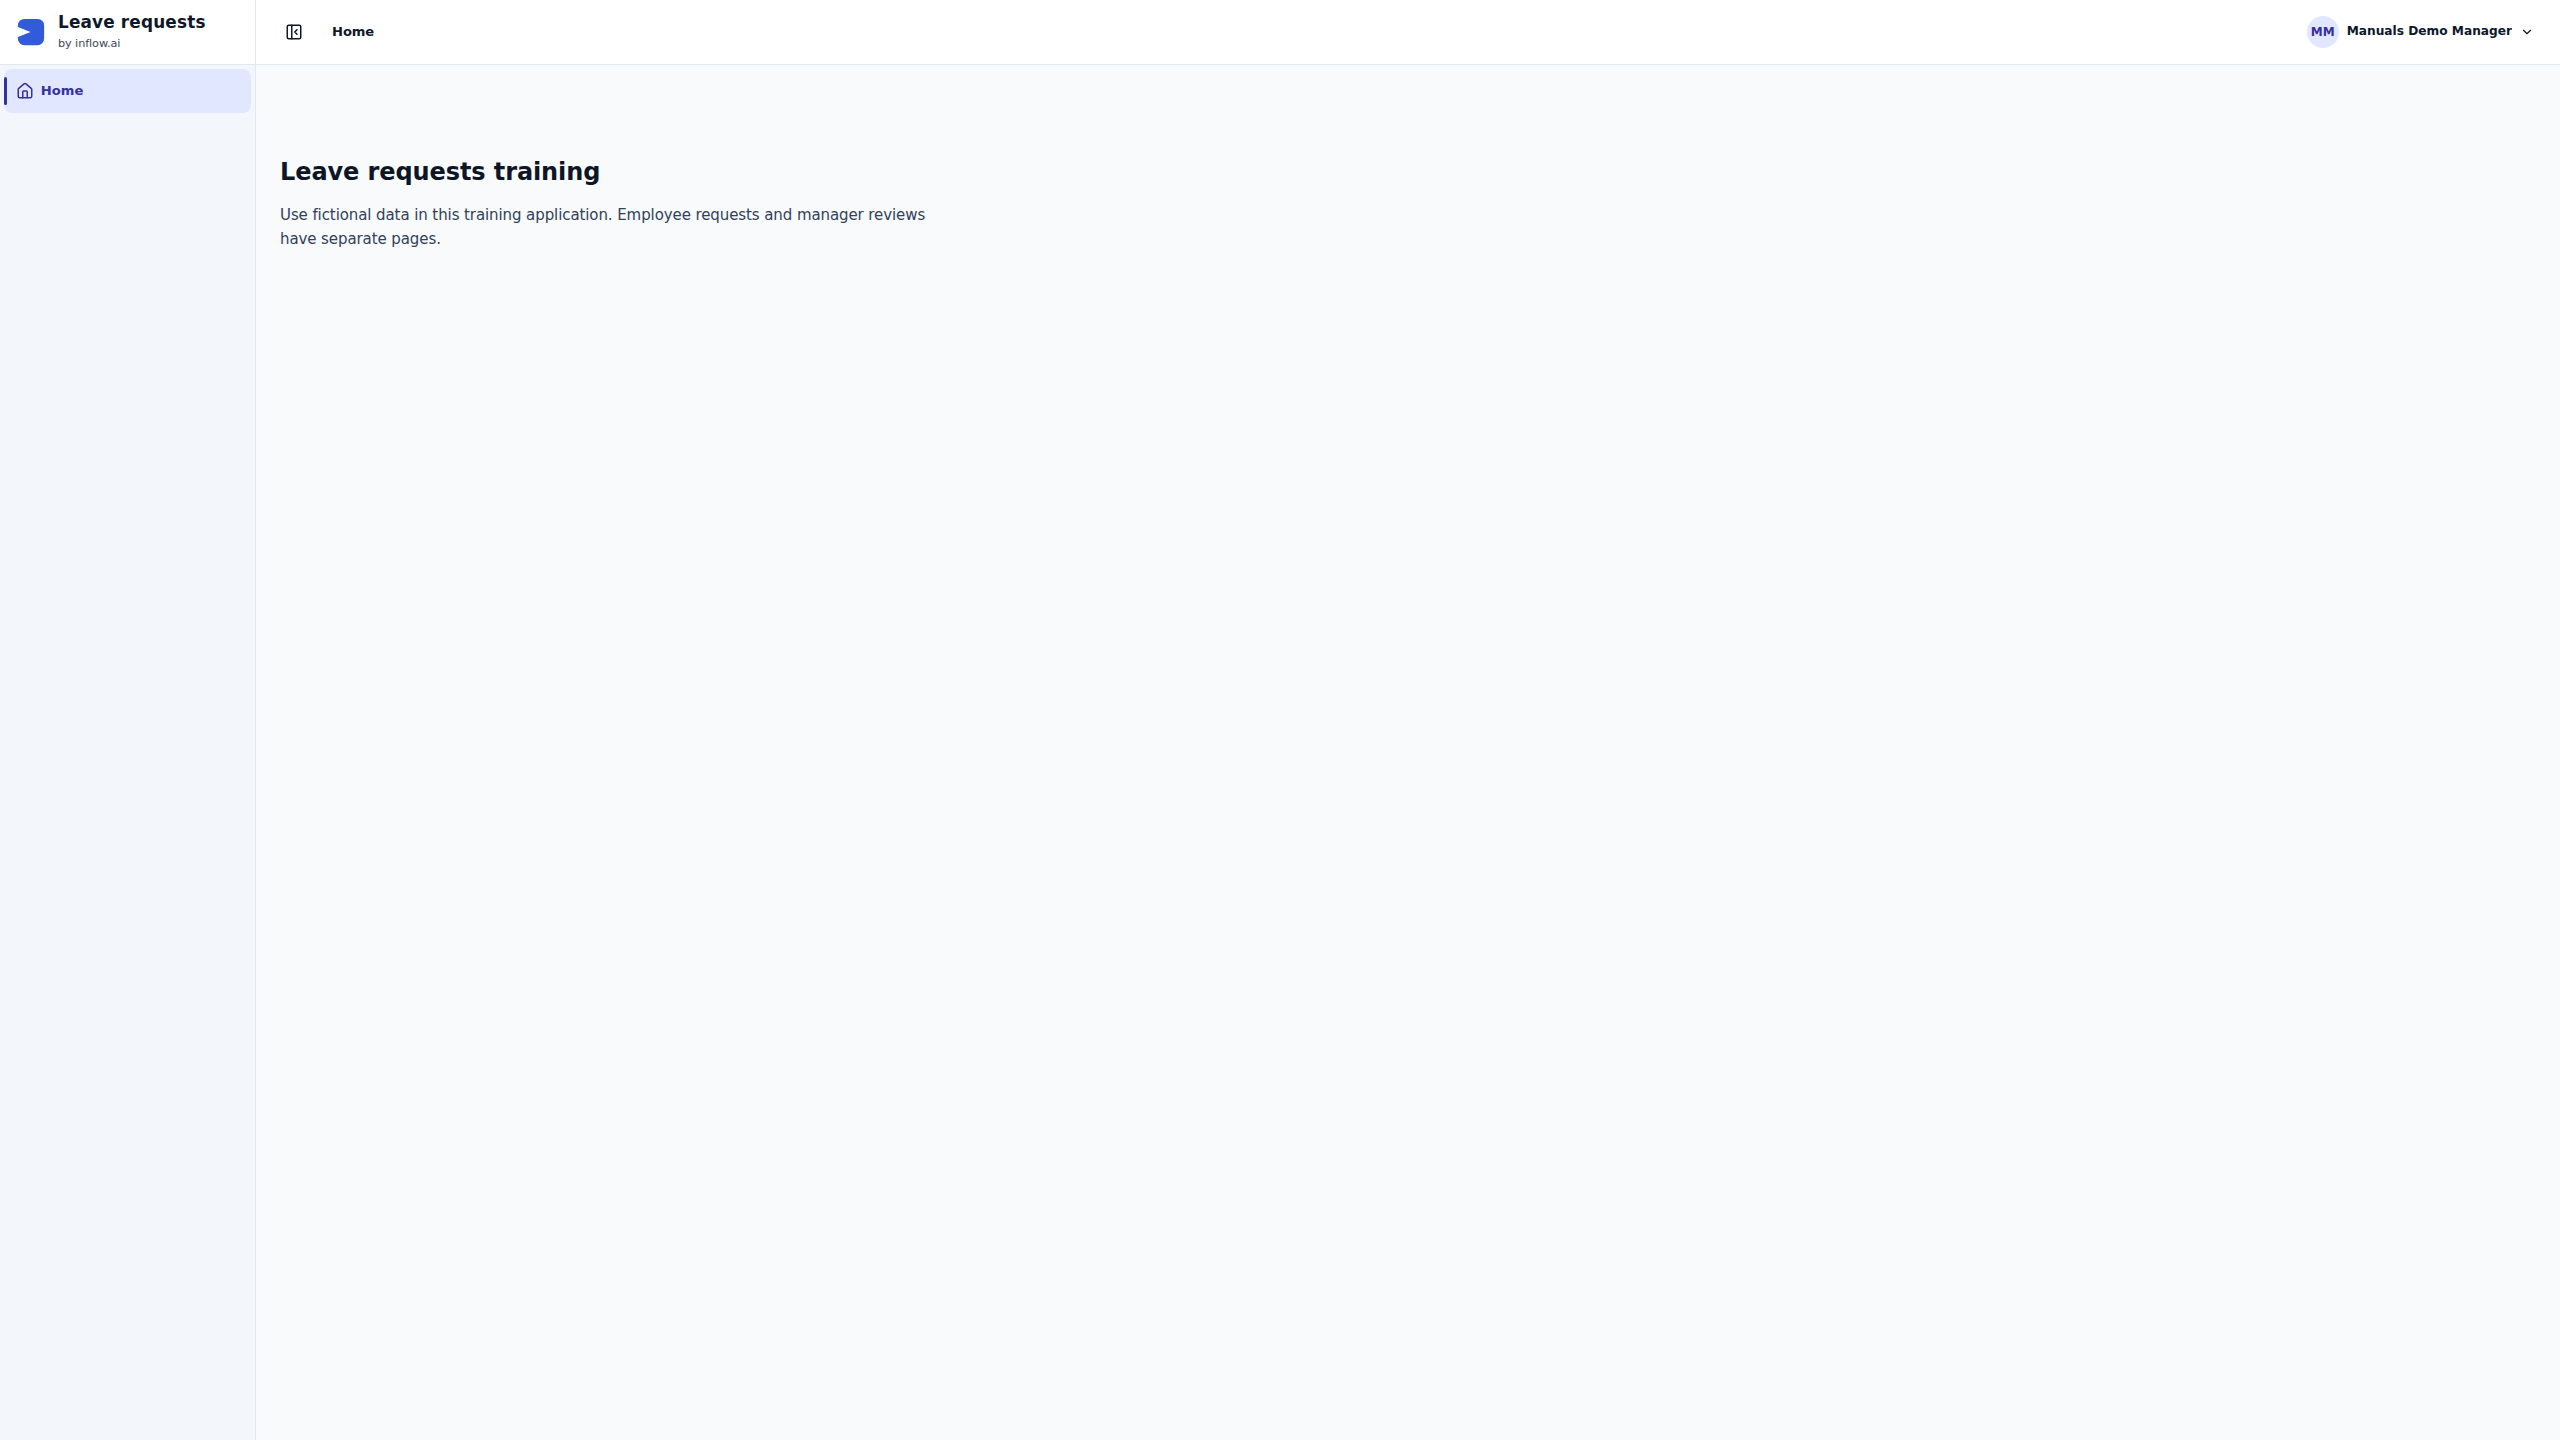
You can check normal sign-in and application entry as soon as the early Home publication is available. Do not submit a request merely to make this checkpoint look complete. In the captured example, the manager's first sign-in retained an old administrator/Studio return context and showed a neutral unavailable message alongside the permitted Home. The supported application entry route then selected the configured Home cleanly; no role was widened.
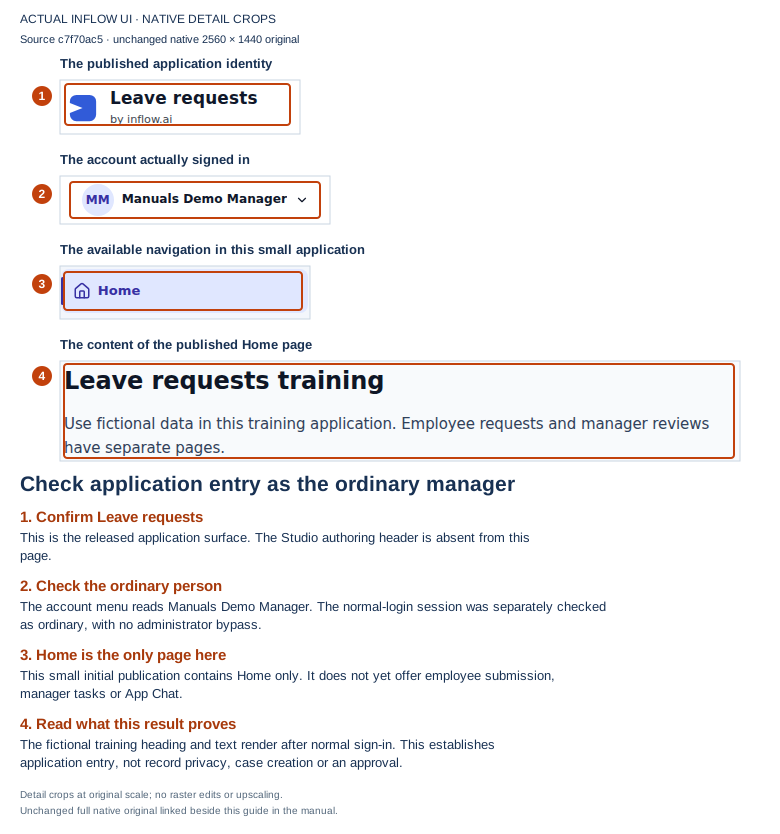
Figure 3. Manuals Demo Manager can enter the small published Home through the ordinary account. The visible account and page were checked alongside the ordinary authenticated session. This is the later application-entry result after resolving the stale return context; it is not a screenshot of a manager task or a claim that the first landing was clean. Open the unchanged full 2560 × 1440 screenshot.
The employee's separate normal-login Home check appears in the application access example. Both Home results are useful evidence of entry. Neither proves that an employee submitted a request, a manager received work, a decision completed or one person could not read another person's records. Keep those checks with the relevant application and workflow lessons.
The five underlying originals across these two lessons were captured on 17 November 2026 from compiled and served revision c7f70ac5. The worked example stops at group setup, saved Home access and ordinary application entry. The later employee submission and assigned-task runtime checks remain pending; native lifecycle input loading and assigned-task source preview were unavailable during preparation. The two new business forms remain unpublished. Do not treat that service unavailability as an empty task list, denial or permission to bypass the review.
What you have prepared
The team now has a clear people-and-access setup and a staged route through the application lessons. Keep a short project worksheet of the workspace, group and published asset names. You do not need to copy internal server fields into it. Use application access and users and groups when revisiting one part.
Further reading
Optional technical reference — detailed contracts and implementation information for your administrator or developer. You do not need it to follow this lesson.