Create a data model and make it ready to use
A data model describes the information an application keeps. For a leave application, it might describe employees and leave requests. You create that design in Studio, then prepare a place to store the records people enter.
Screenshot context: Model-design and recovery images dated 15 November show the nine-field worksheet and its original unconfirmed publication receipt. The Make live sequence dated 17 November uses master source a6a0f15454 at native 2560×1440: it checks the existing version 1, reviews the exact training destination and plan, and confirms a separate Applied result with seven ready functions. The older publication request remains unconfirmed and was not replayed. The 17 November Records sequence then saves three named fictional examples, checking each result. This authoring capture does not prove employee or manager access.
This guide follows Nadia, the consultant building Leave requests. She starts with a small design, checks it, publishes it and adds a few fictional requests. You do not need to write database commands.
Understand the four building blocks
| Term | Meaning | Leave example |
|---|---|---|
| Data model | A group of related kinds of information | Leave management |
| Record type | The description of one kind of item | Leave request |
| Field | One piece of information about that item | First day, requested days or status |
| Record | One actual item entered using that description | Mohammad's request for five days |
A model is a design, so creating it does not automatically create a leave request. Similarly, a request record does not automatically start an approval process. You connect those steps when building the application and workflow.
Before you begin
Open the intended development workspace. You need permission to create and change data models, and permission to publish or make them live for the steps you perform. Your administrator should tell you which existing database destination to use. If you cannot see the required control, ask the workspace owner to check your access; do not switch to an administrator account just to follow the lesson.
Decide the fields and their meaning before opening the editor. Use fictional records while learning.
Example — Design one leave request
Nadia wants to distinguish a request number from the person's name and from the dates of leave. Her worksheet is:
| Field name | Example | Kind of value | Why |
|---|---|---|---|
| request_id | leave-2026-014 | Short text | It is a reference, not a number to add |
| employee_id | M014 | Short text | The employee's business number |
| manager_id | S002 | Short text | A business reference to the manager |
| start_date | 14 December 2026 | Date | The first calendar day |
| end_date | 18 December 2026 | Date | The last calendar day |
| requested_days | 5 | Whole number | The agreed quantity for this example |
| status | PENDING | Choice | A controlled business state |
| reason | Family trip | Longer text, optional | The employee's explanation |
| decision_comment | Cover is arranged | Longer text, optional | A manager comment that can be filled later |
For status, Nadia defines the permitted choices as PENDING, APPROVED and DECLINED. These stored values are separate from the friendly labels the form may show. She makes only genuinely necessary fields required.
The employee and manager numbers in this worksheet are business data. They do not give anyone permission to view the row or complete a task. Later, the workflow uses the actual people selected from the user directory.
Create the model and its fields
A field's Name is the business label and its Key is the technical identifier used by APIs, schemas, relationships, indexes, and generated database columns. Required means a record needs a value; Unique prevents duplicate values. A clean Problems panel is feedback about the draft, not a publication or database change. Keep a model in draft while reviewing its types, keys, business meaning, sensitivity, and relationships with the data owner.
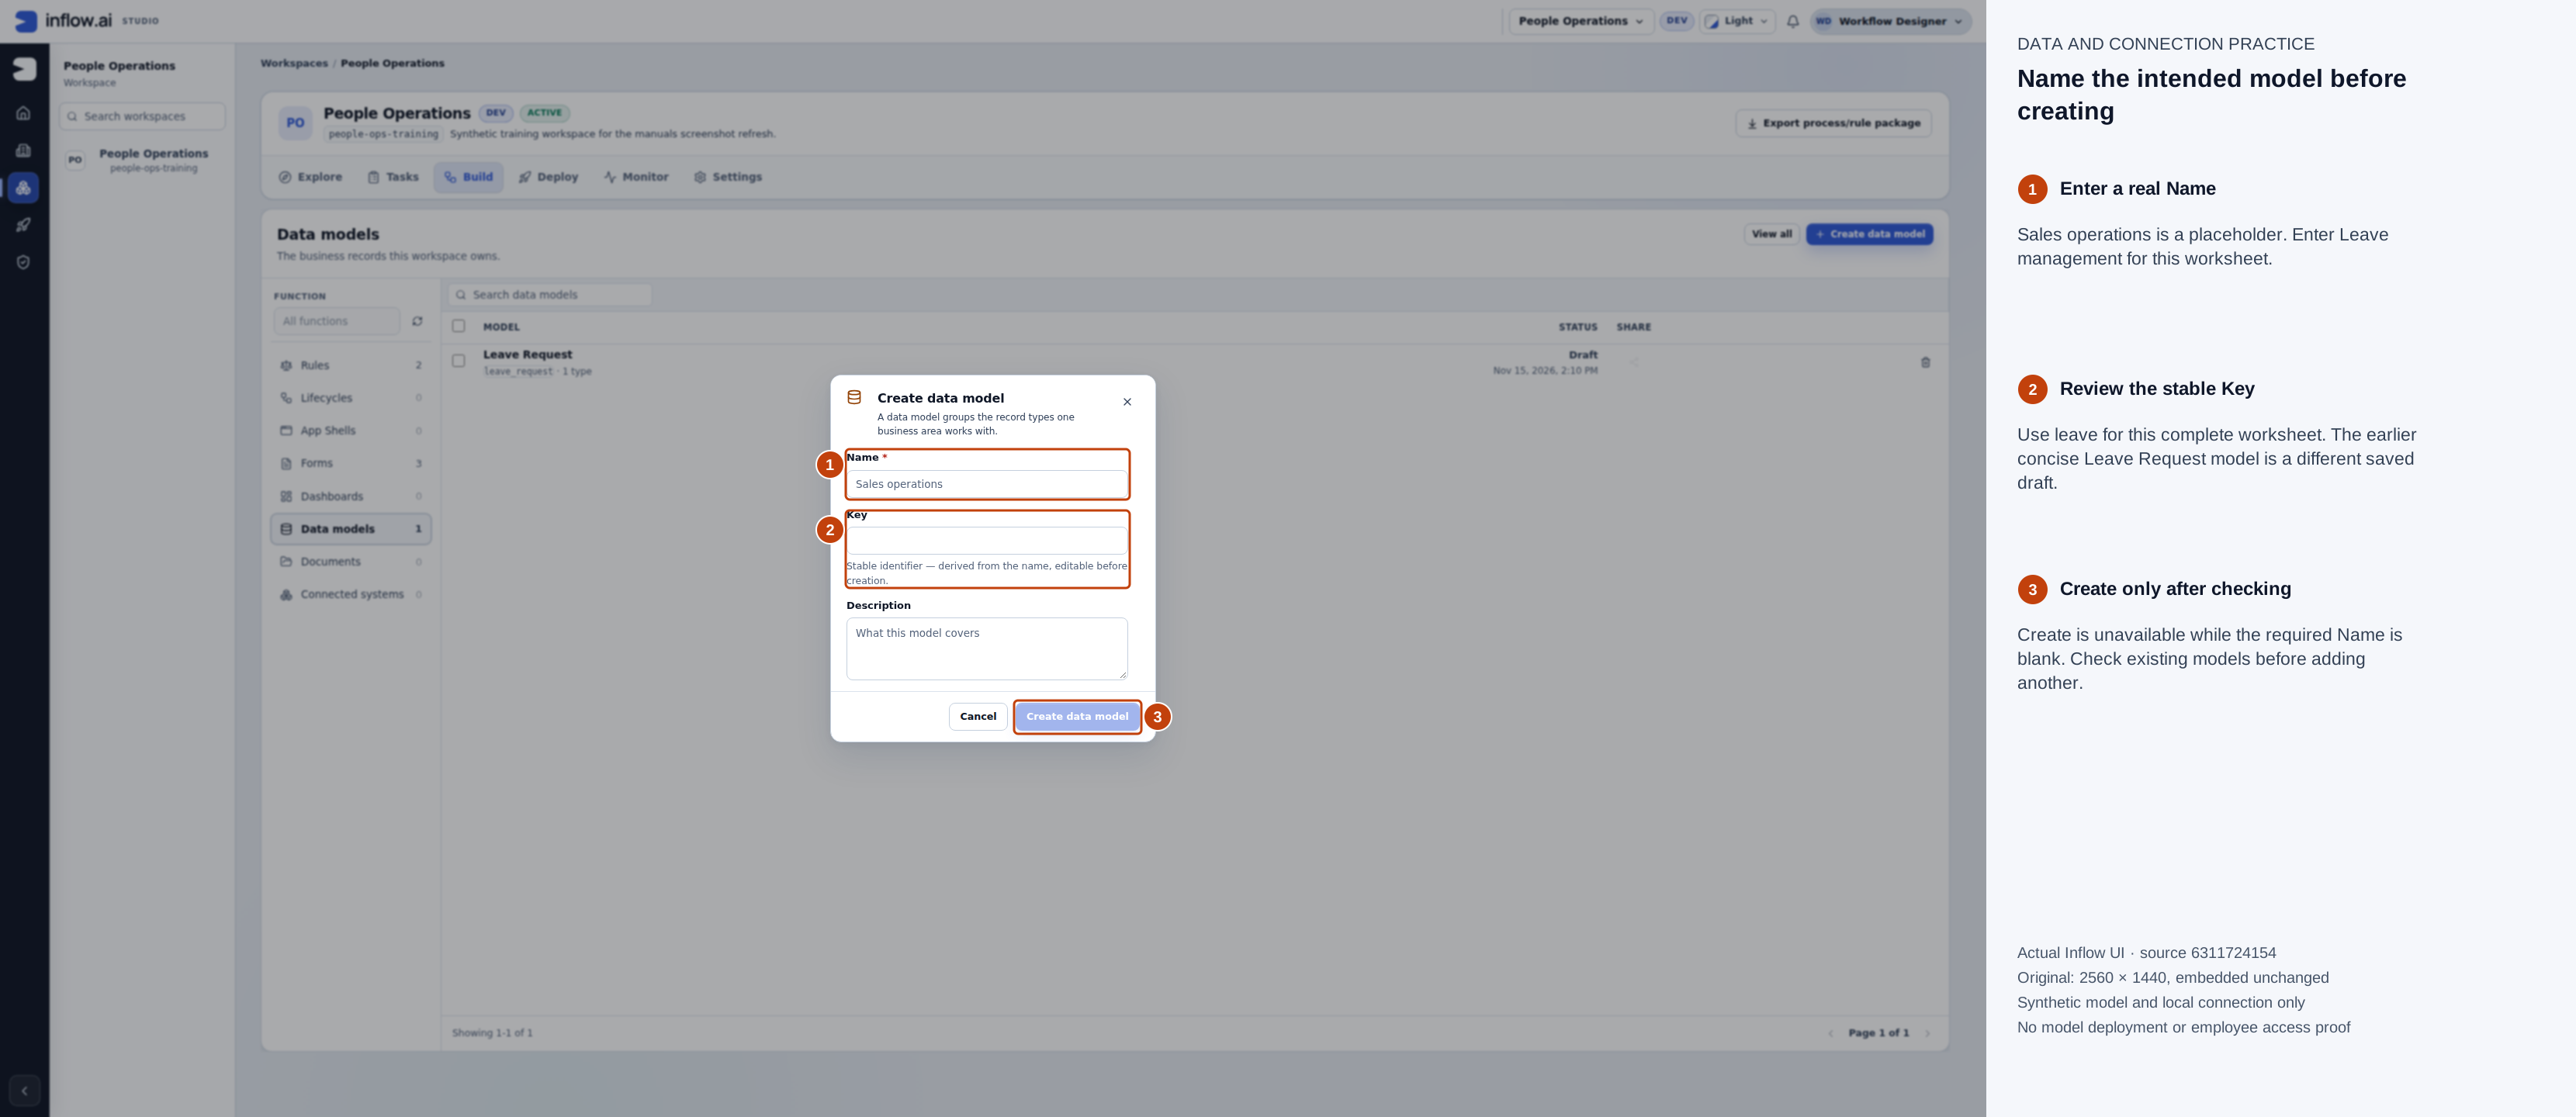
Actual native 2560×1440 capture, 15 November 2026, source 6311724154. Numbered outlines and the side legend are guidance; open the original or open the full-size guide. The earlier concise Leave Request draft is preserved; this complete worksheet uses the distinct model key leave.
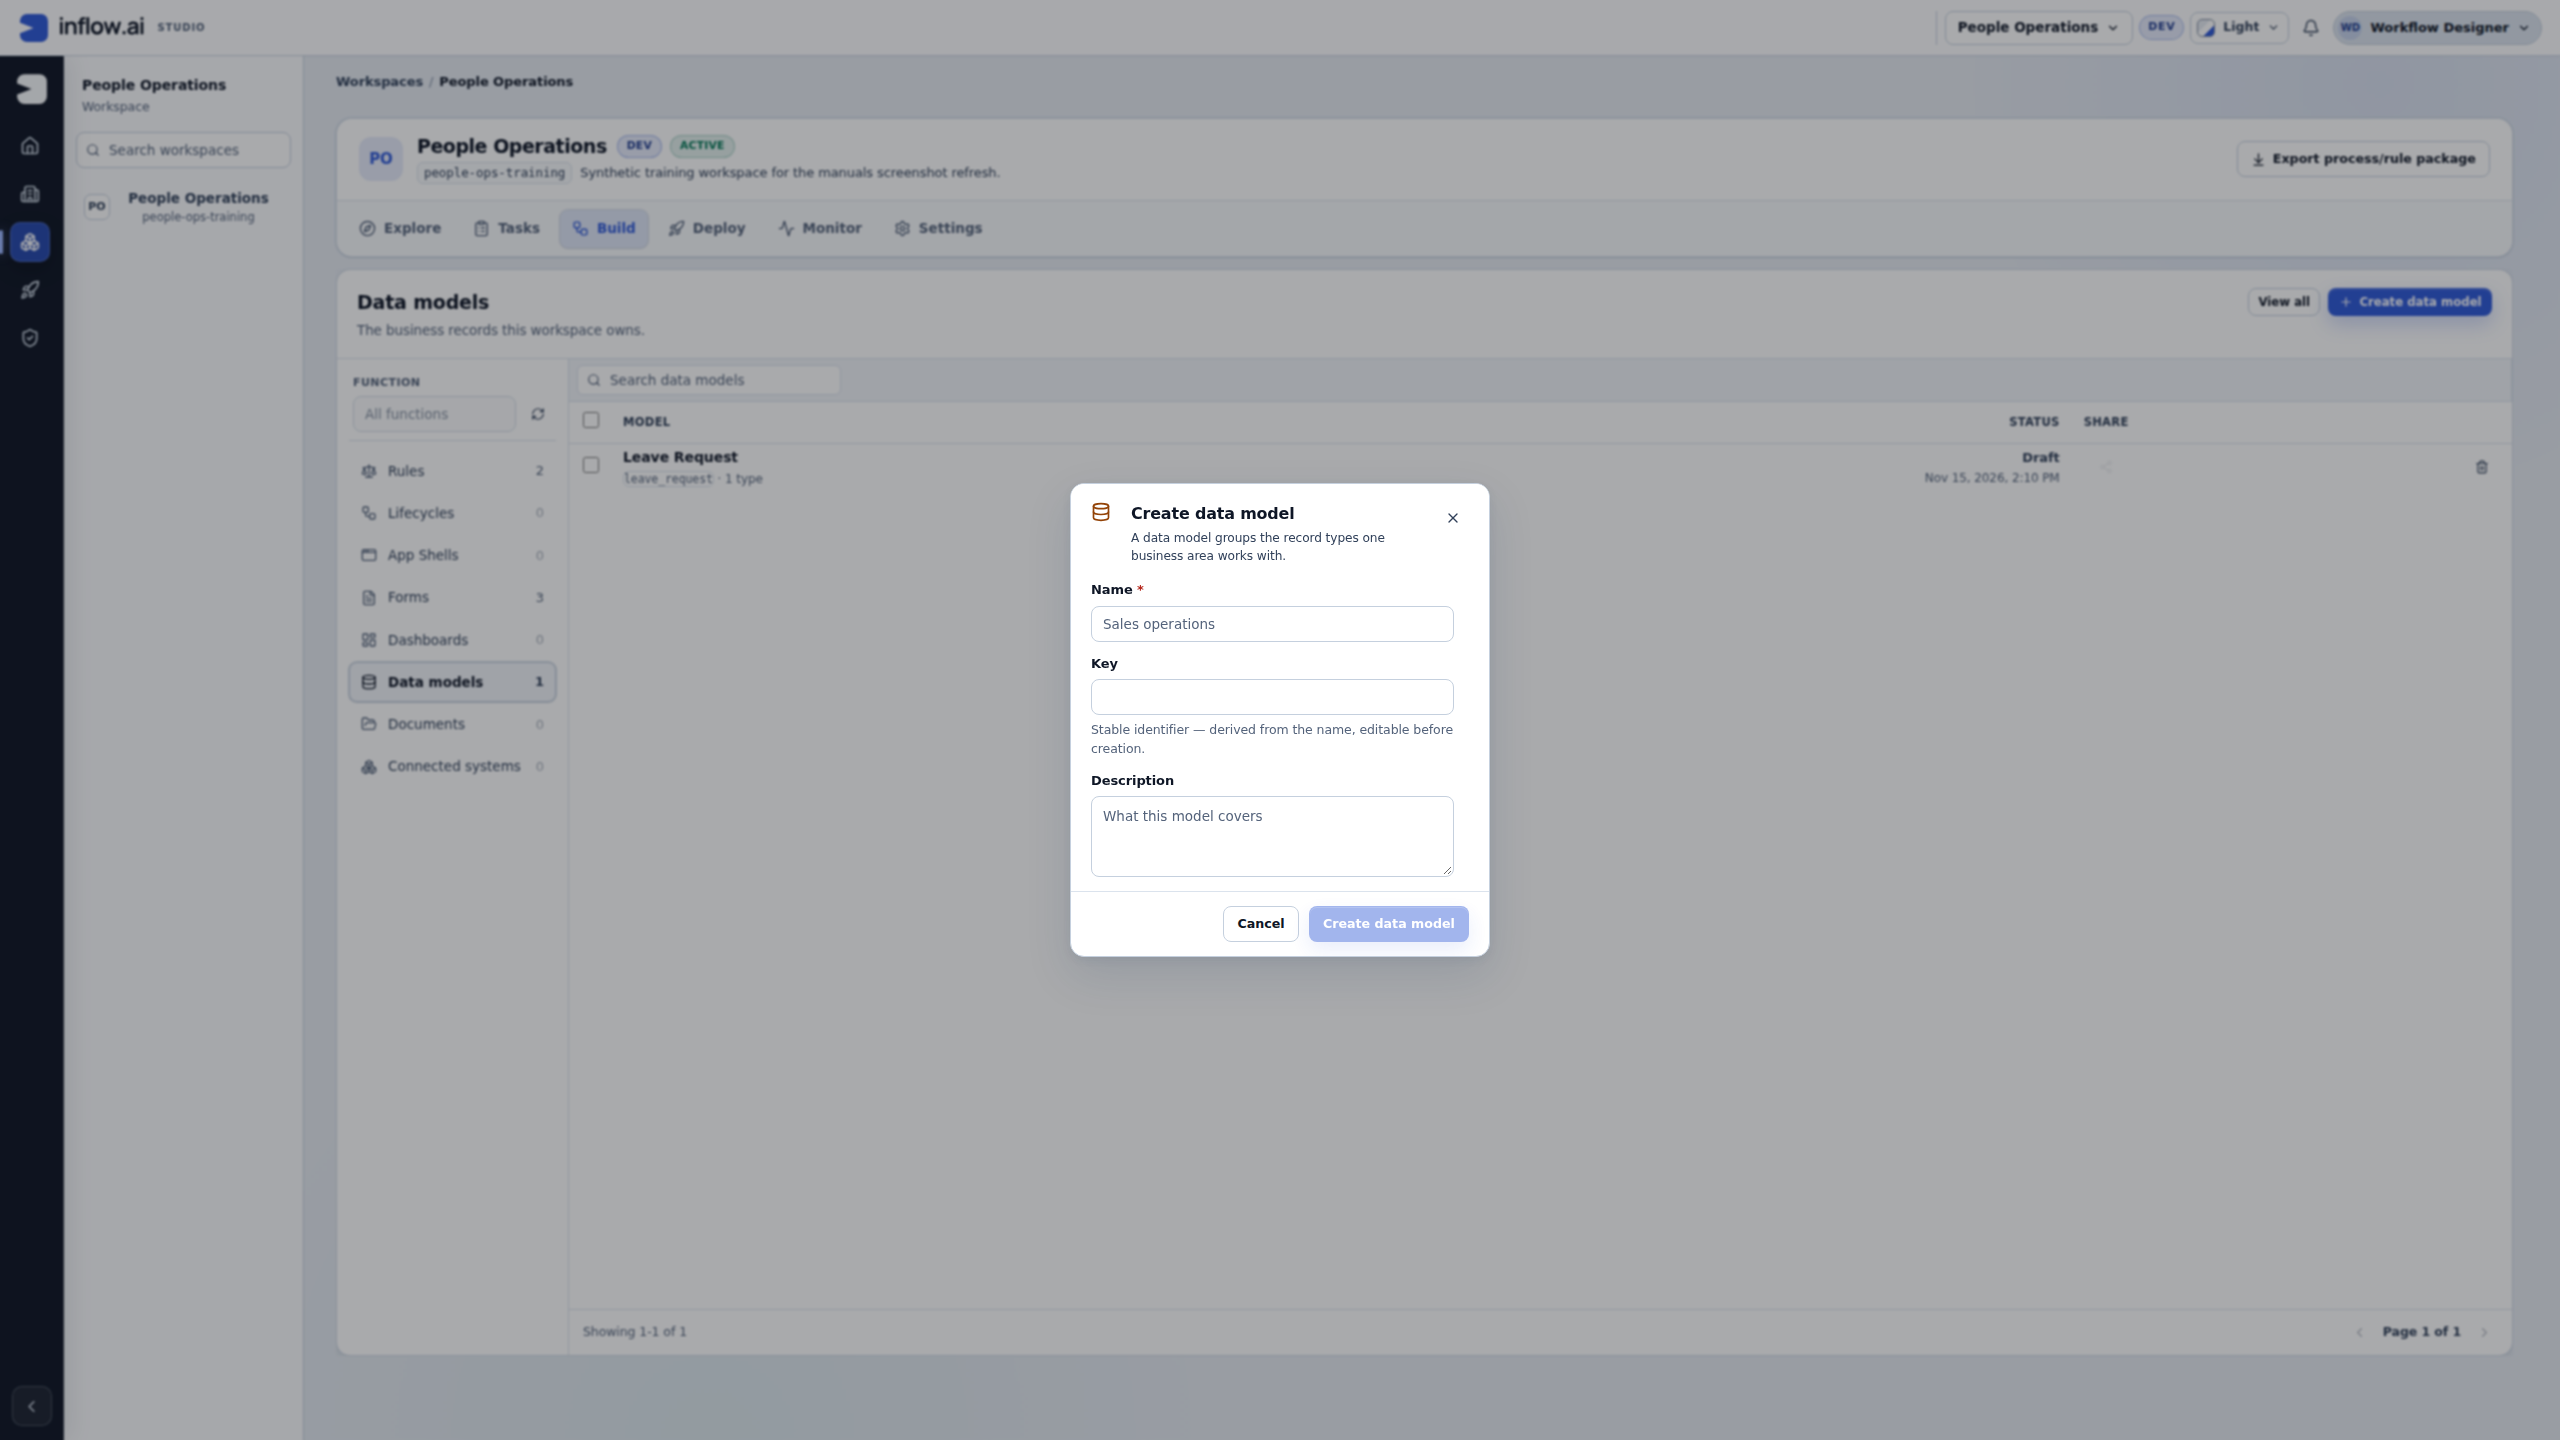
Complete the identity before creating: (1) Enter Leave management as the readable Name; Sales operations is only a placeholder. (2) Review the generated Key. This complete worksheet deliberately uses leave; change the generated leave_management to leave before creating only when that is the agreed stable identifier. (3) Describe the fictional records the model owns. The earlier concise Leave Request draft is a separate example; keep it. Create is unavailable while Name is empty. Inspect existing models first and reuse an existing matching leave model instead of creating another.
- Open the workspace's Build area and choose Data models.
- Open the intended existing Leave management model if it was already prepared. For a new one, choose the new-model action and enter a readable Name, such as Leave management, and a short Key, such as
leave, in Create data model. The key is the stable name other parts of the application use. - For a new model, add a Description explaining what it is for, then create it. Keep an existing model rather than creating another copy.
- Select the existing Leave request type, or enter Leave request in New type name and choose Add type if it is missing. Check its Key is leave_request. Select each existing worksheet field for review; use New field name → Add field only for a missing field. Review Name and Key in Properties. The readable Name and stable Key are separate values.
- Choose each field's type. The model editor uses names such as string for short text, integer for a whole number, date for a calendar date and enum for a fixed choice list. See field and input types for examples.
- Set each field's Key to the worksheet spelling. Keys use lowercase letters, digits and underscores and start with a letter. For status, choose enum and review the current choices. Retain PENDING, APPROVED and DECLINED; use Add option only for a missing choice, without duplicating an existing value. Set Required for the seven required worksheet fields; leave reason and decision_comment optional. Keep the initial design small enough to check easily.
- Choose Save, then Validate. Open each reported issue and correct it. Validation checks the design; it does not add records.
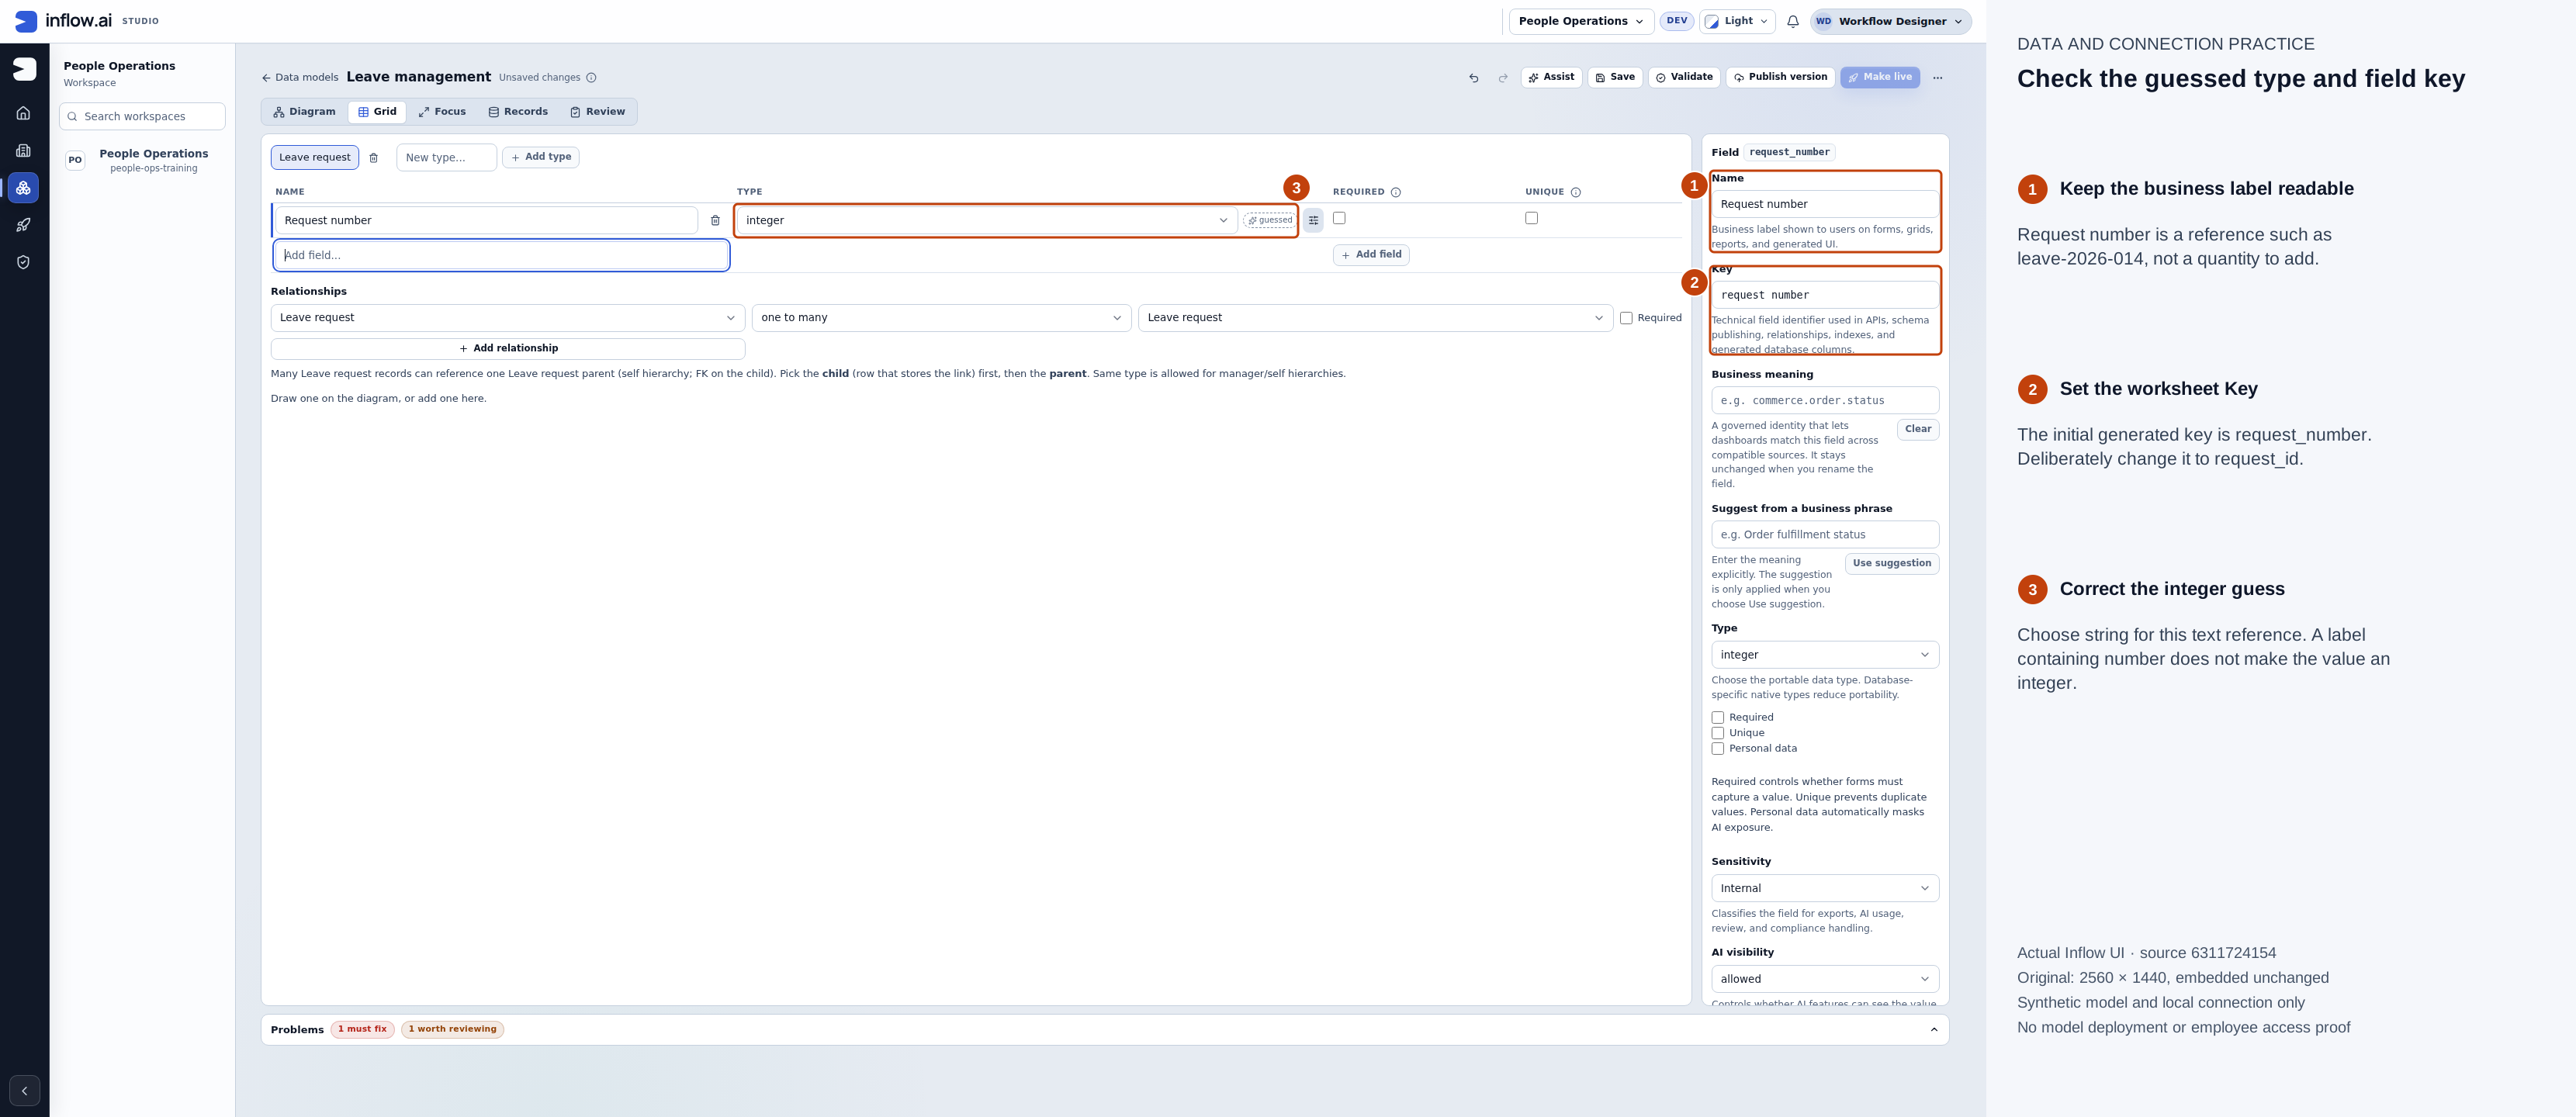
Actual native 2560×1440 capture, 15 November 2026, source 6311724154. Numbered outlines and the side legend are guidance; open the original or open the full-size guide. This is the initial guess before the explicit string and request_id corrections.
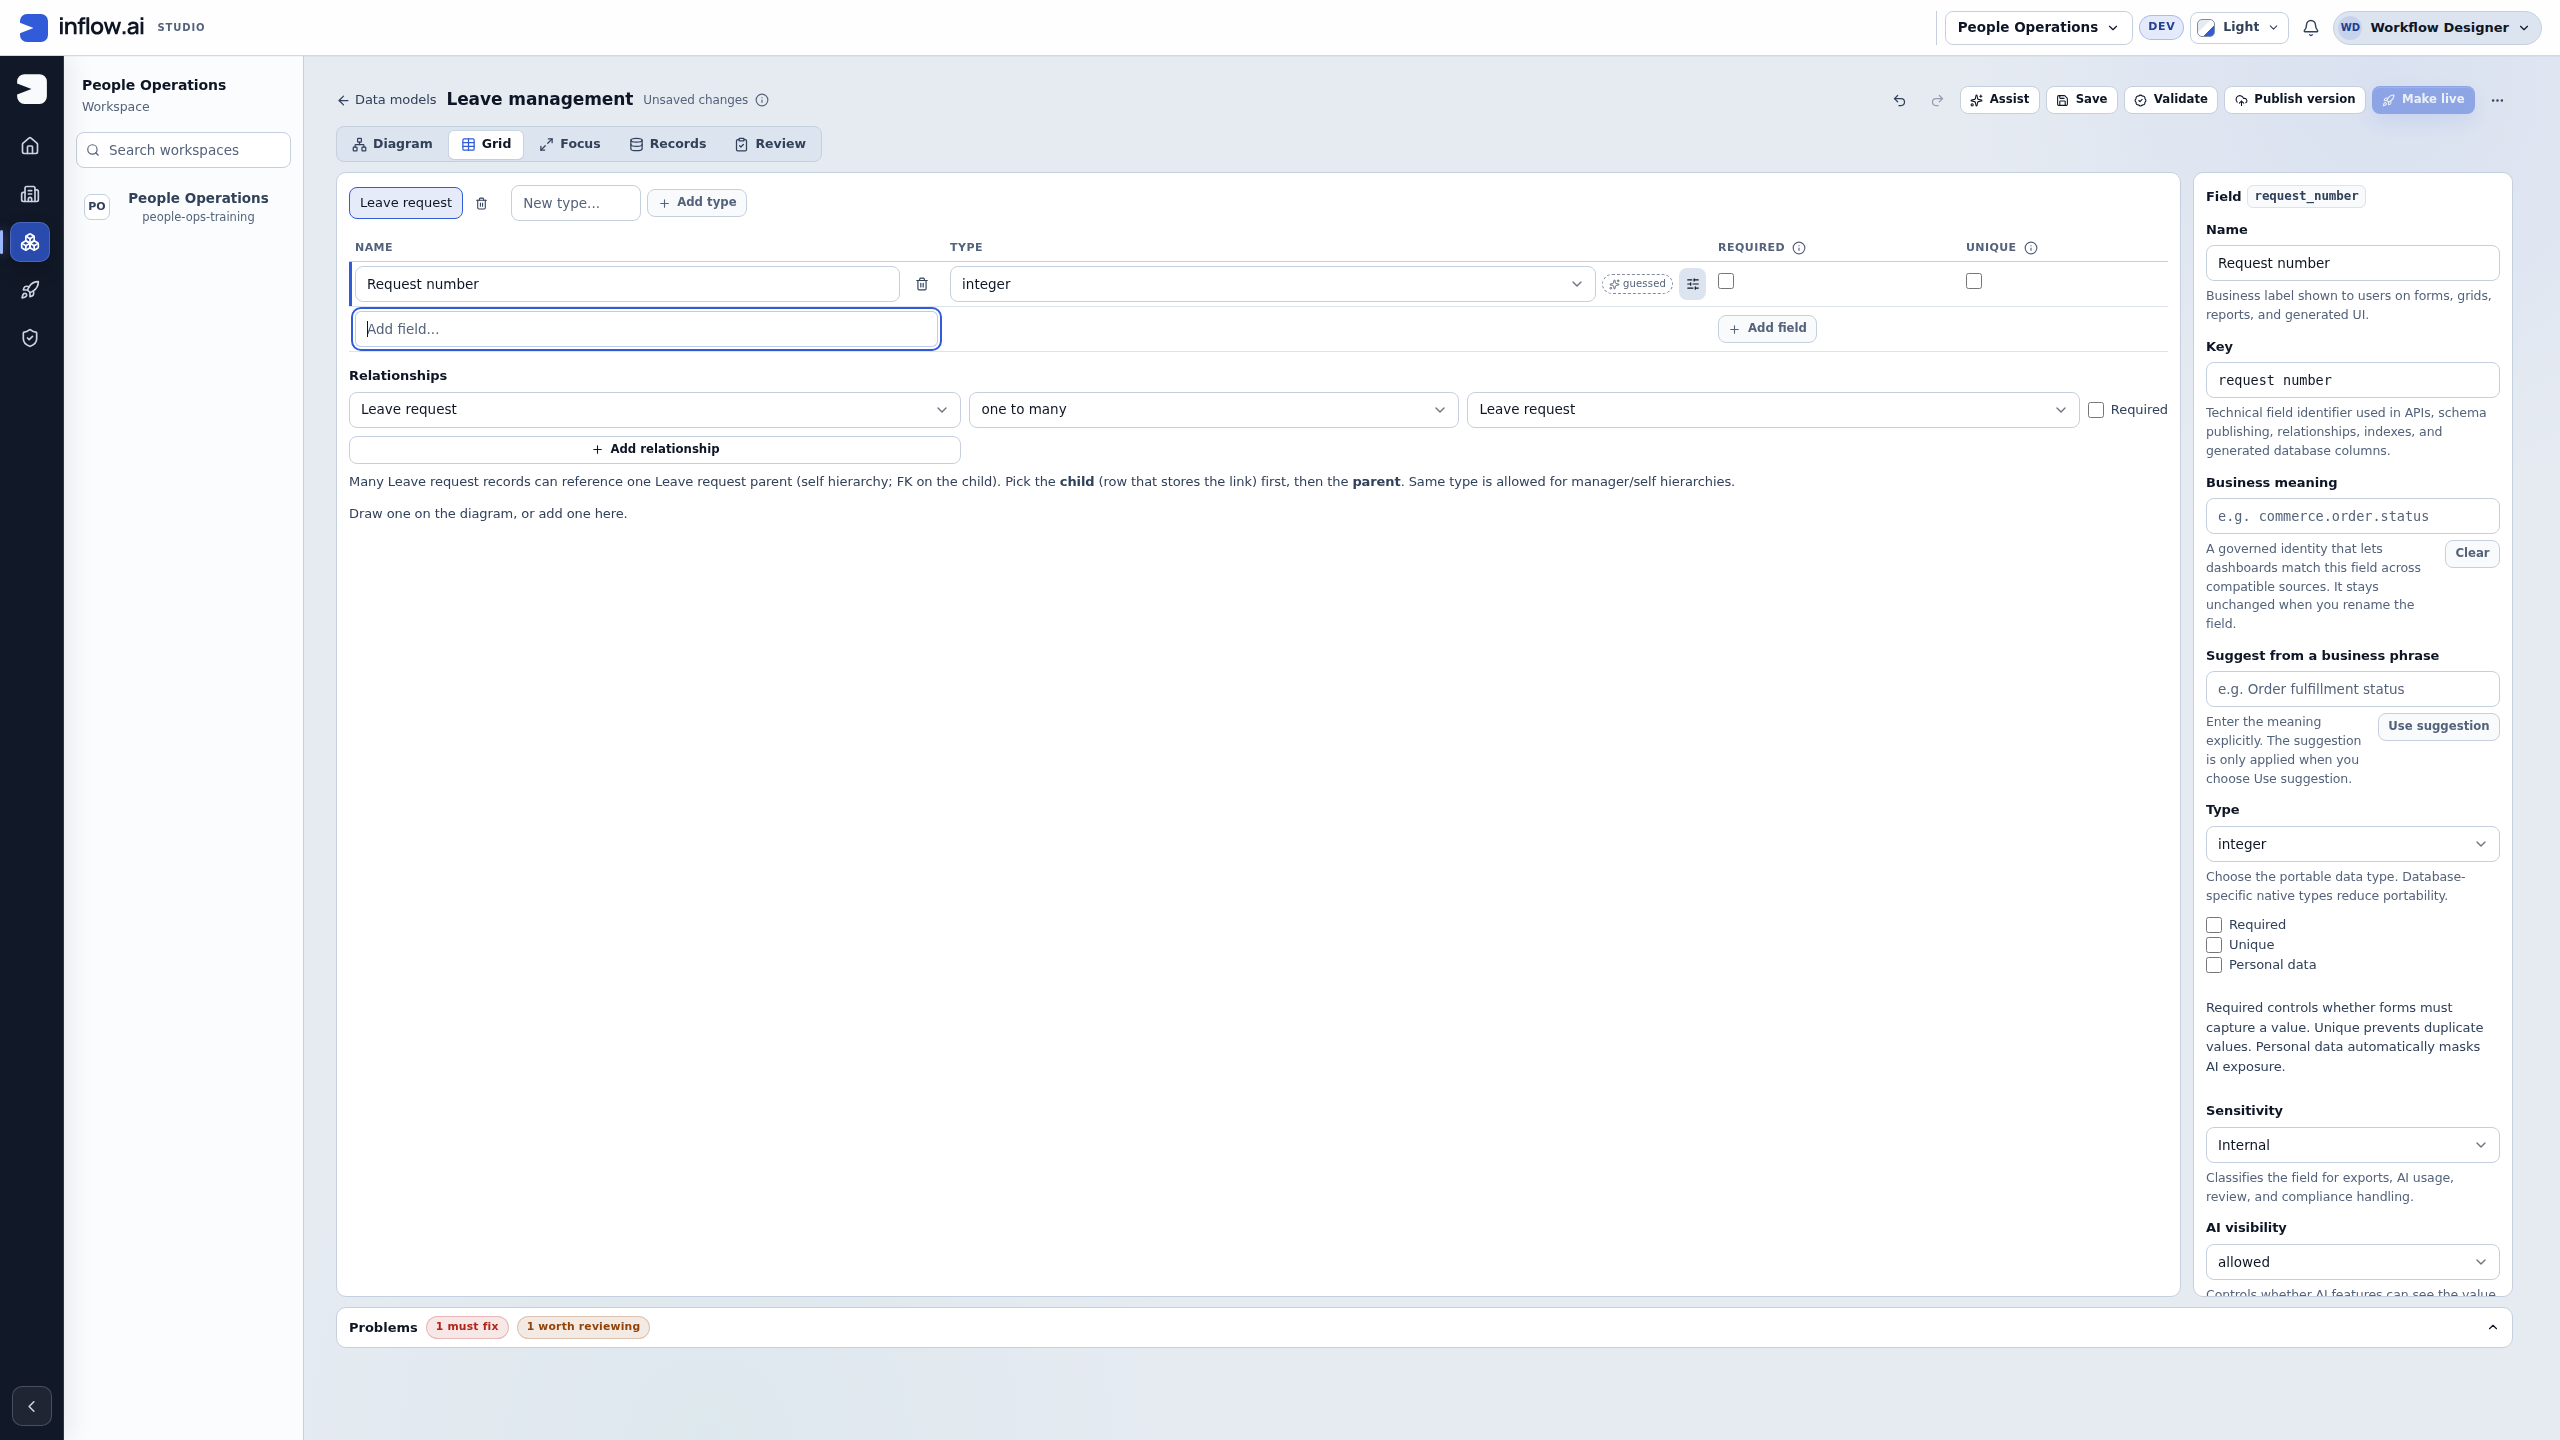
Check the result: This is the initial guess, before correction. Set Key to request_id and Type to string for the teaching reference; leave the friendly Name readable.
The editor may guess integer when you add a Name such as Request number. Choose string explicitly: leave-2026-014 is a text reference. A friendly Name does not change its Key. For the complete click-through example, follow the field-key and type check.
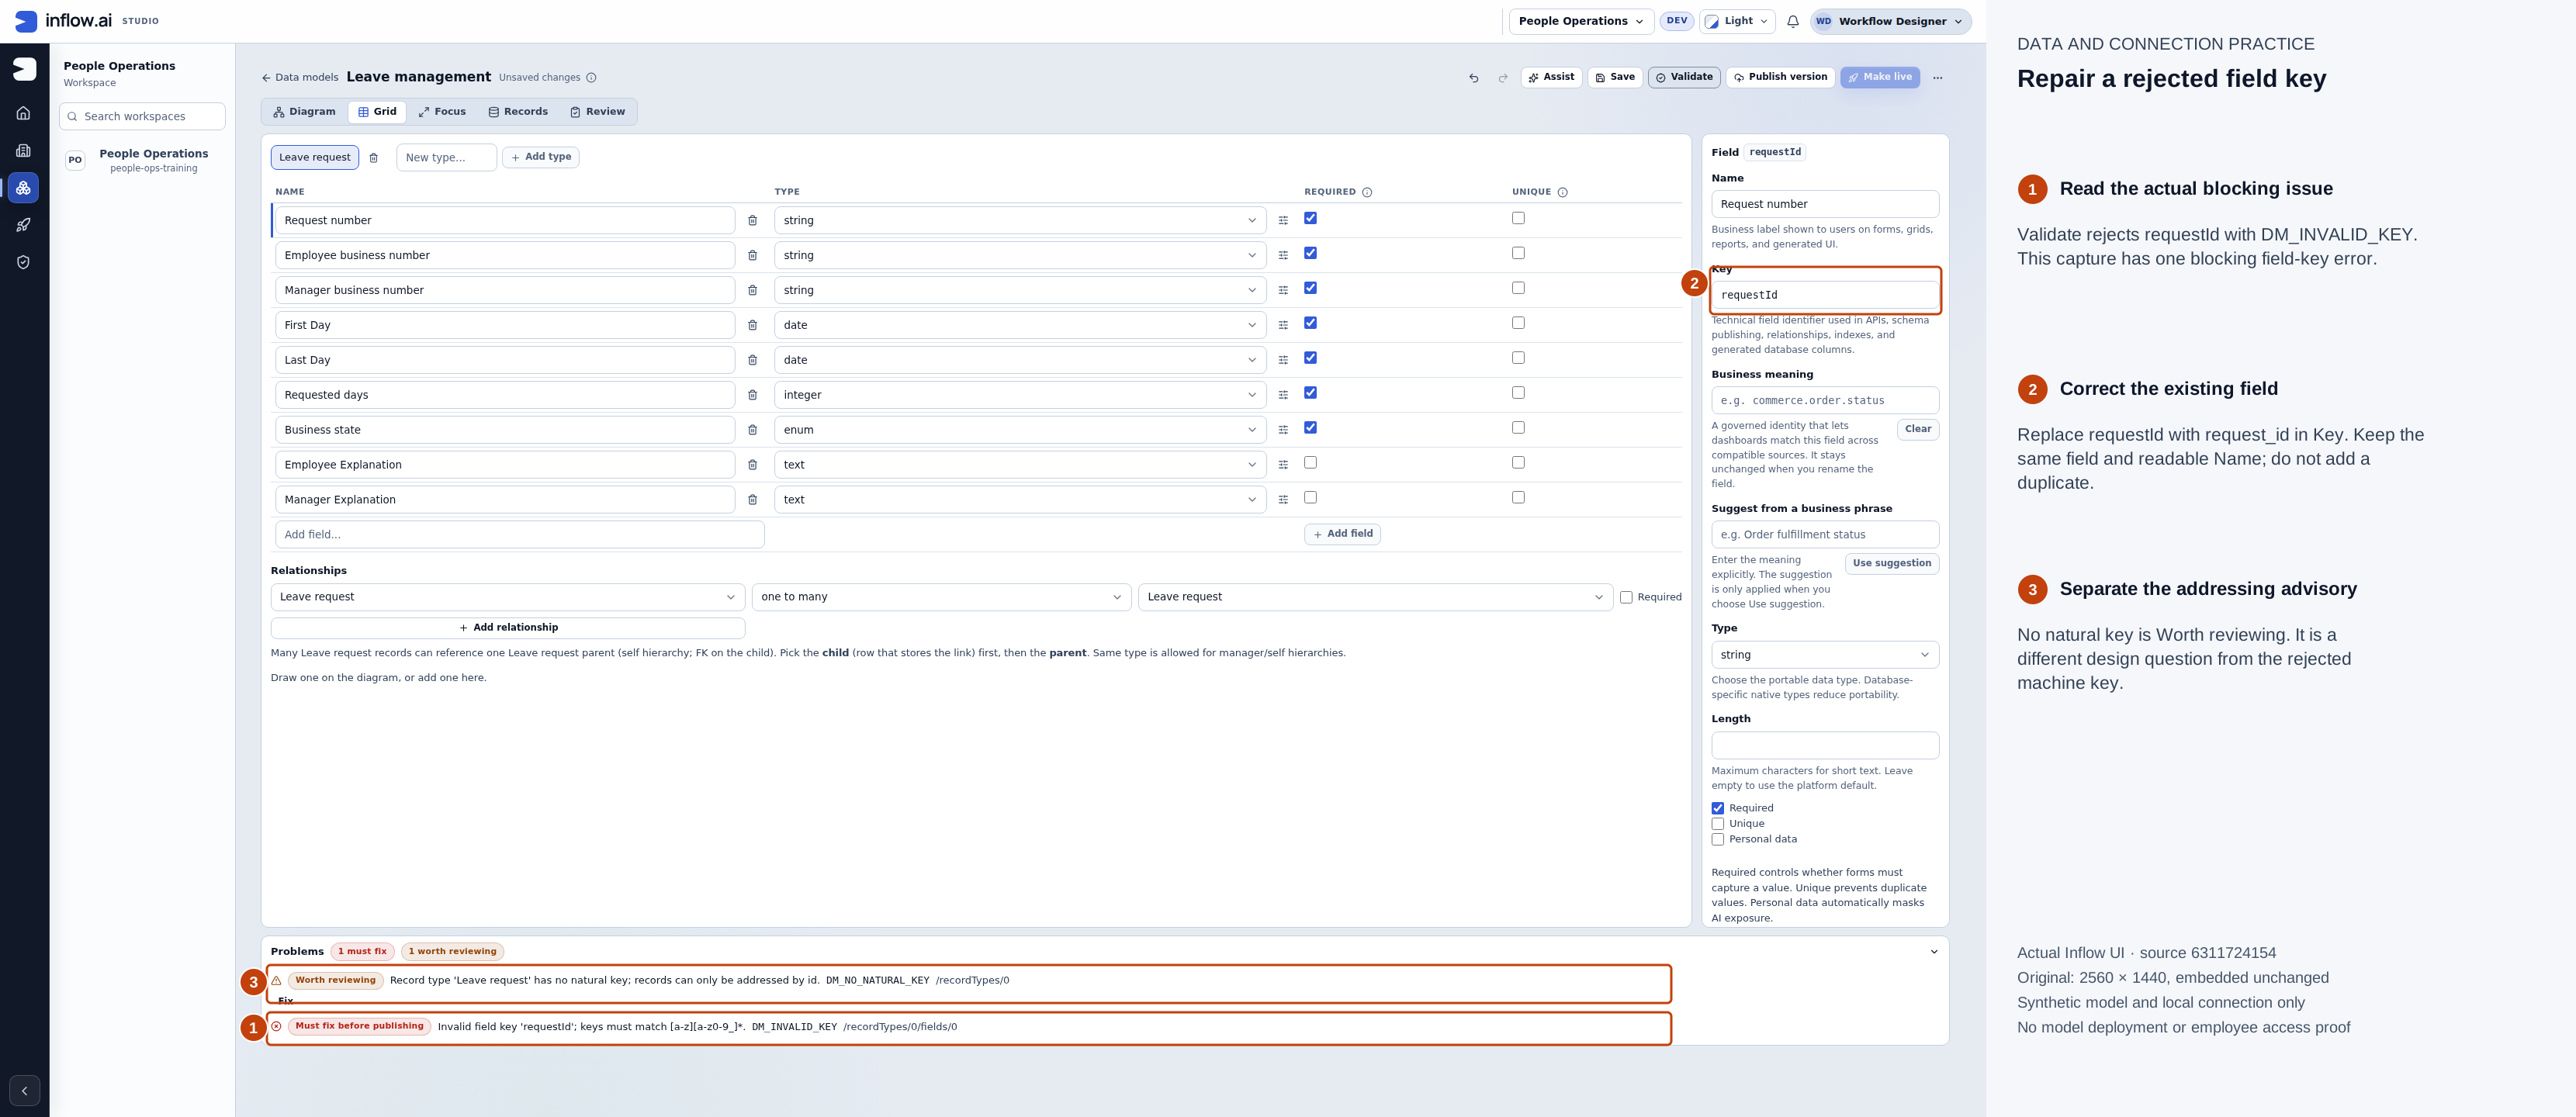
Actual native 2560×1440 capture, 15 November 2026, source 6311724154. Numbered outlines and the side legend are guidance; open the original or open the full-size guide. This current capture has one blocking key error, not the seven errors shown by the older training run.
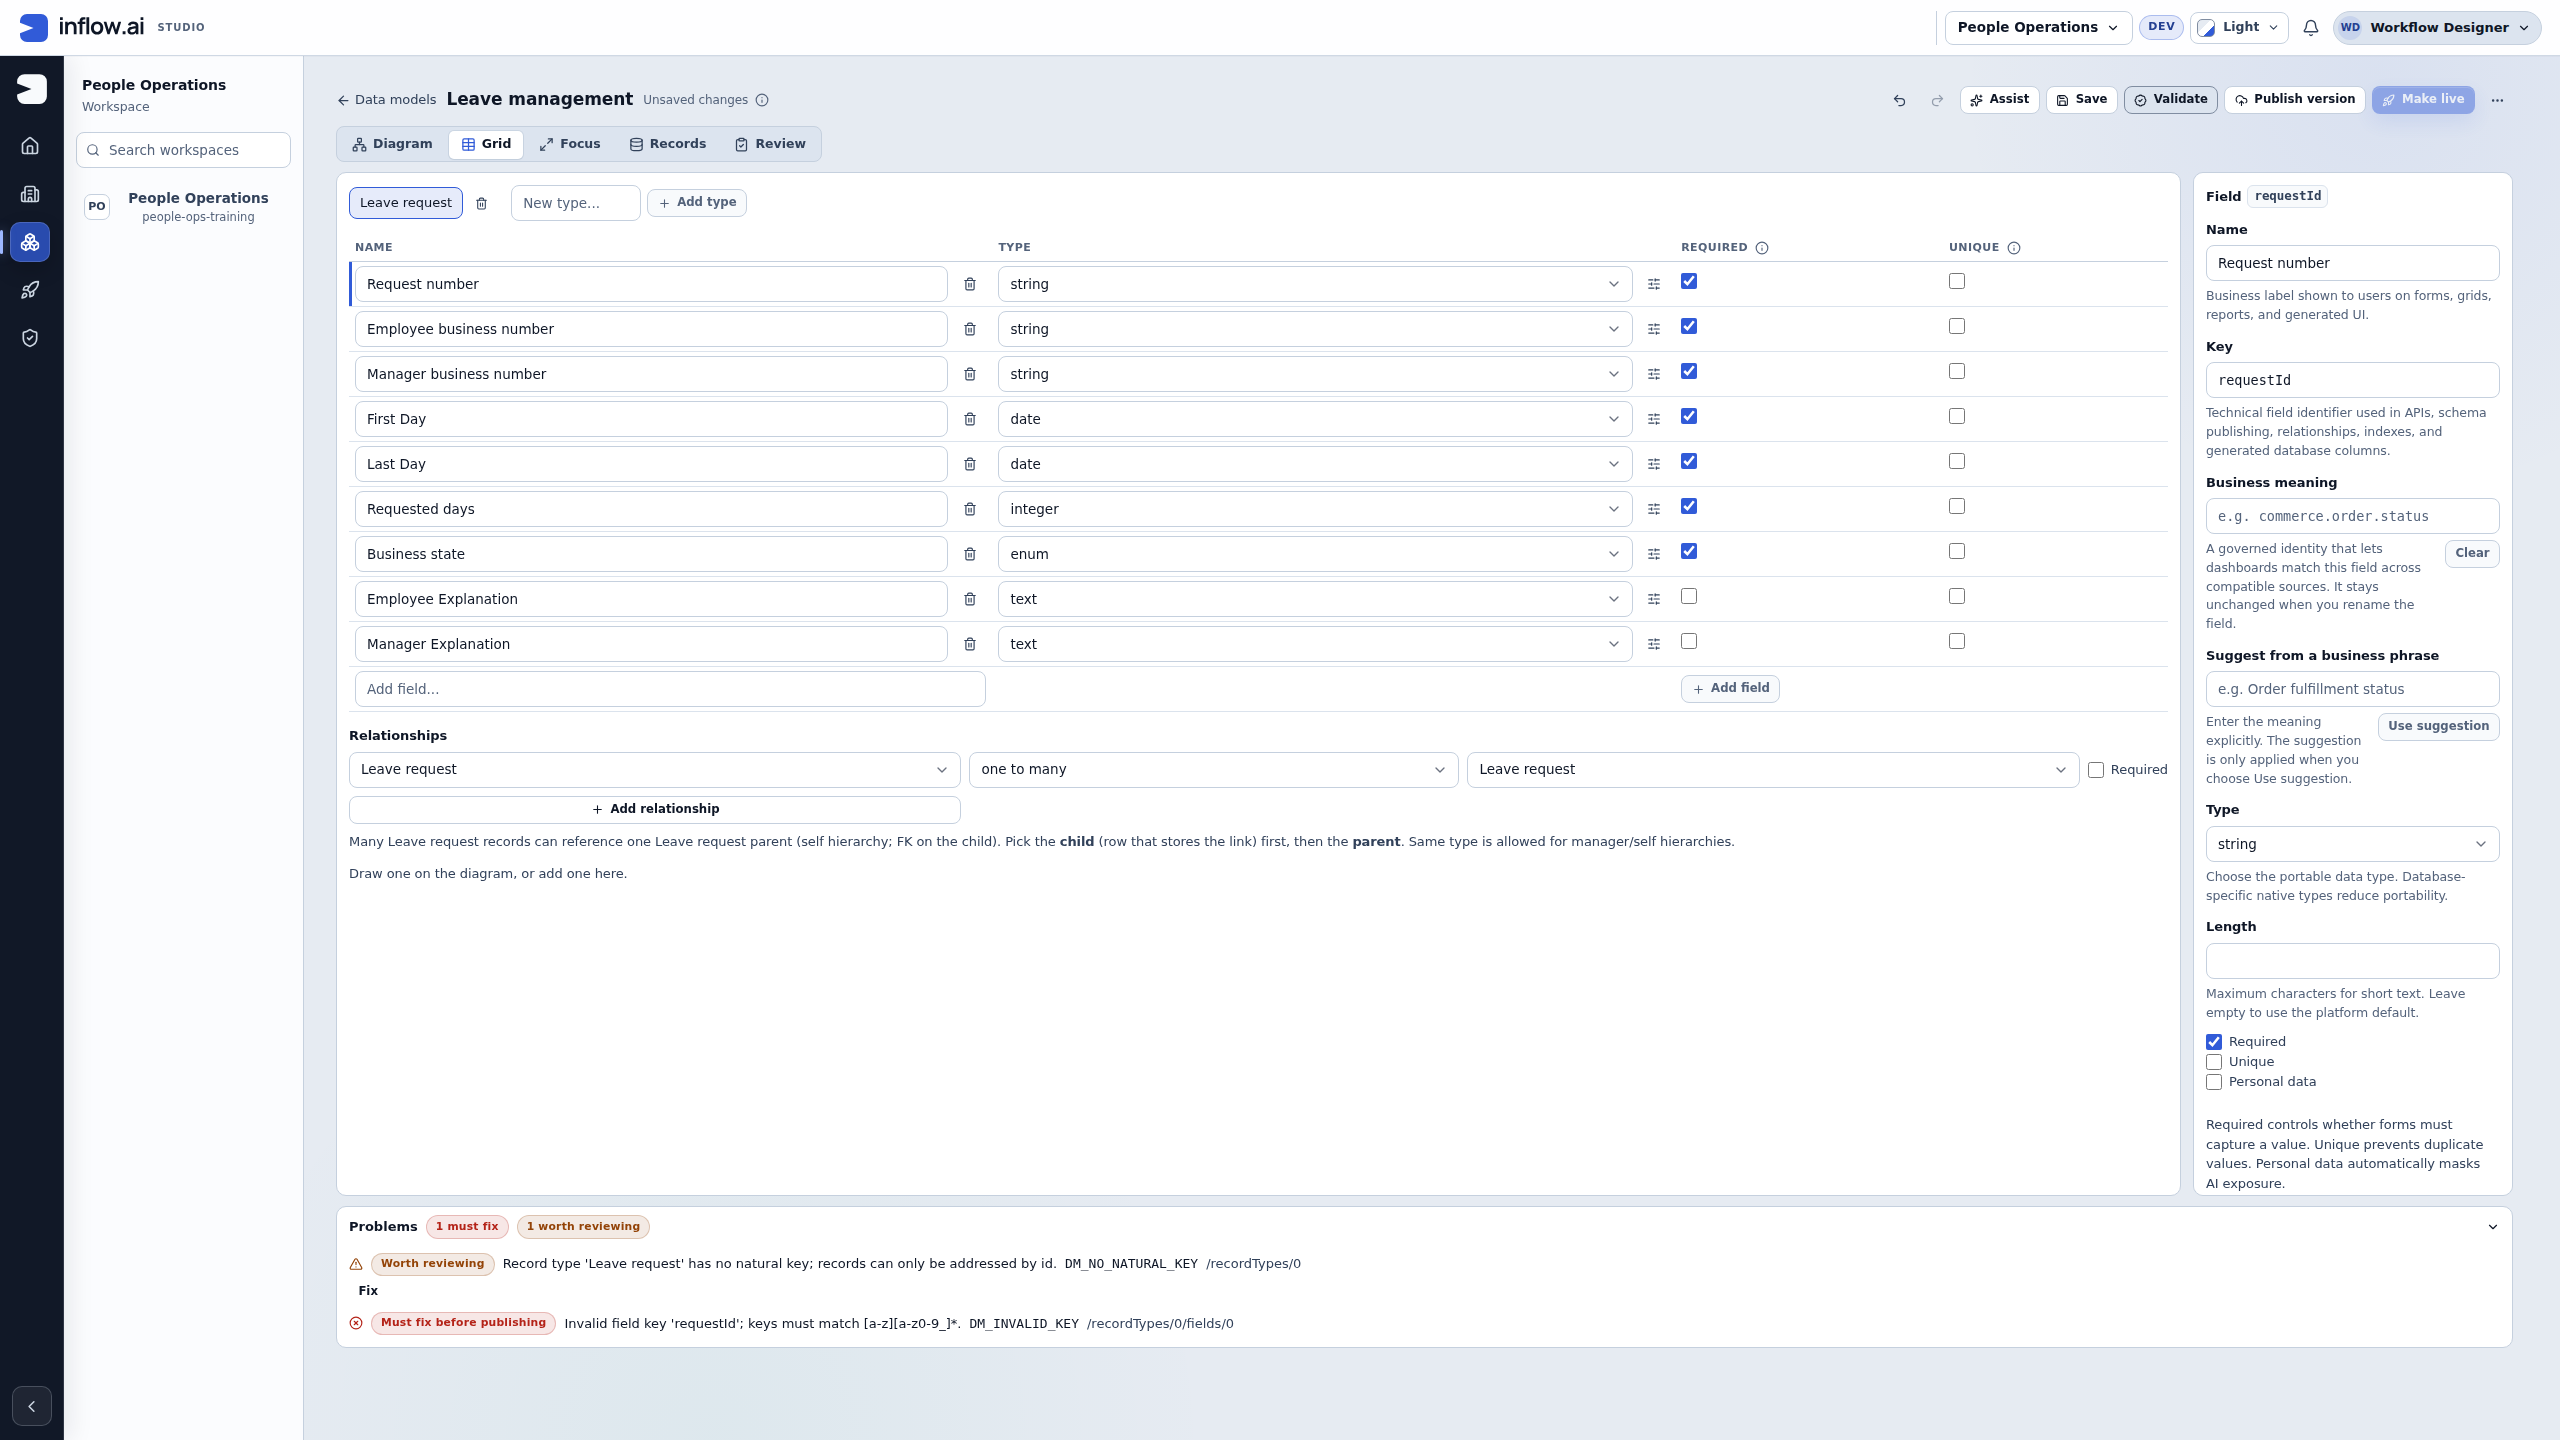
Repair the same field: Validate reports Invalid field key requestId under Must fix before publishing. Select Request number and change its Key to request_id; keep its readable Name and string type. Save and Validate again. The Worth reviewing natural-key notice is separate: discuss the addressing contract rather than selecting Unique merely to remove the warning.
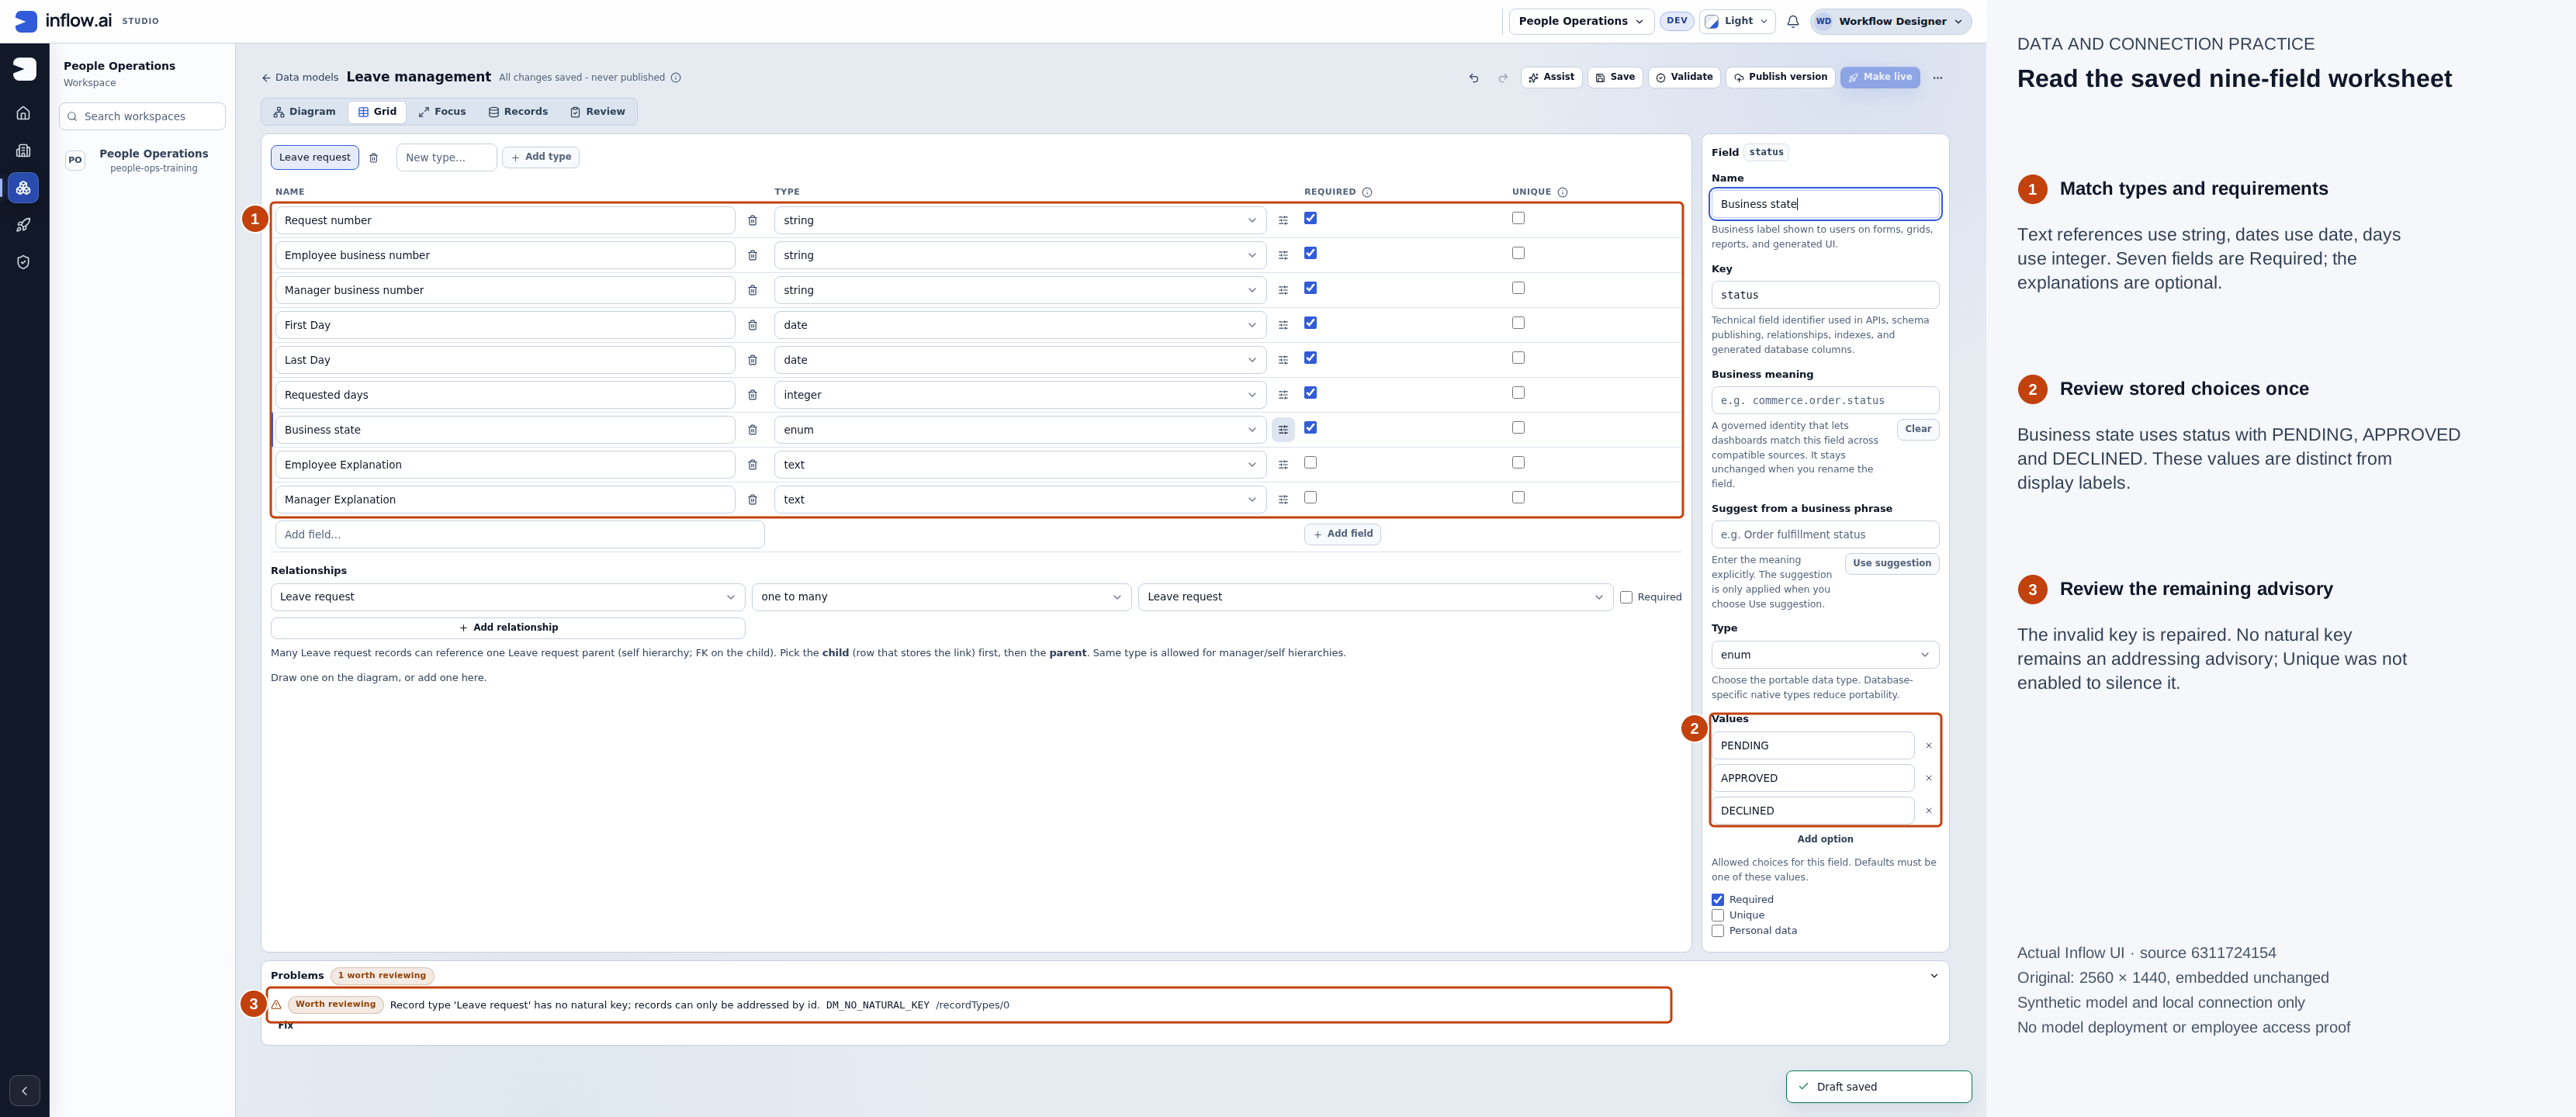
Actual native 2560×1440 capture, 15 November 2026, source 6311724154. Numbered outlines and the side legend are guidance; open the original or open the full-size guide. The saved draft is revision 1. Required is off for the two explanation fields; all Unique choices remain off.
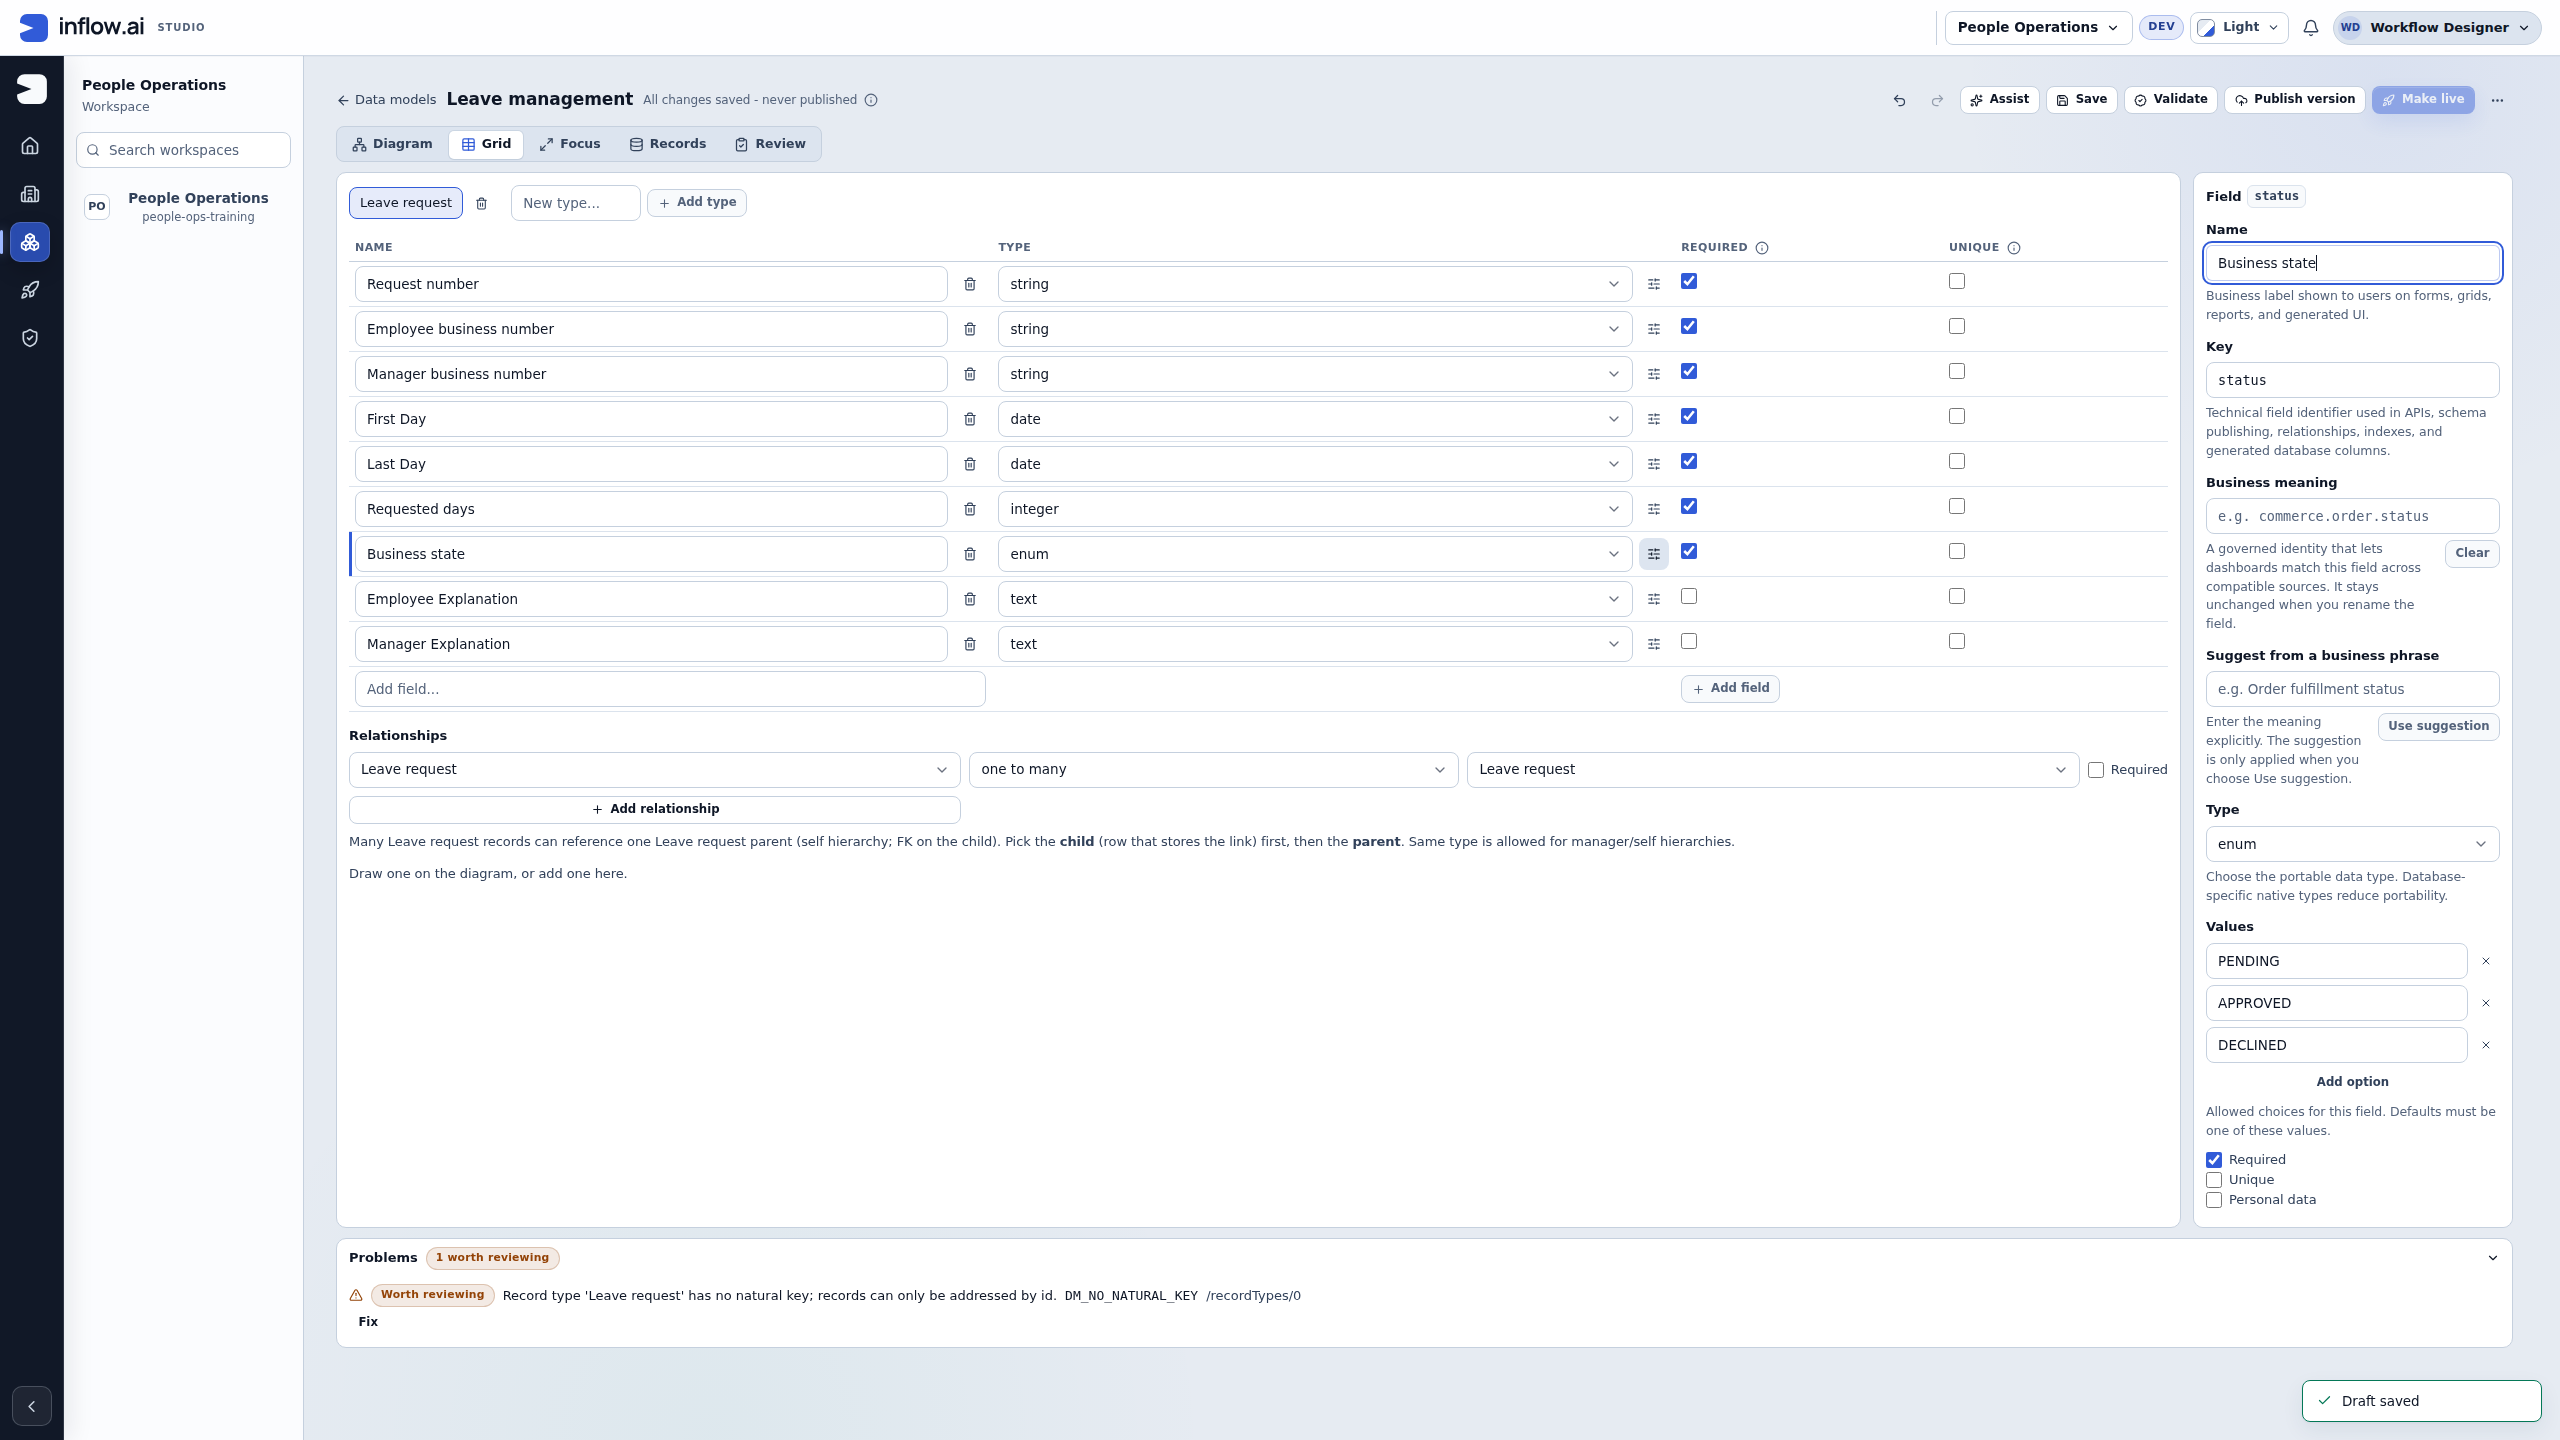
- Match each Type to the value: identifiers such as request_id are text, the first and last day are dates, and requested_days is a whole number. A field label containing “number” does not make it a quantity.
- Business state is a fixed-choice field. Keep PENDING, APPROVED and DECLINED once each, and check Required against the worksheet; reason and decision_comment remain optional in this example.
- Worth reviewing reports that the record type has no natural key and can only be addressed by its system ID. This is an addressing advisory, not a rejected field or validation error. Discuss whether the business needs a stable key before publishing.
Check the result: The grid now matches the worksheet types and required settings. PENDING, APPROVED and DECLINED are the status values; the remaining advisory concerns record addressing, not a rejected field key.
What you should see: a saved model containing the intended record type and fields. Read the names and types back against the worksheet before continuing.
Publish the design, then make it live
These are different steps:
| Action | What it does |
|---|---|
| Save | Keeps your editable draft |
| Publish version | Saves a fixed copy of that design for other parts of the application |
| Make live | Applies the selected published design to the chosen database destination |
- If the checked draft already matches the intended published version, reuse that version and continue to Make live. Otherwise choose Publish version. Review the Publish version N? confirmation: it creates a permanent snapshot of the current design, and does not create database tables. Choose Publish version N only when the displayed version and saved design are correct. This logical-version step does not show the dependent-impact review described in older screenshots; any impact/dependent review belongs to the separate Make live operation below.
- Once the intended fixed version is available and the current publication/recovery state permits you to continue, choose Make live. Do not retry an unconfirmed publication or erase its recovery information. Follow Check the model, Choose where it lives, Review the database changes, then Confirm & apply.
- Under Destination, select the approved connection. Use the database or schema your administrator supplied; do not guess a production destination.
- Read the review carefully, especially any removal, rename or key changes. If you do not understand an effect, ask the model or database owner before applying it.
- In Confirm & apply, check the named connection and schema, then choose Apply to database. Read the Publication review that follows, including dependent changes and pinned versions. Confirm Make live and update dependents only when that review is correct, then wait for the actual result. A published version alone is not confirmation that the model is live.
- After the schema result is confirmed, follow Enter a small fictional worksheet in Records. Inspect the destination for the worksheet reference before creating anything; that detailed section explains how to reuse a matching row and avoid a duplicate.
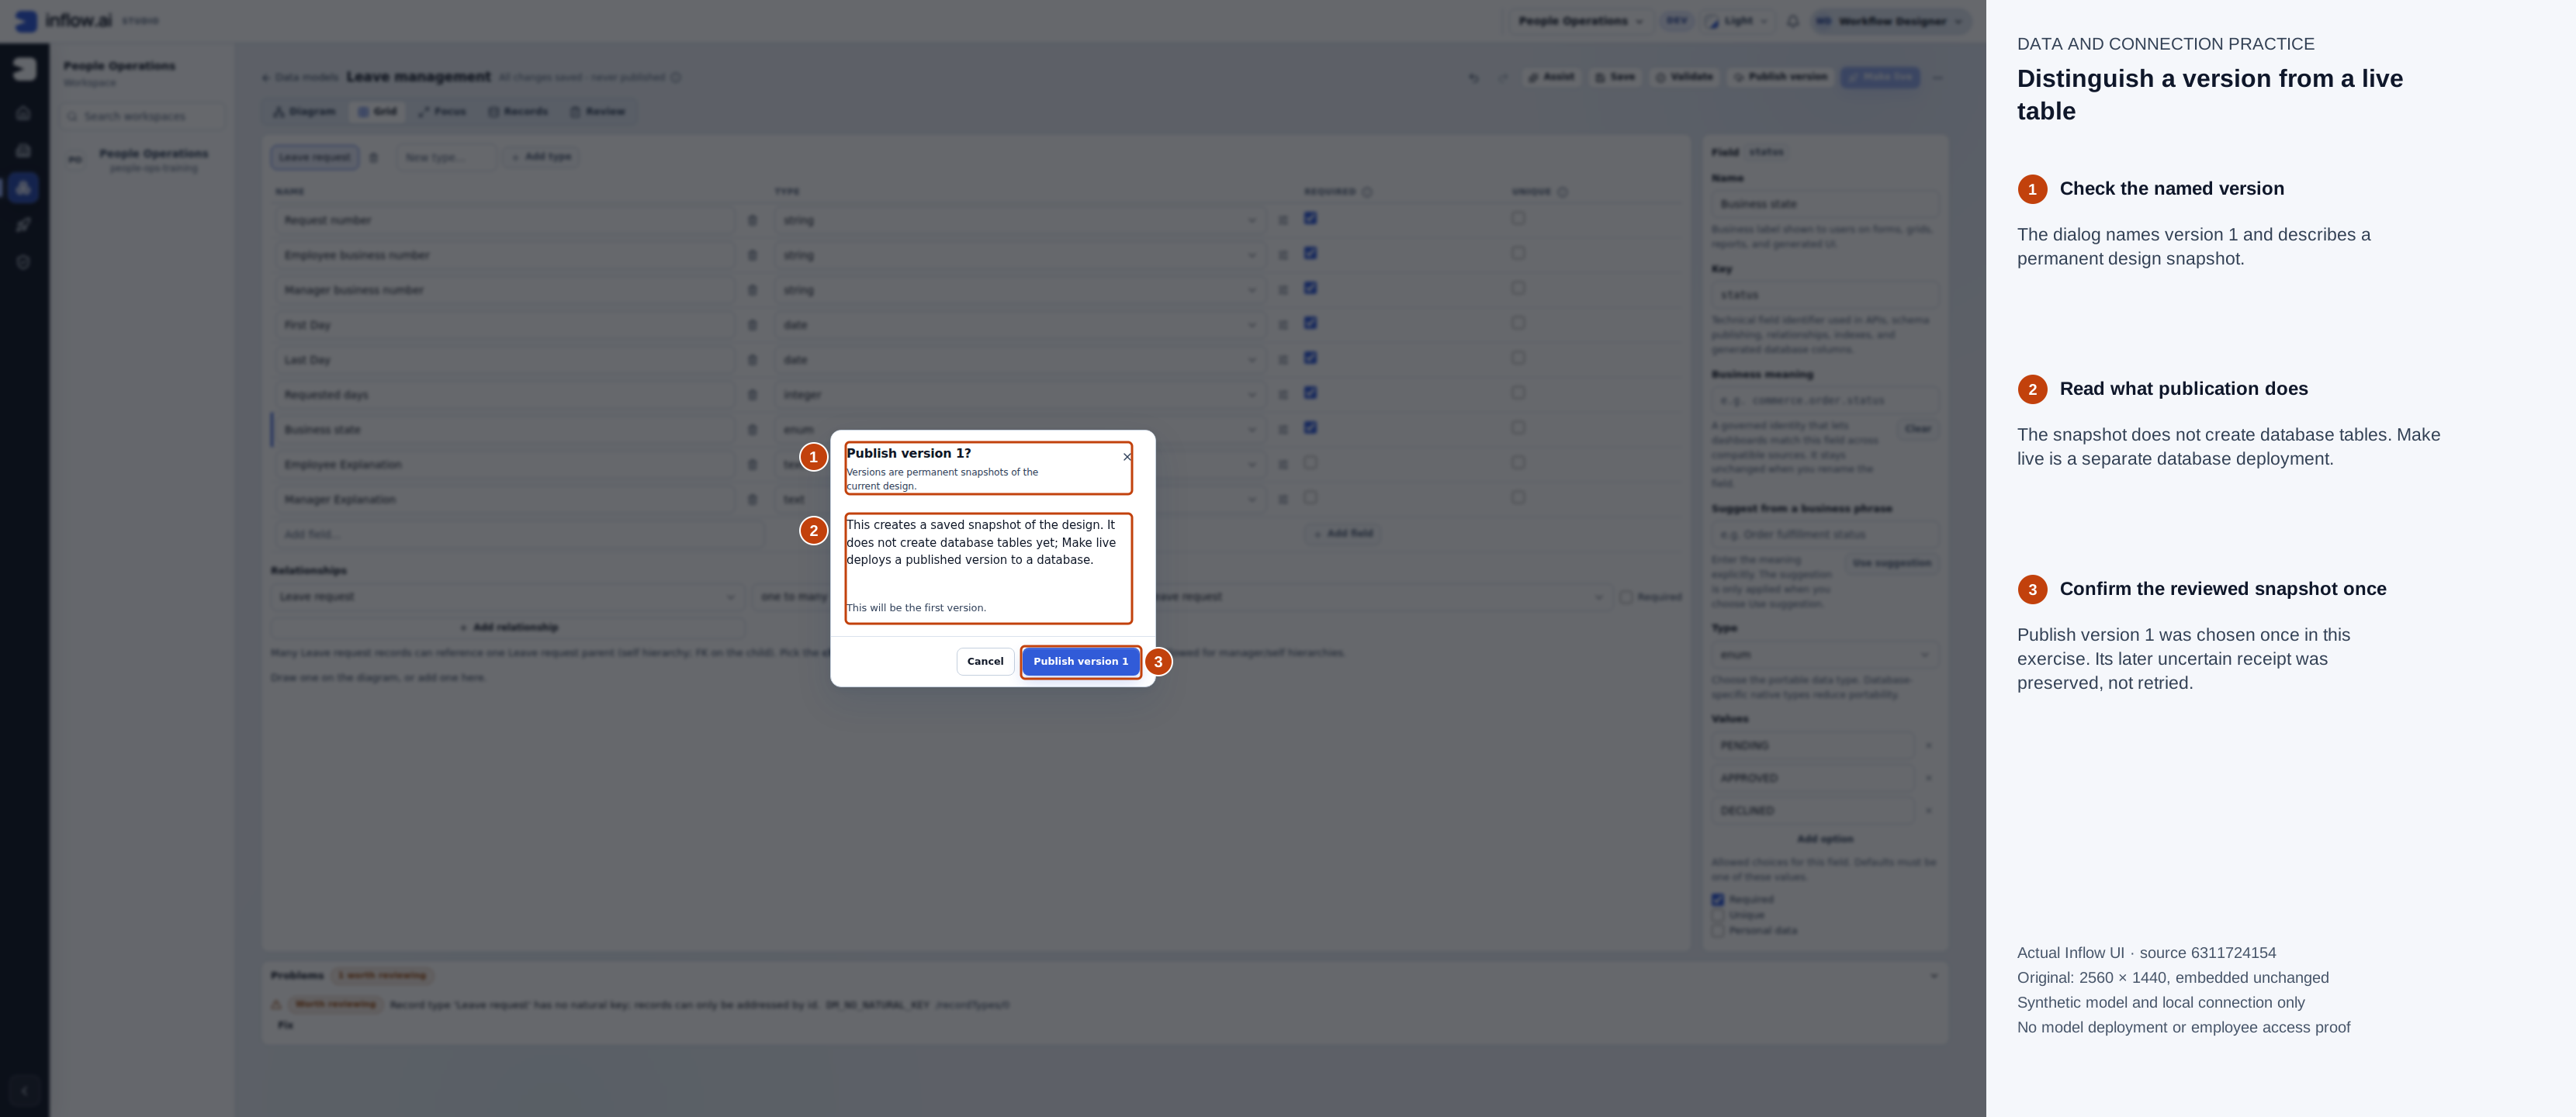
Actual native 2560×1440 capture, 15 November 2026, source 6311724154. Numbered outlines and the side legend are guidance; open the original or open the full-size guide. The version action was submitted once; it did not apply a database plan.
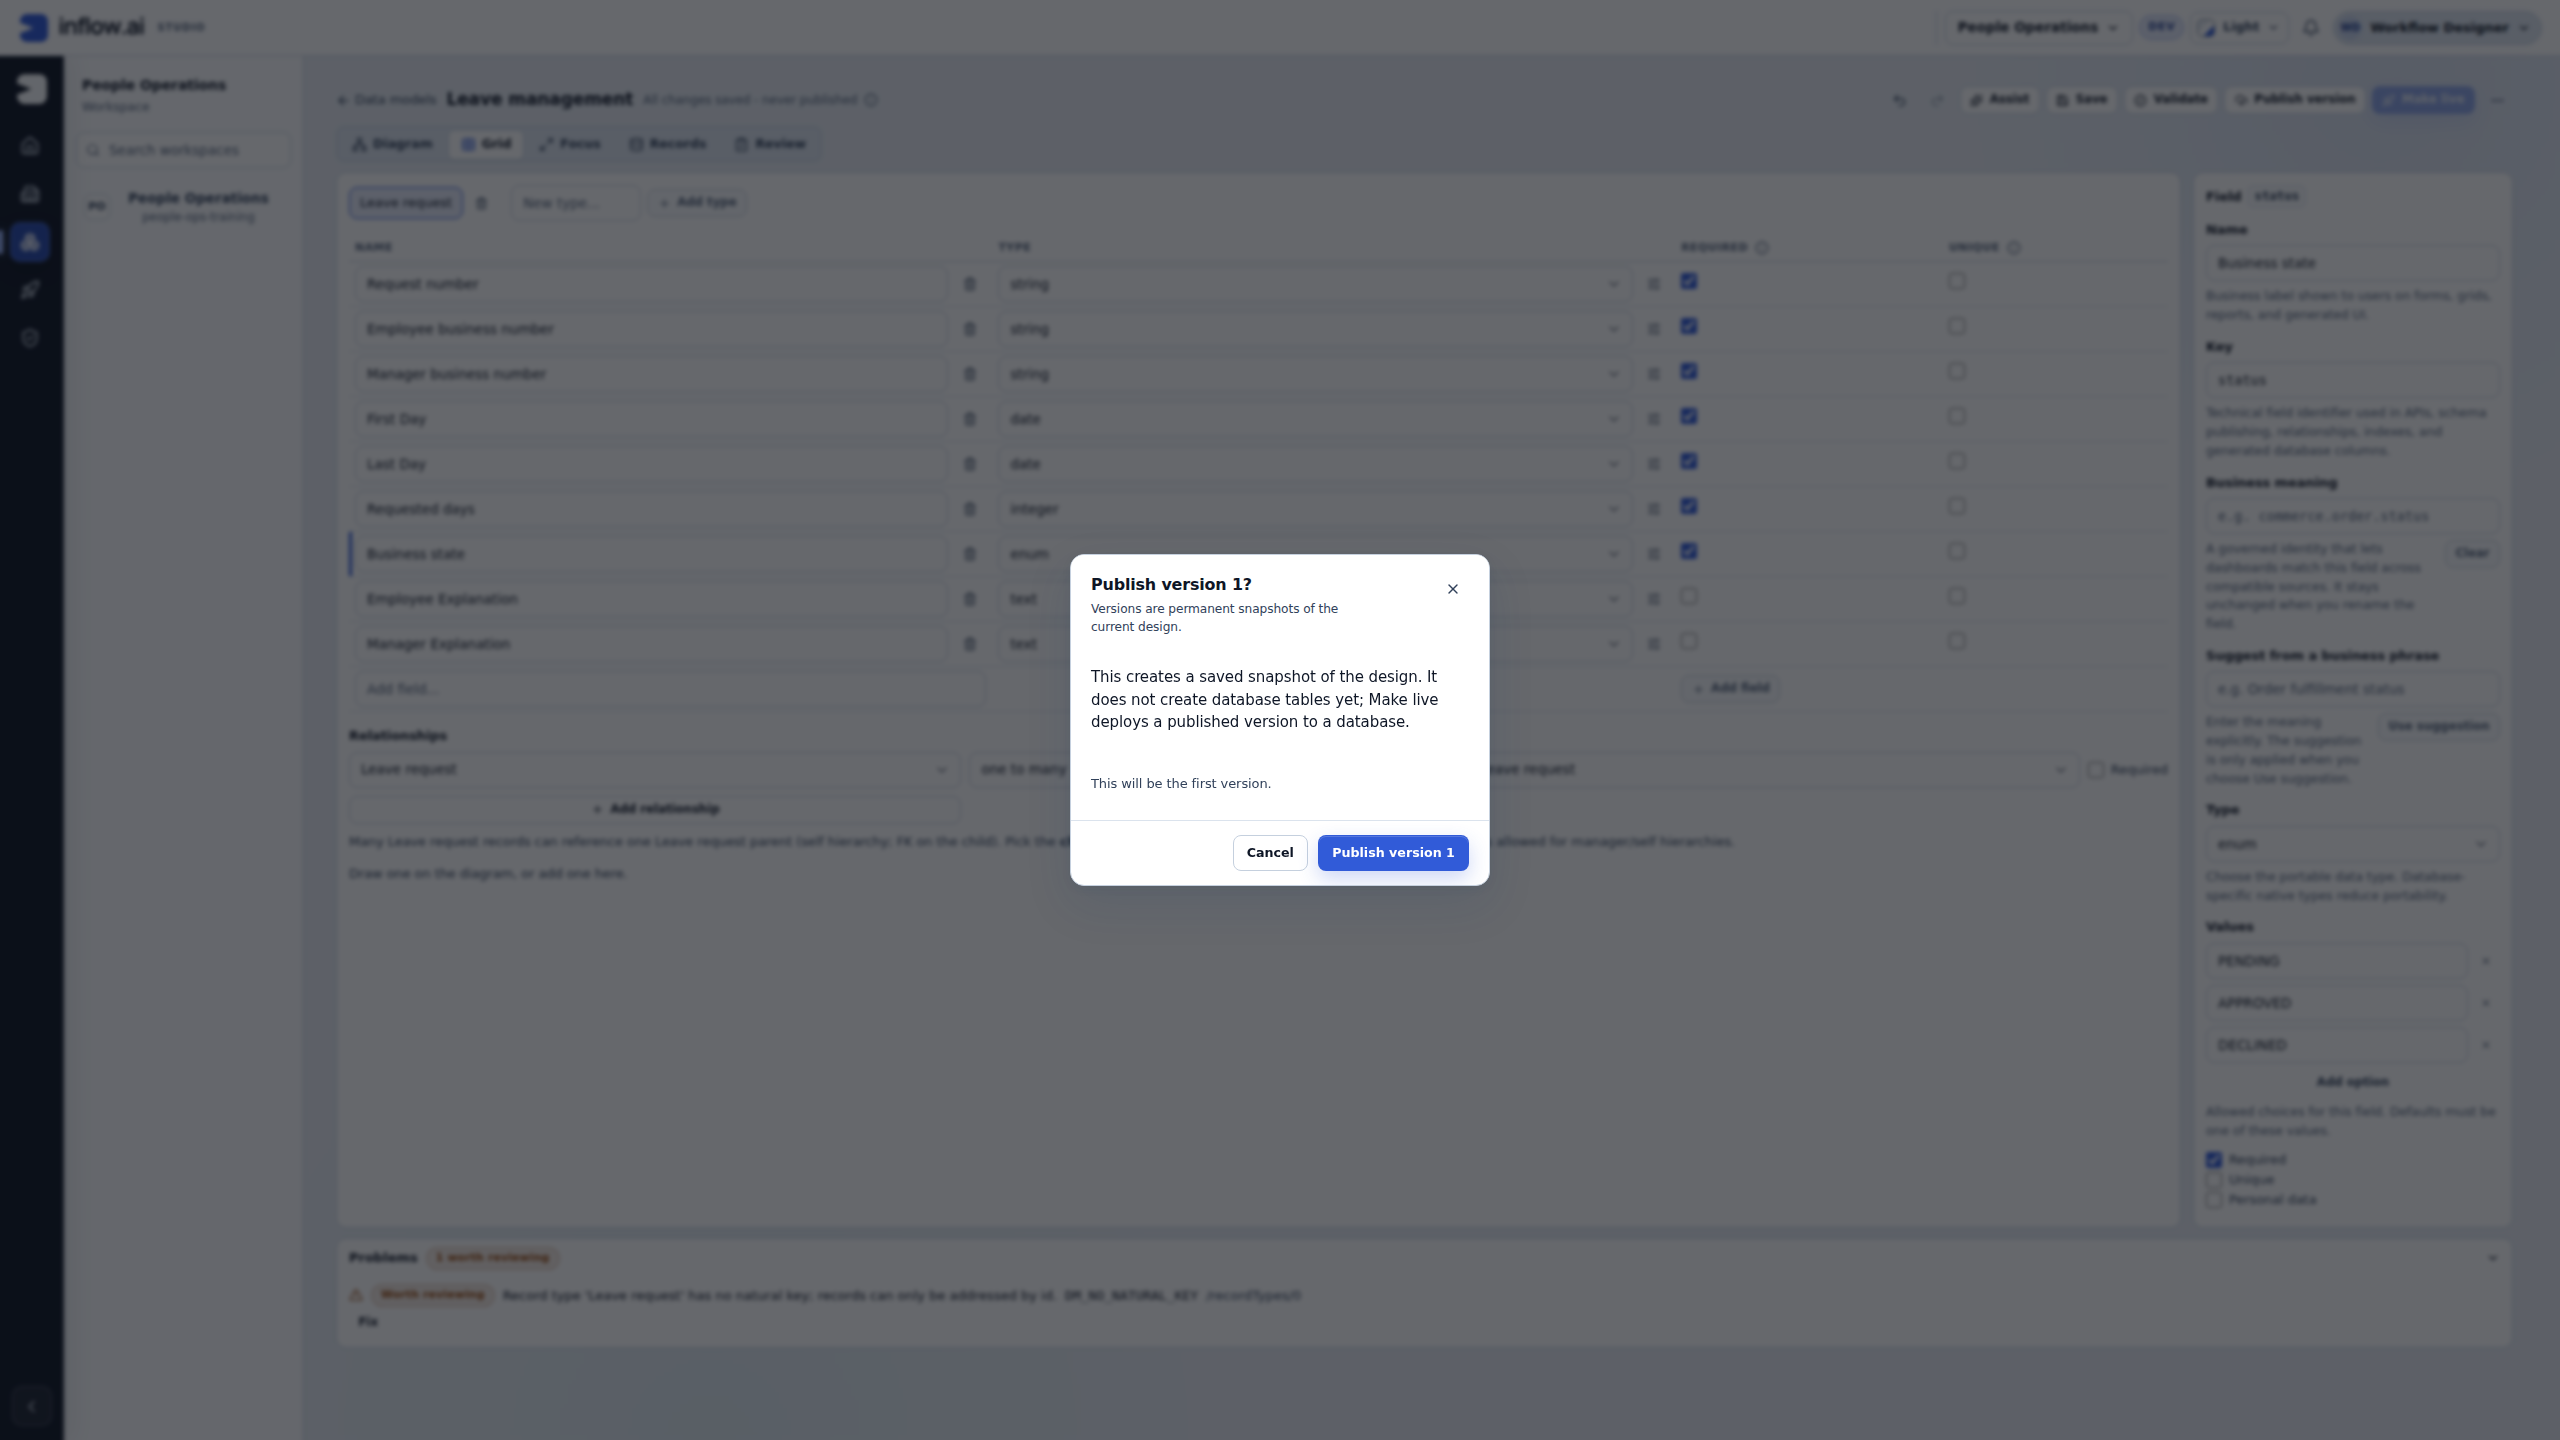
Read this confirmation: A version is a permanent saved design. This dialog does not review SQL or apply tables. The later database plan and dependency review belong to Make live. Choose the named version action only after checking the saved design; wait for its actual result.
If publication stays unconfirmed
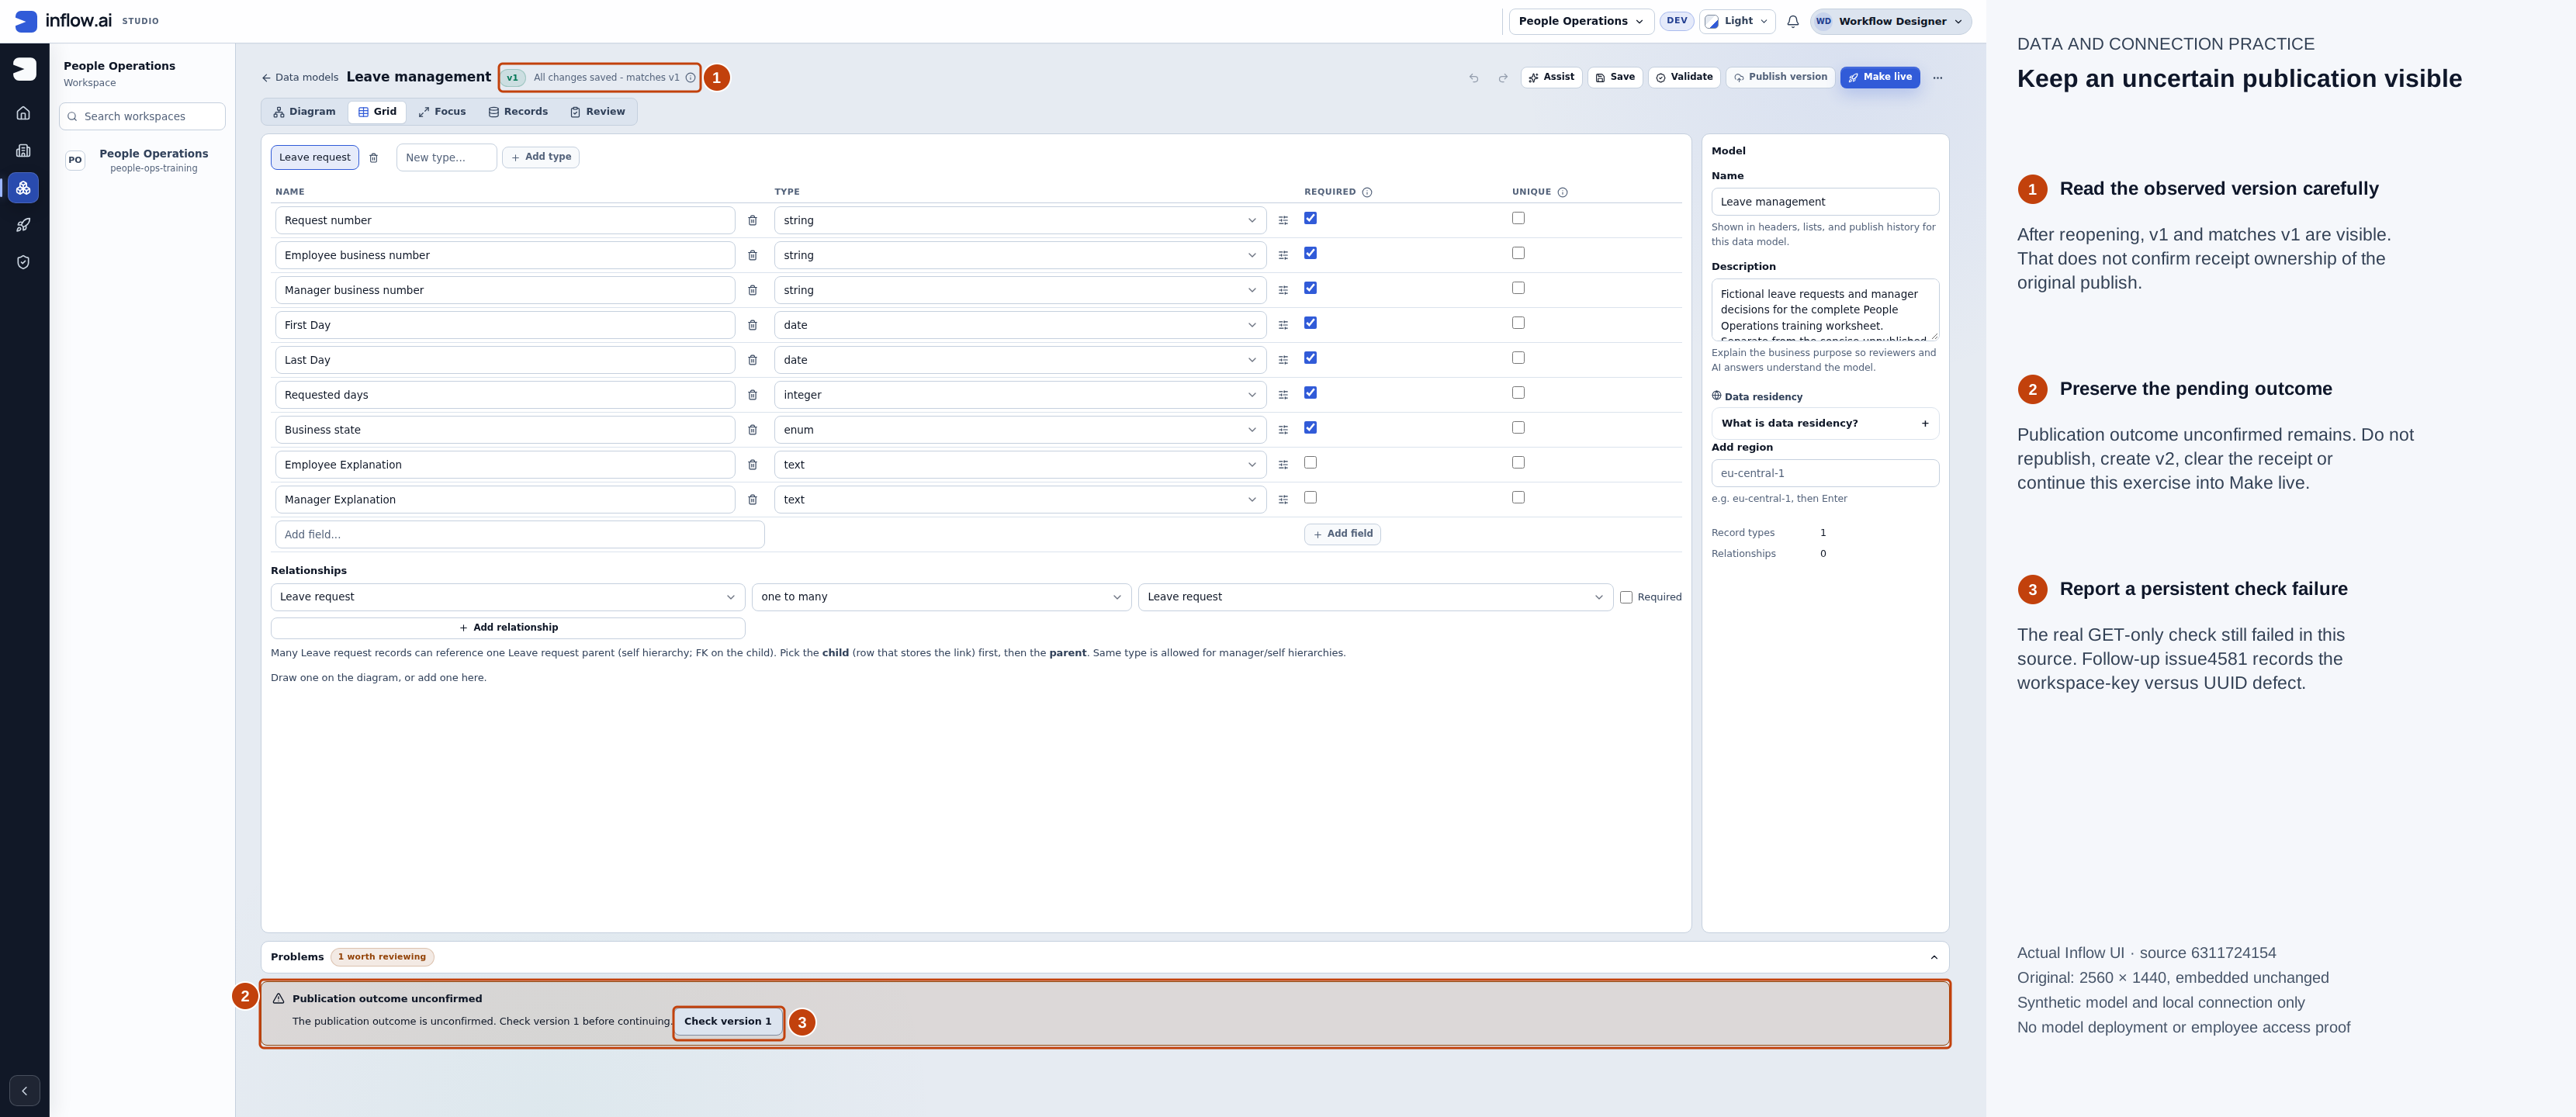
Actual native 2560×1440 capture, 15 November 2026, source 6311724154. Numbered outlines and the side legend are guidance; open the original or open the full-size guide. This is an unresolved recovery state, not a successful publish receipt or database deployment.
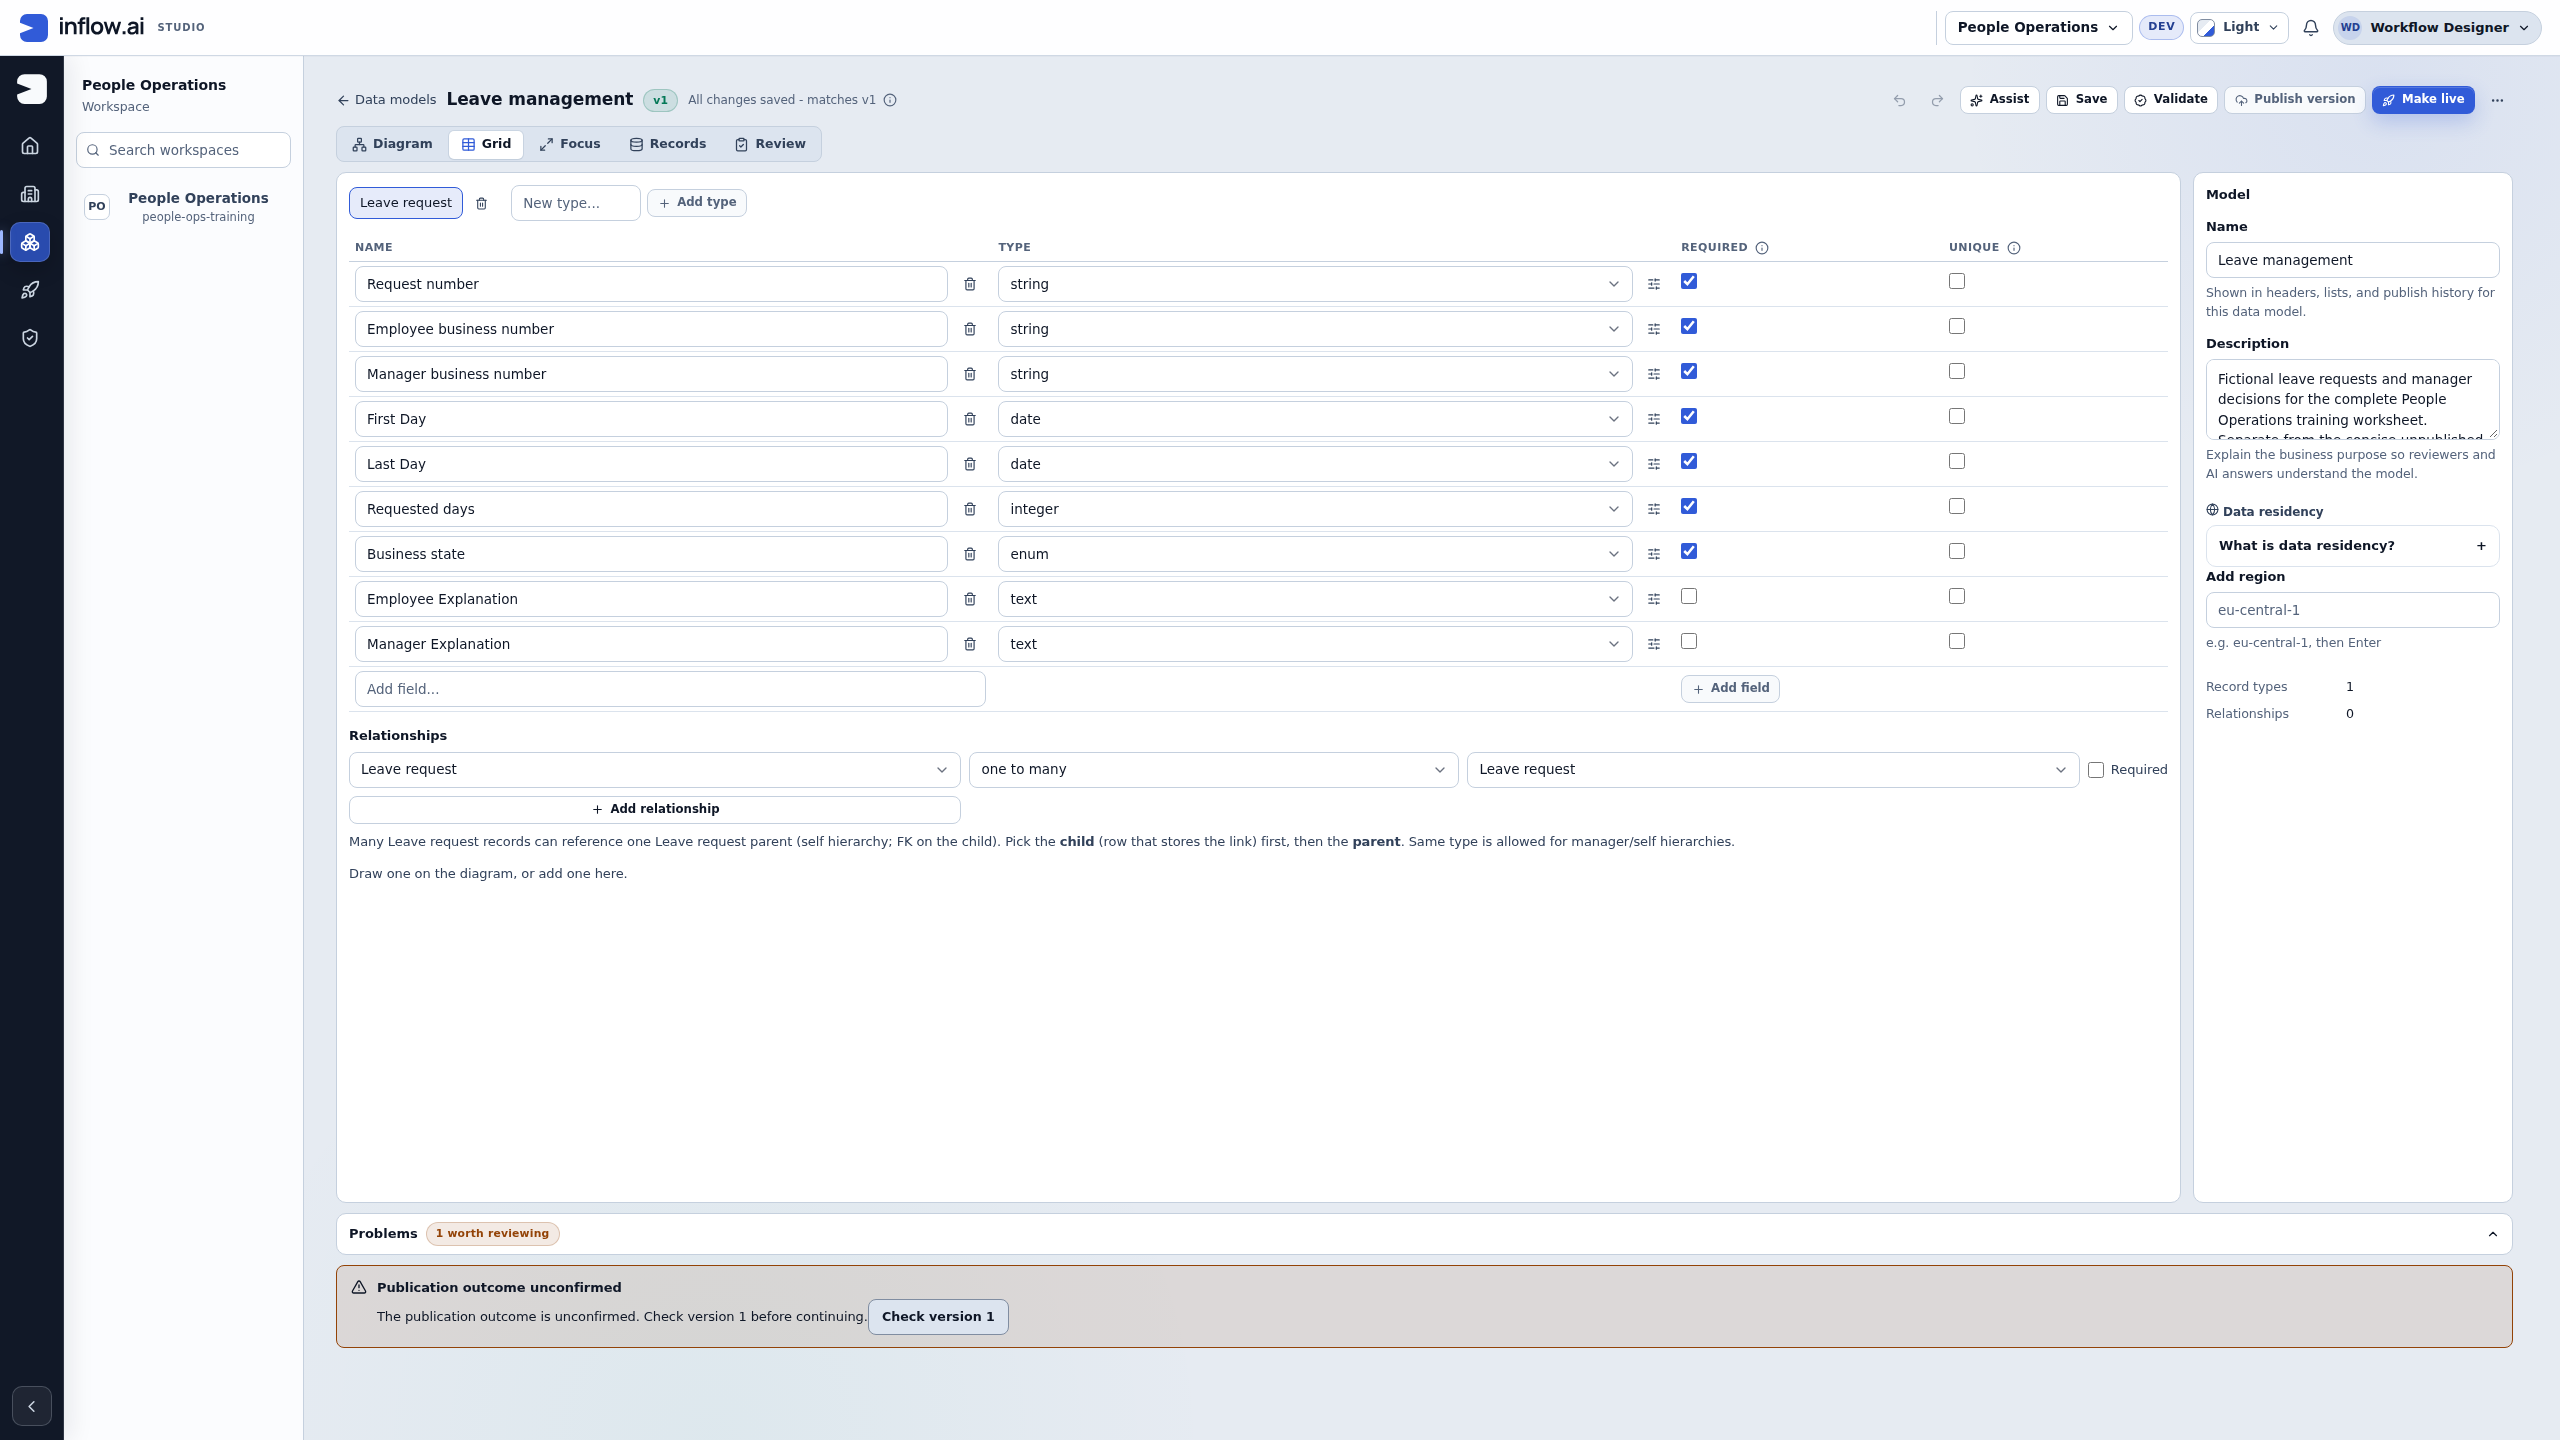
In this captured build, the model version exists and is readable, but Studio rejects its publication response when a workspace URL key differs from the canonical workspace UUID. The same identity comparison also rejects the read-only Check version 1 response. This is tracked in issue #4581. Reopening can show v1 / All changes saved - matches v1 while the pending notice remains; that header does not establish receipt ownership for the original request.
- Keep the draft and pending publication notice. Do not press Publish again, manufacture version 2, or clear browser storage to remove the notice.
- Use the offered Check version N to observe the exact target without replaying the publication. Read its result; a visible target version and a confirmed original request outcome are different facts.
- If the check still says The publication target could not be confirmed. No publication was retried, retain the named model, workspace, version and message for the application owner. Do not keep repeating the same check.
- Stop before Make live while the current recovery flow cannot confirm the intended target. Give the owner the exact pending target and message. Supported recovery must observe the intended version without replaying publication or discarding its receipt. Do not clear browser storage, restart the browser, manufacture another version, or borrow an account to remove a pending indicator.
The 17 November sequence below is a separately prepared release of the already readable version 1. Its model identity, saved design, published snapshot and destination were checked before proceeding. It does not establish that the older publication response arrived, repair the issue above, or teach a way to bypass a pending recovery notice. Keep the two receipts separate: a fixed model version and an applied database publication answer different questions.
Follow the Make live review
For this exercise, the administrator has prepared the empty cf3_manuals_leave schema on the published Training PostgreSQL connection. Use only the approved practice destination. If that connection is not ready, follow the PostgreSQL connection walkthrough first. Do not copy a production connection or enter another person's credentials to reproduce a picture.
1. Reuse the checked model version
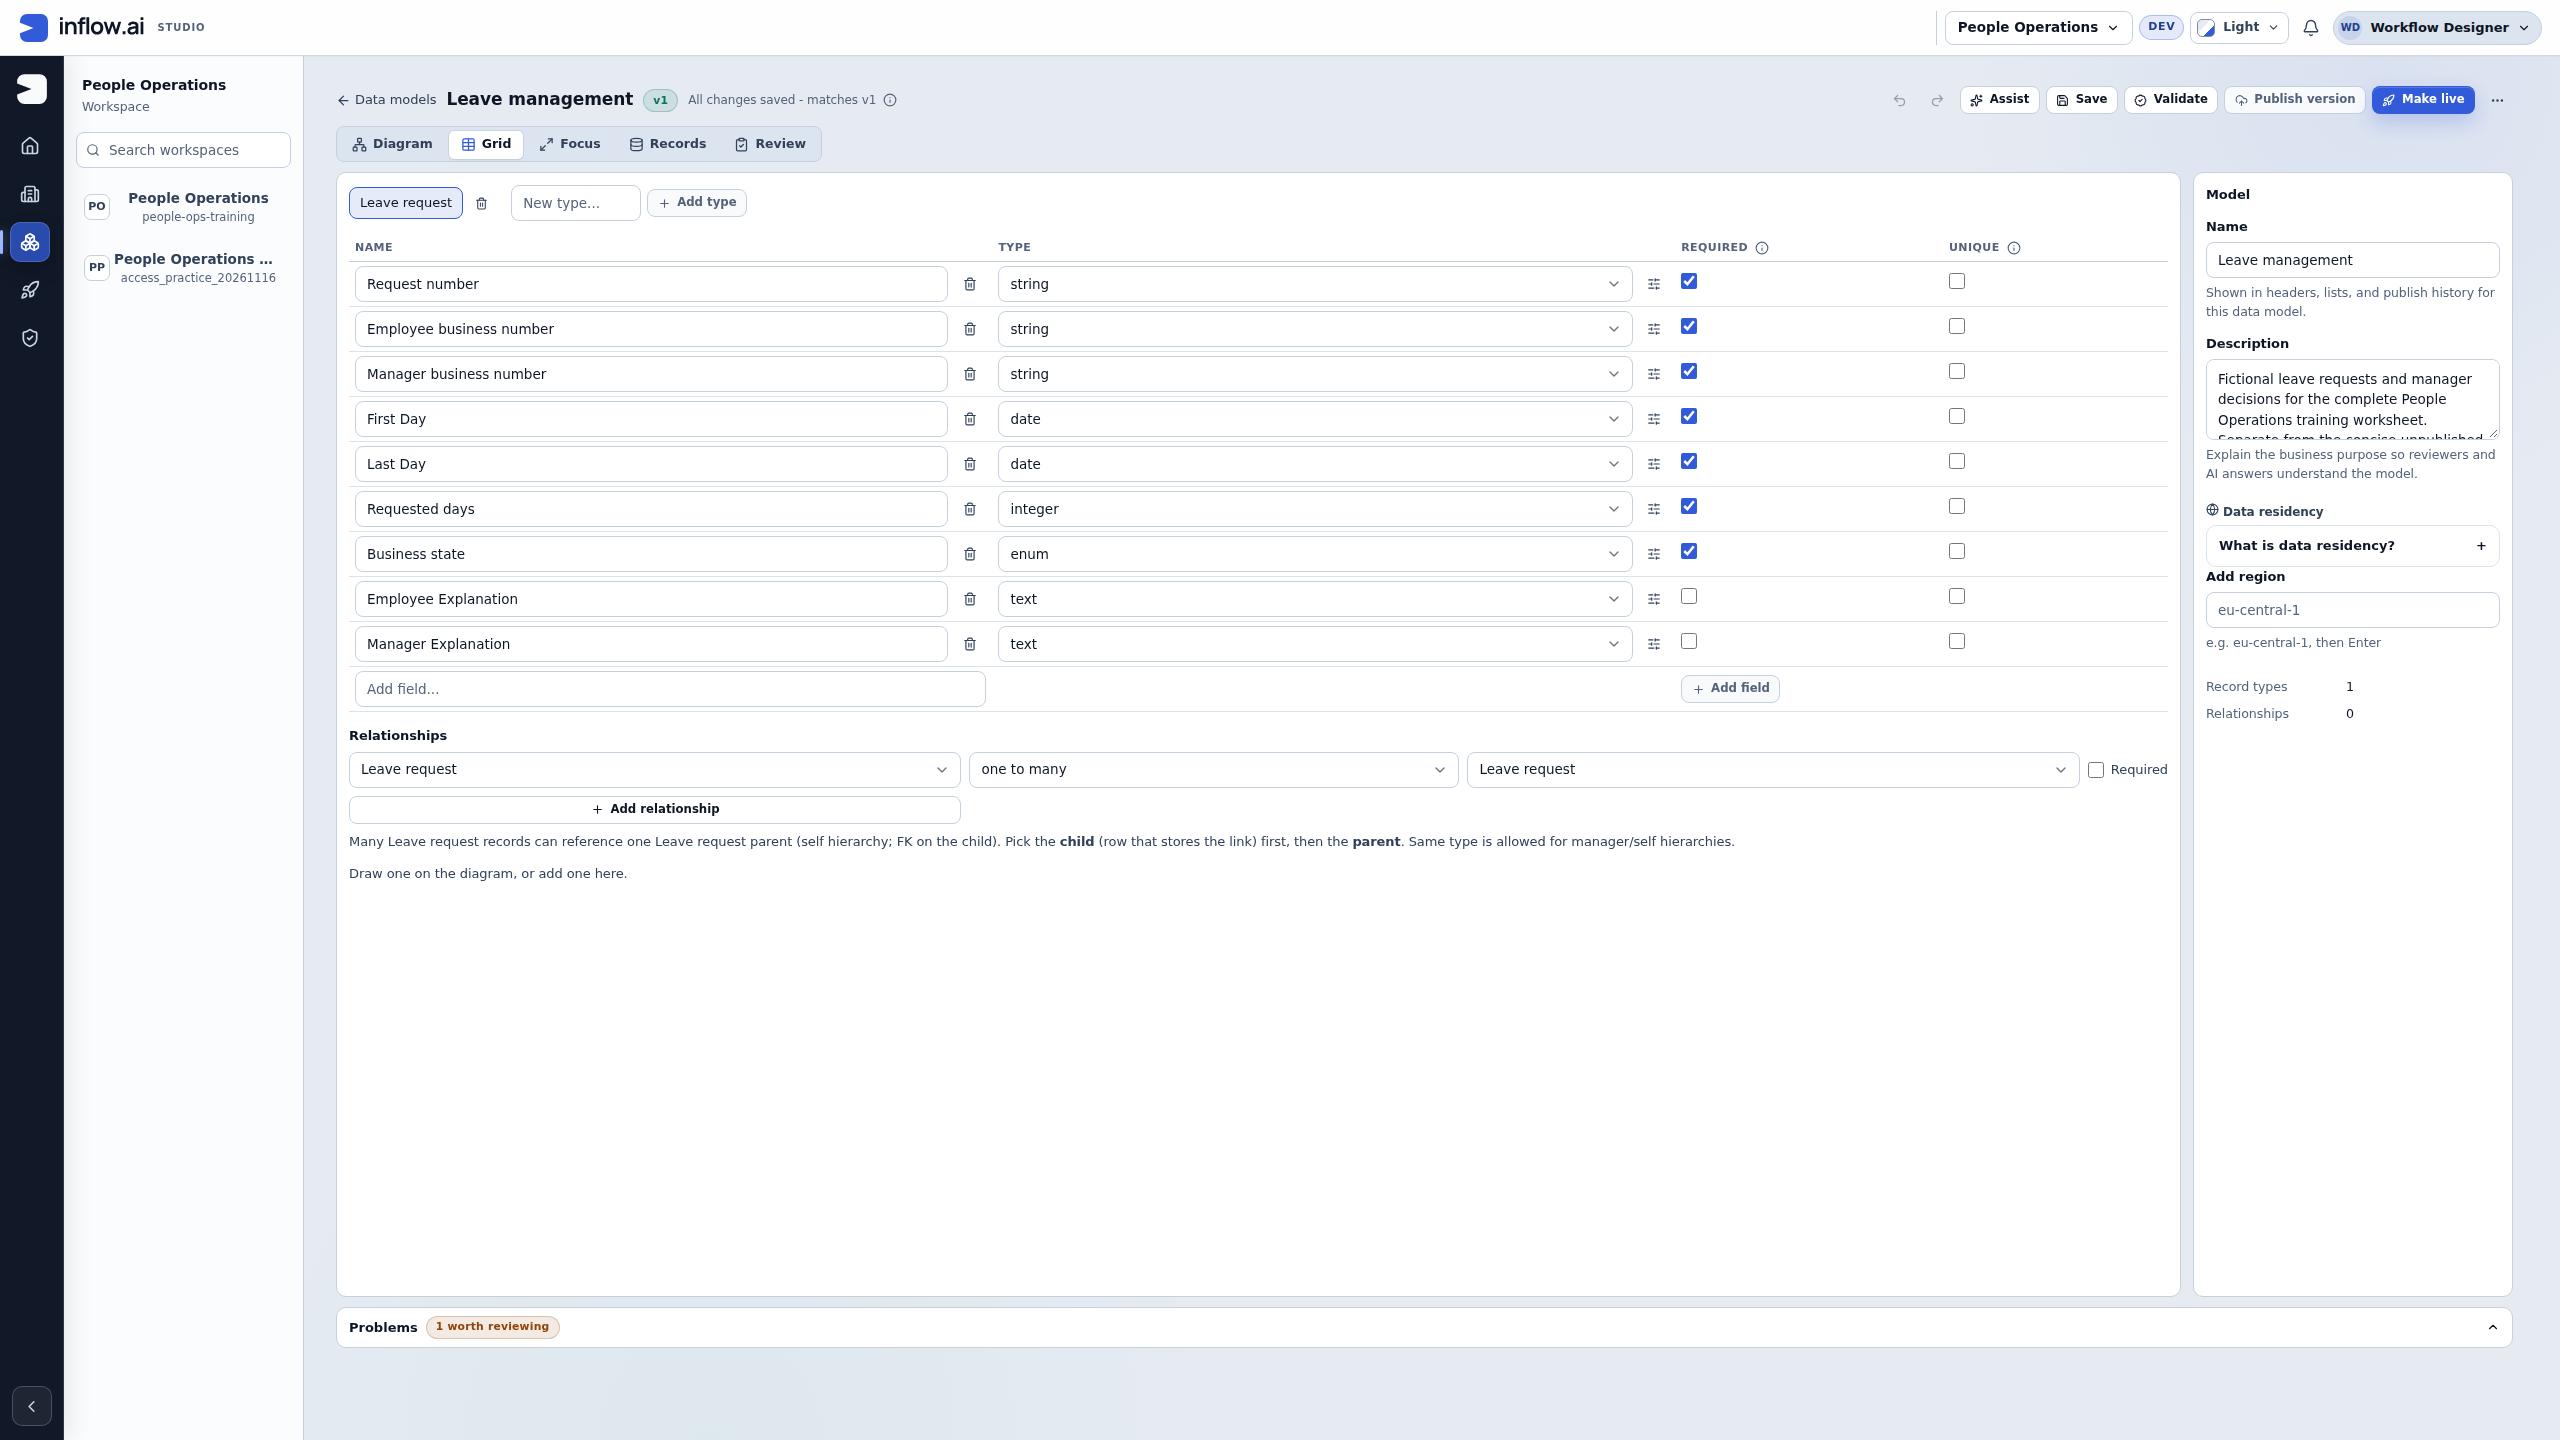
Open Leave management and read its version and save state. In this sequence the model has nine business fields, v1, and All changes saved - matches v1. The deployment uses that fixed version. It does not create version 2 and does not repeat the earlier version-publication request.
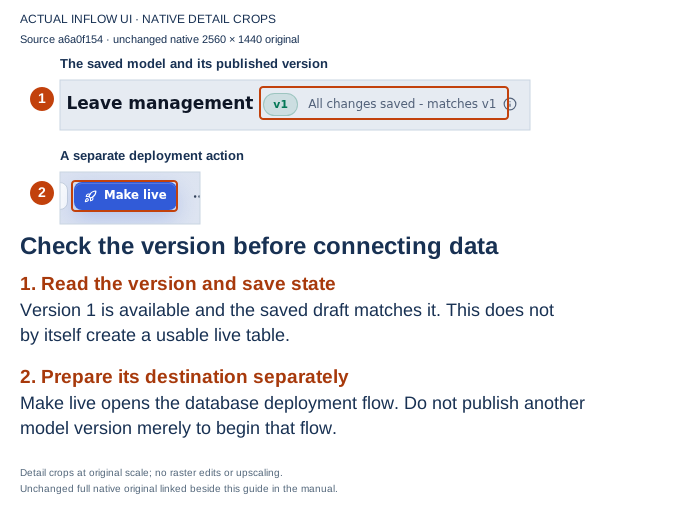
Actual Inflow UI, 17 November 2026, source a6a0f15454, captured at native 2560×1440. The numbered outlines and explanations are editorial guidance over unchanged native details. Open the original or open the full-size guide. The header identifies the model version; the separate Make live control starts preparation for its database destination.
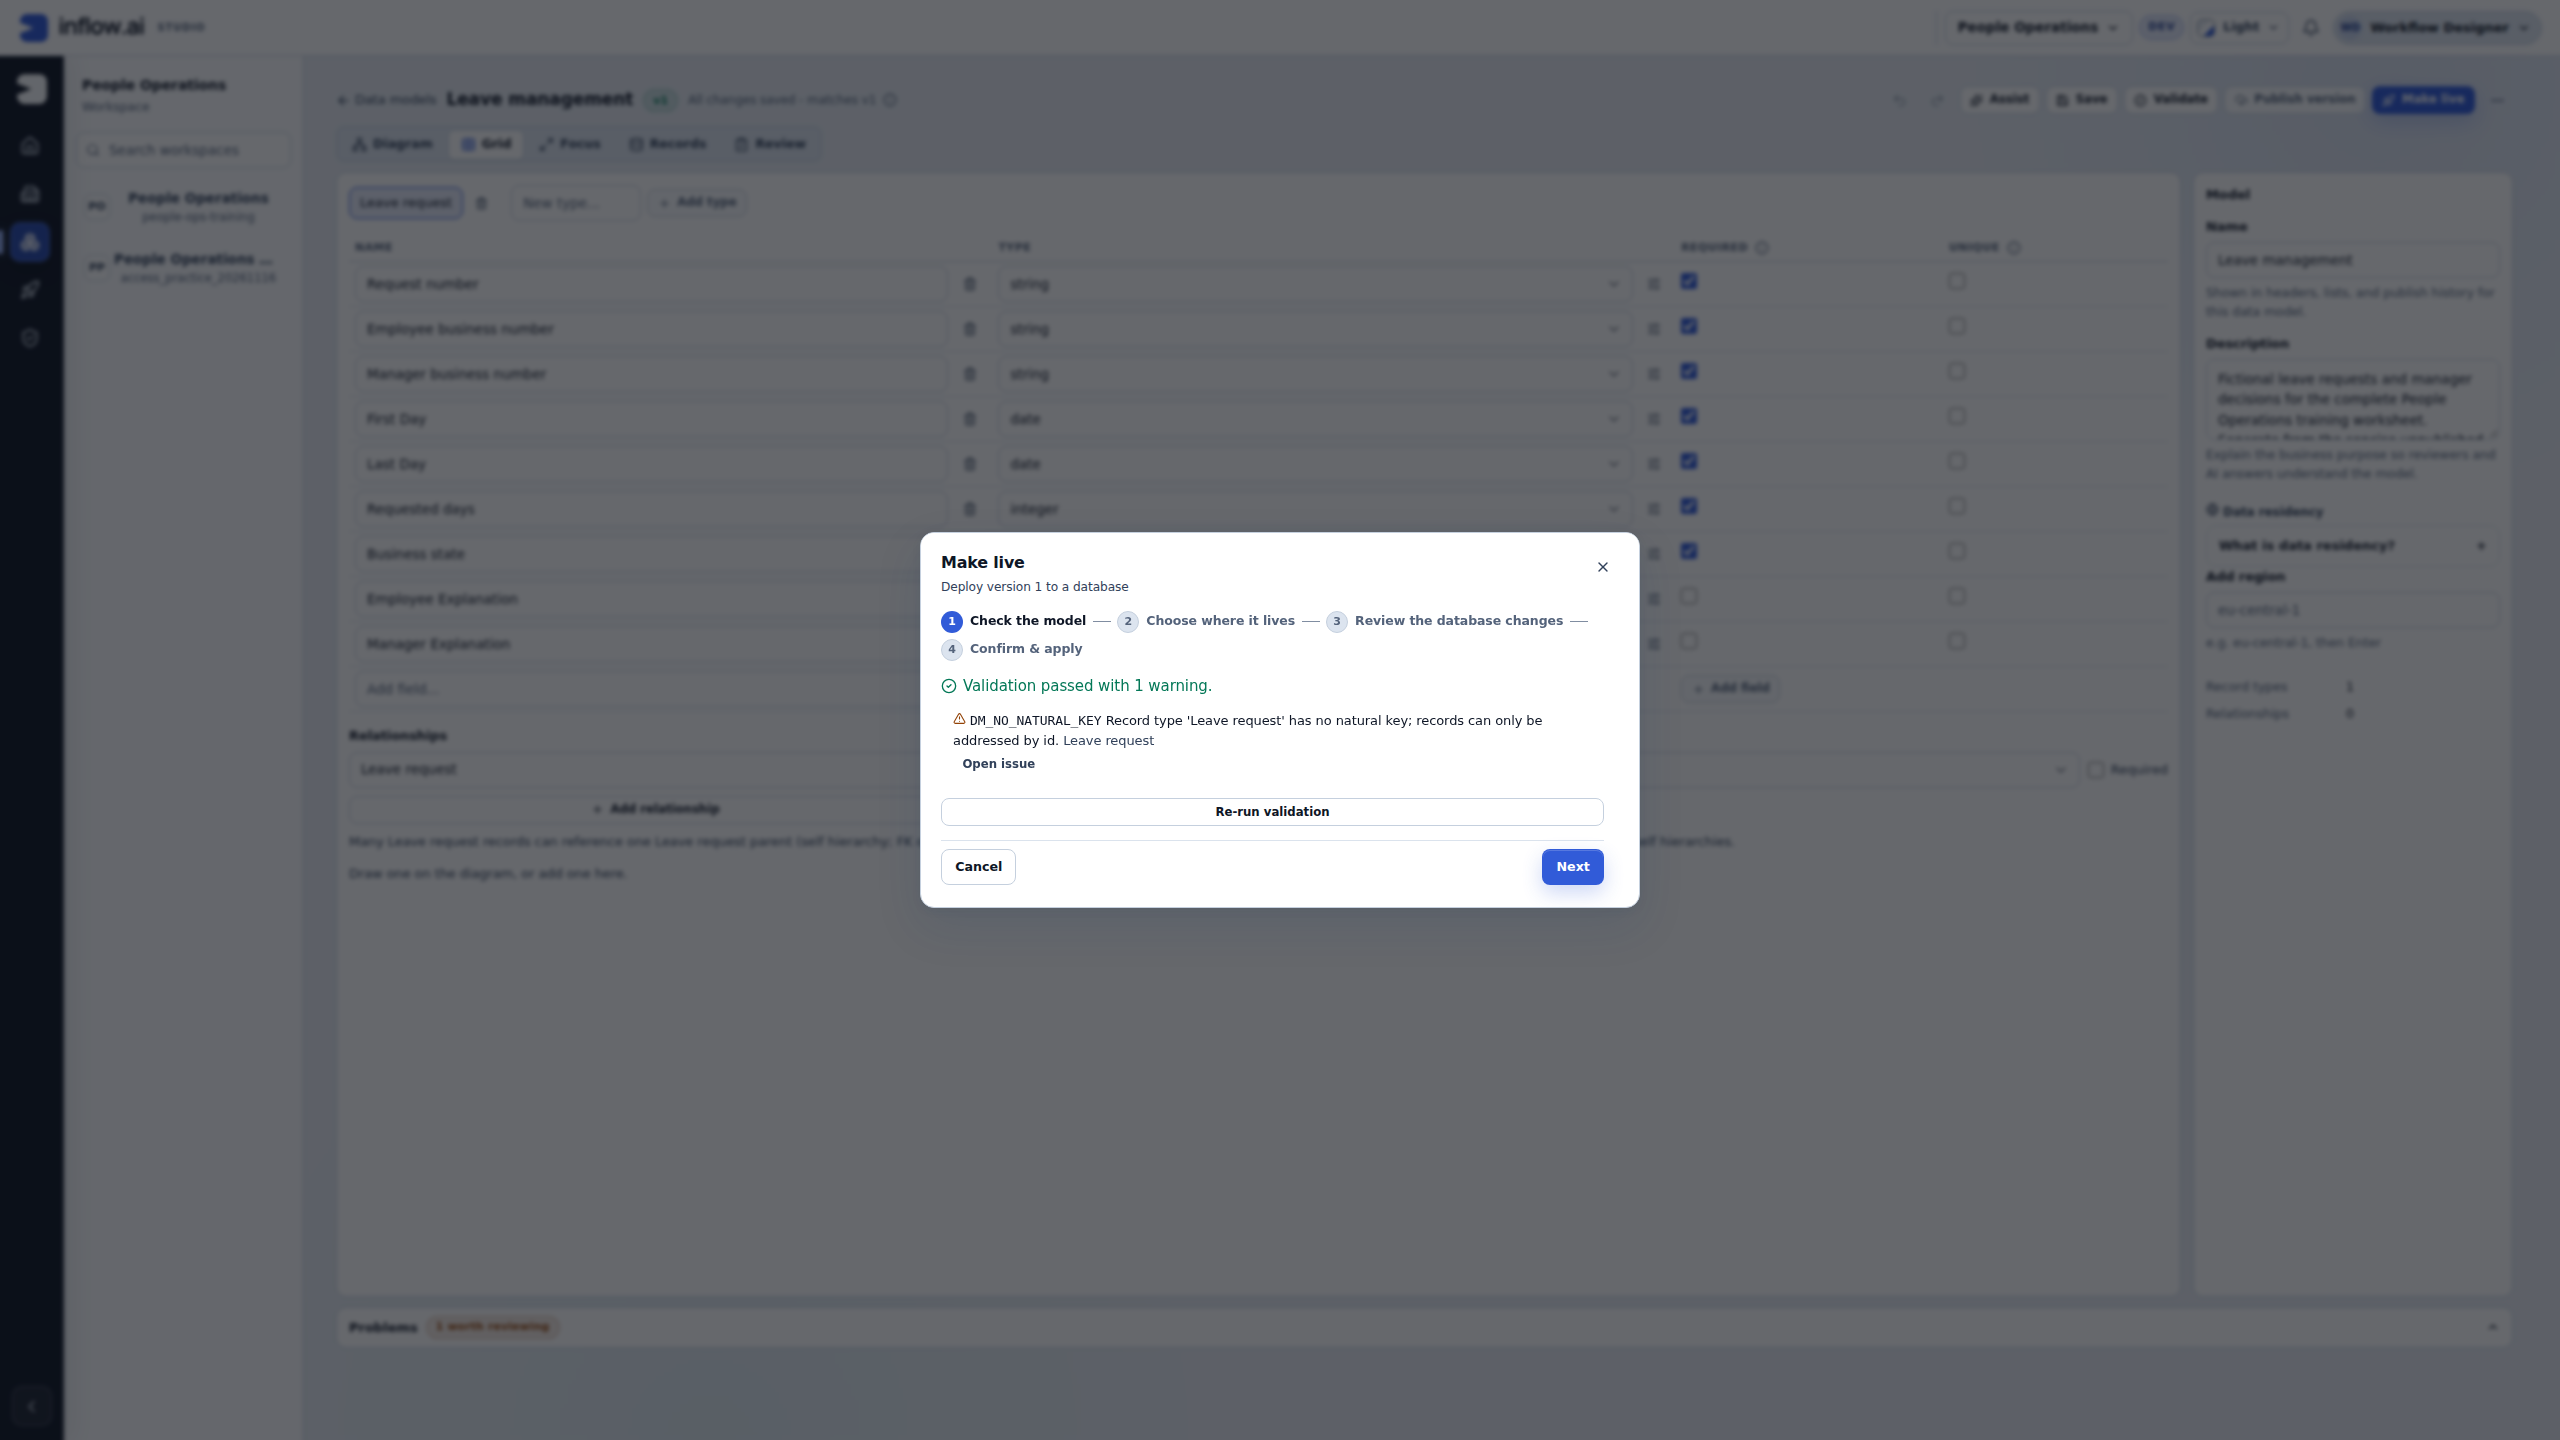
Choose Make live. At Check the model, read the completed result before continuing. Here it says Validation passed with 1 warning. The warning DM_NO_NATURAL_KEY explains that the Leave request type can be addressed by its system id, rather than a declared business natural key. Request number and employee business number are ordinary fields in this worksheet; neither becomes the primary key just because it looks distinctive.
Do not add a guessed natural key to remove a warning during a deployment exercise. A key change affects how records are identified and belongs to a separately reviewed model change. Use the existing system identity in the table or connection when a stable row identity is needed.
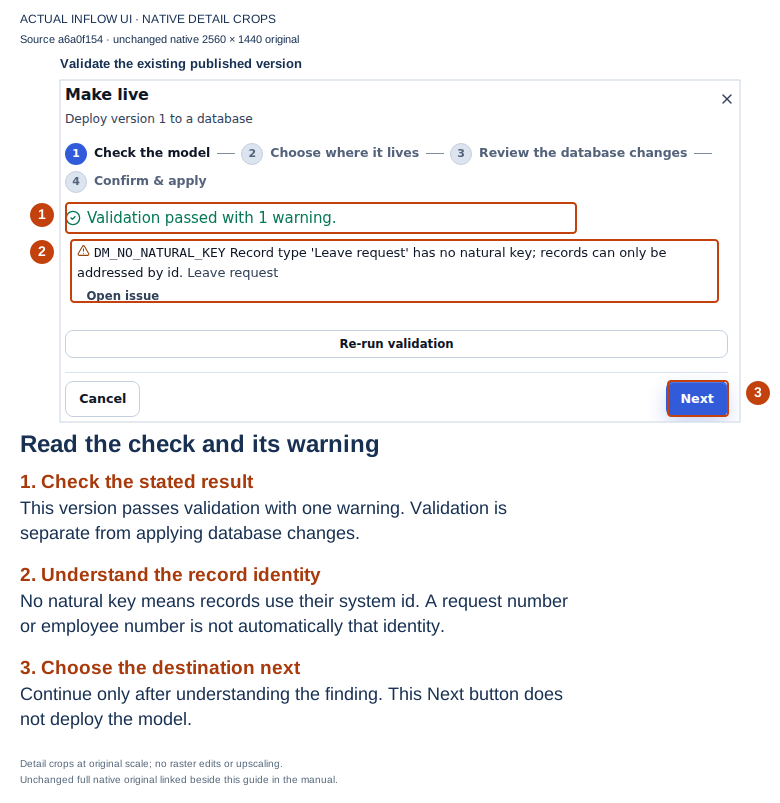
Actual Inflow UI, 17 November 2026, source a6a0f15454, captured at native 2560×1440. The numbered outlines and explanations are editorial guidance over unchanged native details. Open the original or open the full-size guide. This is a successful model check with one warning, not an Applied database result or a record save.
2. Choose both the connection and the schema
- Choose Next to open Choose where it lives.
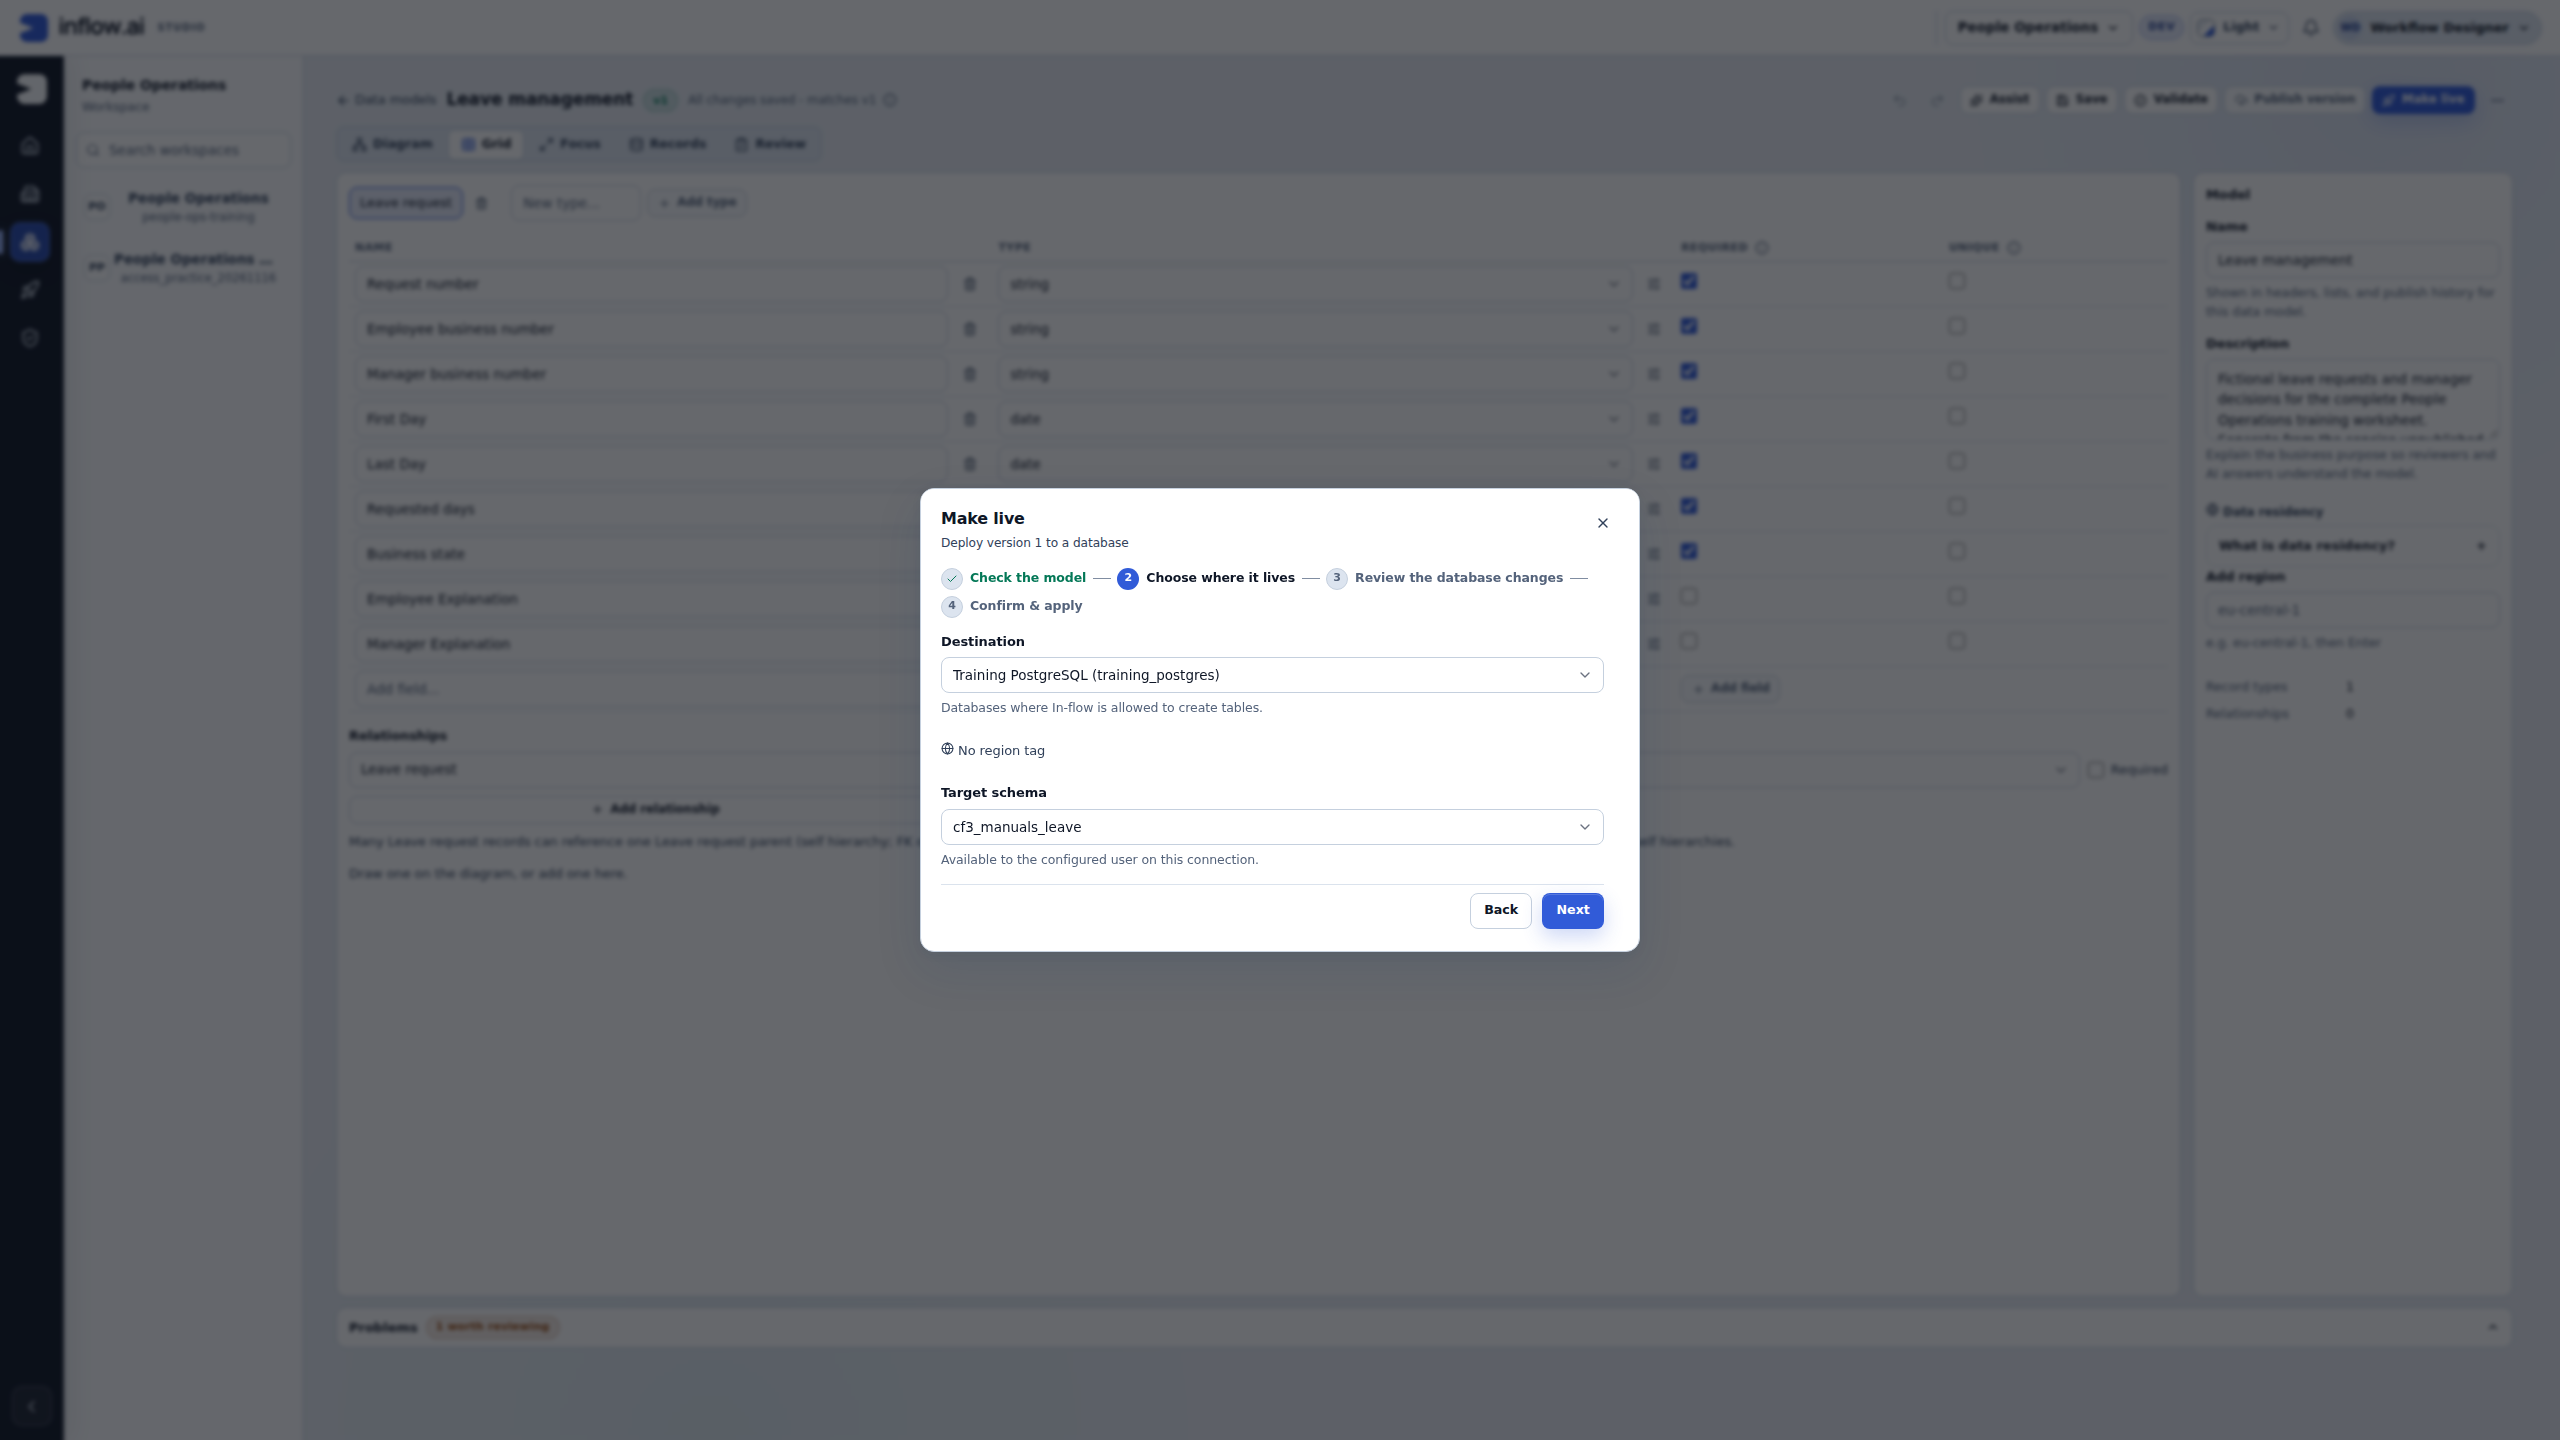
- Under Destination, deliberately select Training PostgreSQL (training_postgres). The first offered PostgreSQL connection may have a different configuration.
- Under Target schema, choose cf3_manuals_leave from the offered namespaces. The connection's own Schema setting does not replace this deployment choice. In this walkthrough the current
publicschema was initially offered; it was not the intended destination. - Read both selected values together, then choose Next. If the agreed schema is absent or unavailable, stop and ask its database owner to prepare or authorize the intended destination. Do not substitute another schema or widen access to get past the step.
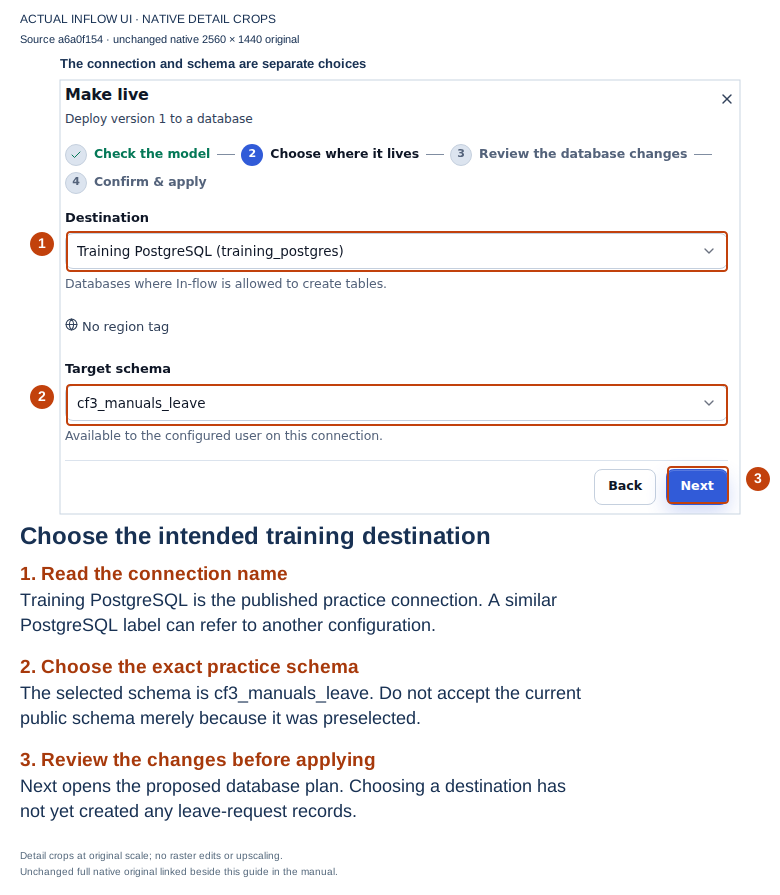
Actual Inflow UI, 17 November 2026, source a6a0f15454, captured at native 2560×1440. The numbered outlines and explanations are editorial guidance over unchanged native details. Open the original or open the full-size guide. Selecting the destination has not applied the plan and has not inserted any leave-request rows.
3. Review the complete database plan
Review the database changes shows the proposed SQL. Read the complete list, including statements below the fold and the rest of any long line. A picture of the first few statements is not a review of the whole plan. The database owner can help interpret an unfamiliar operation; the consultant does not copy the SQL into another console to bypass the reviewed flow.
This initial empty-schema example has ten statements. It prepares the schema, creates the leave-request business table and two platform support tables, creates the support index, initializes a platform bookkeeping lock row, comments on the support tables and records constraint-inventory checks. The support tables track audit delivery and sample-data bookkeeping. They are not additional employee requests, and their presence does not mean sample leave requests have been loaded.
The business table uses a system UUID identity and the nine declared fields. Its business-state choices are PENDING, APPROVED and DECLINED. At this stage those are allowed stored values; the database table has not executed a workflow or approved anyone's leave.
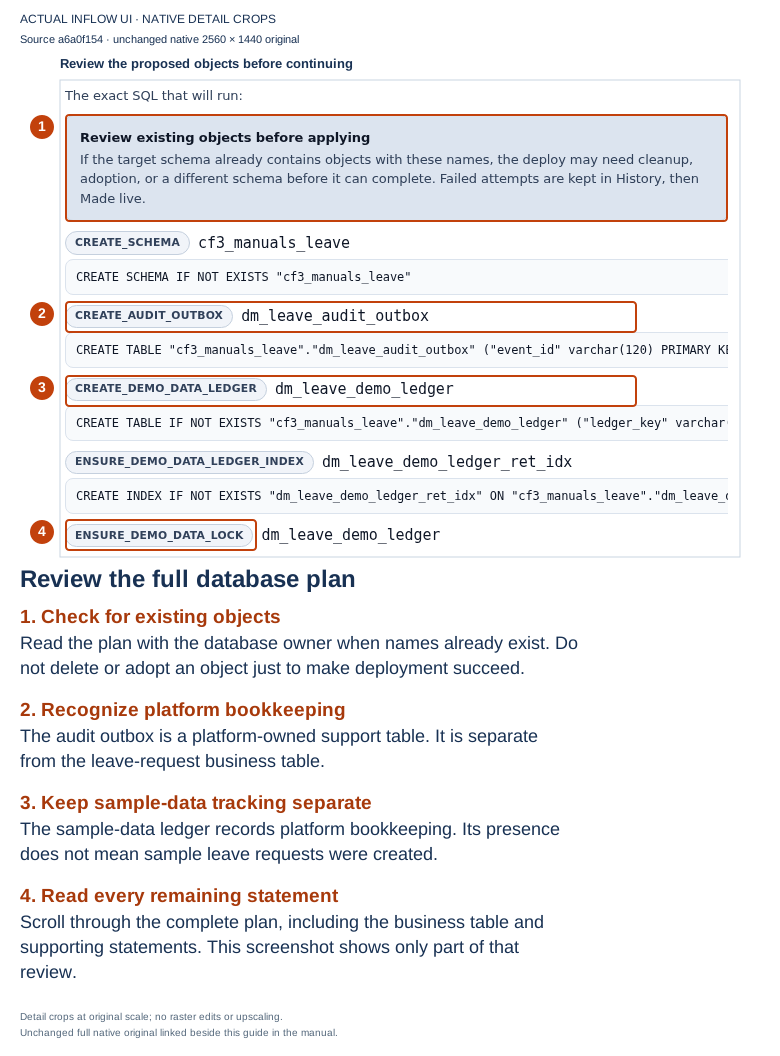
Actual Inflow UI, 17 November 2026, source a6a0f15454, captured at native 2560×1440. The numbered outlines and explanations are editorial guidance over unchanged native details. Open the original or open the full-size guide. The native detail shows only the start of this ten-statement plan. The full plan was read before the separate confirmation; long SQL continues horizontally.
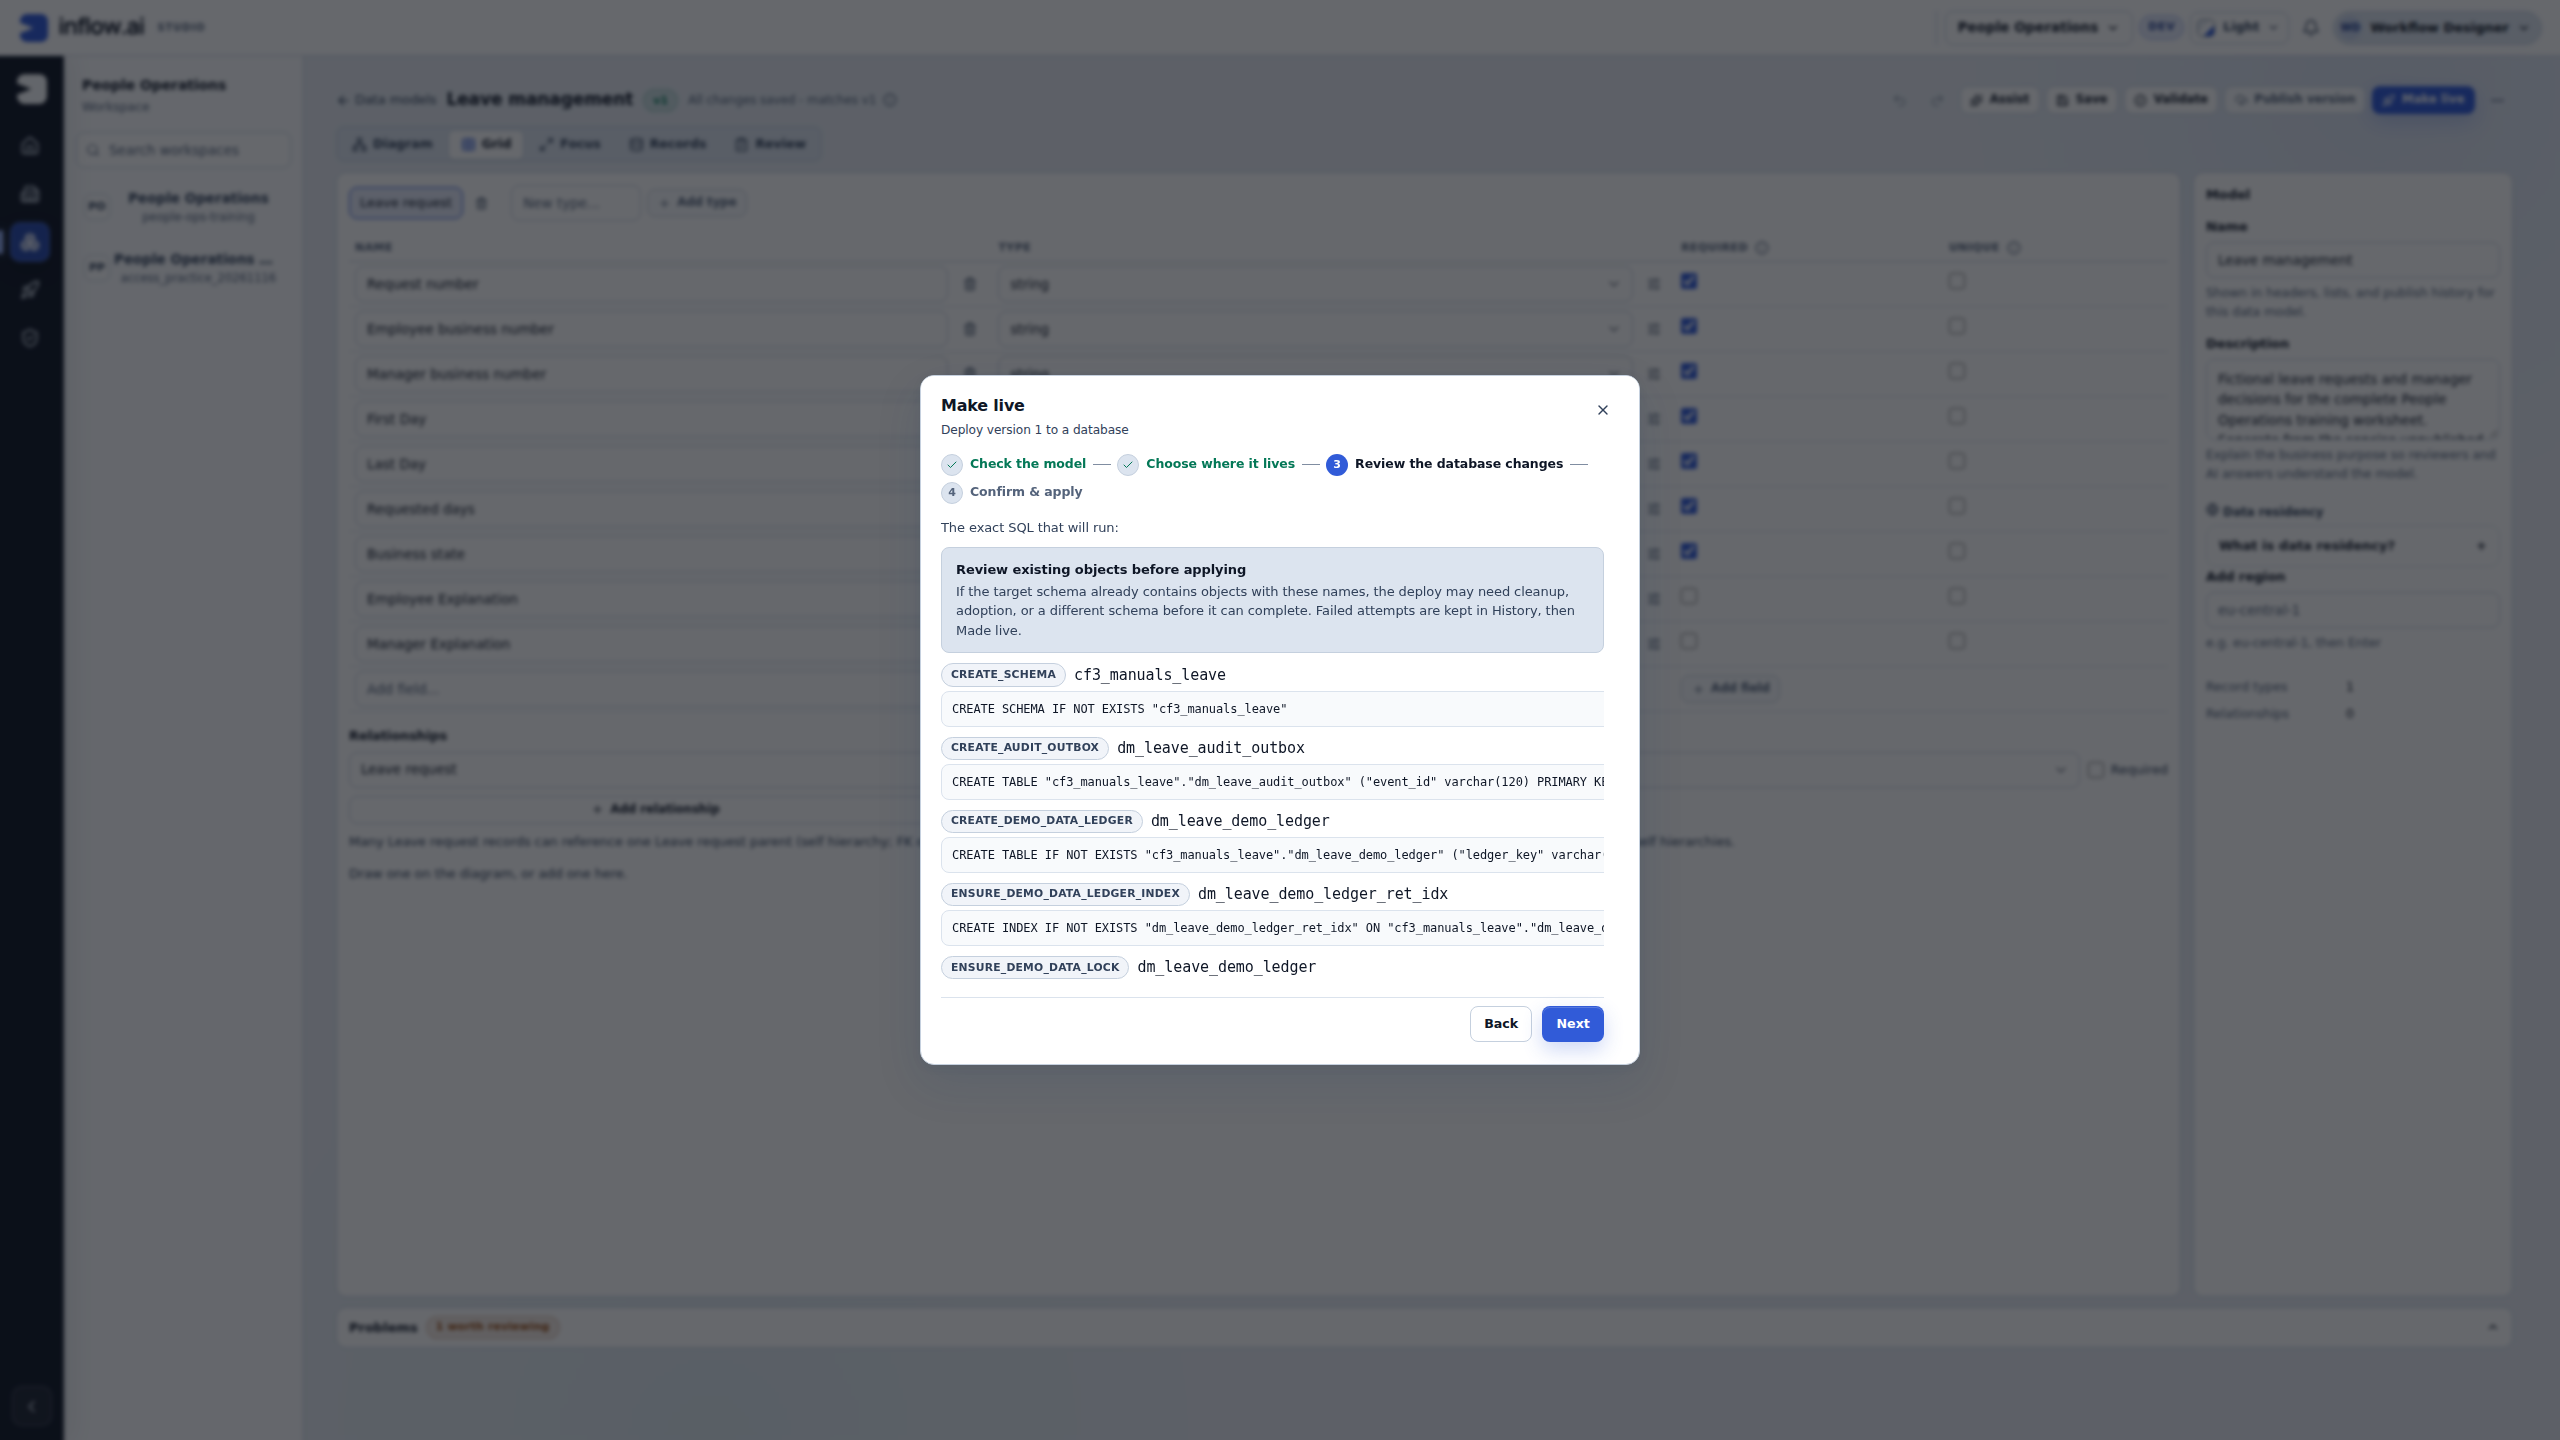
Treat the plan as a change to the named destination. A later model version may contain renames, removals, key changes, data conversions or updates to existing objects; it need not resemble this new-table example. If an object with the same name already exists, stop for its owner. Do not delete it, silently adopt it, choose a different destination or assume IF NOT EXISTS makes it safe. Any intended adoption or migration needs its own reviewed plan.
4. Check the target, then read Publication review
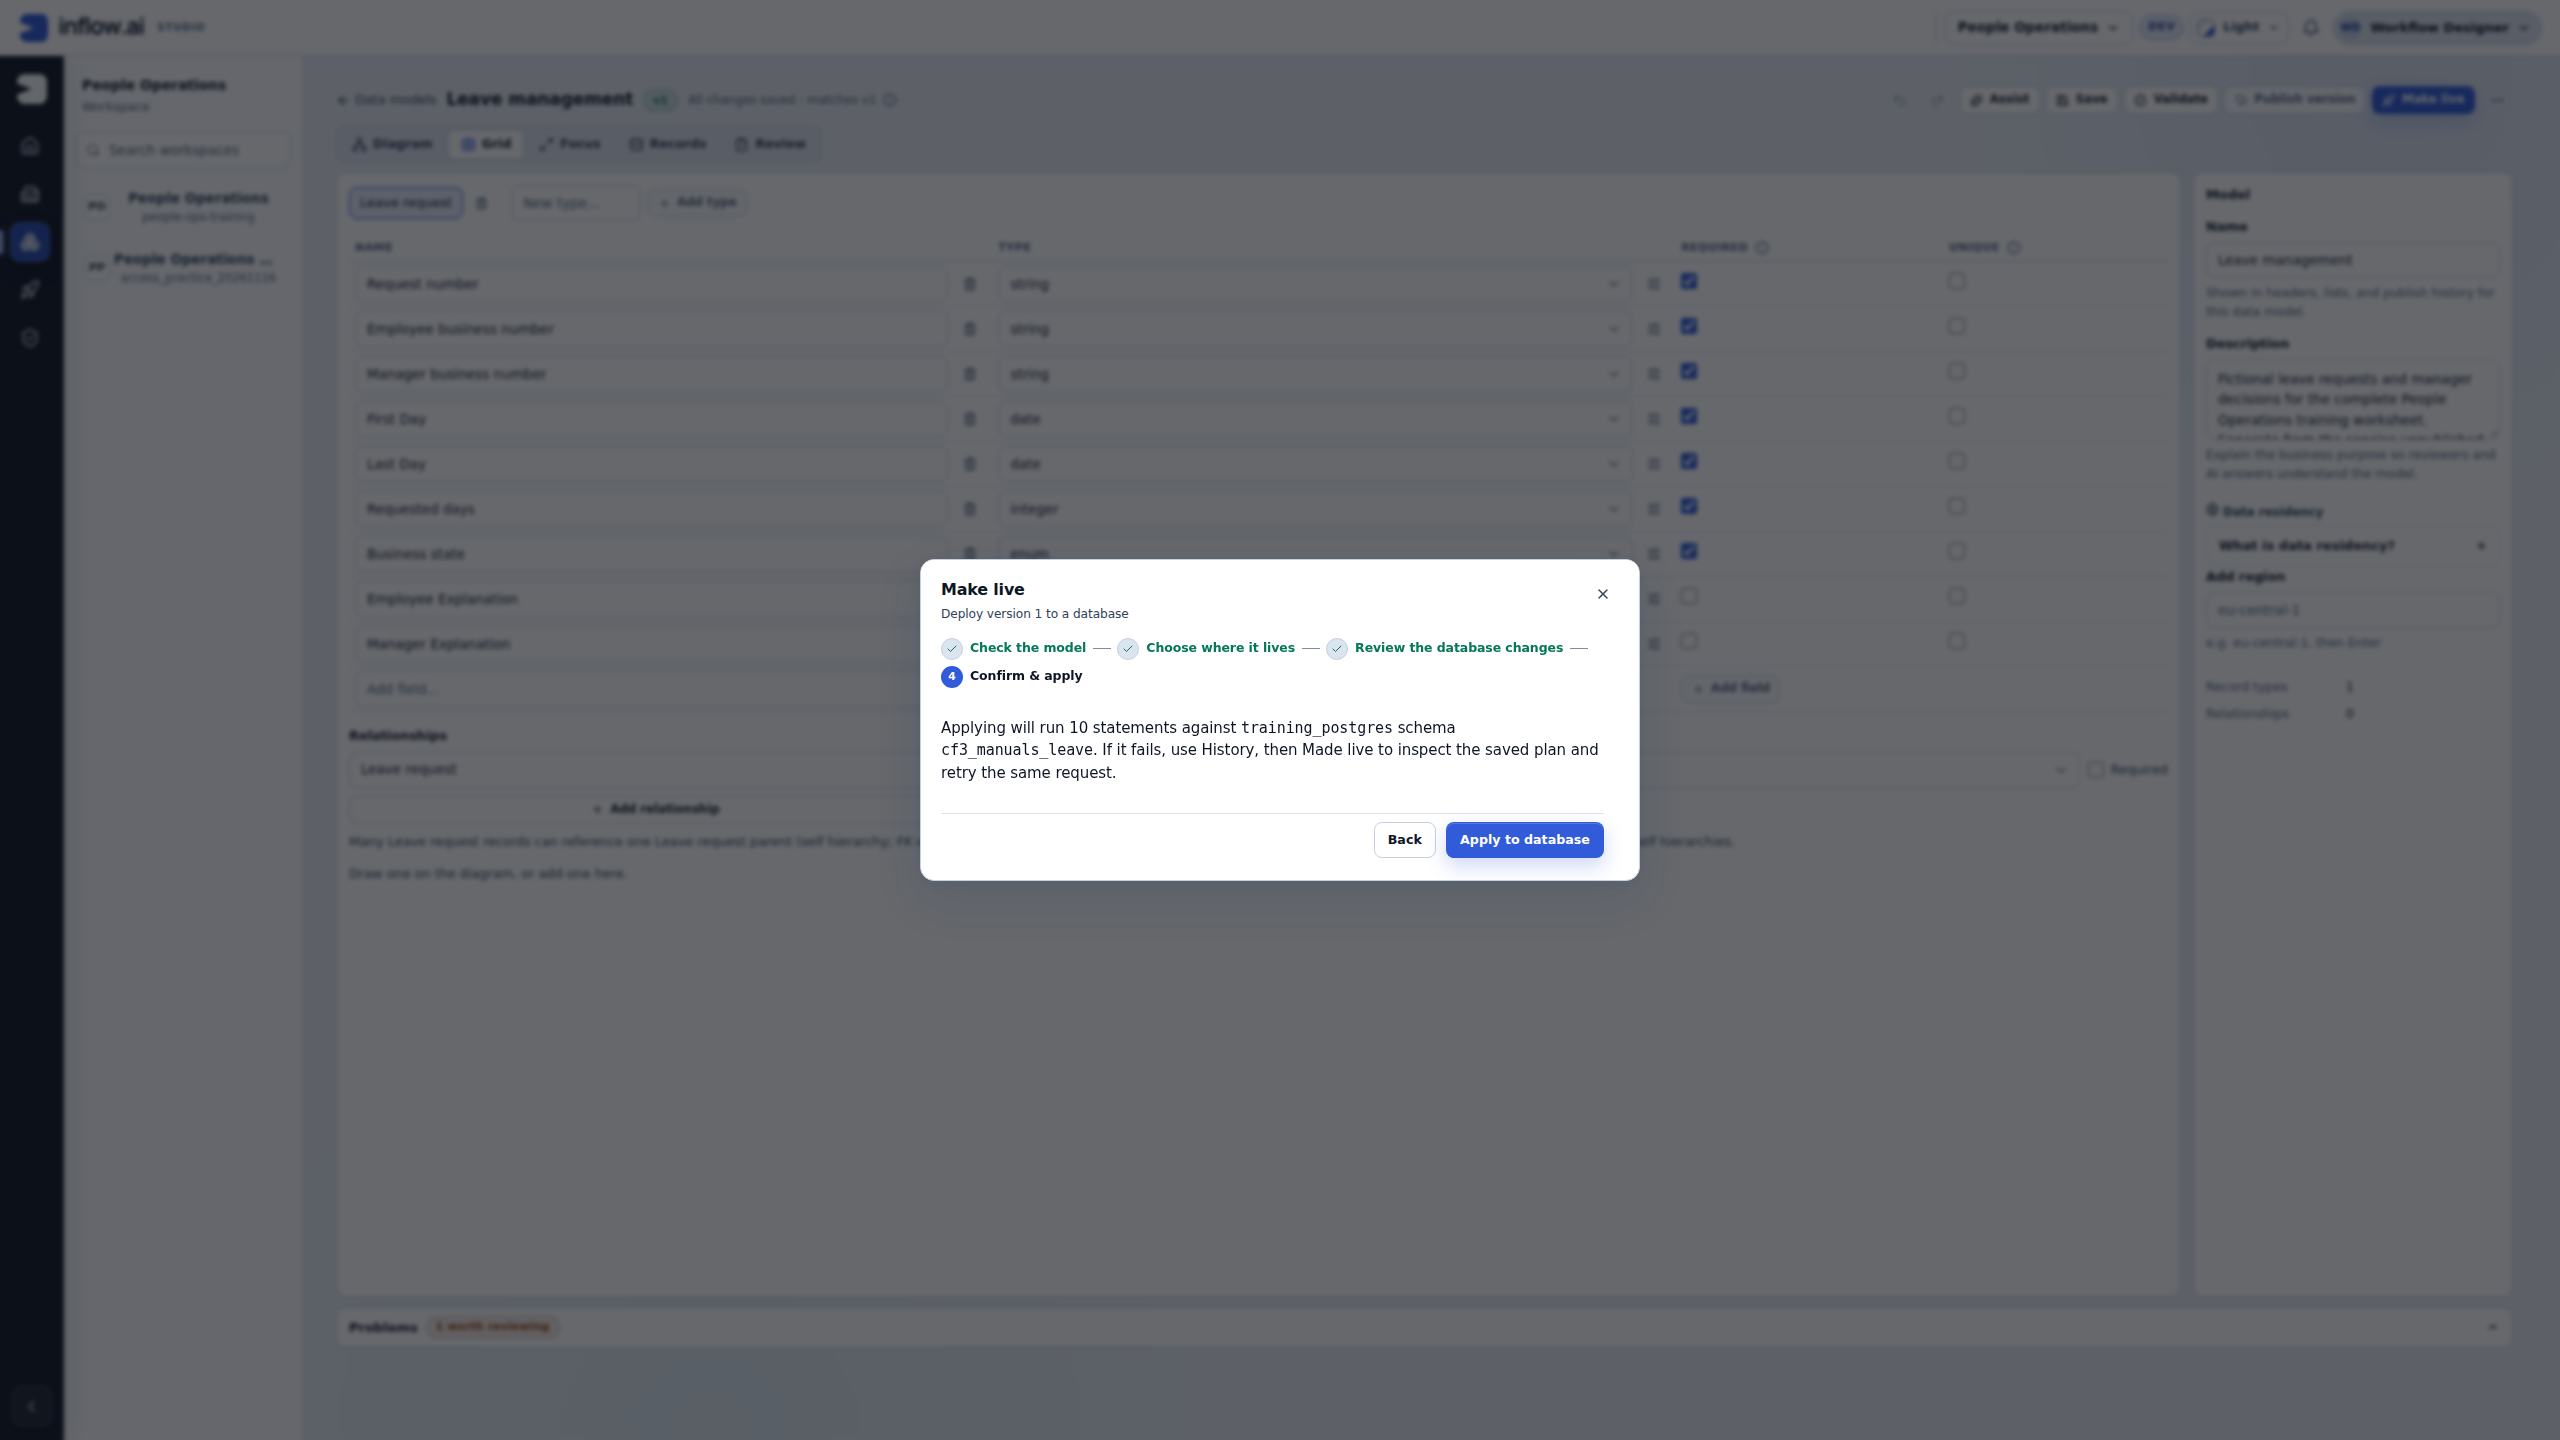
Choose Next only after understanding the plan. In Confirm & apply, compare the model version, statement count, connection and schema with the change you intend. This example names version 1, ten statements, training_postgres and cf3_manuals_leave.
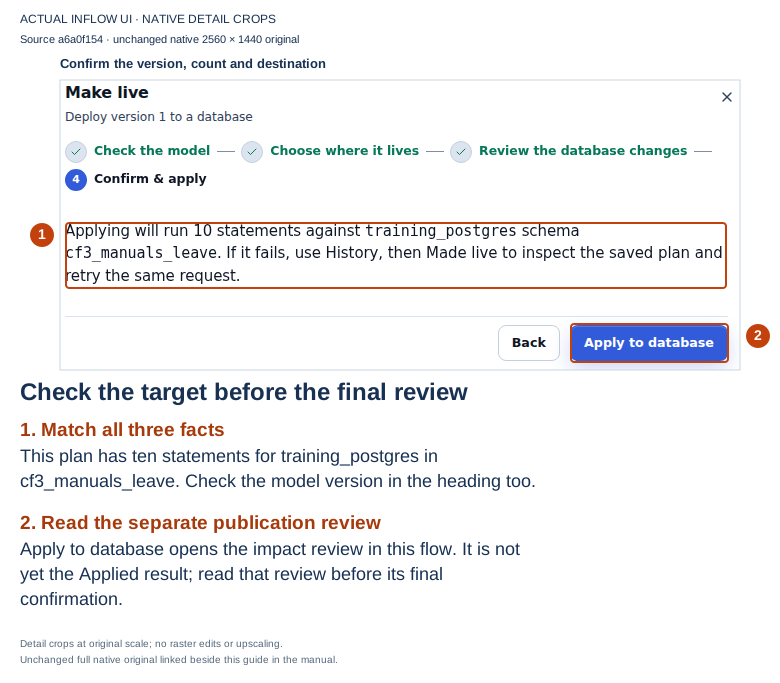
Actual Inflow UI, 17 November 2026, source a6a0f15454, captured at native 2560×1440. The numbered outlines and explanations are editorial guidance over unchanged native details. Open the original or open the full-size guide. In this current flow, Apply to database starts the additional impact review. It is not yet the Applied result.
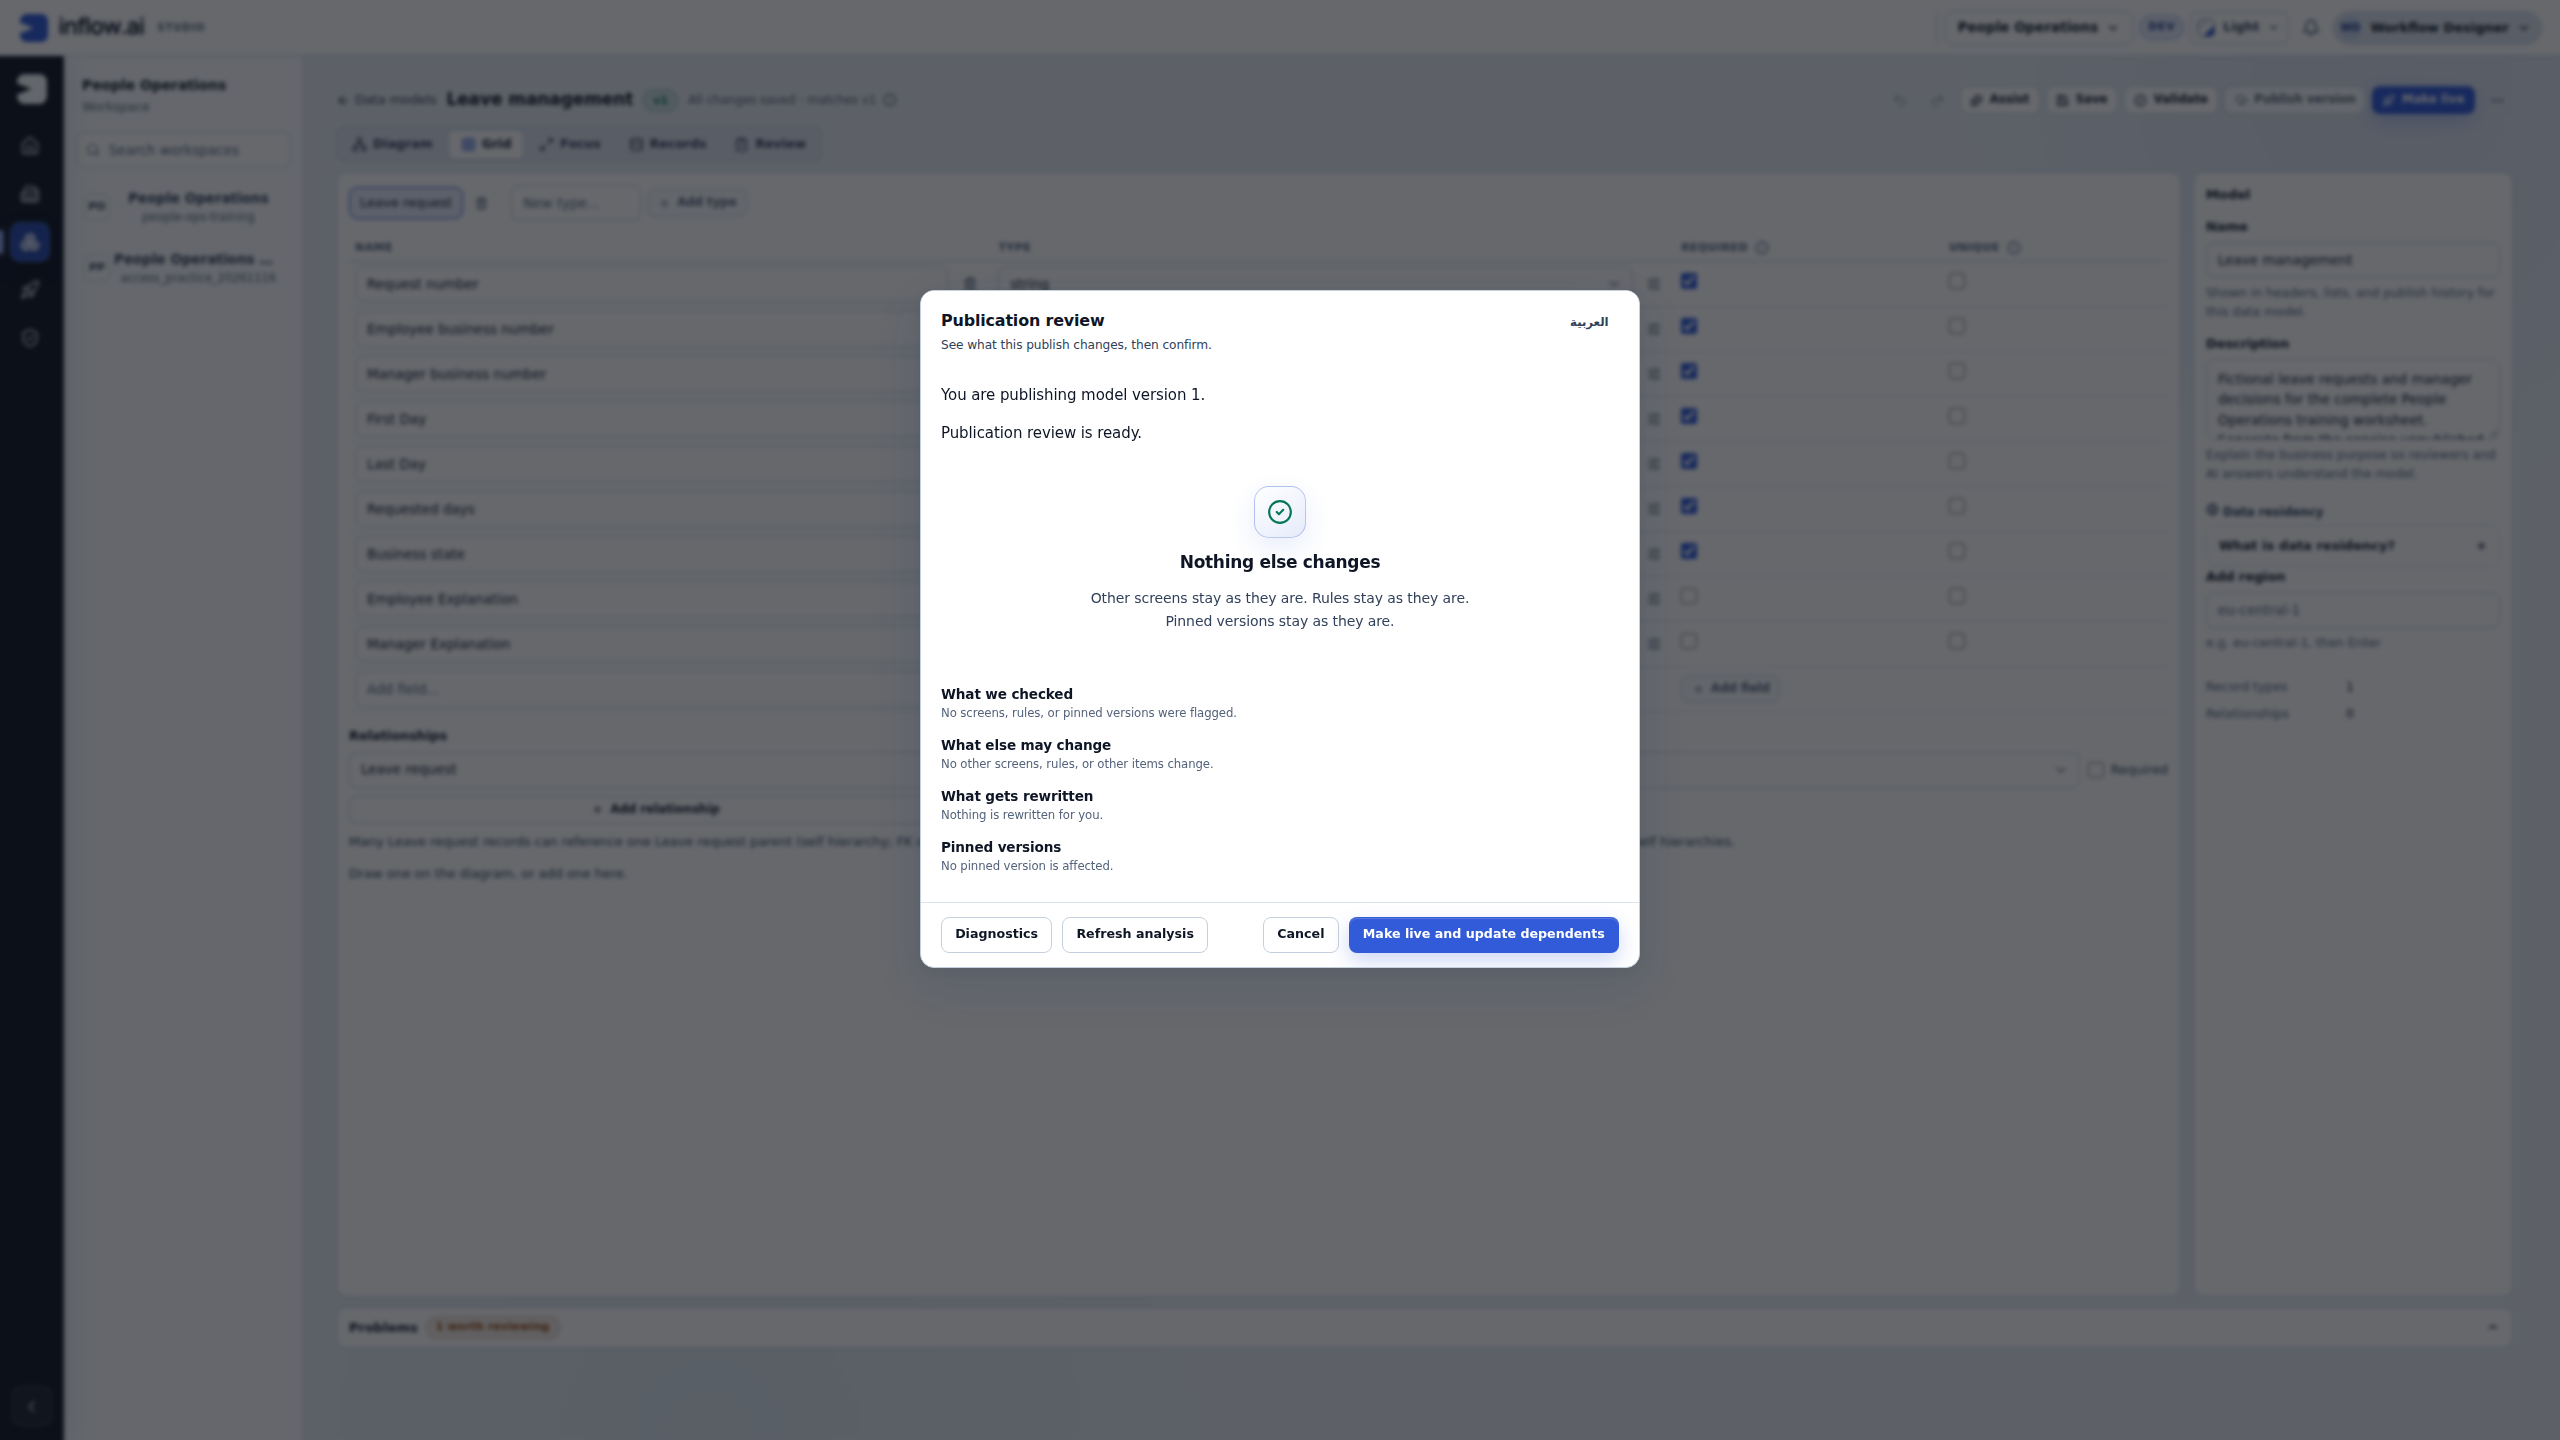
Choose Apply to database once, then read the additional Publication review. This review answers which existing screens, rules and pinned versions the change affects; it does not replace the SQL review. Read What we checked, What else may change, What gets rewritten and Pinned versions.
For this fresh practice destination the review is ready and says Nothing else changes. No existing screens, rules or pinned versions are flagged, nothing is rewritten and no pinned version is affected. Those statements describe this review's existing dependents. They do not promise that another application has no dependencies, that no database objects will be created, or that a generated CRUD pack has already run.
If a dependent change appears, identify its owner and understand its effect. If the review is incomplete, restricted, stale, blocked or unexpectedly different, cancel or resolve that state through the supported path. Use Refresh analysis after an intended change; read the refreshed result before making a decision. Do not infer permission or safety from this example's empty finding list.
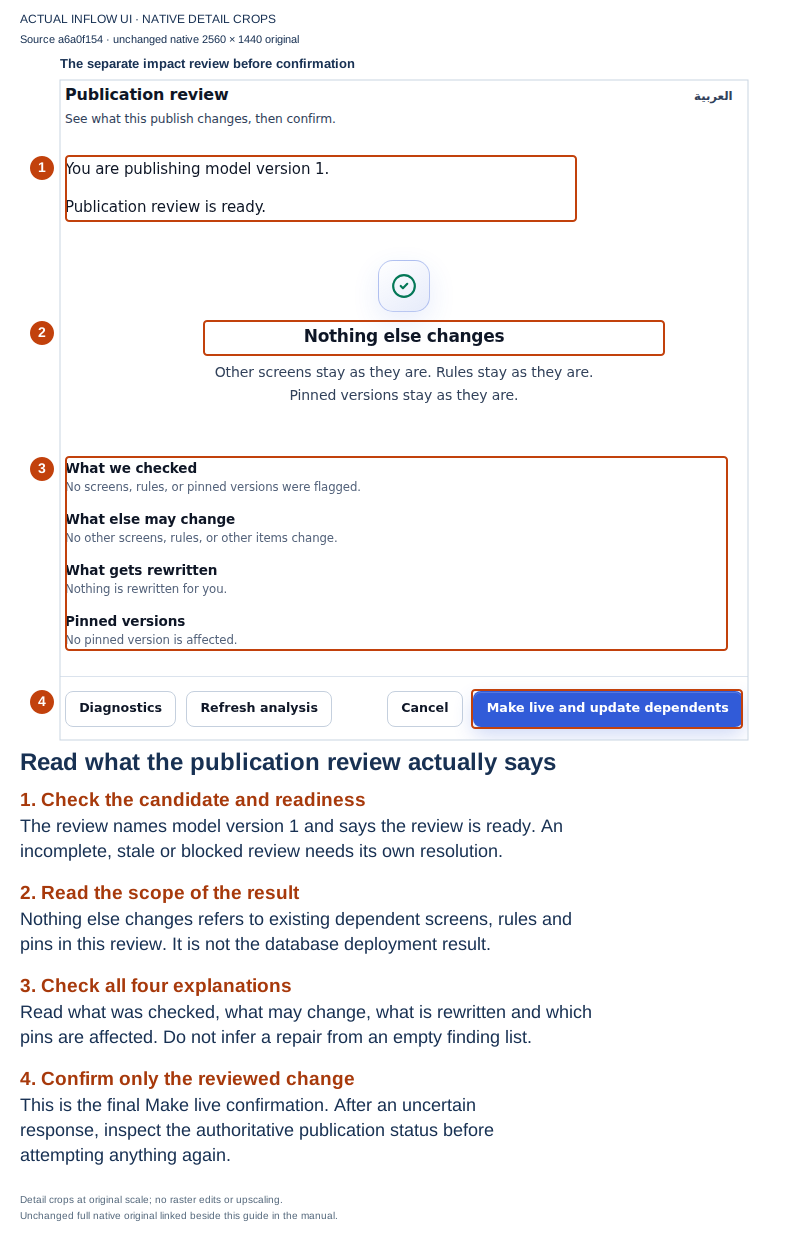
Actual Inflow UI, 17 November 2026, source a6a0f15454, captured at native 2560×1440. The numbered outlines and explanations are editorial guidance over unchanged native details. Open the original or open the full-size guide. Make live and update dependents is the final confirmation for the reviewed activation, separate from the earlier Apply to database step.
5. Check the actual result and the generated functions
Only when both reviews and the intended destination are correct, choose Make live and update dependents once. Wait for the actual result. A returned click, a closed dialog or an earlier v1 badge is not confirmation that the database changes succeeded.
In this sequence the result says Applied - the model is live on training_postgres / cf3_manuals_leave and supplies a live-publication identifier. It also reports CRUD functions, pack version 1, COMPLETE, with 7 ready functions: create, update, delete, list, find by ID, search and count. Read the deployment result and function-pack result separately. A database deployment can finish while a later supporting operation needs attention; do not infer that every function is ready from Applied alone.
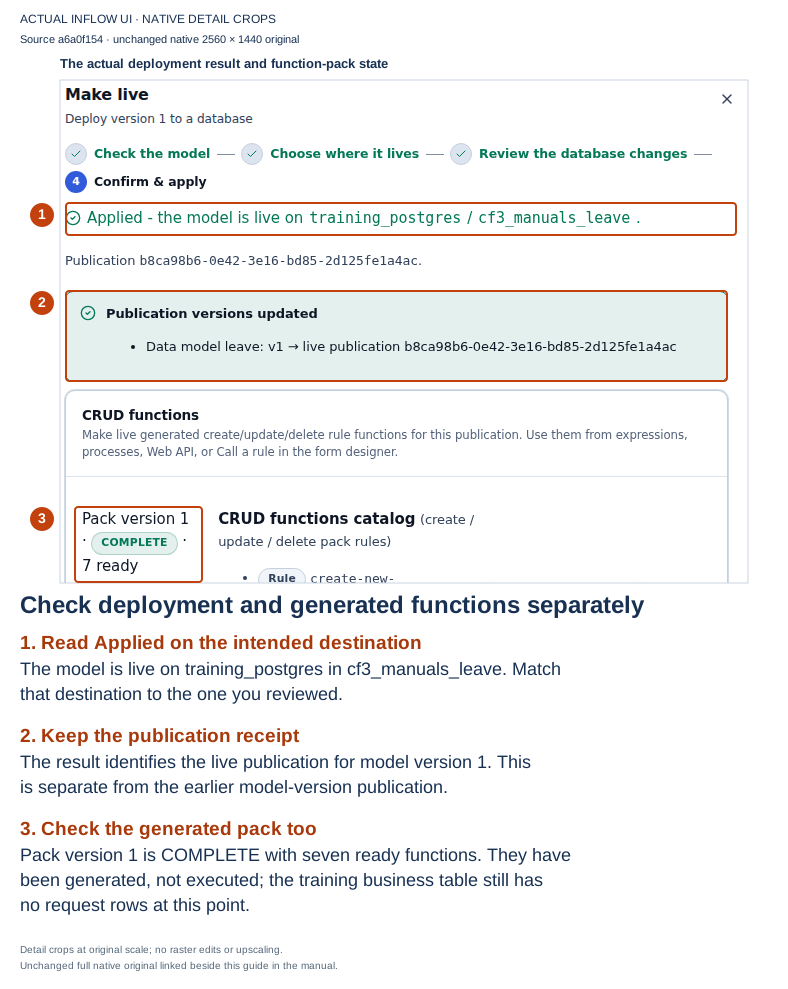
Actual Inflow UI, 17 November 2026, source a6a0f15454, captured at native 2560×1440. The numbered outlines and explanations are editorial guidance over unchanged native details. Open the original or open the full-size guide. The business table had zero leave-request rows at this captured point. Generating functions did not execute them, submit leave or complete an approval.
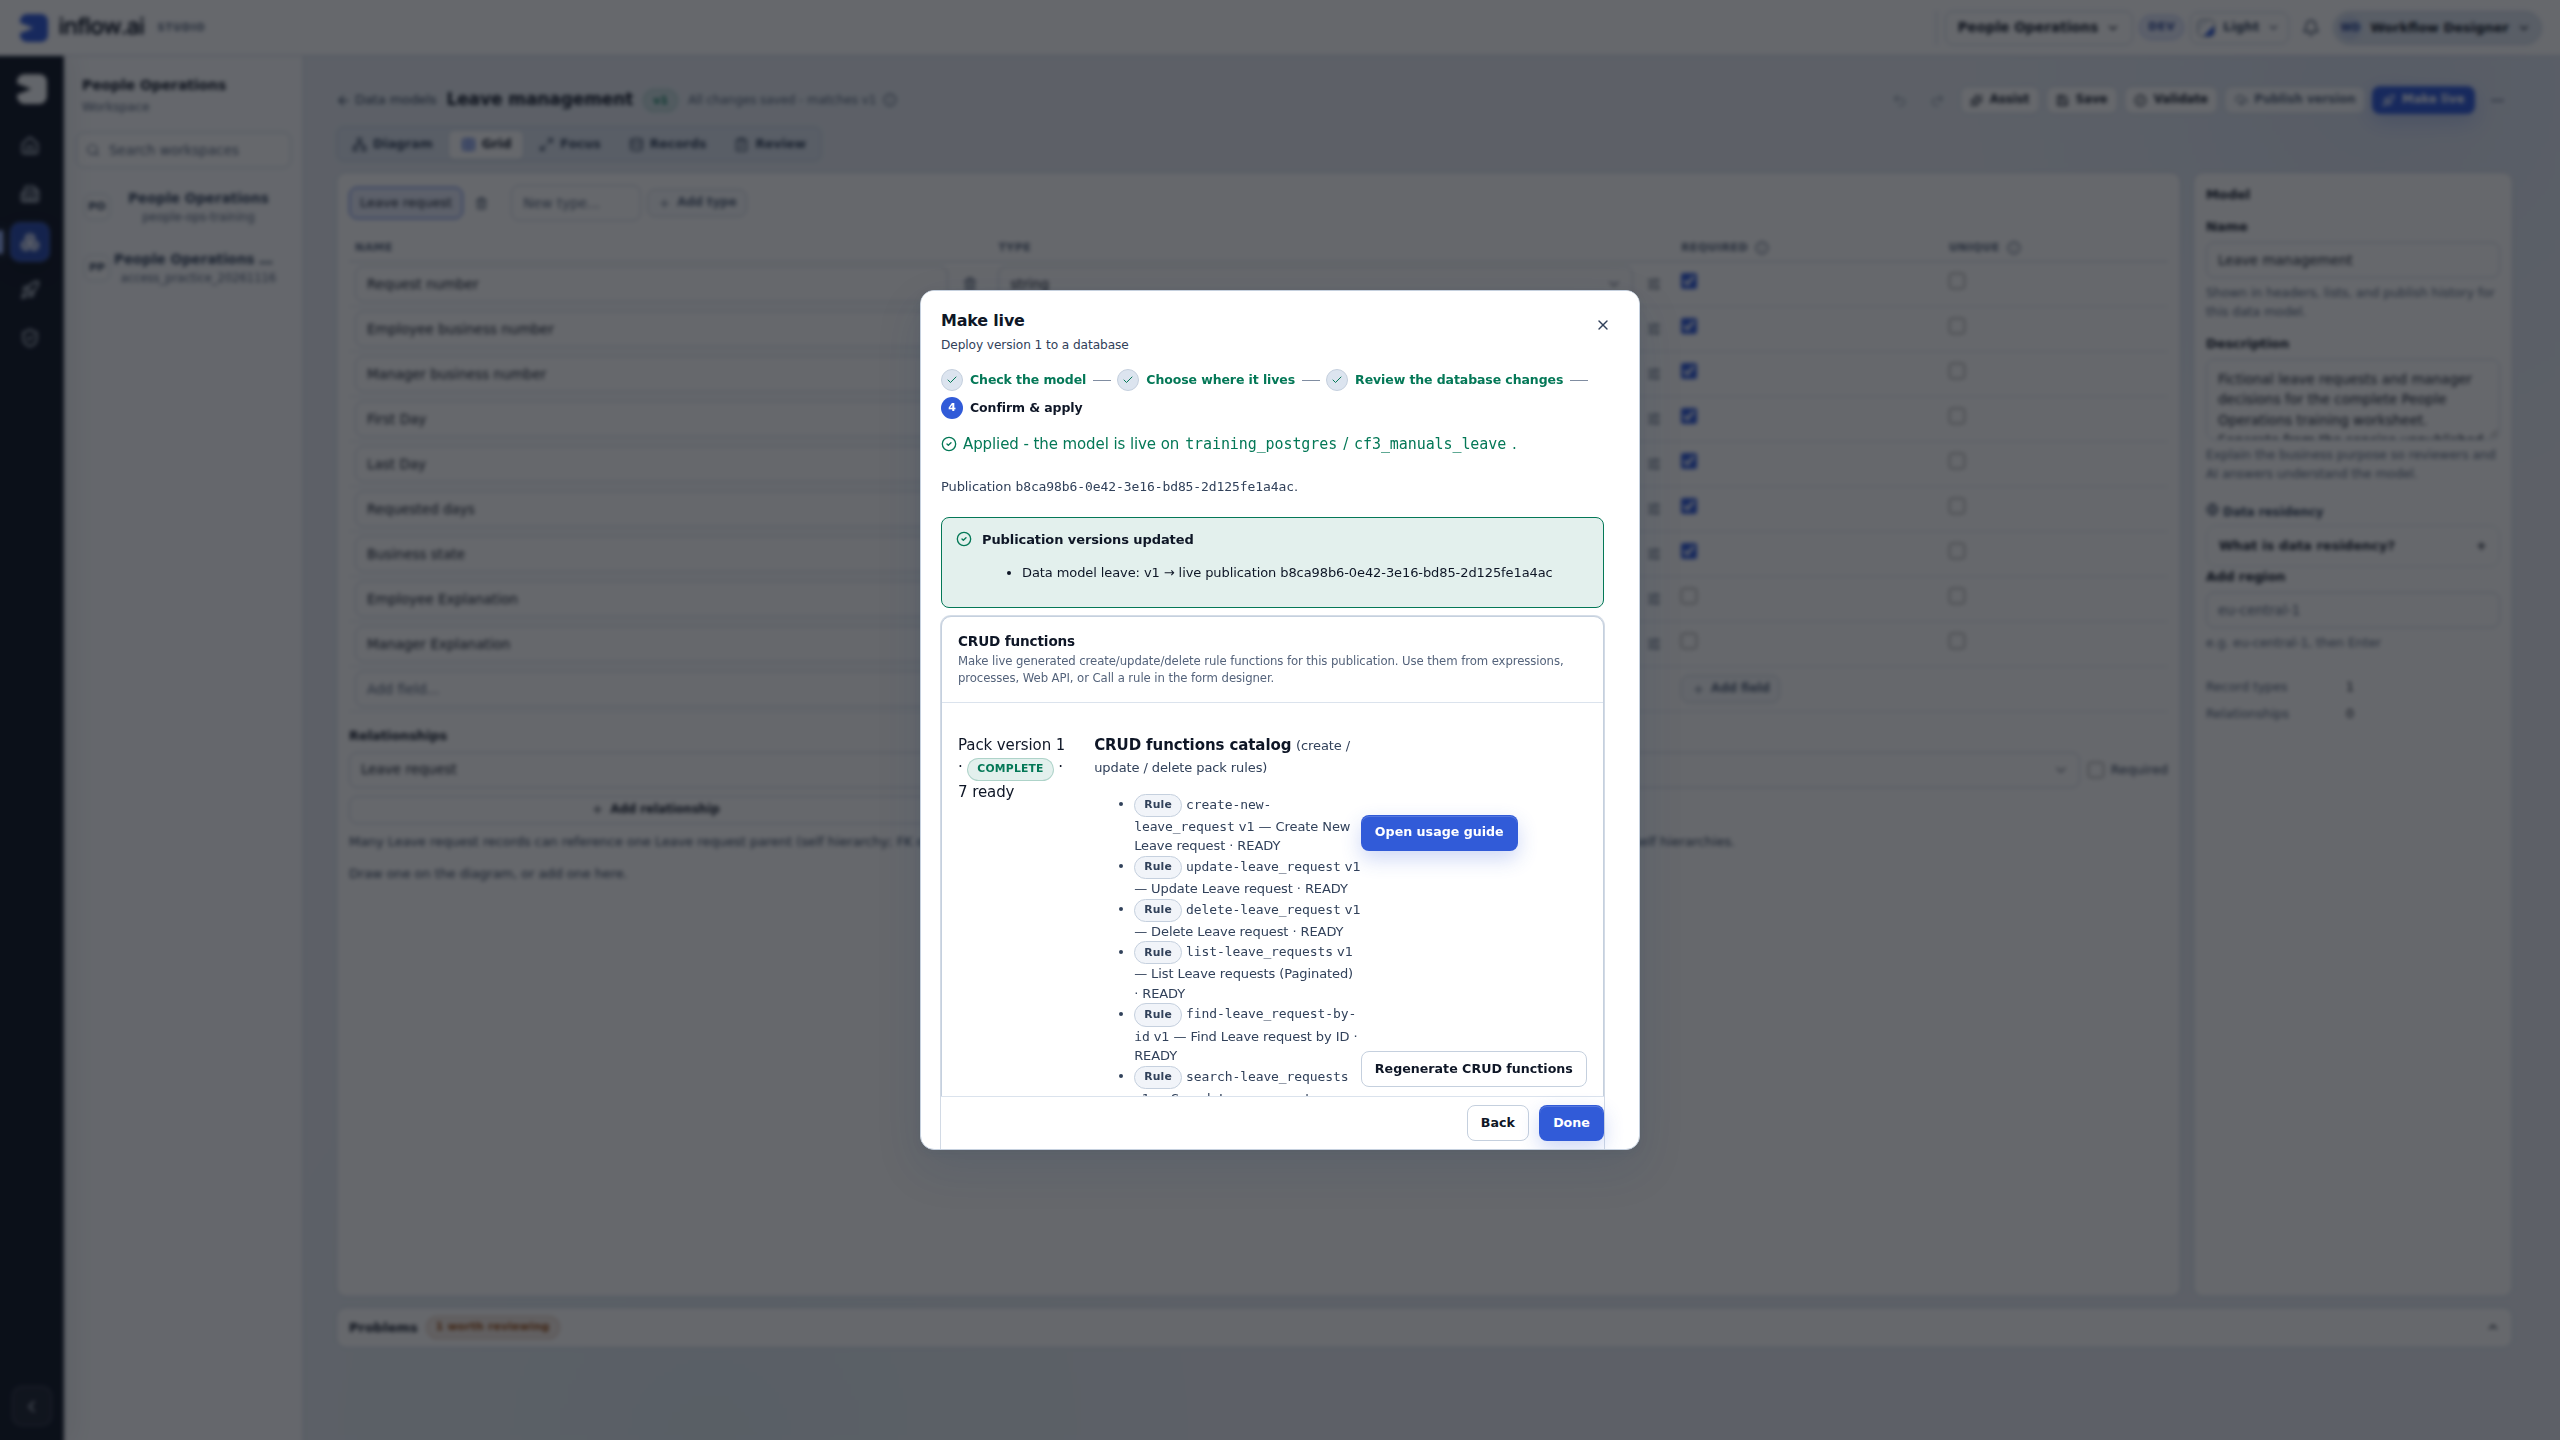
Use Open usage guide to read the functions before configuring an intended caller. Regenerate CRUD functions is a separate consequential action, not a way to create a request or retry an uncertain deployment. Choose Done to close the completed wizard. Records and a screen connection are separate next steps; do not deploy the model again to add the first request.
If a result is interrupted or uncertain, retain the model/version, target and visible publication identifier. Inspect that exact saved attempt through History → Made live before attempting anything again. A failed or pending operation is not an empty table, and a later readable version is not proof that the original request's response arrived. Ask the responsible owner to resolve an unclear attempt rather than creating another version, removing receipts, changing permissions or repeating Apply.
Enter a small fictional worksheet in Records
The earlier design worksheet uses examples such as leave-2026-014, M014 and S002. The illustrated connection exercise below uses a separate, clearly fictional three-row worksheet. Both fit the same nine-field model; they are not the same saved request. Keep an existing exercise's references rather than silently changing its records to match a screenshot.
For this 17 November exercise, the approved destination is training_postgres / cf3_manuals_leave, and the starting count was zero. The request references are short text, so retain leading zeroes:
| Request number | Employee business number | Manager business number | First Day | Last Day | Requested Days | Business State |
|---|---|---|---|---|---|---|
| 014 | EMP-014 | MGR-001 | 14 December 2026 | 16 December 2026 | 3 | Pending |
| 015 | EMP-015 | MGR-001 | 21 December 2026 | 22 December 2026 | 2 | Pending |
| 016 | EMP-016 | MGR-001 | 7 December 2026 | 8 December 2026 | 2 | Approved, training label only |
For 014 and 015, enter Annual leave under Employee Explanation and leave Manager Explanation blank. For 016, enter Fictional worksheet example and Training state only; no workflow approval was performed. These values make the comparison row explicit. Selecting Approved in this editor stores a business value; it does not show that Sara approved anything.
- Open Records in the model and select Leave request. Match Active destination to the approved connection and schema. A successful Make live creates storage, not a business request.
- Search for the first intended request reference before creating it. If a matching worksheet record exists, reuse it. If needed, inspect it through Edit, compare its values and Cancel without saving. If a reference appears more than once or the values differ, resolve that difference with the exercise owner before continuing. This worksheet has not made the request number unique.
- Only when 014 is absent, choose Create record. Read Save directly to the live data-model table: this is a real write to the selected practice destination.
- Enter 014, EMP-014 and MGR-001 in their own fields. The system record ID is generated separately. Do not paste a request number or employee number into a system-ID field.
- Use the two date controls for 14 and 16 December 2026. Read the displayed month, day and year before proceeding. The illustrated browser shows month/day/year; your browser can use another local display order. The calendar value is what matters, not a date-looking string elsewhere on the form.
- Enter 3 requested days, choose Pending, and add the explanation above. Days are the worksheet's business quantity; this editor has not demonstrated a holiday calendar or automatic leave-balance calculation.
- Review all nine fields, then choose Save record once. After the dialog closes, inspect the saved row and the changed count. For this fresh exercise the count became 1. Do not treat the click alone as a confirmed save.
- Repeat the existence check and single-create sequence for 015 and 016 only when each is absent. In the captured exercise the counts became 2 and then 3. Check the third row's training explanation; its state is not a real manager decision.
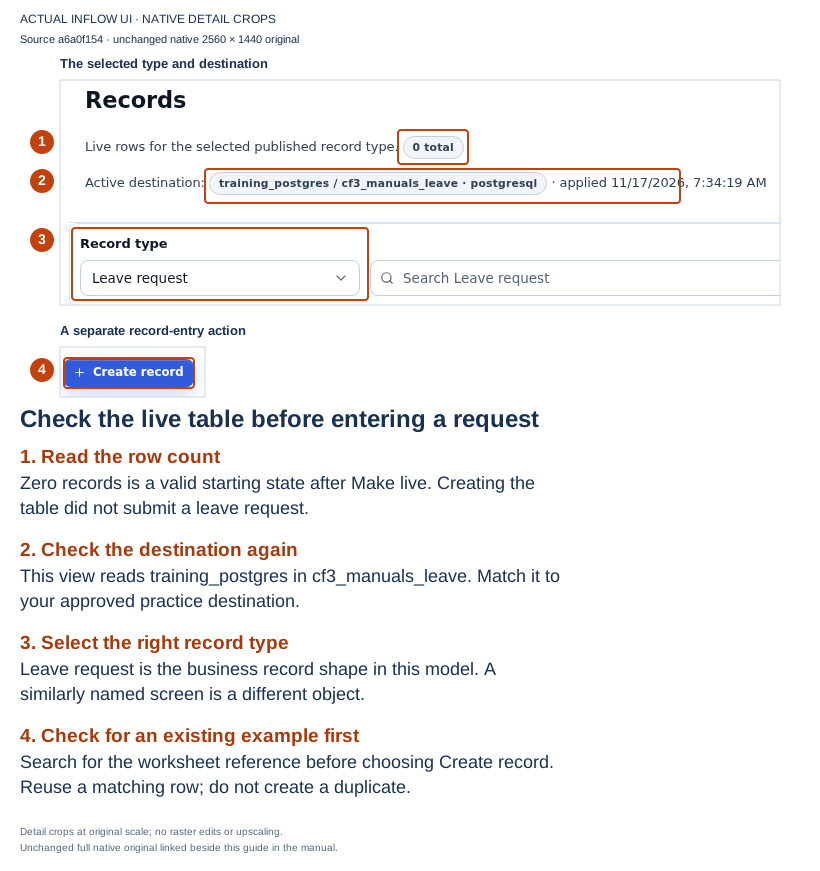
17 November, source a6a0f15454. Native detail crops and numbered outlines are editorial guidance. The full 2560×1440 original is unchanged. Zero is the observed starting count, not a claim that every reader's destination will be empty.
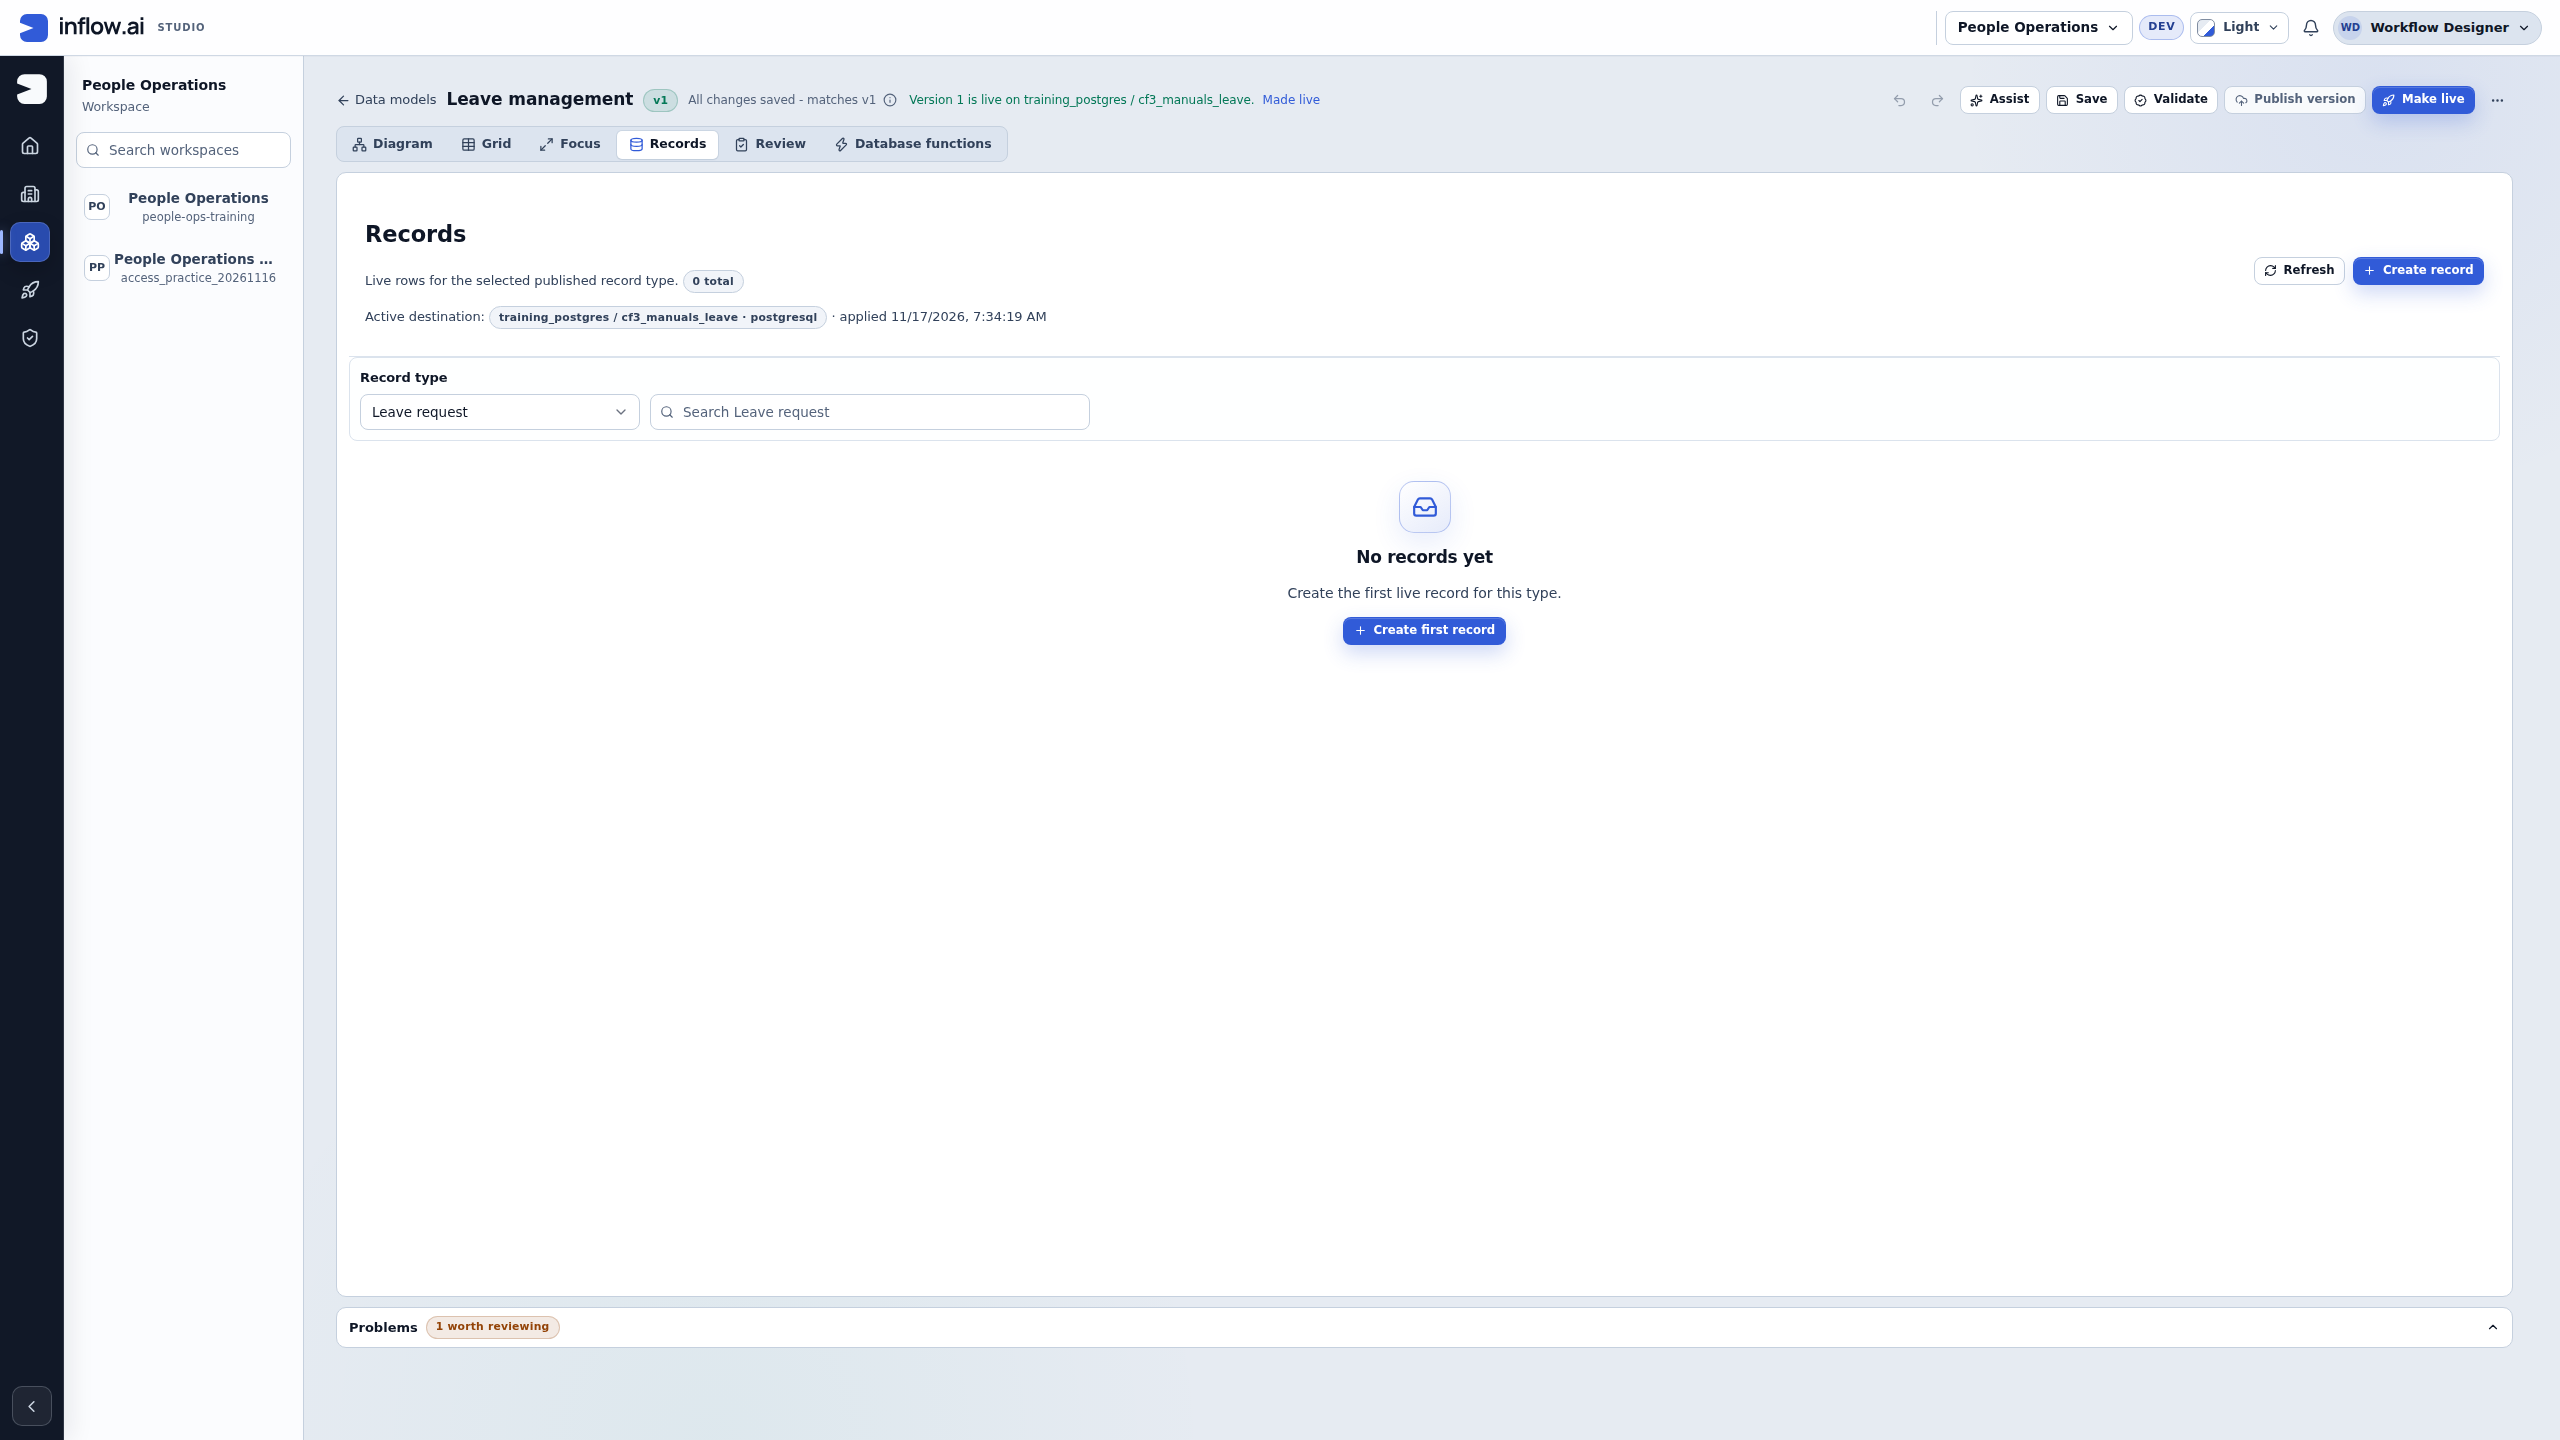
Read the four marks: confirm the count, connection/schema and selected record type before using the create action. An empty table after a successful deployment is different from a missing live table. If Make live failed, investigate that result before adding records.
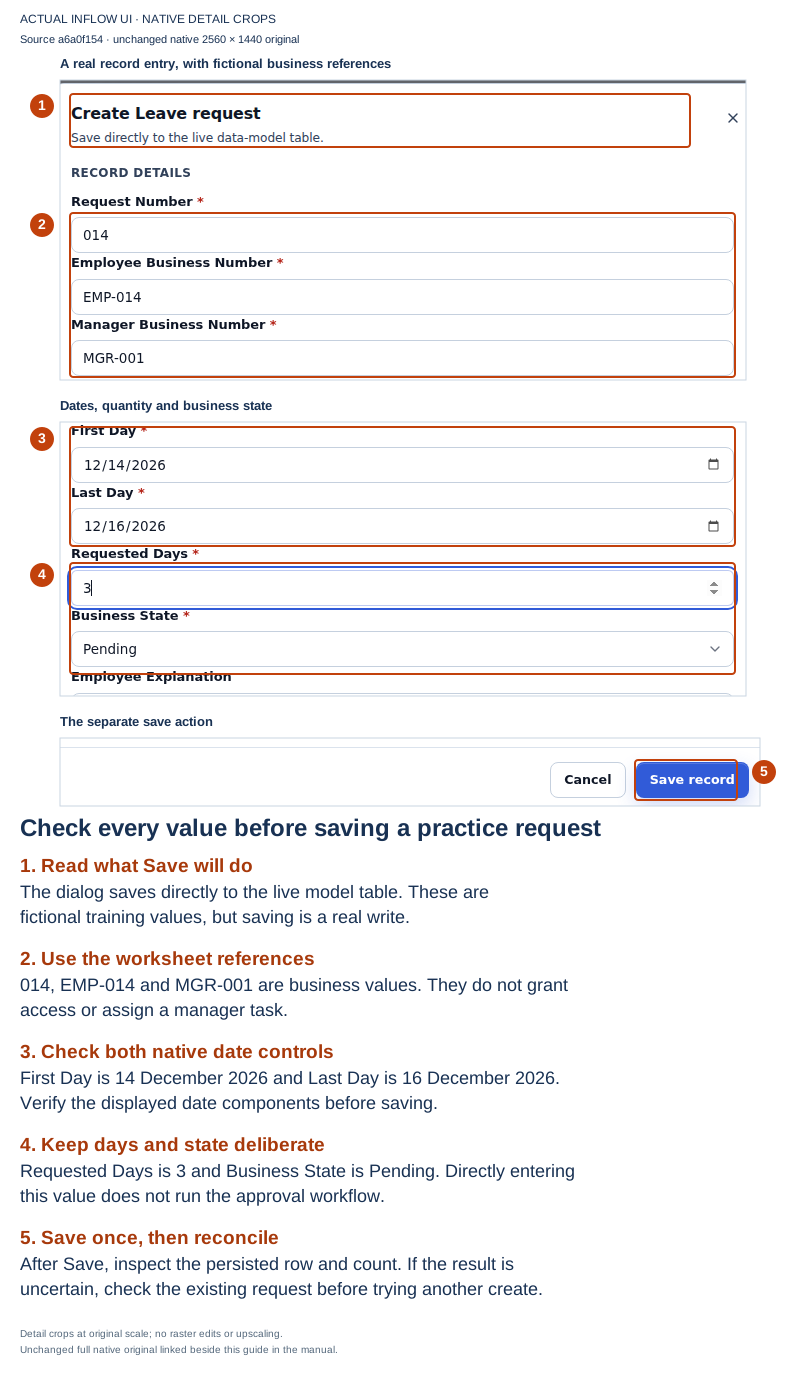
The unchanged native original shows the completed form before the first Save. Both date controls were checked before any write. It is not a captured validation refusal or a completed approval.
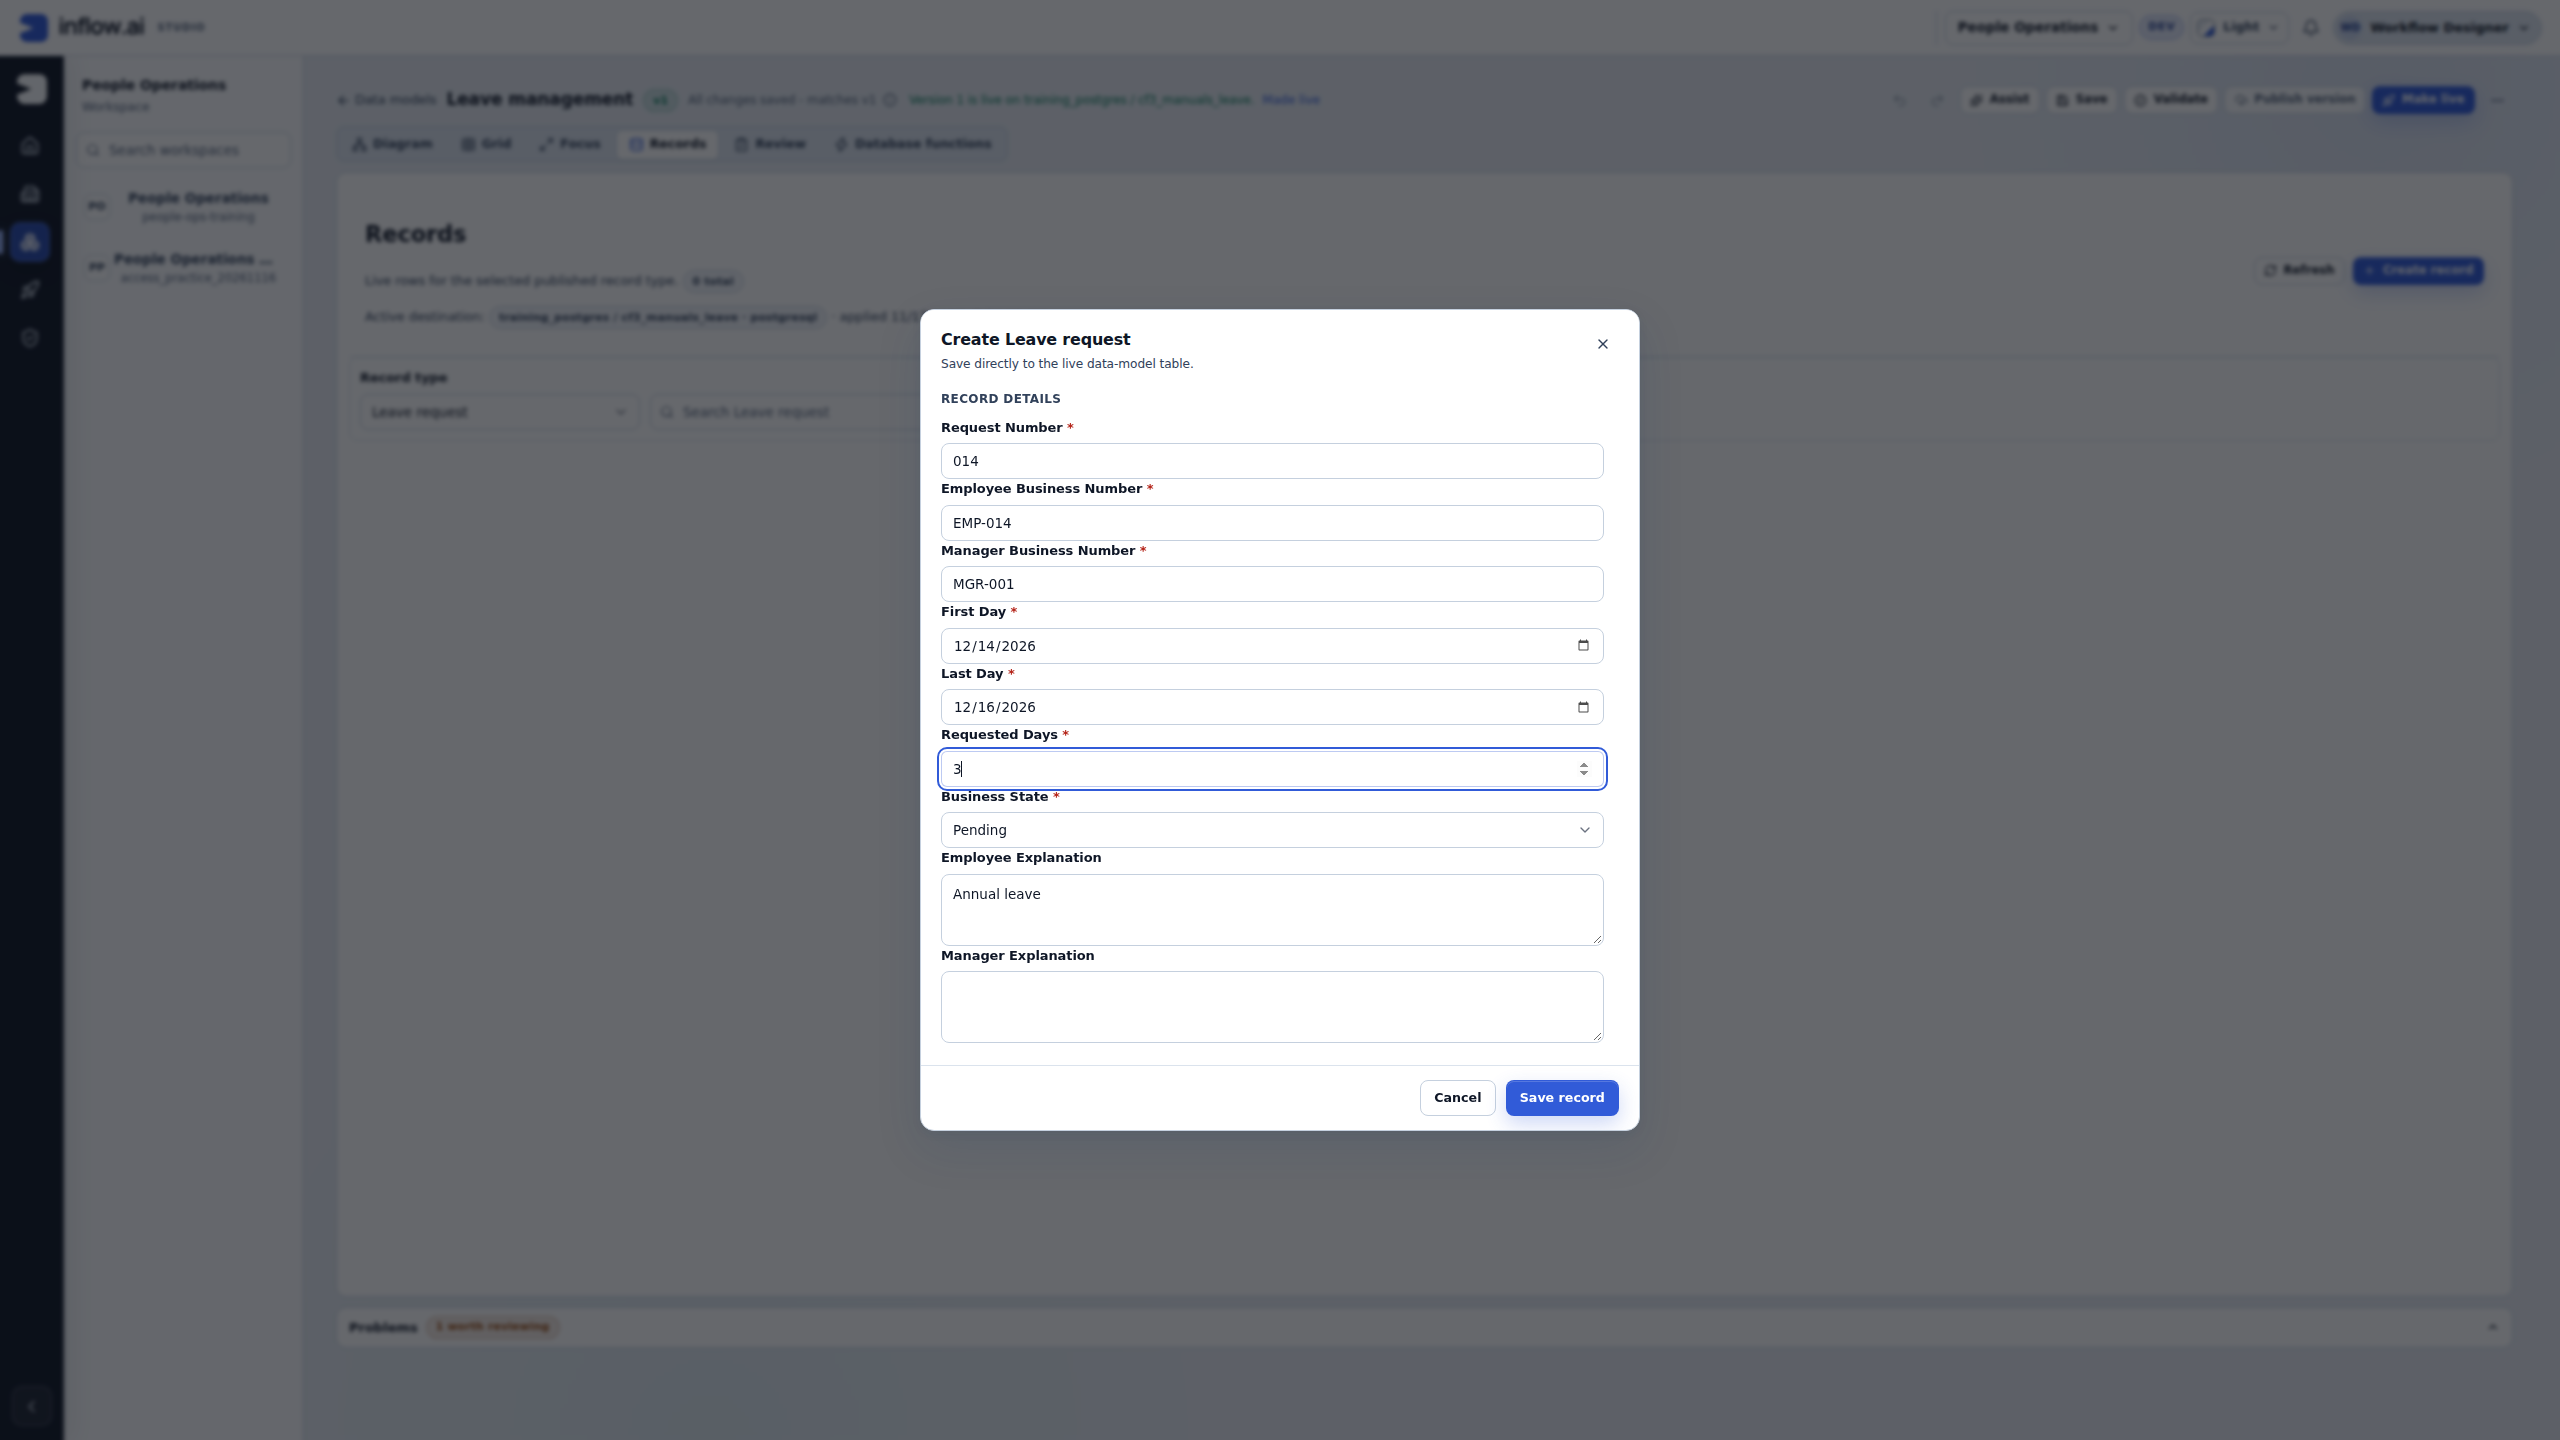
Check before saving: the first and last dates are different controls. Empty or partly entered date segments are not a complete date. Correct them in the same unsaved dialog. If a normal save reports required-field errors, follow the located field messages and retain the other intended values; do not create a second request to repair the first unsaved entry.
Confirm persistence and handle an uncertain response
The compact Records table shows the system ID, business references and dates. It does not show every stored field. Read all the needed values through the supported record view; when using Edit just to inspect, choose Cancel afterwards. Do not add an update merely to prove that a create worked.
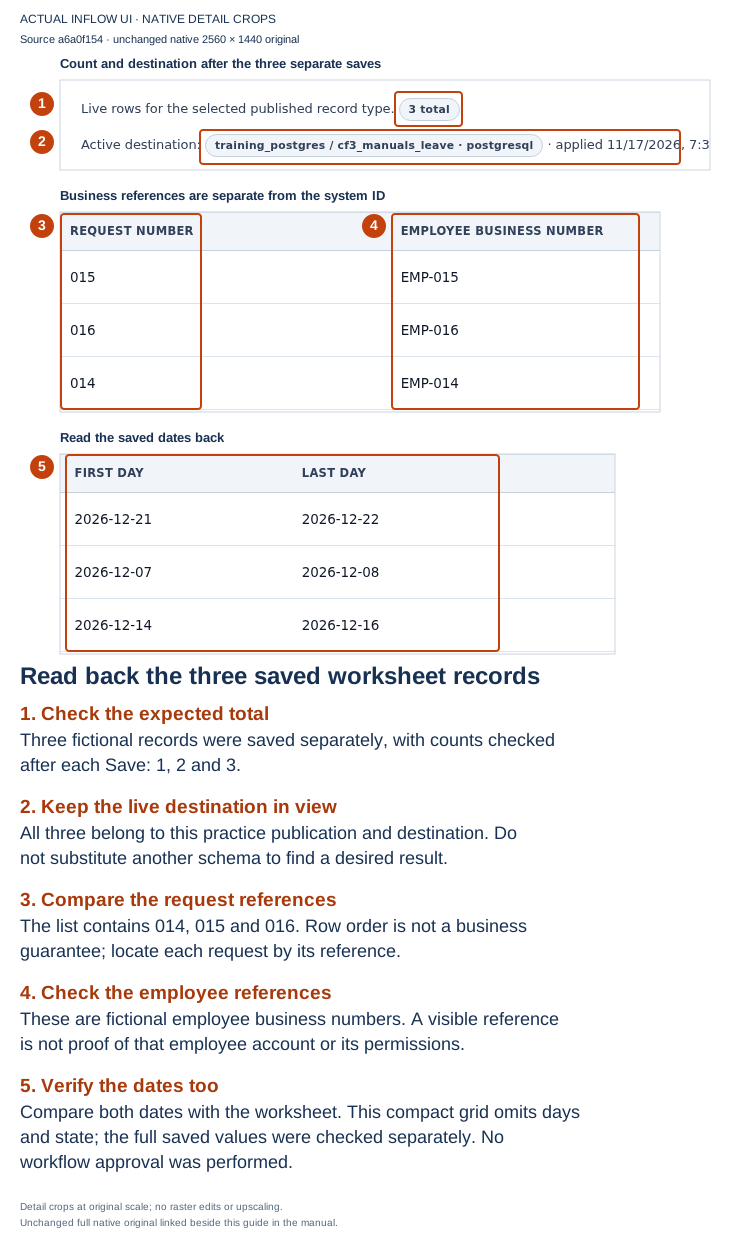
The full original preserves the actual order 015, 016, 014. Each saved row's nine worksheet values was checked separately; the image does not show the omitted days, state or explanations. Direct record entry did not start a workflow or notify a manager.
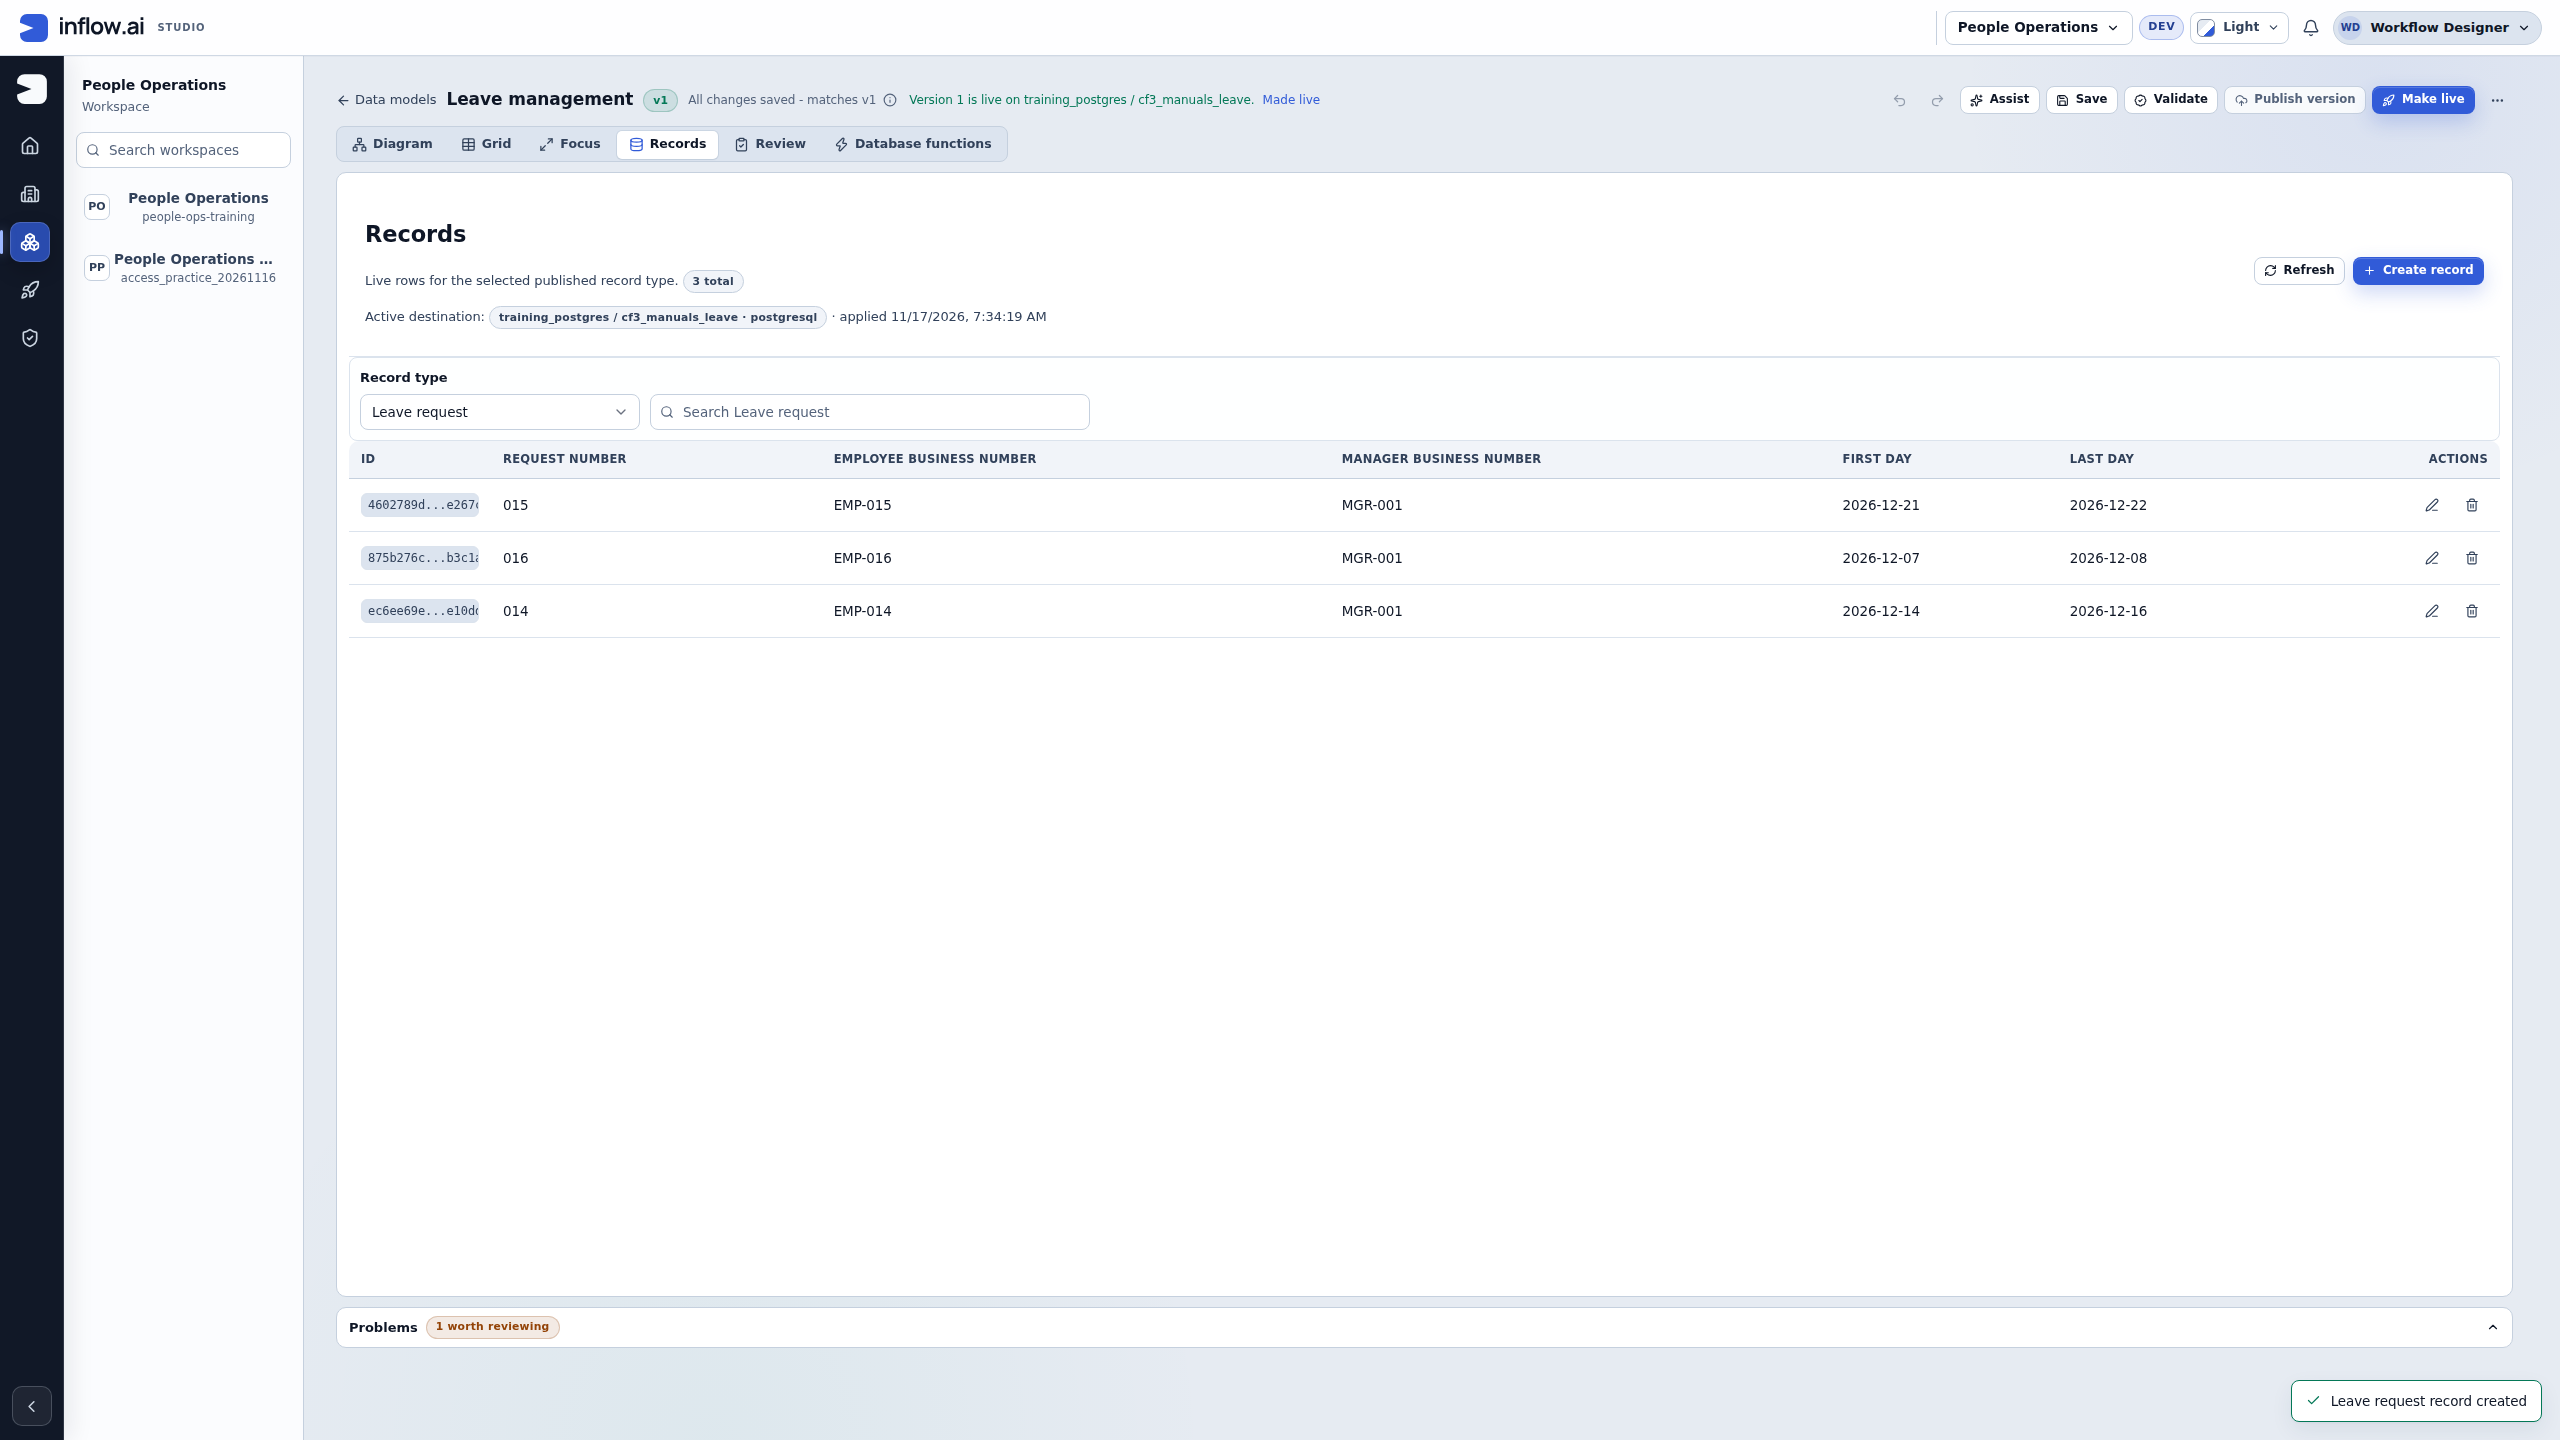
Use the request reference to locate an example, rather than expecting it to be the first row. The system UUID identifies the persisted record; 014 is the business reference. EMP-014 and MGR-001 are fictional business numbers. None of those values grants application access or assigns a task.
If Save times out, the tab disconnects or the result is otherwise uncertain, pause the create sequence. Read the authoritative record list on the same destination and compare the intended reference and values. A row may have committed even when the browser did not receive confirmation. Do not open a new create dialog or change the payload to force another attempt before reconciling that uncertainty with the owner. Preserve the original recovery information.
What you should see: the intended existing records, plus only the missing worksheet records you deliberately created. In this fresh run there are exactly three, with two PENDING values and one explicitly fictional APPROVED value. The record-list tutorial reuses them without creating replacements. The separate data-and-rules tutorial has its own worksheet context; compare that worksheet before crossing between exercises.
Example — Add handover notes later
After testing the first version, Nadia wants a place to describe who will cover the employee's work. She adds the optional handover_notes field to the draft. This is a new field: the initial worksheet already includes the separate decision_comment used for a manager's decision.
- Open the model draft and add the optional text field.
- Save and Validate, then publish the updated design.
- Review Make live for the intended destination. A new optional field is still a change to review; do not assume every design edit applies itself.
- Check an existing fictional request and a newly entered one. The older record may have no handover notes because nobody entered them.
The expected result is a place for handover notes without turning an old blank into invented business information. Changing the model also does not automatically add a comment control to every existing form; update the relevant form deliberately.
Example — allow longer text in a PostgreSQL field
Suppose a fictional PostgreSQL-backed Leave request model has a non-key summary field stored as string, and the team now needs longer free-text notes. PostgreSQL's existing varchar values remain valid when the column becomes text; this specific widening does not shorten or rewrite those values.
Decide whether this is the right change
First compare the business need with the model and destination. The word summary is just a label; it does not prove that the field is independent of keys, indexes or relationships.
| What you inspect | Eligible example | Stop and ask the owner |
|---|---|---|
| Current model type | The published field is portable string; the proposed field is portable text |
Either side is a native/custom SQL type, the current type is unknown, or the draft changes other properties at the same time |
| Selected destination | The reviewed destination uses PostgreSQL | The destination is another database dialect, or you have not confirmed which destination is selected |
| Field dependencies | summary is not a natural/business key, primary-key field, unique field, indexed field or relationship mapping |
The candidate field appears in any of those roles, or you cannot tell from the model and plan |
| Requested change | The team wants to keep all current values and allow longer text | The team wants to shorten values, convert in the reverse direction, or make an unrelated type change |
Only the eligible column above matches this documented case. For example, request_id may look like a text field too, but if it identifies a record or participates in an index, do not infer that it is safe just because PostgreSQL supports the varchar-to-text storage change. The schema planner separately refuses widening for physically dependent fields.
Review and apply the exact destination plan
- In the model draft, confirm the selected model and record type. Read the current Type for
summary, then change only that field from portable string to portable text. Do not bundle a rename, key change, relationship edit or other type change into this review. - Save and Validate the model. Validation checks the design; it does not update a database. If validation reports a different issue, resolve that issue separately rather than treating it as approval for this type change.
- Publish the intended design version if it is not already published. A published version is a saved design snapshot; it is still not the live schema.
- Open Make live for the approved destination. Read the whole Review the database changes plan, including the selected connection/schema, source and target field types, every listed operation, and any other changes in the same plan. Confirm that the candidate is the expected
summarywidening and that the destination is the one the data owner approved. - Stop if the plan includes an unexpected field, table or conversion; if it describes a reverse/shrinking change; if it refuses the candidate; or if the selected destination is not PostgreSQL. Keep the draft and give the data-model/database owner the exact field, current and proposed types, destination, and displayed refusal or plan. Do not retry with hand-written SQL or a different field key.
- Only after the authorized reviewer approves the complete plan, use the normal Confirm & apply step. Read the resulting status and destination. A successful model validation, a published version, or a visible plan by itself does not mean the database change was applied.
- Follow the normal record checks for that destination. Compare existing fictional records before and after, and confirm that their earlier
summarytext remains readable. Enter a new longer sample only if the exercise owner has approved writing to that practice destination; do not use real customer or employee text for this example.
Expected result for the eligible case: the approved PostgreSQL plan treats the summary type change as a widening from the existing varchar representation to text, while retaining the existing field identity and its other column properties. Existing values remain valid; the type change does not invent content for blank summaries. The application's form or other input control may need a separate review if it has its own length limit.
Refusal example — indexed customer code: a fictional customer_code is modeled as string but is also used by an index or relationship mapping. Even if the requested destination is PostgreSQL, preserve the draft and stop at the refusal. Ask the model/database owner to decide whether the field's design should change; do not remove the dependency, drop the index, or rewrite stored values as a workaround for this lesson.
Refusal example — different destination or narrower type: a model is connected to a non-PostgreSQL destination, or a team asks to change text back to string to impose a smaller limit. This example does not establish that conversion as safe. Do not assume another dialect, reverse conversion, length reduction or generic type conversion will preserve data; request a destination-specific reviewed plan from the owner.
If the preview refuses the change, preserve the draft. The owner must inspect the exact field dependencies, current published model and live schema together before preparing a new reviewed change. Never repair the destination manually to make the preview appear to pass.
Example — Show fields in Arabic
The Arabic HR desk shows the same leave requests as the English one. Its people should read «نوع الإجازة: سنوية», not "Leave type: Annual". Translations change only what people read. The stored value stays Annual, so the English app, rules, filters and the AI assistant keep working with it.
- Open the model draft and select the field, for example Leave type (
leave_kind, an enum). - In Properties, find Translations. Type the Arabic label in the Arabic (ar) cell of the Label row.
- For an enum, each option has its own row: type the Arabic label beside Annual, Sick and the rest. Renaming an option (typing over its text) keeps its label; removing an option removes it.
- For a string field whose values come from a known list, such as
status, choose Add value label. Enter the stored value exactly as stored (Pending), then its Arabic label. The field still accepts any text; a value without a label is shown as stored. - Save, Validate and publish a new version. A translation-only change adds no database change to the plan: the change review lists nothing for it.
- An app reads the model version it is bound to. Move the app's tables and chat sources to the new version, through the Make live dependent update or by binding and republishing the app, before you check it.
- Open the app whose language is Arabic. Tables bound to the record type, the App Chat decision card, its receipt and the chat's task list show the Arabic label and value wherever the designer translated them.
What stays in English: a column header the designer wrote in their own words is kept as written; only a header that is the field's model name follows the translation.
Example — An Arabic app end to end: record type, task name and decisions
The model's field translations reach the task page too. A task form's row that shows a model field — its label is the field's model name, such as Leave type, or its input key is the field key, such as requestRef for request_ref — reads the field's Arabic label and value labels in an Arabic app. Three more words are translated where they are authored:
- Record type name. In the model draft, select the record type (Leave request). In Properties, under Description, type the Arabic name in the Arabic (ar) cell of Translations («طلب إجازة»). Save and publish. Like a field translation, this is no schema change. The receipt, the task page's record change and the "this decision also updates" note name «طلب إجازة LR-1006». A lifecycle bound to an older model version still shows it: a translation the bound version lacks comes from the newest published version of the same model, for the same record type and field keys.
- Decision labels. In the form designer, select the Approve button of the task form. Under General, type «موافقة» in Arabic label; then «رفض» for Reject. Save and publish the form. The decision recorded, its id and the value it sets never change.
- Task name. In the lifecycle, open the state's flow and select the user task (Approve leave request). Under Runtime task name, type «الموافقة على طلب الإجازة» in Arabic task name (ar). A step whose task name is computed from data (a runtime-name expression) keeps the computed name in every language.
- Point the lifecycle step at the new form version if it pins one, then save and publish the lifecycle. Workflow words follow the versions a task pins: tasks created before this publish keep their authored words; new cases read the translations.
An Arabic app then shows the translated task name on its task cards and task page, the translated decisions on the buttons and in What was decided, and numbers and dates in Arabic-Indic digits. The AI assistant never reads a translation: it keeps working with ids, codes and the authored words. Person names are record data and are shown as stored.
Common mistakes
- “Published” but no records can be added: finish Make live for the intended destination and inspect its result.
- A field or choice is missing: check the selected model, record type and published version. A change sitting only in a draft is not a completed update.
- Someone else changed the design: reload, compare their work and decide what to keep before saving again.
- Make live failed: open its history and give the responsible administrator the visible failure and intended destination. Do not repair database tables yourself.
- Wrong people can see a request: ask the owner to review record access. A query filter or an employee-number field is not a security setting.
Continue
Build a query for pending requests, then connect a screen to the data. The connected leave tutorial combines these steps.
Database administrators and developers can use the optional technical publishing reference.