Organize documents for an application
Documents gives an application a shared library for policies, letters, supporting files and other business material. You can organize files, upload a correction as a new version and let the right people find the file they need.
This guide uses a Leave evidence folder and a fictional approval letter. It is for consultants configuring and using the document library, not for administrators configuring storage.
Learn the library's four terms
| Term | Meaning | Example |
|---|---|---|
| Cabinet | A top-level library in the workspace. | People Operations documents. |
| Folder | A place inside a cabinet used to organize files. | Leave evidence. |
| Document | The continuing business file. | Leave approval for request 014. |
| Version | One particular uploaded edition of that document. | The original letter, followed by a corrected letter. |
A folder name is not a permission. Two workspaces can have folders with the same visible name. Work in the intended workspace and choose actual resources through their pickers.
Before you begin
Your administrator must prepare the document service and the access you need. Creating cabinets, creating folders, reading files and uploading corrections can require different rights. Use a small fictional Word document for the examples; keep real confidential personnel material out of a training exercise.
If your task is simply to upload a file to an existing application form, use that form's allowed upload control. You do not necessarily need permission to create a new cabinet.
Create a clear place for the files
- Open the intended workspace and Documents.
- Select the cabinet you are allowed to use. If you are responsible for creating a new one and New cabinet is offered, choose it.
- In the cabinet dialog, enter a readable Name, such as People Operations documents, and an optional Description explaining its purpose. Create the cabinet and confirm it appears in the correct workspace.
- Select the cabinet or intended parent folder and choose New folder.
- In Create folder, enter Leave evidence as the Name. Check the displayed destination before creating it.
- Open Leave evidence. Confirm the library's location before uploading a file.
Check your result: the folder is in the intended cabinet and parent location. A similarly named folder elsewhere is not the same destination. If the creation controls are absent, ask the owner for the intended folder or responsibility rather than broadening your access unnecessarily.
Upload and inspect a document
- Open Leave evidence and choose Upload or the empty-folder Upload documents action.
- In Upload documents, select a fictional file such as Leave approval.docx.
- Read any file type, size or batch warning. If a Display name is offered, use a business-readable title rather than adding sensitive information to the filename.
- Start the upload and wait for each file's displayed result. A selected file is not yet a stored file.
- Open the document details. Check the name, current version and intended folder.
- Use Preview to read the document. If preview is unavailable for its type, use Download where you have access and open it in an appropriate application.
Do not assume that every preview-capable file looks exactly like it does in its original desktop program. Check the actual pages and layout before relying on a business letter.
Illustrated practice: keep a letter's correction history
Nadia is preparing a fictional supporting letter. Its first edition says the leave ends on 17 December 2026; the correction must say 18 December 2026. She needs one continuing Word document with both editions in its history. Later, she will make a PDF from the corrected current edition.
The pictures use a separate Document library practice 20261116 cabinet and its Leave letters folder in the People Operations training workspace. Keep this exercise separate from the Leave evidence folder and the later restore, Trash and move examples. Use your own approved practice location and fictional files; creating another cabinet is unnecessary when the workspace owner has already supplied one.
Prepare two small local Word files before starting. Both can be called Leave approval practice.docx in different local folders, but read their contents to distinguish them. The first says Leave ends: 17 December 2026 and the corrected file says Leave ends: 18 December 2026. Keep the employee and reviewer explicitly fictional. A matching filename does not tell you which edition you selected.
Create the practice location
- Confirm People Operations is the intended training workspace, then open Documents. Check the workspace name before using a library with a familiar name.
- If the owner has authorized you to create this separate practice cabinet and New cabinet is offered, open it. Enter Document library practice 20261116 as Name and a short synthetic-training description. Choose Create cabinet once.
- Select the created cabinet. Upload can remain unavailable while only the cabinet is selected: files need a folder destination. Choose New folder, enter Leave letters, and choose Create folder once.
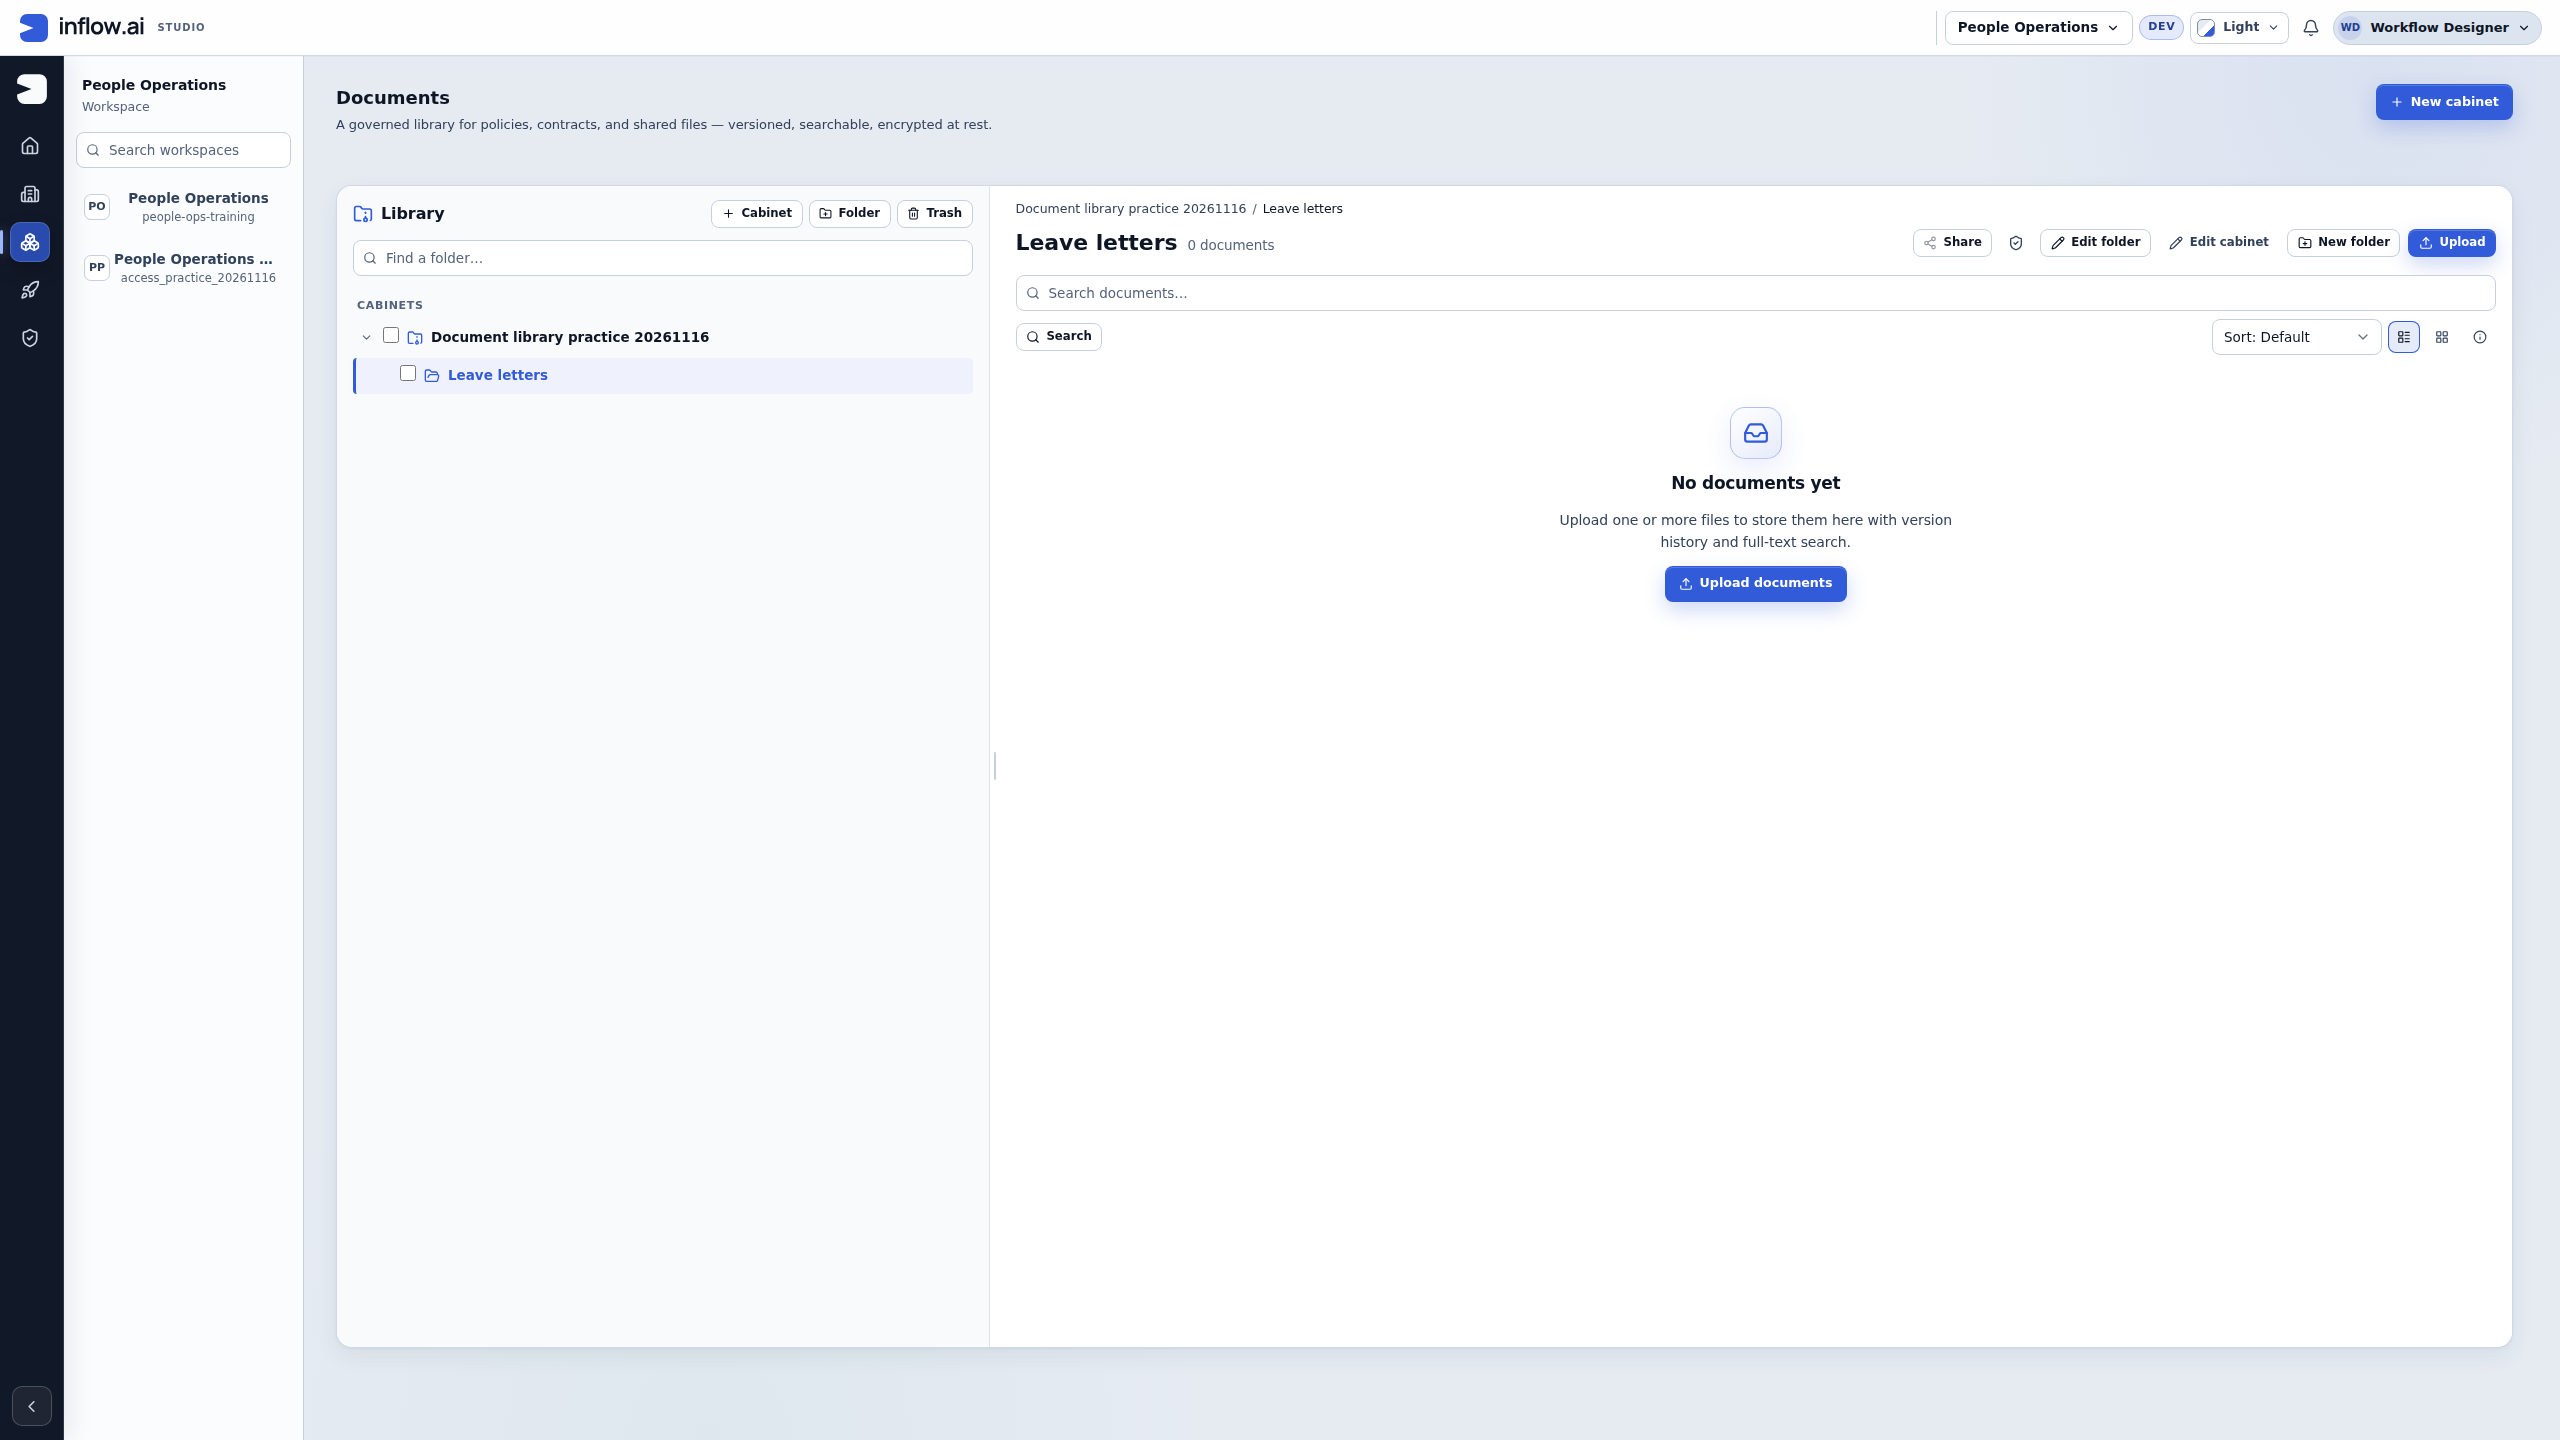
- Open Leave letters. Read the cabinet name in the breadcrumb, the folder heading and its document count. This example starts with 0 documents and No documents yet.
- Check that Upload is offered for this destination before choosing a file. If it is absent, ask the owner for the intended writable folder instead of changing permissions or creating a public copy.
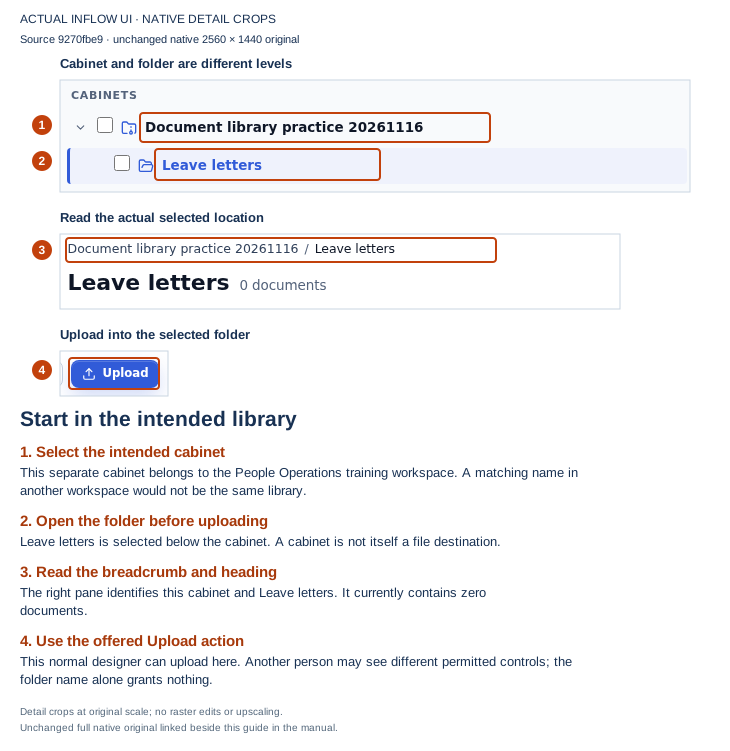
Read the location before acting: the cabinet contains the folder; the folder is the upload destination. The same words in another workspace would identify a different location.
Open the unchanged full-size screenshot.
Upload the first edition
- In the empty Leave letters folder, choose Upload. The empty-folder Upload documents action opens the same upload dialog.
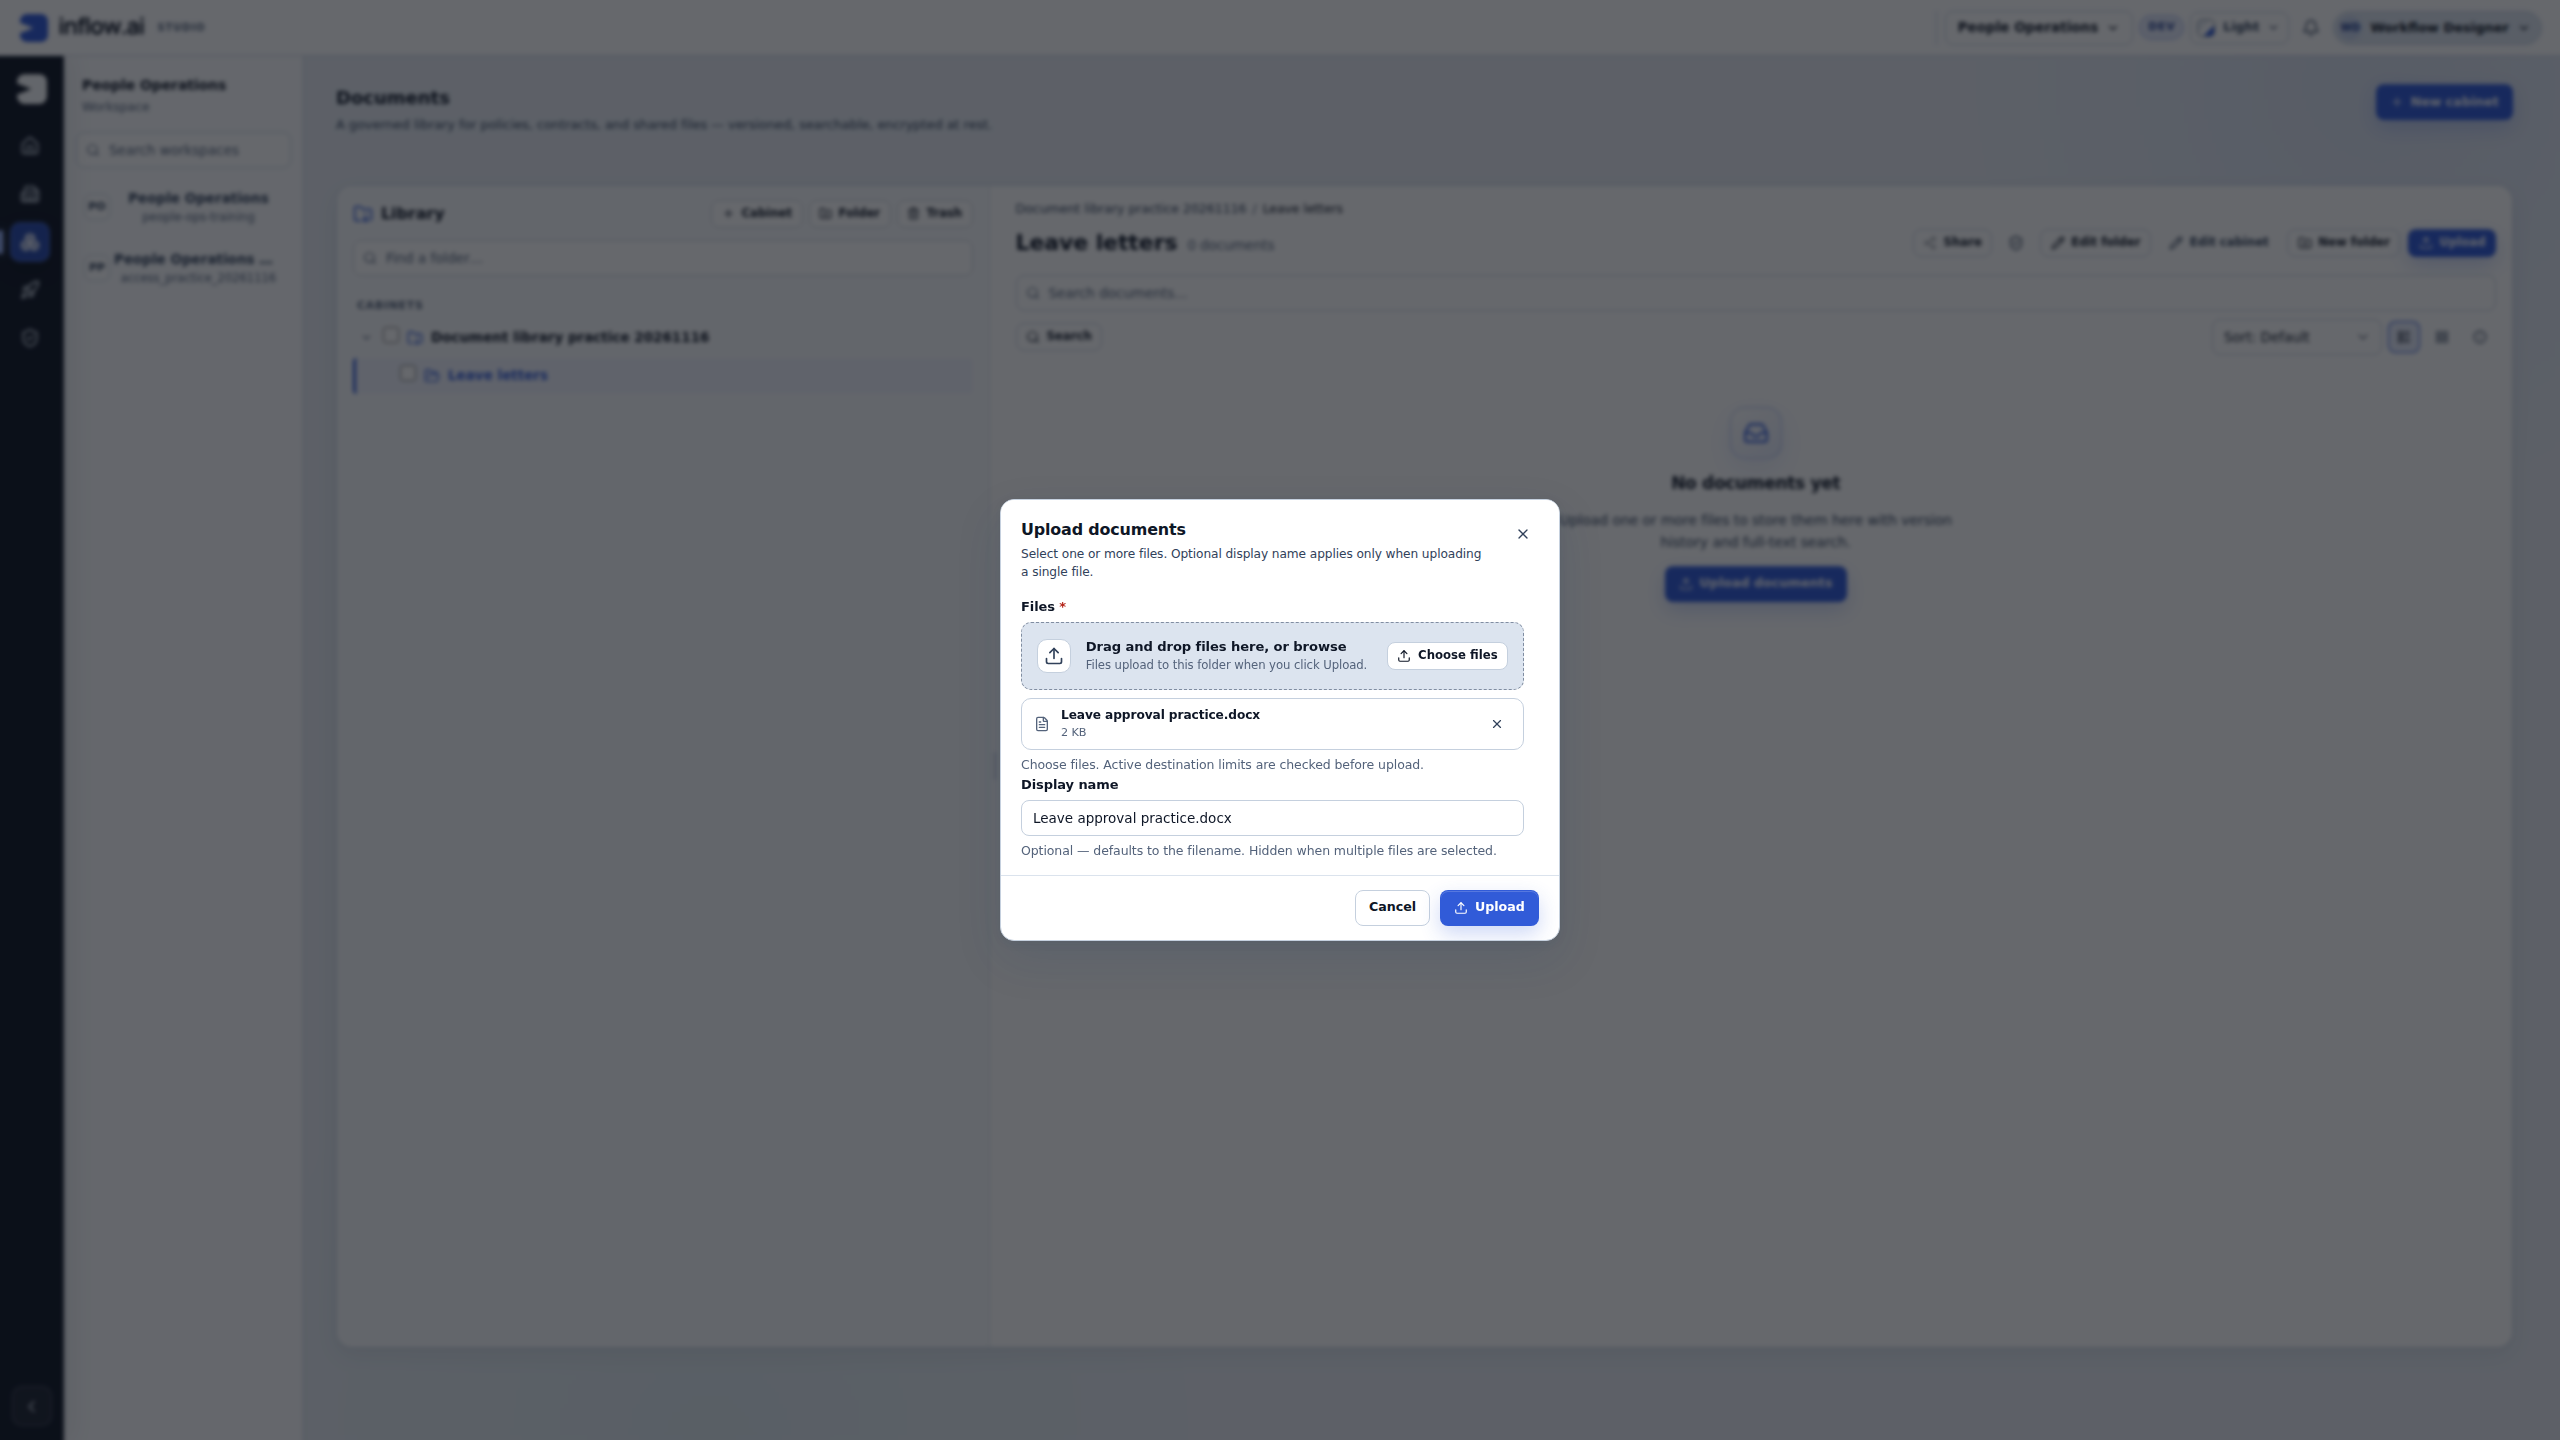
- Under Files, choose the first Leave approval practice.docx. Check its selected-file chip. If you chose the wrong local edition, remove that selection and choose the intended file before starting the upload.
- Read Display name. Here it defaults to Leave approval practice.docx. Keep that name for the practice. The optional title does not change the Word contents or grant access to another person.
- Read any active type, size or destination limits. This practice selects one small Word file. The multiple-file outcome and recovery controls discussed later are a separate situation.
- Choose Upload once. Wait for the outcome. In this successful single-file example, the dialog closes and the document appears in the folder; you do not need to keep waiting for a permanent progress banner.
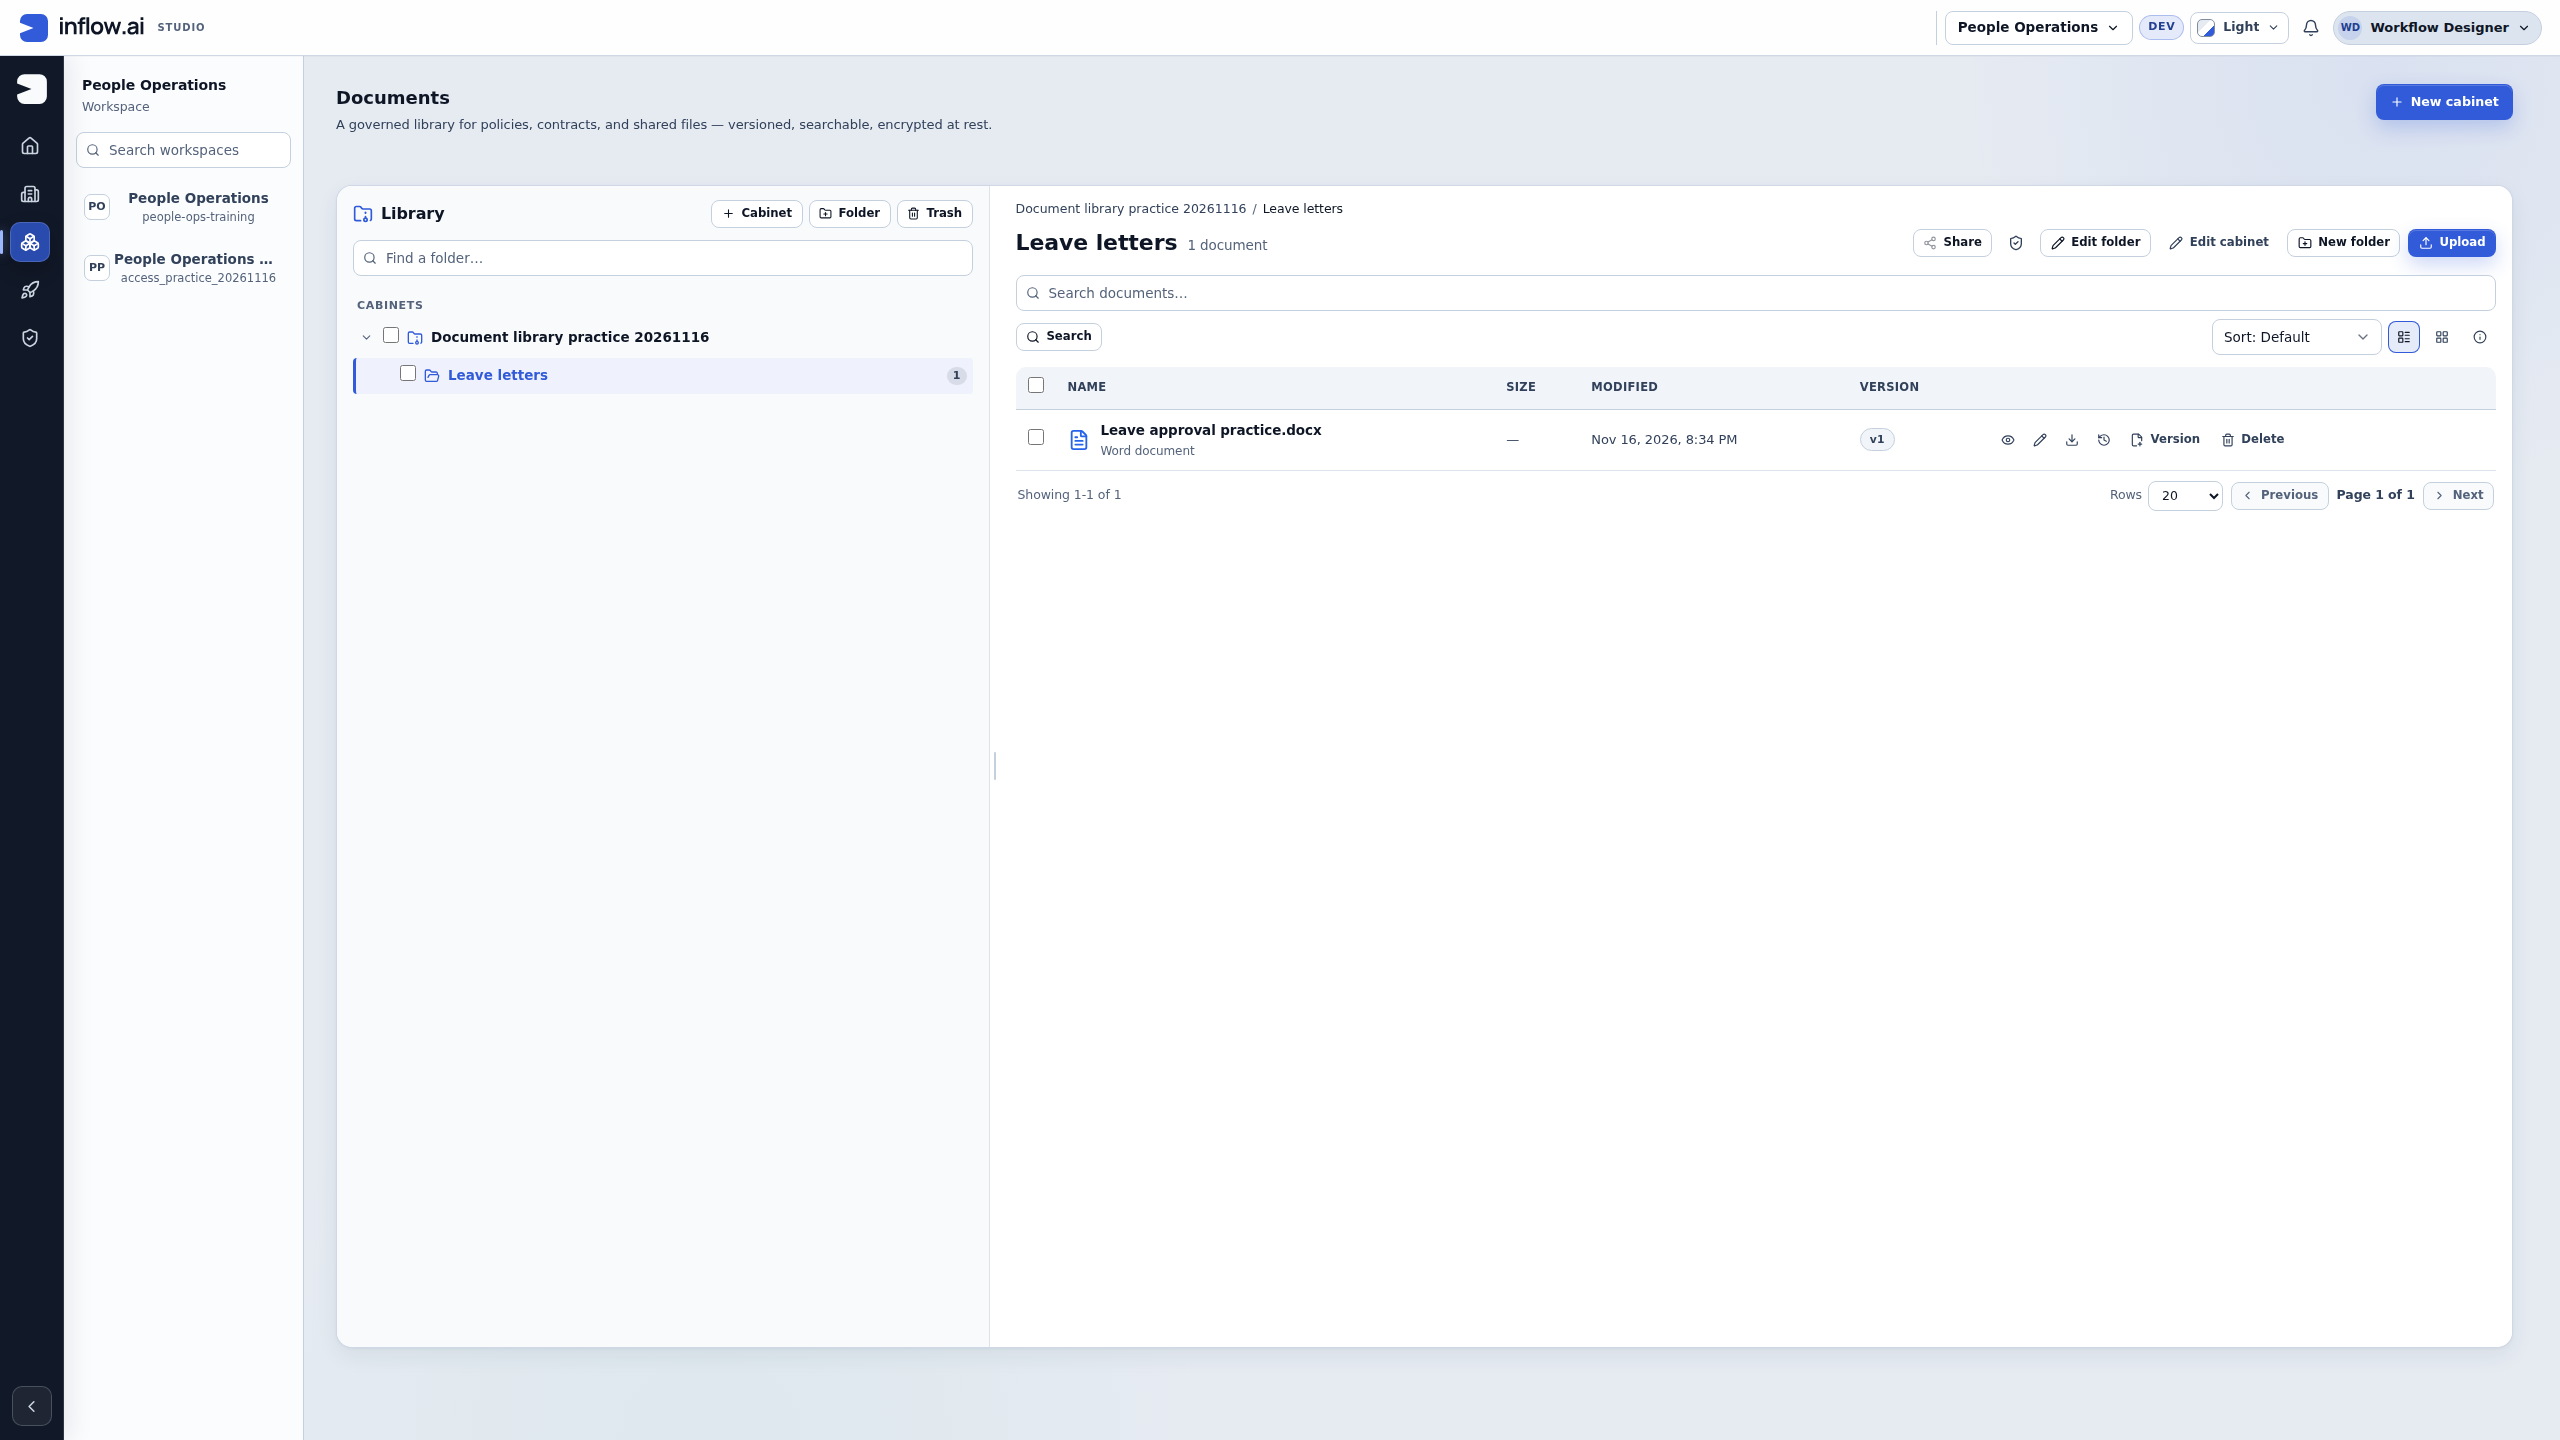
- Find Leave approval practice.docx in the resulting library list and read v1 in the Version column. The folder now contains 1 document. Use the permitted Download action when you need to inspect the actual Word contents in a suitable reader.
- If a response is lost or an error appears, reconcile the existing folder and version history before uploading again. If the intended file is already stored, another upload can create another edition rather than repair a missing one.
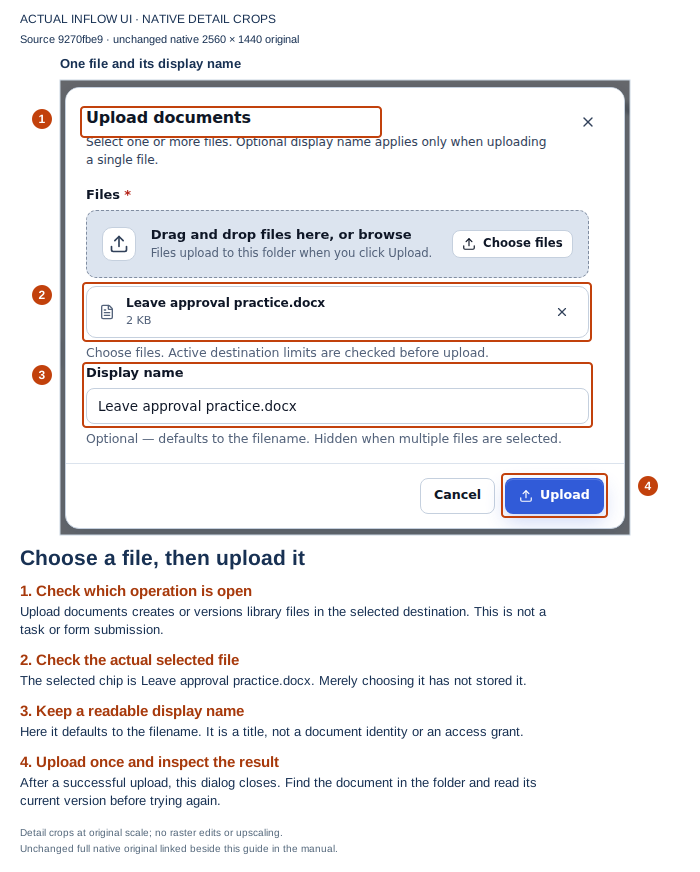
Selection comes before storage: the file chip and display name are ready, but the upload has not started in this picture. Read the local file before relying on its filename.
Open the unchanged full-size screenshot.
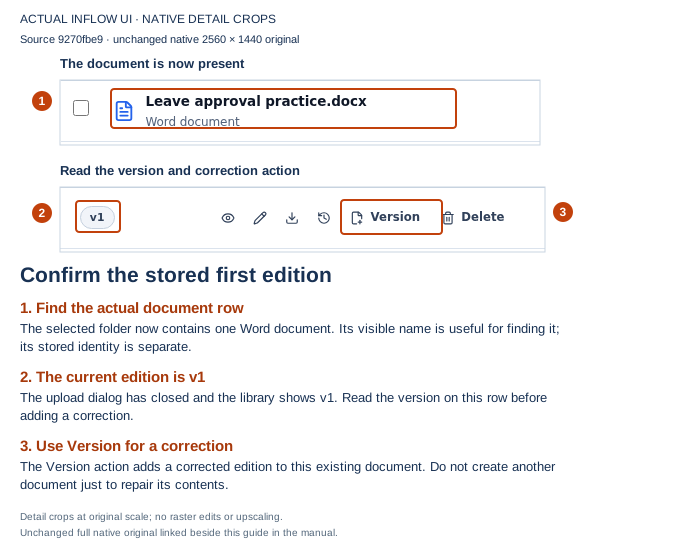
Confirm the stored result: the upload dialog has closed and the Word document is present at v1. The row’s Version action is the next step for a correction to this same document.
Open the unchanged full-size screenshot.
Correct the same letter and check Versions
- Read the corrected local Word file and confirm it says 18 December 2026. Leave the original local edition available for comparison.
- On the existing Leave approval practice.docx row, choose Version, whose accessible name is Upload new version of Leave approval practice.docx. Do not use a new filename to create another library document.
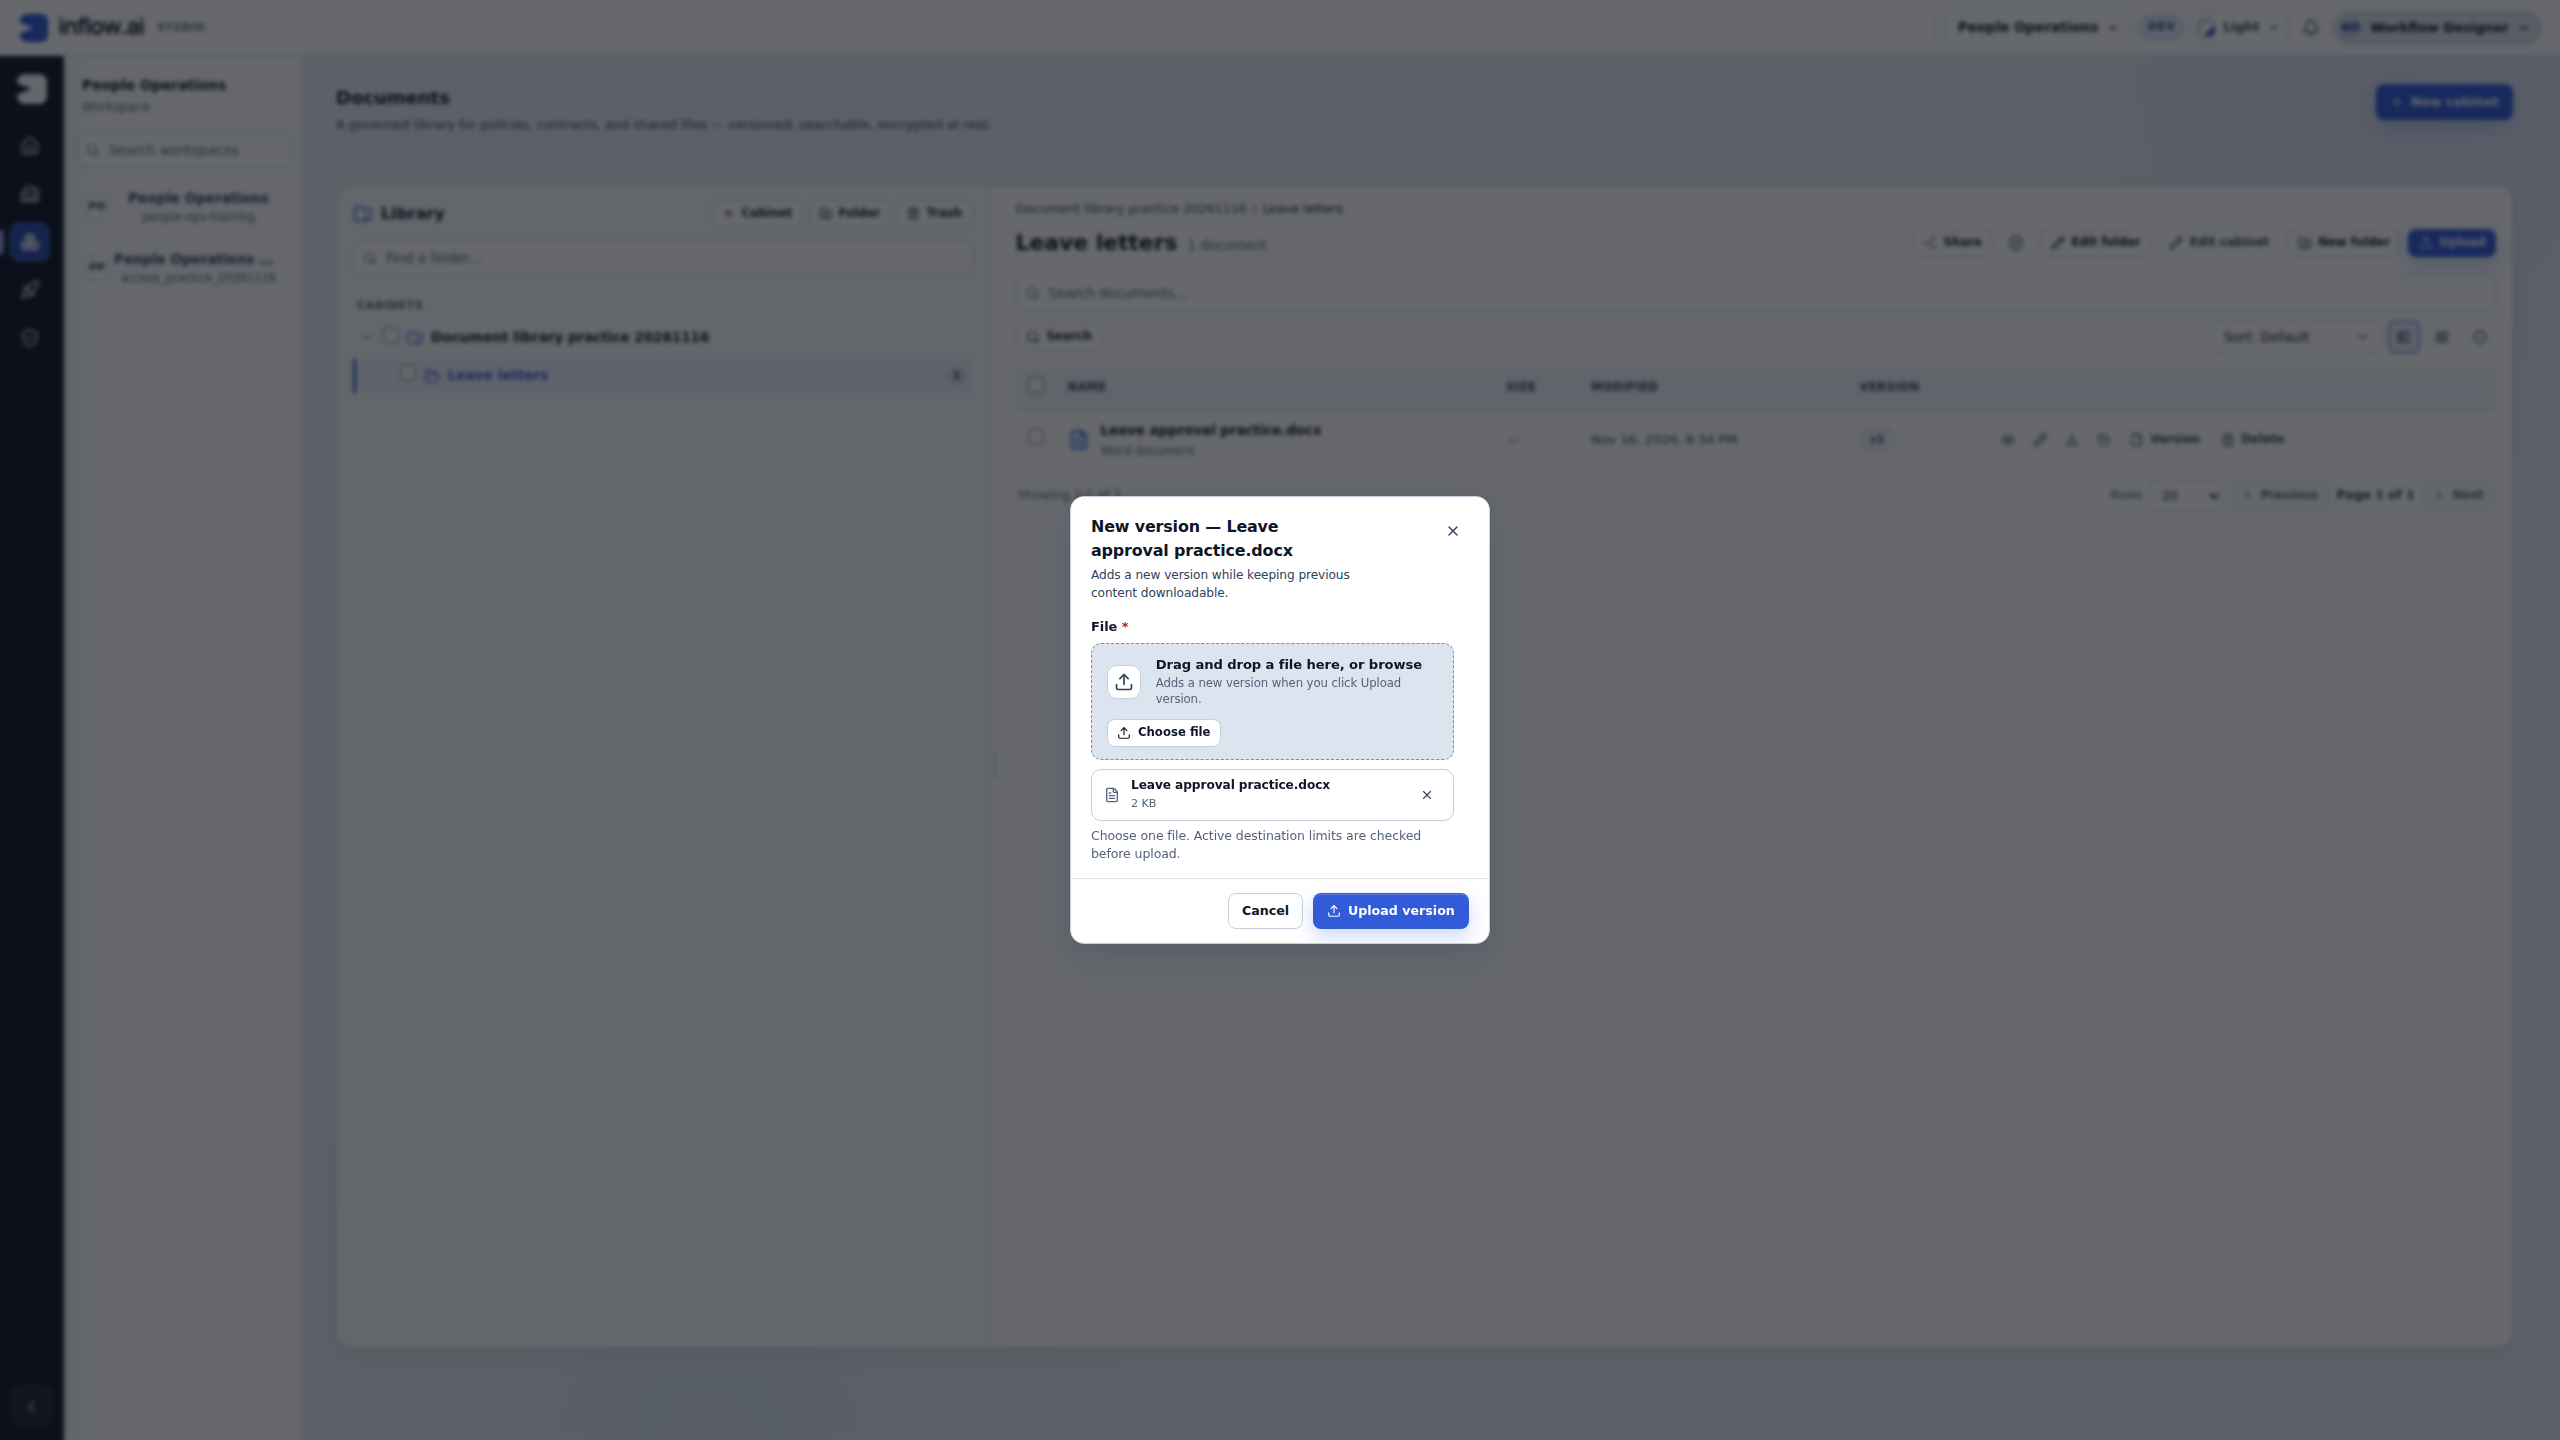
- Read New version — Leave approval practice.docx at the top of the dialog. Its explanation says the earlier content remains downloadable. The dialog identifies the existing document that will receive the correction.
- Choose the corrected local file. The filename may be identical to the first edition, so use the file you inspected rather than guessing from that name.
- Choose Upload version once and wait for the library to show v2 on the same Word document. In this practice the completed dialog closes automatically.
- Open the row’s Versions action. The drawer lists v2 and v1 under the same document name, with their own upload information. Upload new version in this drawer would add another correction; it is not needed merely to inspect history.
- Check the current edition and the earlier edition separately through the permitted version actions when required. Restore version 1 would make earlier contents current as another new edition; leave it alone when the intended correction is already v2.
- If the current version is uncertain after an interruption, reopen the same document’s Versions view and inspect its actual contents before any retry. Do not create v3 merely because the first confirmation was missed.
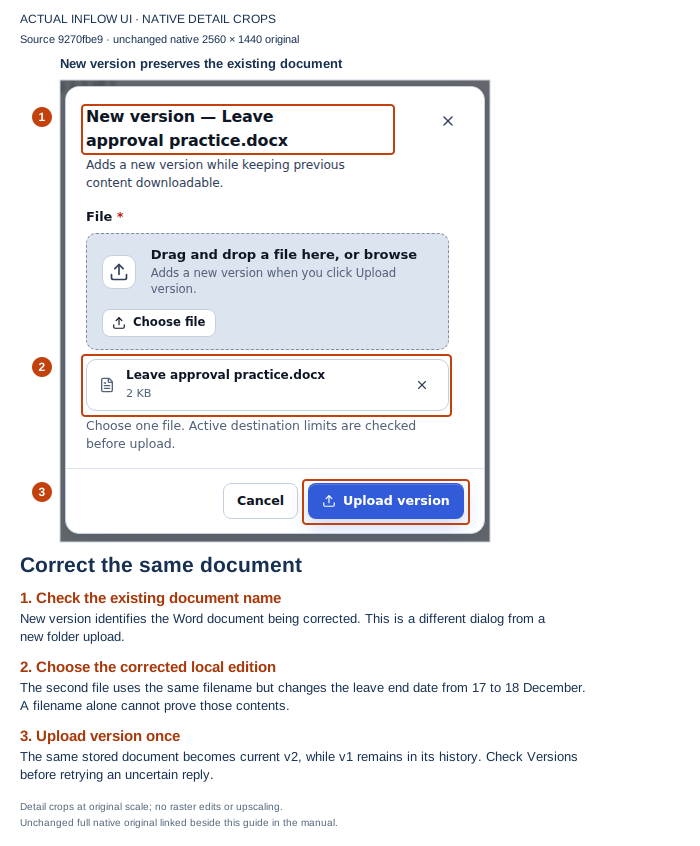
Add an edition to the existing document: the corrected file is selected for Upload version. This operation preserves the document’s history.
Open the unchanged full-size screenshot.
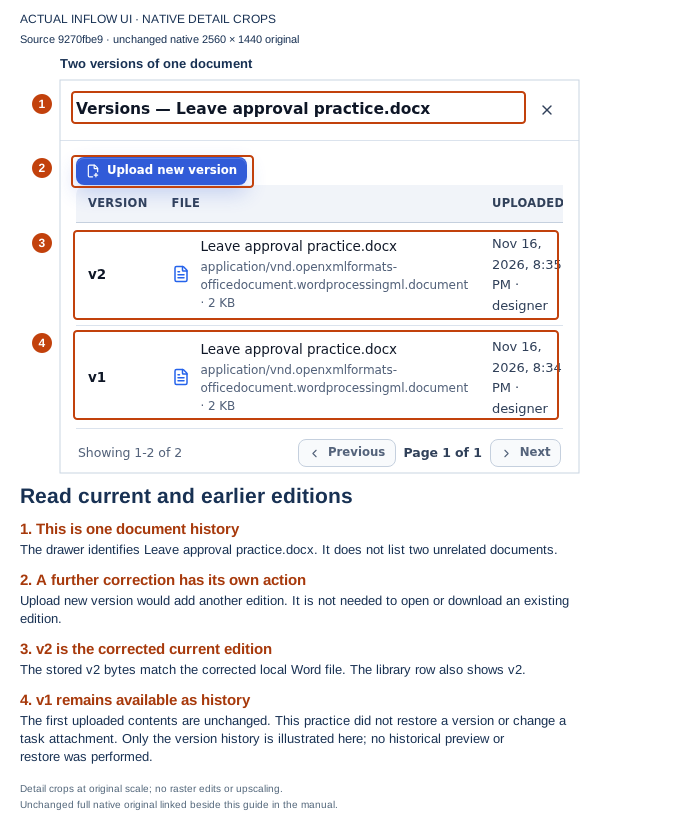
Read both rows: the current Word document is v2, and v1 remains in its history. This picture illustrates version history; no restoration or historical task change occurred.
Open the unchanged full-size screenshot.
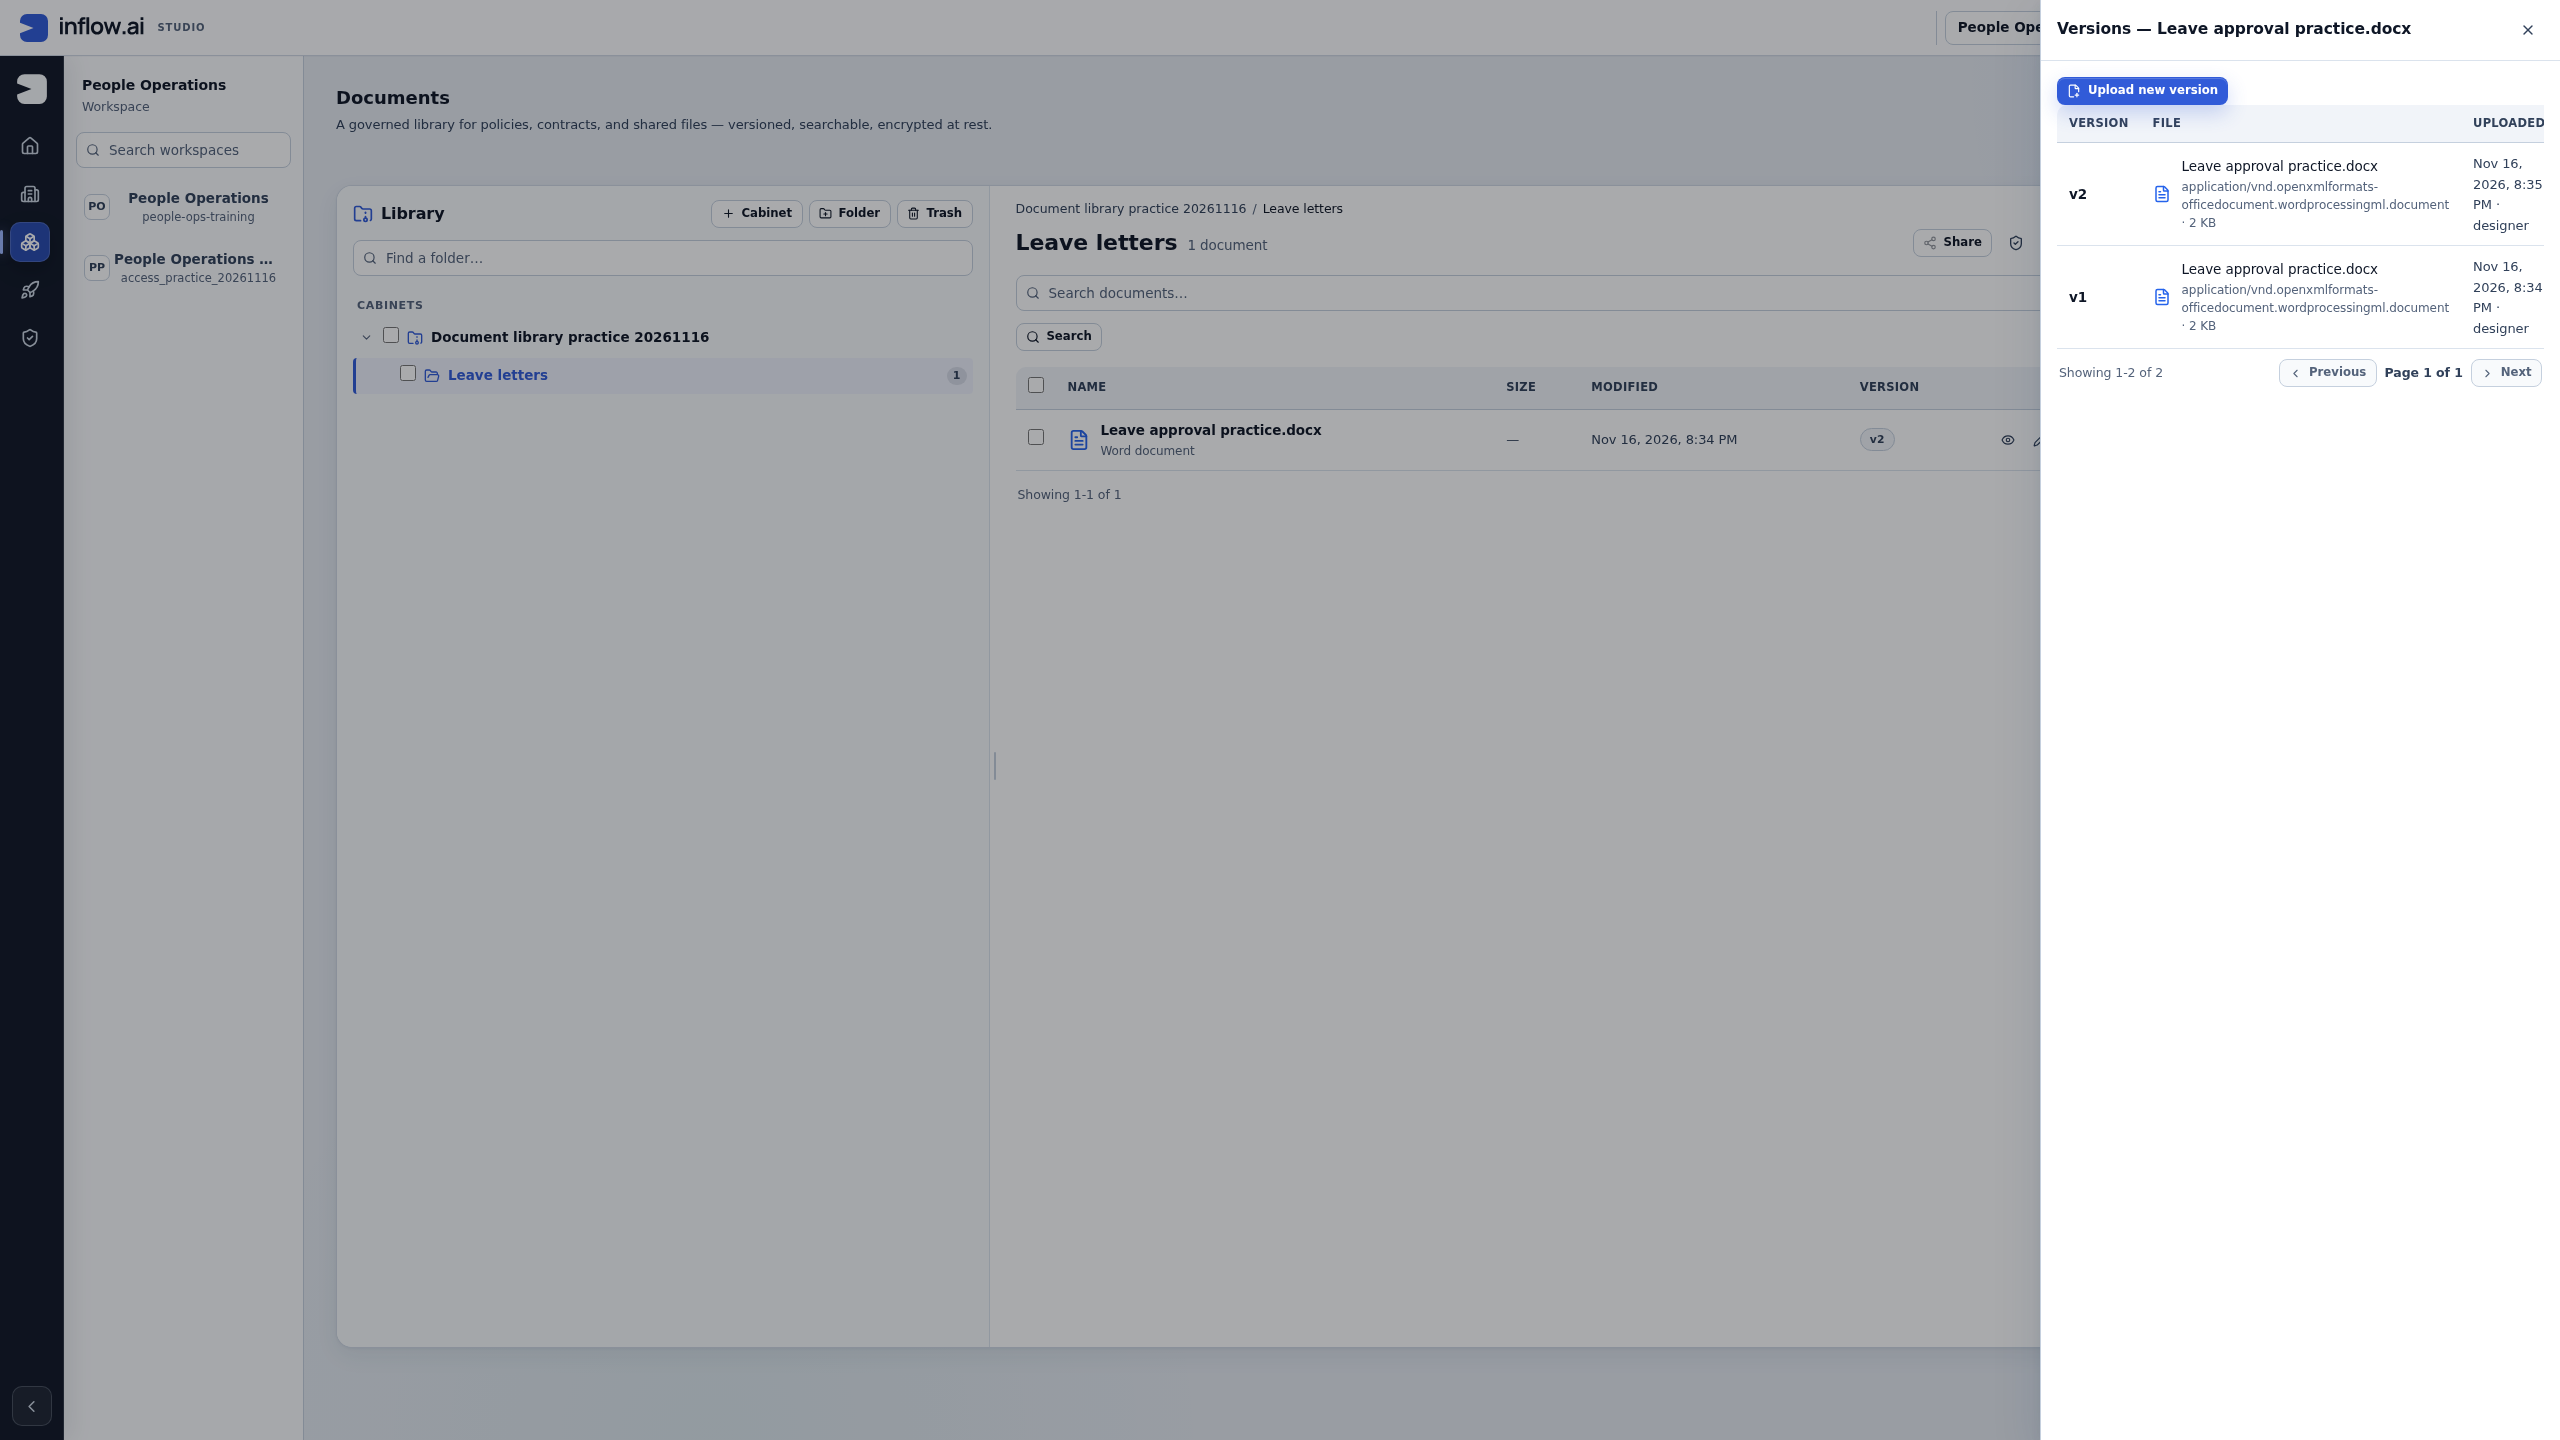
Check your result: one Word document appears in Leave letters, its current version is v2, and Versions retains both uploaded editions. A correction is an edition of that document; the PDF created next is a separate document with its own version number.
Continue with the illustrated PDF conversion. It uses this current v2, checks that the intended PDF name is absent, converts once and reads the actual PDF. Uploading a correction by itself does not update a task’s retained attachment, make a PDF, send a letter or approve leave.
Find a document by its words
Use Search documents in the intended workspace when you know a title, filename or a distinctive phrase from the current document. Enter the words and choose Search. Results show the document title, filename, cabinet/folder location and a short match snippet. Open the result or its folder, then preview the document to confirm you found the right current edition.
For example, search for Leave approval 014 to find a letter by its title or filename. To find a letter by something written inside it, search for a distinctive phrase such as return to work. Content matches use text extracted from the current version; title and filename matches are checked directly. Search does not switch to an older version just because that version contains the words.
If a content search finds no match: try the document's title or filename, confirm you are in the right workspace, and check that the current version is the one you mean. Some small text files are indexed during upload; PDF, Office and other supported formats may still be waiting for background text extraction. A scanned page or image-only PDF may contain no searchable text because scan OCR is not available. Preview the document or ask its owner to confirm the intended text and version; do not upload a duplicate as an indexing retry.
Search results are limited to documents you can view. If an expected result is missing, confirm the intended workspace and ask the document owner to review access. A search result or snippet does not grant access to the file; opening or downloading it is checked separately.
Example: prepare a manager's supporting letter
Nadia wants Sara to read the approval context for Leave request 014.
- Create or select the intended Leave evidence folder.
- Upload a small fictional Leave approval.docx, with dates and people that match the learning story.
- Preview or download it and check its text.
- Use the actual application/task attachment or document-selection control to attach or select it; do not type a guessed filename and treat that as the attachment.
- Check the result through Sara's intended ordinary-user experience.
If Sara sees the task but cannot open the file, the task did not automatically grant file access. Resolve the intended document sharing with its owner. Do not copy the file into an unrelated public folder just to make the warning disappear.
Upload a correction as a new version
A new version keeps the relationship between the original file and its correction. Uploading a separate new document with a similar title creates a different library item instead.
- Find the existing document and inspect its current version.
- Use Upload new version for that document, selecting the corrected fictional file.
- Read the upload result and reopen the document's Versions view.
- Check that the earlier and later versions are both identified in the history.
- Preview the intended version when reviewing historical evidence; use the current document when the business task calls for the newest edition.
Check your result: the document has a clear correction history. A task that retained the original version can still describe what Sara reviewed then; the current document can be newer.
Example: correct the end date without rewriting earlier evidence
The first approval letter accidentally says 17 December instead of 18 December.
- Correct the Word file and upload it through the existing document's new-version action.
- Check the new current version in Documents.
- Inspect any earlier task attachment or selected reference before assuming that it now points to the correction.
- If the process must use the corrected file, use its supported update/review procedure deliberately and tell the reviewer what changed.
- If a PDF is needed, convert the intended current source and check the new PDF.
A record of an earlier review should not be silently described as a review of a later correction. The distinction matters even when both editions have the same title.
Restore an earlier version without erasing the history
Use Restore version N when the document owner confirms that an earlier edition should become current again. Restore does not rewind or delete the version list: it uploads the selected earlier contents as a new current version of the same document. For example, restoring v1 while v2 is current creates v3 with v1's contents; v1 and v2 remain in the history.
- Find the exact document and open its Versions view. Check its title, folder and current version before choosing a row.
- On the earlier version you intend to restore, choose Preview version N or Download version N. Read the actual content and confirm with the document owner that it is the right edition to make current. A matching filename or date alone is not enough.
- Check that you have the required document-version authority and that the owner has approved the restore. Select Restore version N only after that review. This action starts restoration directly; the current UI does not show a second confirmation dialog.
- Read the result, such as Restored v1 as v3. Reopen or refresh Versions, confirm the same document now has the new current version, and inspect that new version's content. The earlier rows should remain available as history.
- If a task or form retained a reference to an older version, check that reference separately. Making v3 current does not rewrite what an earlier participant reviewed or submitted.
- If the action reports an error or the result is uncertain, inspect the document's current version and history before trying again. If the earlier content already appears as a newly created current version, do not restore it a second time; another successful restore would create another version.
What you should see: one document identity with a new current version whose contents match the reviewed earlier edition, while its original versions and prior task references remain distinguishable. If the version list or result does not show that outcome, stop and ask the document owner to reconcile the document before using it in another business step.
Example: restore the approved first edition in a separate training document
This recovery example uses a separate synthetic document, Training case 027 — Leave approval.docx, so it does not change the Leave request 014 letter above. Its approved first edition (v1) says the leave begins on 18 December. A rushed correction (v2) accidentally changes that date to 17 December. Nadia must not upload v1 as a second document or delete v2 to hide the mistake.
- Open this document's Versions view and choose Preview version 1. Compare the date and request reference with the approved case, then ask the document owner to confirm that v1's contents are the intended current edition.
- Check the required restore authority. Because the action starts immediately, select Restore version 1 only after the owner has approved it. Do not expect a second confirmation prompt.
- Read the result, Restored v1 as v3, then refresh Versions. Confirm v3 is current and preview it to verify 18 December; keep v1 and the mistaken v2 visible as history.
- If an earlier task in this separate training case retained v2, leave that historical task reference intact and follow the process owner's review procedure for the corrected current document. Restoring v1 does not rewrite a participant's earlier evidence or decision.
- If Nadia sees an error, refresh the version list before another attempt. If v3 already exists with the intended contents, stop; another restore would create v4.
Move, share and delete deliberately
A move changes where a document is organized. Sharing controls who can access it. Deleting removes it from ordinary browsing according to the library's supported lifecycle. These are separate responsibilities.
Use the current selection/context actions only when your role allows them, review the selected objects and read confirmations. Before restoring an earlier document version, inspect the exact version and confirm its effect with the owner; Restore starts directly without a second confirmation. Do not use deletion as an upload retry or as a way to remove evidence of a business mistake.
Move one existing document within its cabinet
Use Move to change a document's folder while keeping the same document. Do not treat it as a new upload, a new version, a share, or a way to repair a permission problem.
- In the active cabinet, locate the exact approved synthetic document. Check its name, current folder and displayed version. Select that document only, then read the selection count before opening Move.
- In Move selection, verify the displayed item count. Open Destination folder and choose the intended folder in the same cabinet. The dialog rejects a missing destination; the service also enforces same-cabinet movement and destination permissions.
- Read the folder name again, then choose Move here once. Wait for the dialog to close and read the result, for example Moved 1 item.
- Open the destination and find the same document by its stable identity/name. Confirm it no longer appears in its former folder. Open Versions and confirm the same version history is still attached; a move changes the folder reference, not the file contents or version number.
- Ask the document owner to review who must read or edit the document at its new location. The move itself is not a sharing decision and does not prove that earlier task participants or other viewers can still open it from the destination.
If the result is partial or uncertain: a multi-item move sends separate item requests, so the result may say Moved X, failed Y after some items already moved. Reload both source and destination and reconcile each intended item by identity before repeating anything. After a lost response, perform the same readback first; do not reopen Move on an item that is already in the destination. If the destination is wrong or a user loses access, stop and ask the document/access owner to decide the supported correction and sharing review.
Example: move one synthetic letter into the manager evidence folder
For a separately approved synthetic practice fixture, Nadia has Manager letter practice.docx in Incoming practice. The owner approves moving that one document into Leave evidence practice in the same cabinet. These example names are illustrative until the practice document and folders are admitted in the fixture manifest; this does not authorize creating a runtime fixture or moving the existing Leave request 014 letter or any document attached to a real business task.
- Nadia checks that the selected row is Manager letter practice.docx, that the current folder is Incoming practice, and that the selection count is one document.
- She opens Move selection, chooses Leave evidence practice under Destination folder, and checks the one-item summary and same-cabinet destination before choosing Move here.
- She reads Moved 1 item, opens Leave evidence practice, and confirms the same document is present. She reopens Versions to make sure its existing version remains the current version.
- If the result instead says Moved 0, failed 1, or the response is lost, she reloads Incoming practice and Leave evidence practice and checks for the same document before deciding whether the owner should retry. She does not upload another copy to make the folder look complete.
- The document owner separately confirms that the intended manager can access the destination. The folder change alone neither grants the manager a share nor proves access through a prior task reference.
Recover a deleted item from Trash
Trash restores a soft-deleted document or folder to its library. It is separate from Restore version N, which makes older file contents a new current version. Use Trash only when the document owner confirms the deleted item should return and your role offers the restore action.
- Open the intended workspace and cabinet, then choose Trash. Check the cabinet name before searching; Trash is scoped to that cabinet.
- Identify the exact deleted document or folder using its name, type, deletion date and displayed deleter when available. If the row is ambiguous, stop and ask the owner rather than restoring a similarly named item.
- If the list shows Retry loading trash, use it to reload the list. It does not retry a restore. If the item still cannot be read or the action is absent, ask the owner to check access and current state.
- For a single deleted document, confirm its original parent folder is active and no current document with the same name already occupies that folder. If the parent folder is still deleted, restore the parent first. If the name is already in use, do not rename or delete either item to make the action pass; ask the owner which item should remain and how to resolve the conflict.
- For a deleted folder, check the parent folder first and review what the folder contained. Restoring a folder can also restore child folders and documents that were deleted with that folder. A same-name conflict can leave a child item in Trash even when the parent folder was restored, so inspect the resulting folder and reload Trash afterward.
- Choose Restore on the exact row once. The row action starts immediately without a second confirmation. Read its result, then reload or re-open Trash and verify that the intended item disappeared from the deleted list.
- Turn Trash off and inspect the original location in the active folder list. For a folder, inspect its contents and any remaining deleted children; for a document, confirm the restored document appears in the original folder.
- If the restore reports an error or the response is uncertain, refresh the Trash list and inspect the active location before trying again. A successful folder restore may have returned the parent while leaving a conflicting child in Trash. Do not repeat blindly.
What you should see: the approved item is back in its original cabinet and folder, while unrelated items and same-name conflicts remain untouched. A result toast alone is not proof that every child of a restored folder returned; compare the active folder and remaining Trash entries.
Example: restore a deleted training folder without overwriting another item
In a separate synthetic Training case 028, Nadia must recover the deleted Leave evidence practice folder. The cabinet also contains an unrelated active folder, Leave evidence archive; matching words do not make them the same folder.
- Select the prepared cabinet and open Trash. Confirm the exact deleted folder name and parent location.
- If the parent is deleted, restore and verify that parent first. If the parent is active, review that Leave evidence practice and its contained teaching documents are the intended recovery scope.
- Select Restore for that folder once. Read the result; do not interpret Retry loading trash as a retry of the restoration.
- Turn Trash off and inspect the restored folder. Check which child documents and folders returned. Reopen Trash and review any children still listed; a same-name conflict may have kept them there.
- If the folder or a child could not return because the destination name is occupied, leave both items intact and ask the document owner to decide how the conflict should be resolved. Do not rename or delete records just to complete the training story.
The separate Training case 028 recovery does not change the Leave request 014 letter or the Training case 027 version-restore example.
If a cabinet is provided from another workspace or as a read-only library, its visible actions may differ. Follow the actual allowed operations rather than assuming every library has the same edit controls.
Handle an upload problem without duplicating files
Read the result for each file in a batch. A successful file and a failed file are different outcomes; retrying the whole batch can create unnecessary extra documents.
If the page offers Check stored content after an uncertain result, use that check before starting another upload. If it asks you to reselect a file, choose the original intended file and follow the displayed recovery. A lost confirmation is not proof that no file was stored.
Example: one file fails in a two-file upload
Nadia selects two fictional supporting letters. The first file finishes successfully; the second is rejected by a type rule. She reads both rows instead of treating the batch as one all-or-nothing result.
- Keep the successful file and confirm that it appears in the form's selected documents. Do not upload it a second time just because the other row failed.
- Read the second row's message. If it identifies an unsupported type or size, choose Skip for that row, prepare a corrected file that meets the displayed rules, then select that corrected file.
- If the row offers Retry, use it only for that named file after correcting any batch-level count or total-size limit. If it says Reselect original, choose the same original file again; do not substitute a different file into an uncertain attempt.
- If the outcome is unknown and Check stored content is offered, check it before retrying. If upload access is refused, the remaining batch can pause; ask the document owner to review the intended access, then inspect the pending rows before continuing.
The form may save successful files progressively while later files are still being sent. A batch-level limit can affect every pending row, while a file-specific rule can affect only one. Follow the actual row and page messages; do not assume that the entire batch failed or that a selected filename is already stored.
Common mistakes
| What you notice | What to do |
|---|---|
| Upload is absent. | Check that you selected a valid writable folder and have the intended upload rights. |
| A file is rejected. | Read the actual type/size/batch message and choose a supported file. Do not rename its extension to disguise its contents. |
| Preview is unavailable. | Download where permitted, or use a supported conversion if that fits the document type. |
| The correction appears as a separate file. | Use Upload new version on the original document when a versioned correction is intended. |
| An older task shows the earlier letter. | Check whether it retained that specific version; do not relabel the old review. |
| Restore returned an error or its result is unclear. | Refresh Versions and inspect the current version before retrying; restoration may have created a new version even when a reply was lost. |
| A document cannot return from Trash. | Check whether its parent folder is still deleted or a same-name document is active; ask the owner before changing either item. |
| A restored folder is missing a child item. | Reload Trash and inspect for a same-name conflict; folder restoration may leave that child in Trash. |
| Another person cannot open a visible title. | Actual document access is separate from seeing a reference or using the form. |
Where to go next
Continue with Add a document library to a form or application. For implementation contracts and administrator/developer details, use the optional technical reference. You do not need that reference to follow this lesson.