Build a leave-request list, then plan the pending-only page
Sara wants a short list of requests waiting for review. Nadia, the consultant, first proves that a saved page can read the intended business records. She then separates three different requirements: a working record list, a permanent pending-only business question and Sara's permitted application experience.
The illustrated path builds an all-requests practice list from a live model. Searching PENDING demonstrates a temporary subset. It does not finish the reusable pending-only Query, publish a page, grant Sara access or approve a request. Keeping those stages distinct makes failures easier to locate.
The App Shell and interface tutorial covers the application frame. The workflow tutorial covers the actual manager decision. The data-and-rules tutorial explains the model and reusable business questions; compare its worksheet context before reusing a different exercise's records.
Before you begin
Use the intended development workspace and an approved fictional fixture. You need the screen-authoring and record-view rights required for the actions you perform. Source visibility in the designer does not establish employee access. If a needed control is absent, ask the workspace owner to check the intended rights; do not borrow an administrator session.
The captured 17 November exercise uses People Operations, the live Leave request record type in model version 1 and training_postgres / cf3_manuals_leave. The model lesson has already saved these three examples:
| Request number | Employee business number | Manager business number | Requested days | Business state |
|---|---|---|---|---|
| 014 | EMP-014 | MGR-001 | 3 | PENDING |
| 015 | EMP-015 | MGR-001 | 2 | PENDING |
| 016 | EMP-016 | MGR-001 | 2 | APPROVED, worksheet value only |
Reuse matching existing rows. Do not create another set merely because the current search does not show them. The third request's explanation explicitly says that no workflow approval was performed. All employee and manager numbers are fictional business references, not user accounts or grants.
Screenshot context: the native 2560×1440 originals were captured from source a6a0f15454 on 17 November. They show the author configuring and reading an unpublished draft. Numbered detail crops are editorial guidance around unchanged original pixels. They do not show a released App Shell or an ordinary employee session.
Example — Sara needs a short pending list
The final business question is “which permitted requests are pending?” Its two parts are independent:
- A business condition selects PENDING requests from the intended source.
- Current access rules determine which rows and fields the signed-in user may receive.
The three-row teaching fixture contains two pending examples and one comparison example. A user entitled to all three can see two matches for that condition; another user's allowed result may be smaller. The author seeing two rows does not prove that Sara should receive them.
Step 1 — Prepare a saved practice Form
- Open the intended workspace's Build → Forms area. Search for the intended practice Form before creating one.
- If starting the fresh exercise, choose New form. Keep Form as its type and Leave Management as its placement.
- Use the title Leave request list practice 20261117 and the key leave_request_list_practice_20261117 only for a genuinely new matching exercise. If it already exists, open the intended draft; do not replace or delete it to repeat the tutorial.
- Describe the purpose as a read-only training list using fictional records. Review type, placement, title and key before Create interface.
- Add one Data Grid through the toolbox. The initial sample orders are representative layout data. They are not leave requests and are not evidence that the model is connected.
- Keep the draft saved. Do not publish it during the following connection exercise.
Check your work: the Form belongs to the intended workspace/function. This capture created one separate practice draft; it did not replace the intake Form or manager task Form used in another lesson.
Step 2 — Connect the intended published source
- Select the Data Grid and choose Connect data.
- On Source, choose Data models. Read the Leave request card's connection and schema before selecting it: training_postgres / cf3_manuals_leave in this exercise.
- Continue to Preview and wait for the completed result. Compare the references 014, 015 and 016 with the worksheet.
- Read the preview's boundary: it is a bounded sample for field discovery, temporary and not saved as rows on the interface. It does not prove every user's access or the size of a production data set.
- If the source is missing or unavailable, resolve that specific source, publication, destination or access problem with its owner. Do not substitute a similarly named source or an unavailable category just to proceed.
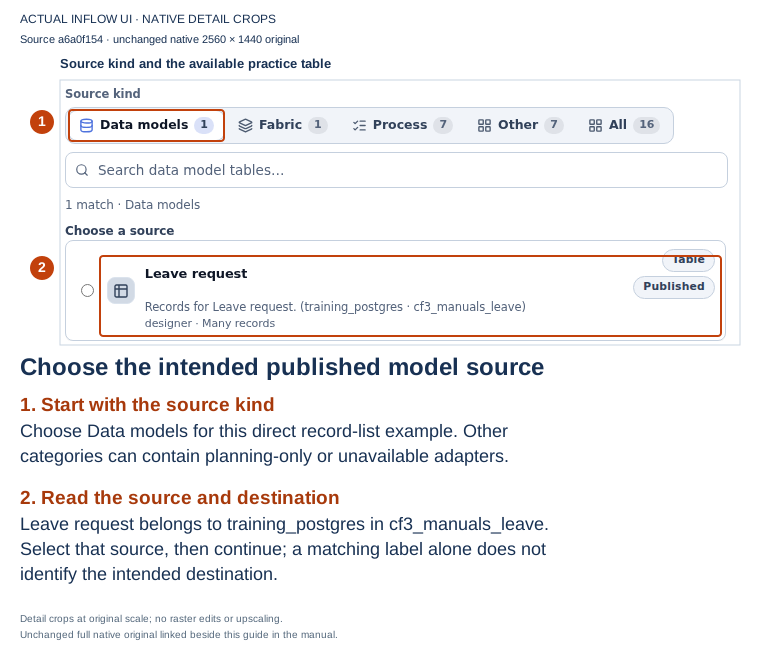
The full original precedes selection of the radio button. The Published label belongs to the source; it does not publish this Form.
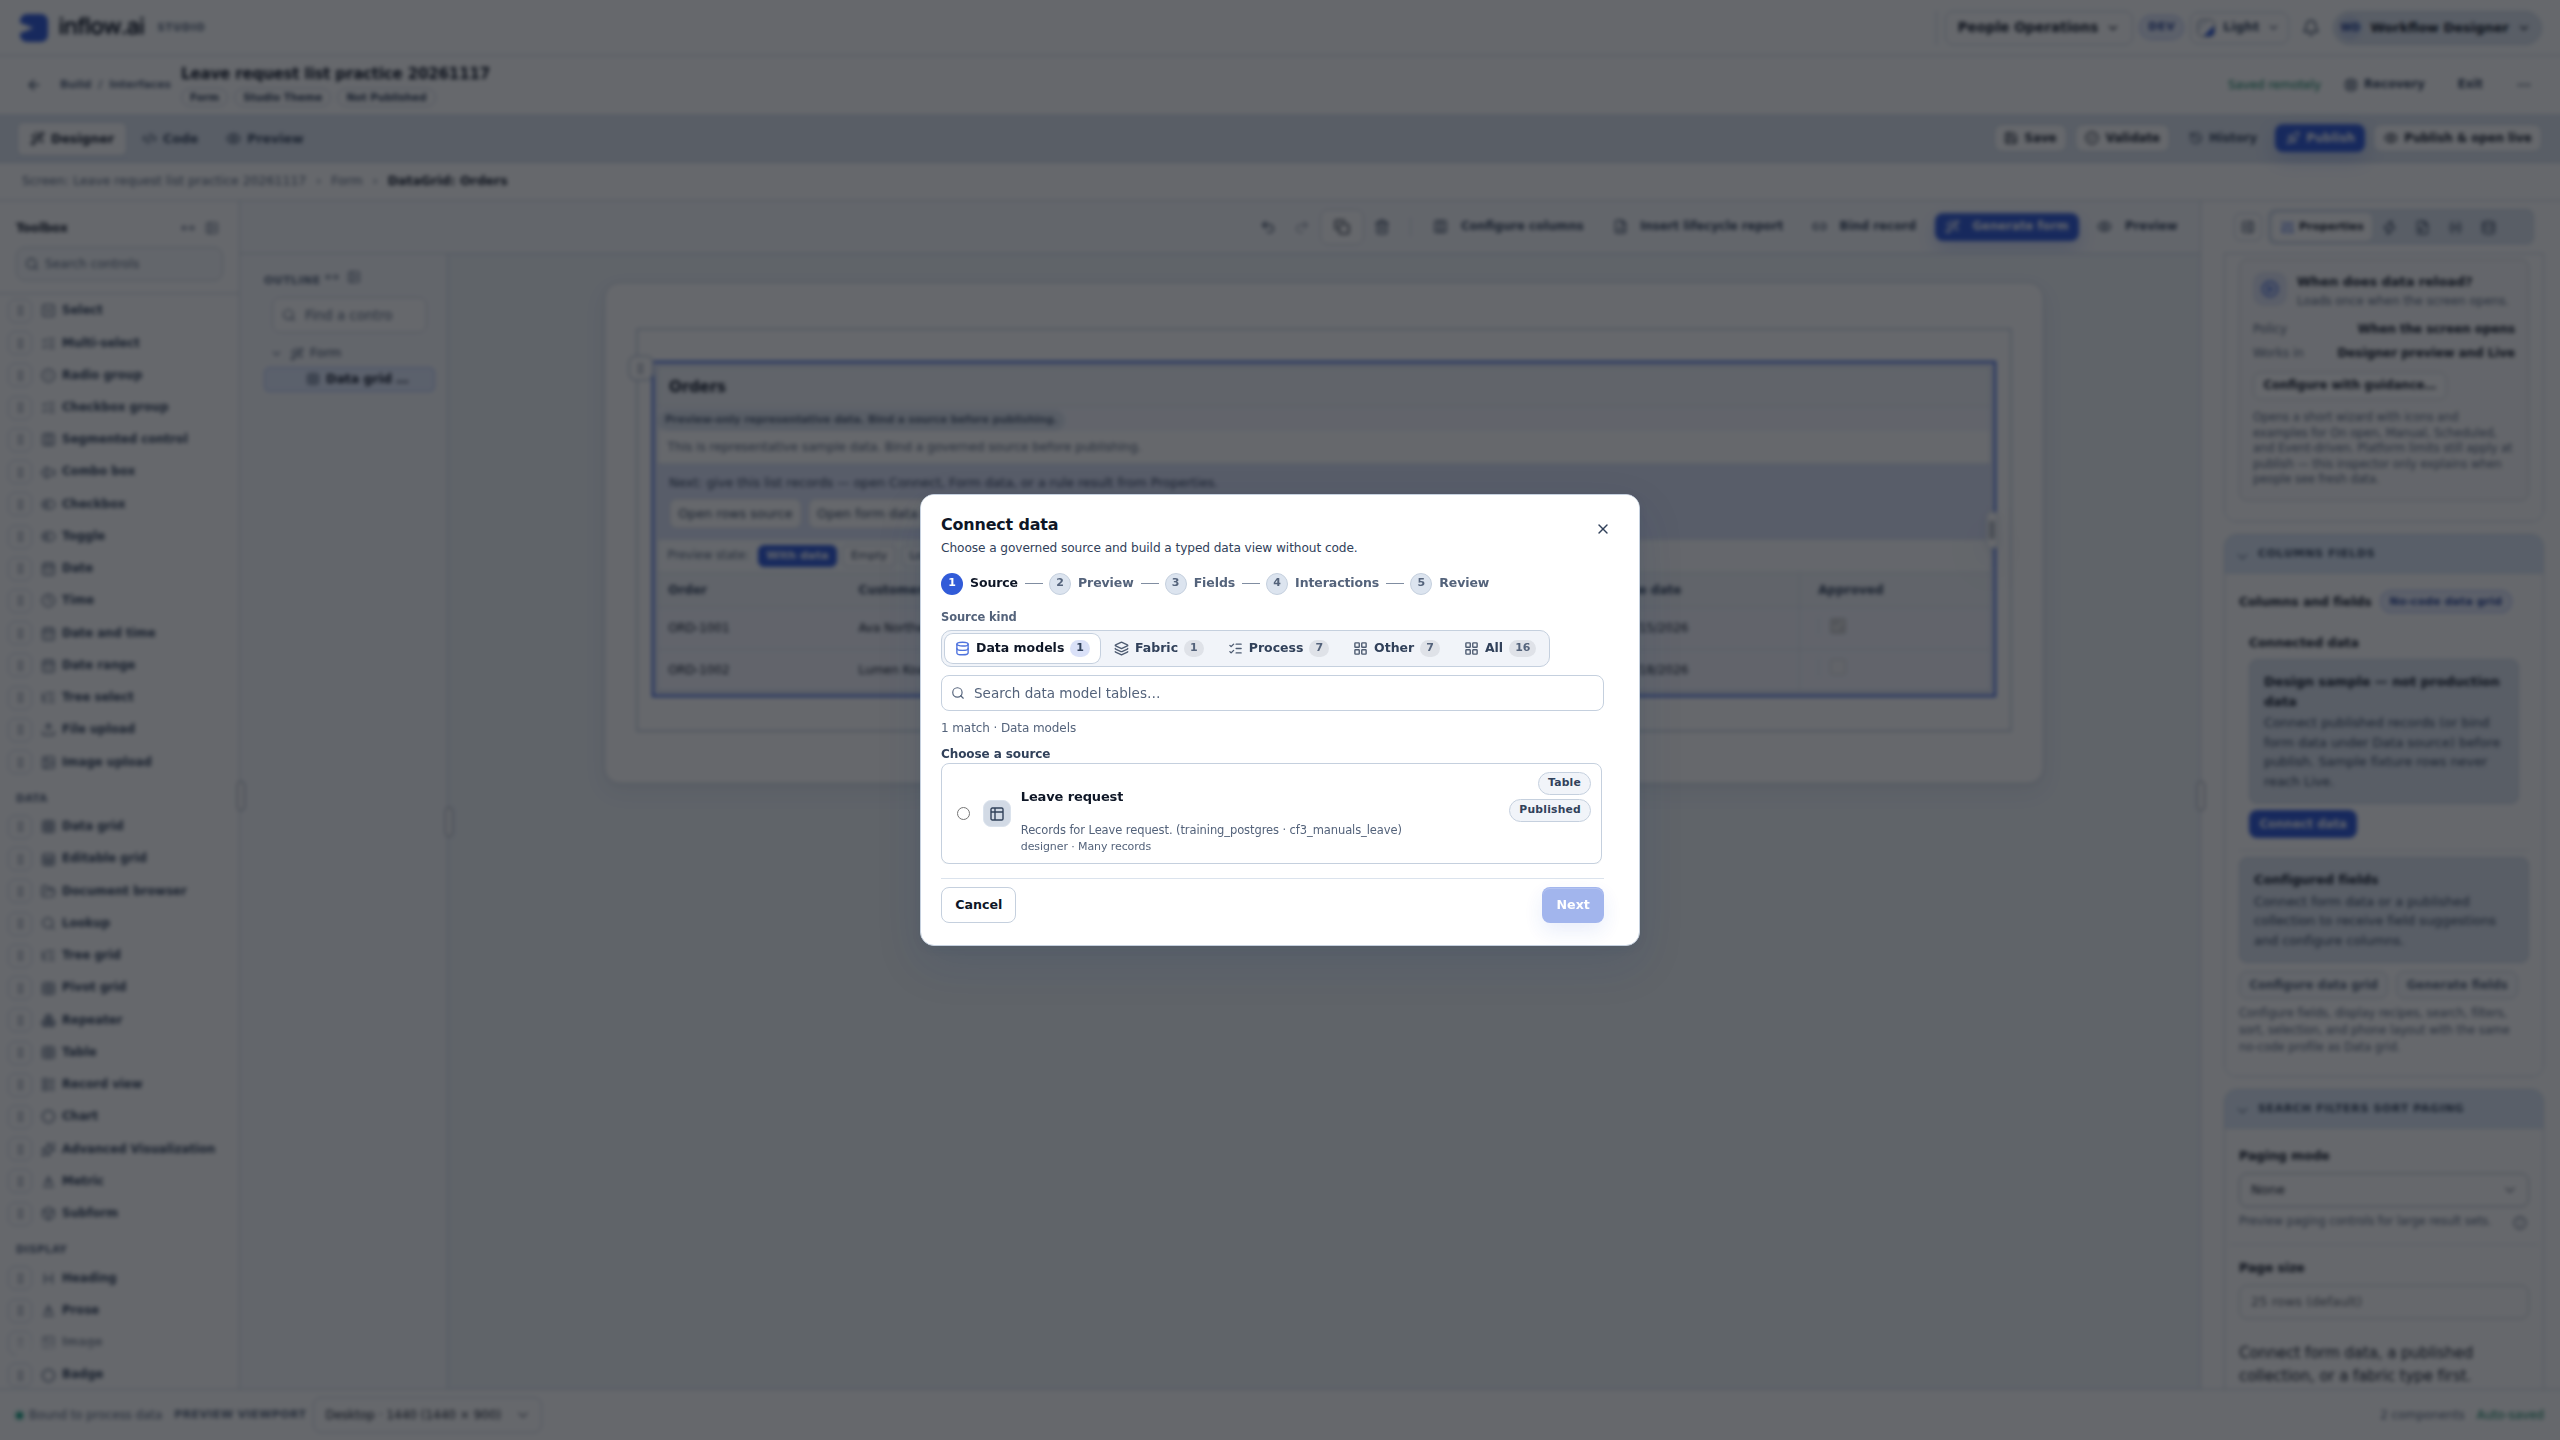
In the illustrated general source chooser, Rule results reports its rule-query adapter unavailable. That is why this completed connection uses the available published-record source. The property panel also has separate Connect query rule and Use a rule result paths; their presence is not evidence that the general catalog adapter works. The later pending-only stage must select a supported Query path deliberately rather than silently treating this direct model connection as equivalent.
Step 3 — Choose fields and review interactions
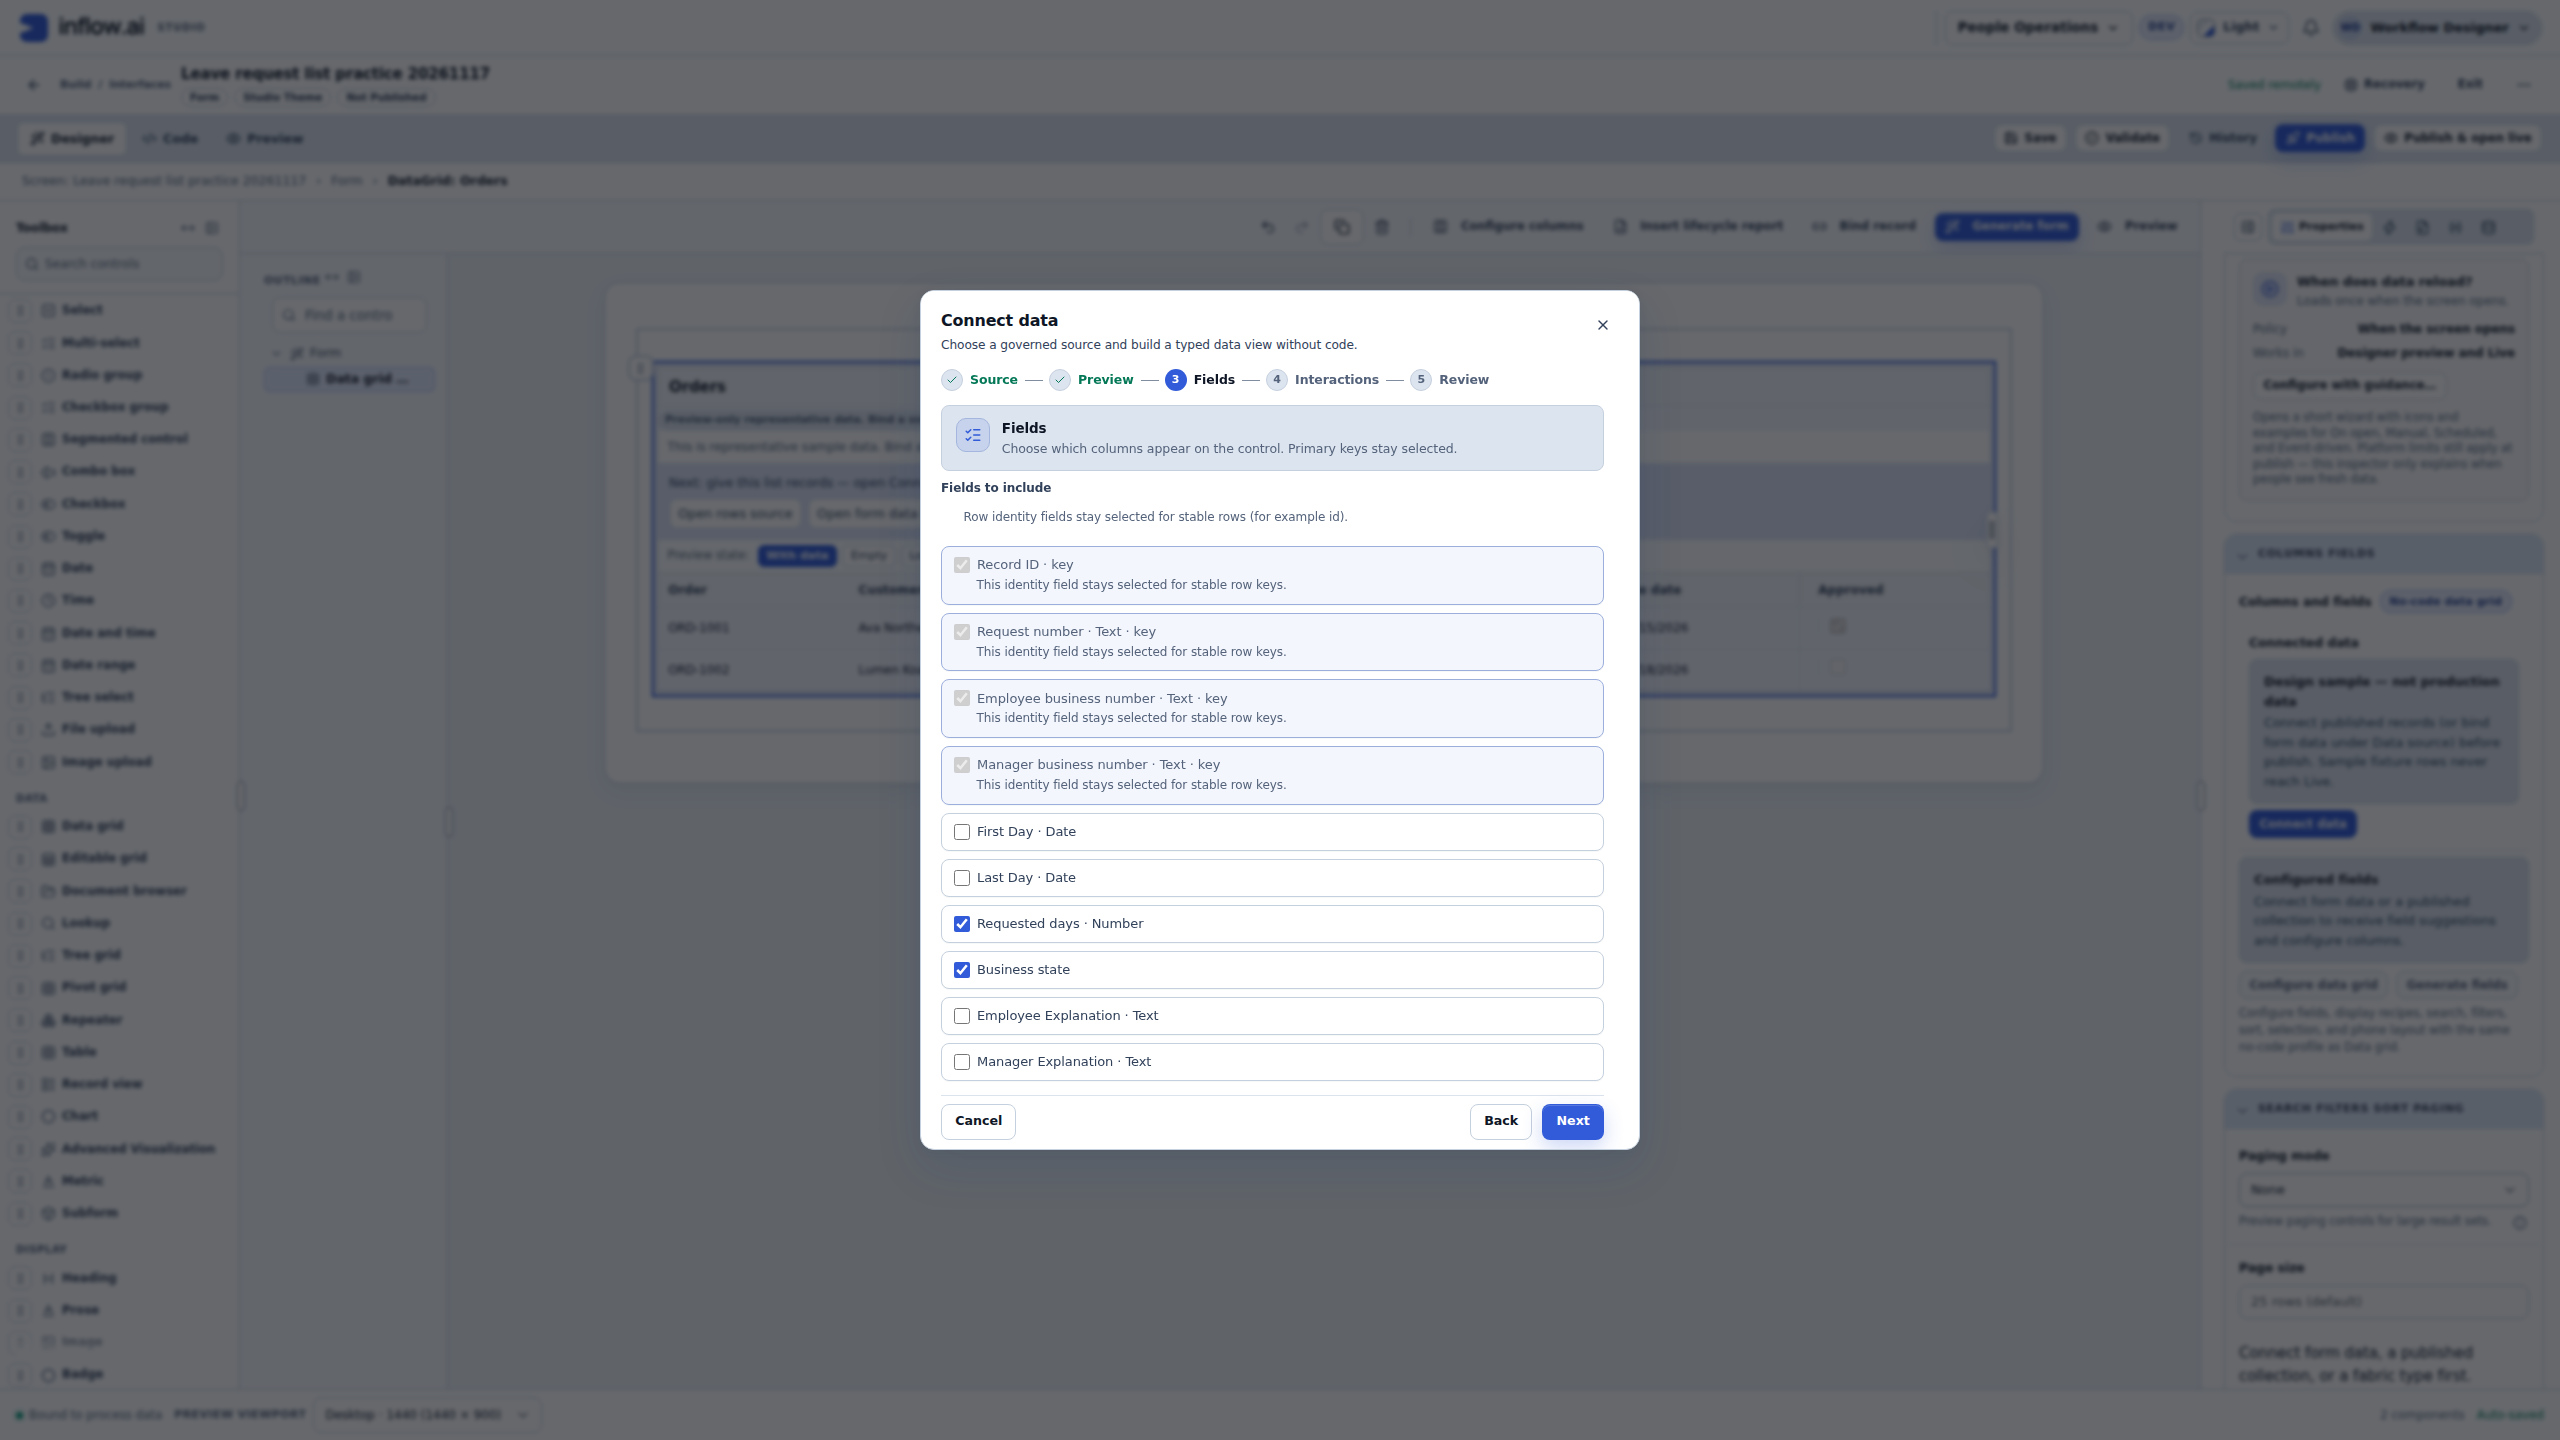
- On Fields, read the required identity help. In this run the chooser locks four fields: Record ID, request number, employee business number and manager business number. Keep them selected.
- Add Requested days and Business state. Uncheck both dates and both explanations for this list. These choices produce six fields, not the four-column projection of a separately designed pending Query.
- Understand the key markers. Record ID is the actual system record identity here. The other references do not become user identities, database primary keys or permission rules because the chooser retains them.
- On Interactions, enable the supported Search, Filter and Sort options and keep Selection → None. Do not configure an edit, delete, decision or task action for this practice grid.
- Read Review. Confirm Leave request, six fields, 25 rows per page and no selection. Exact shape/confidence describes a field match; it is not a permission audit or a successful manager journey.
- Finish with Connect data. Give the grid the title Fictional leave requests — training states, no workflow approvals, then save the draft.
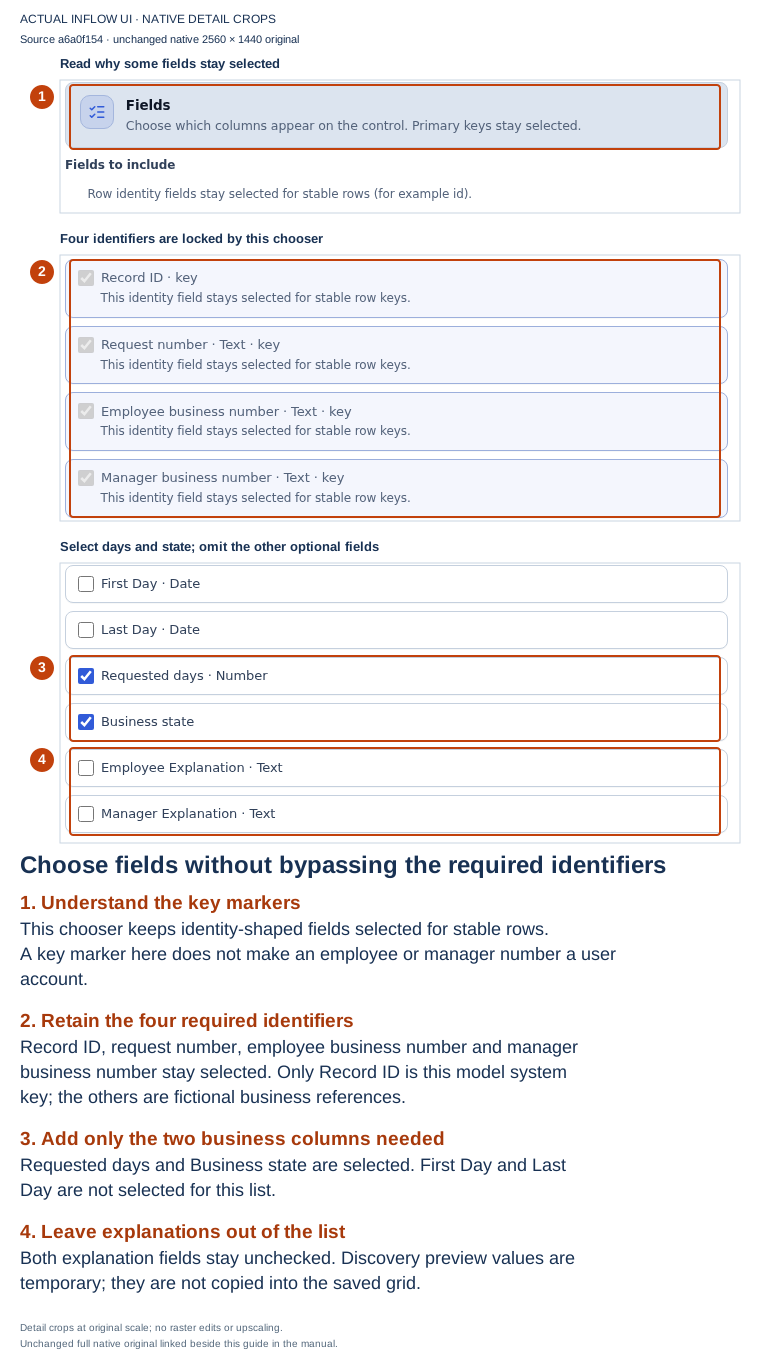
The native original preserves the actual locked choices. Keep the synthetic-only boundary: MGR-001 is a worksheet reference. If a real application's audience must not receive a required field, stop and review the source/projection and access design with its owners.
Check your work: the saved connection names the intended model version and live publication, uses the six reviewed fields and contains no sample-order rows. A successful Save is a draft checkpoint; it is separate from publishing the Form. Use Configure data grid for later display changes, and replace a source only when its business purpose actually changes.
Step 4 — Read the actual draft result
- Open Preview → Interactive on the saved draft. This Form has no inputs, so it opens without test parameters.
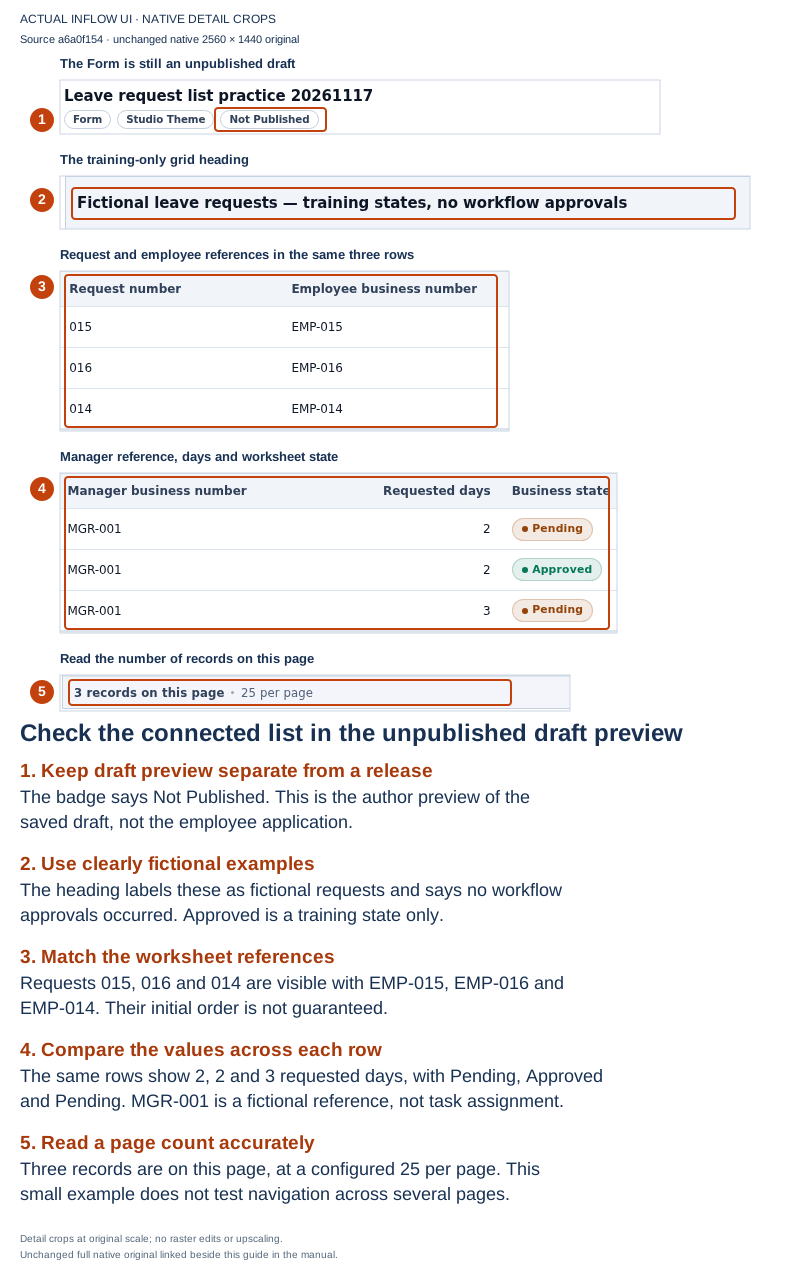
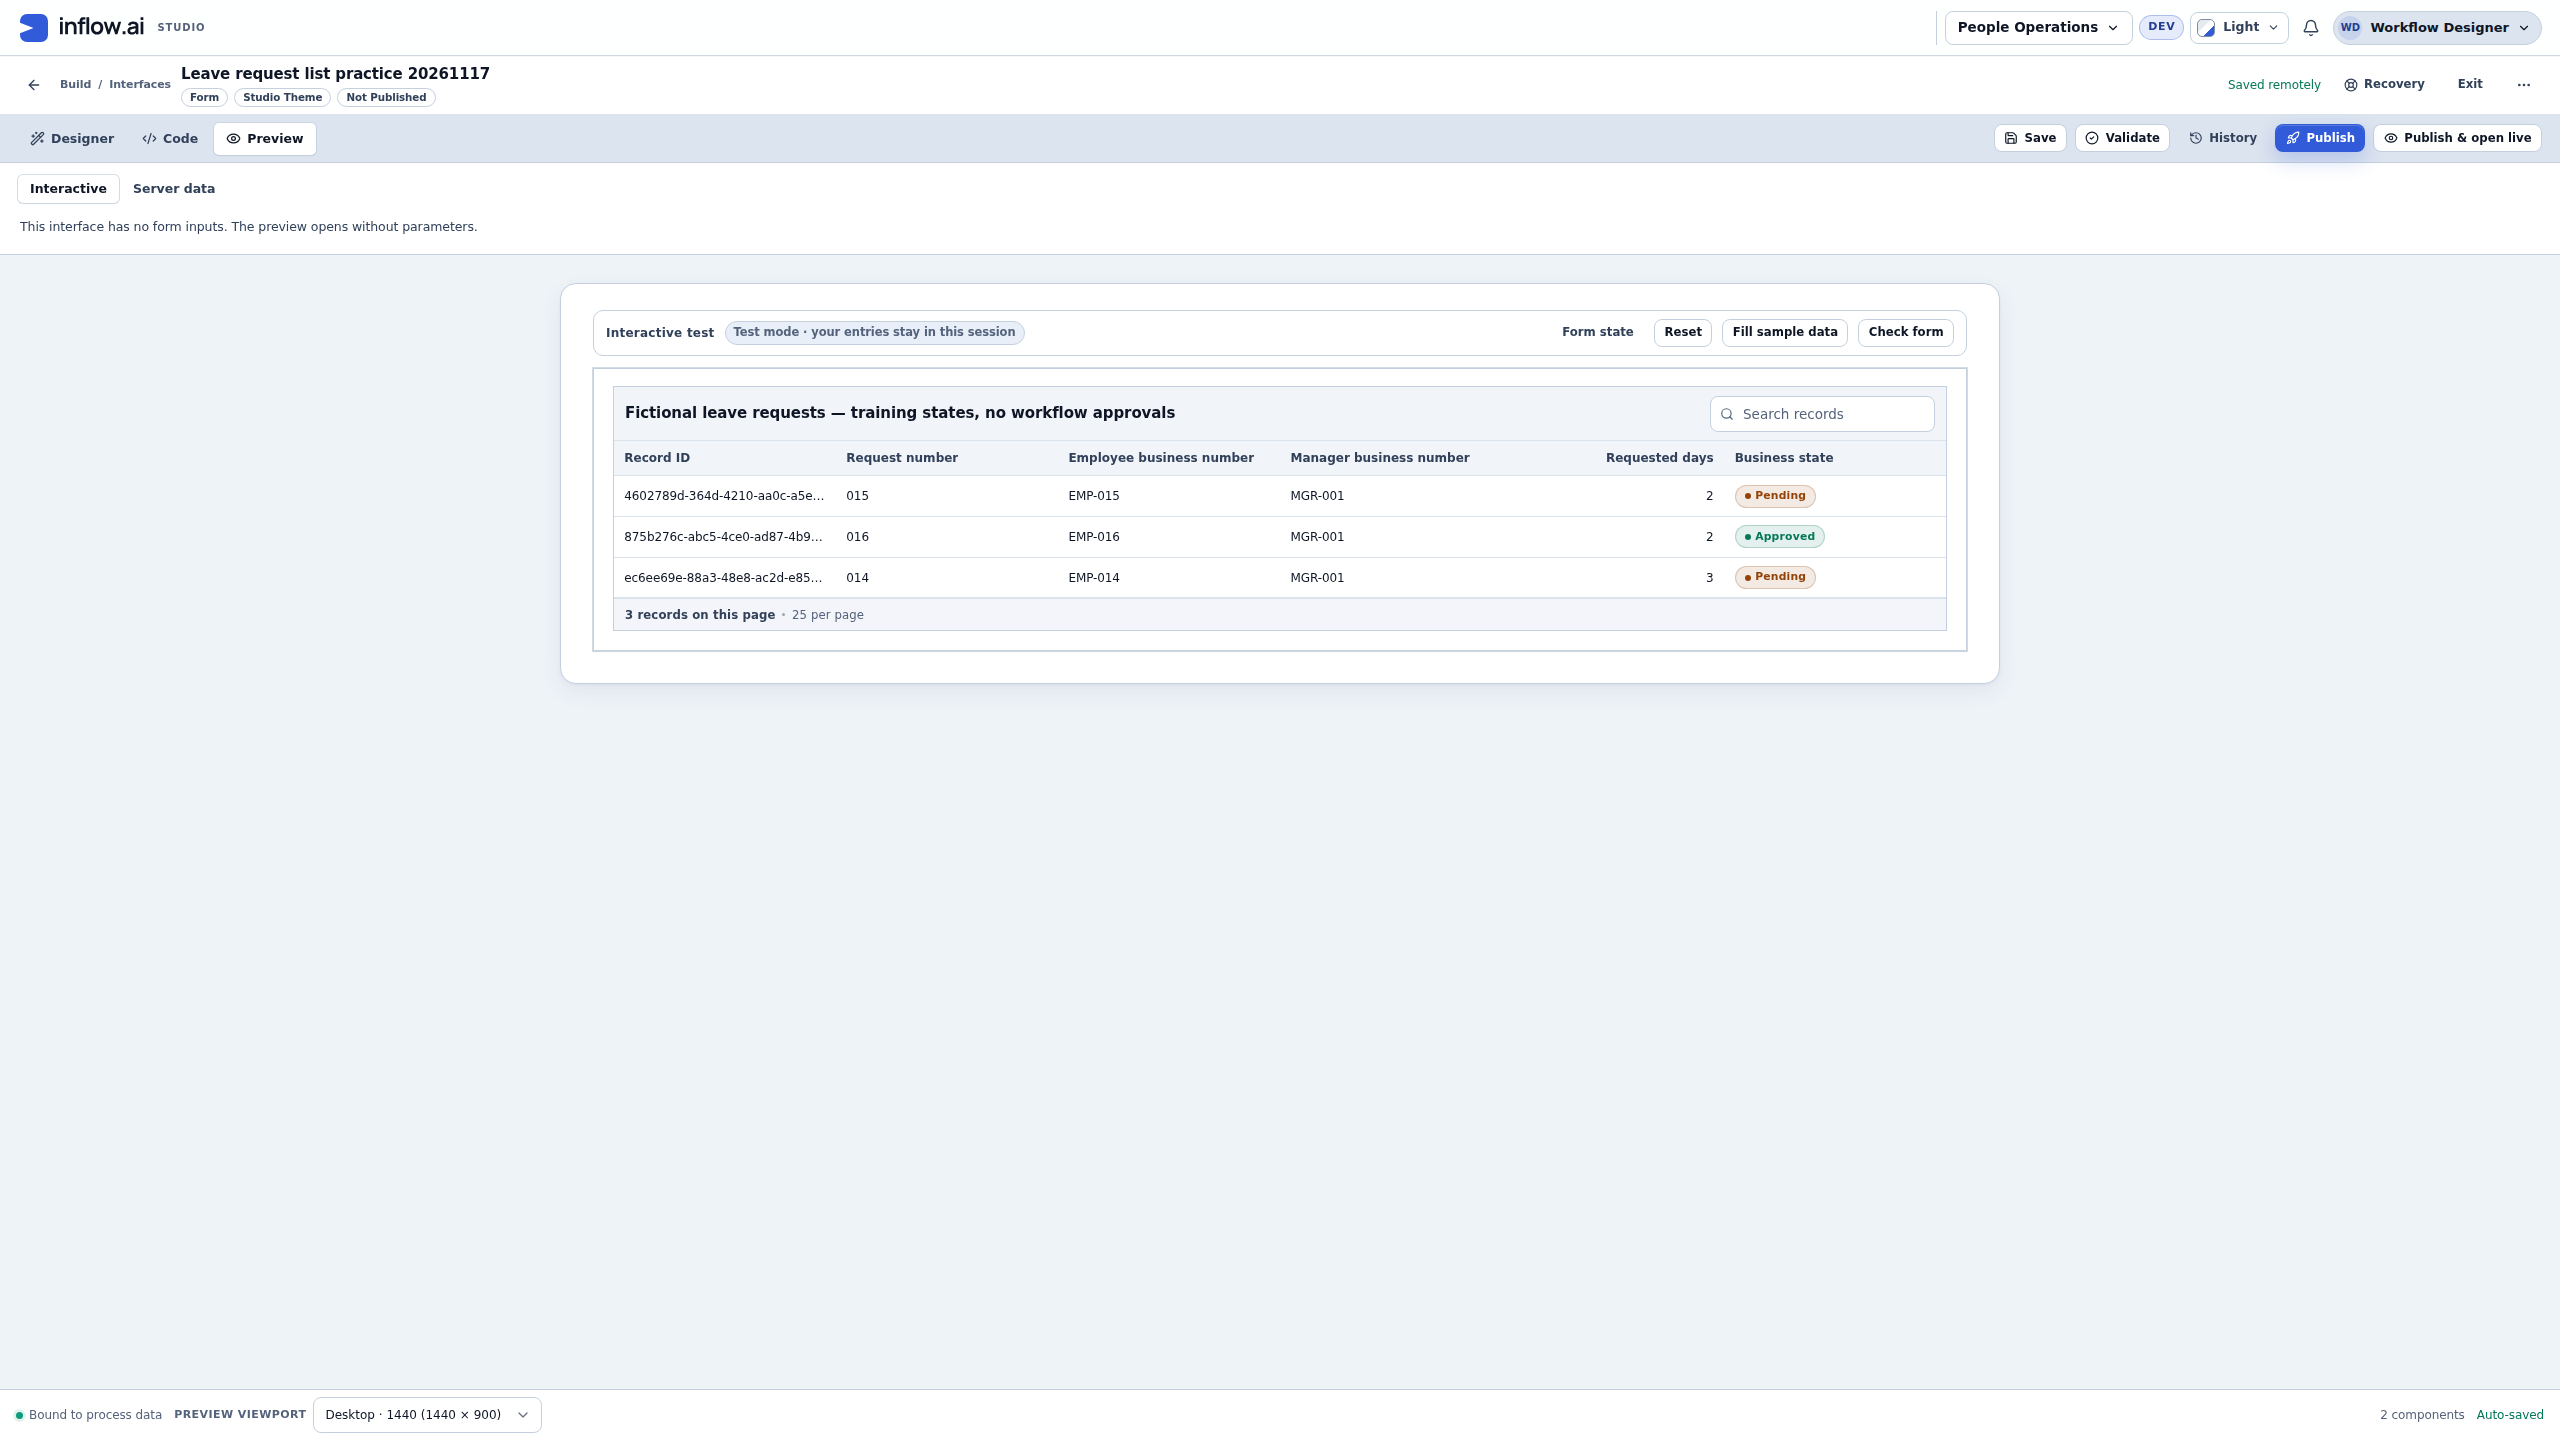
- Wait for the source request to finish. Compare all three request numbers, employee references, quantities and states with the worksheet.
- Read the heading and the Not Published badge together. The list is fictional and the Form is an author preview.
- Read 3 records on this page · 25 per page accurately. Three examples fit on one page; this is not a test of next-page navigation or a global count for all users.
- Keep all row actions absent for this exercise. Seeing a green Approved badge is not a working approval button or a task decision.
The full original shows the initial order 015, 016, 014. The result came from the connected live model in the author's draft preview; it is not the toolbox's order sample or a published employee page.
Narrow the current view without changing the records
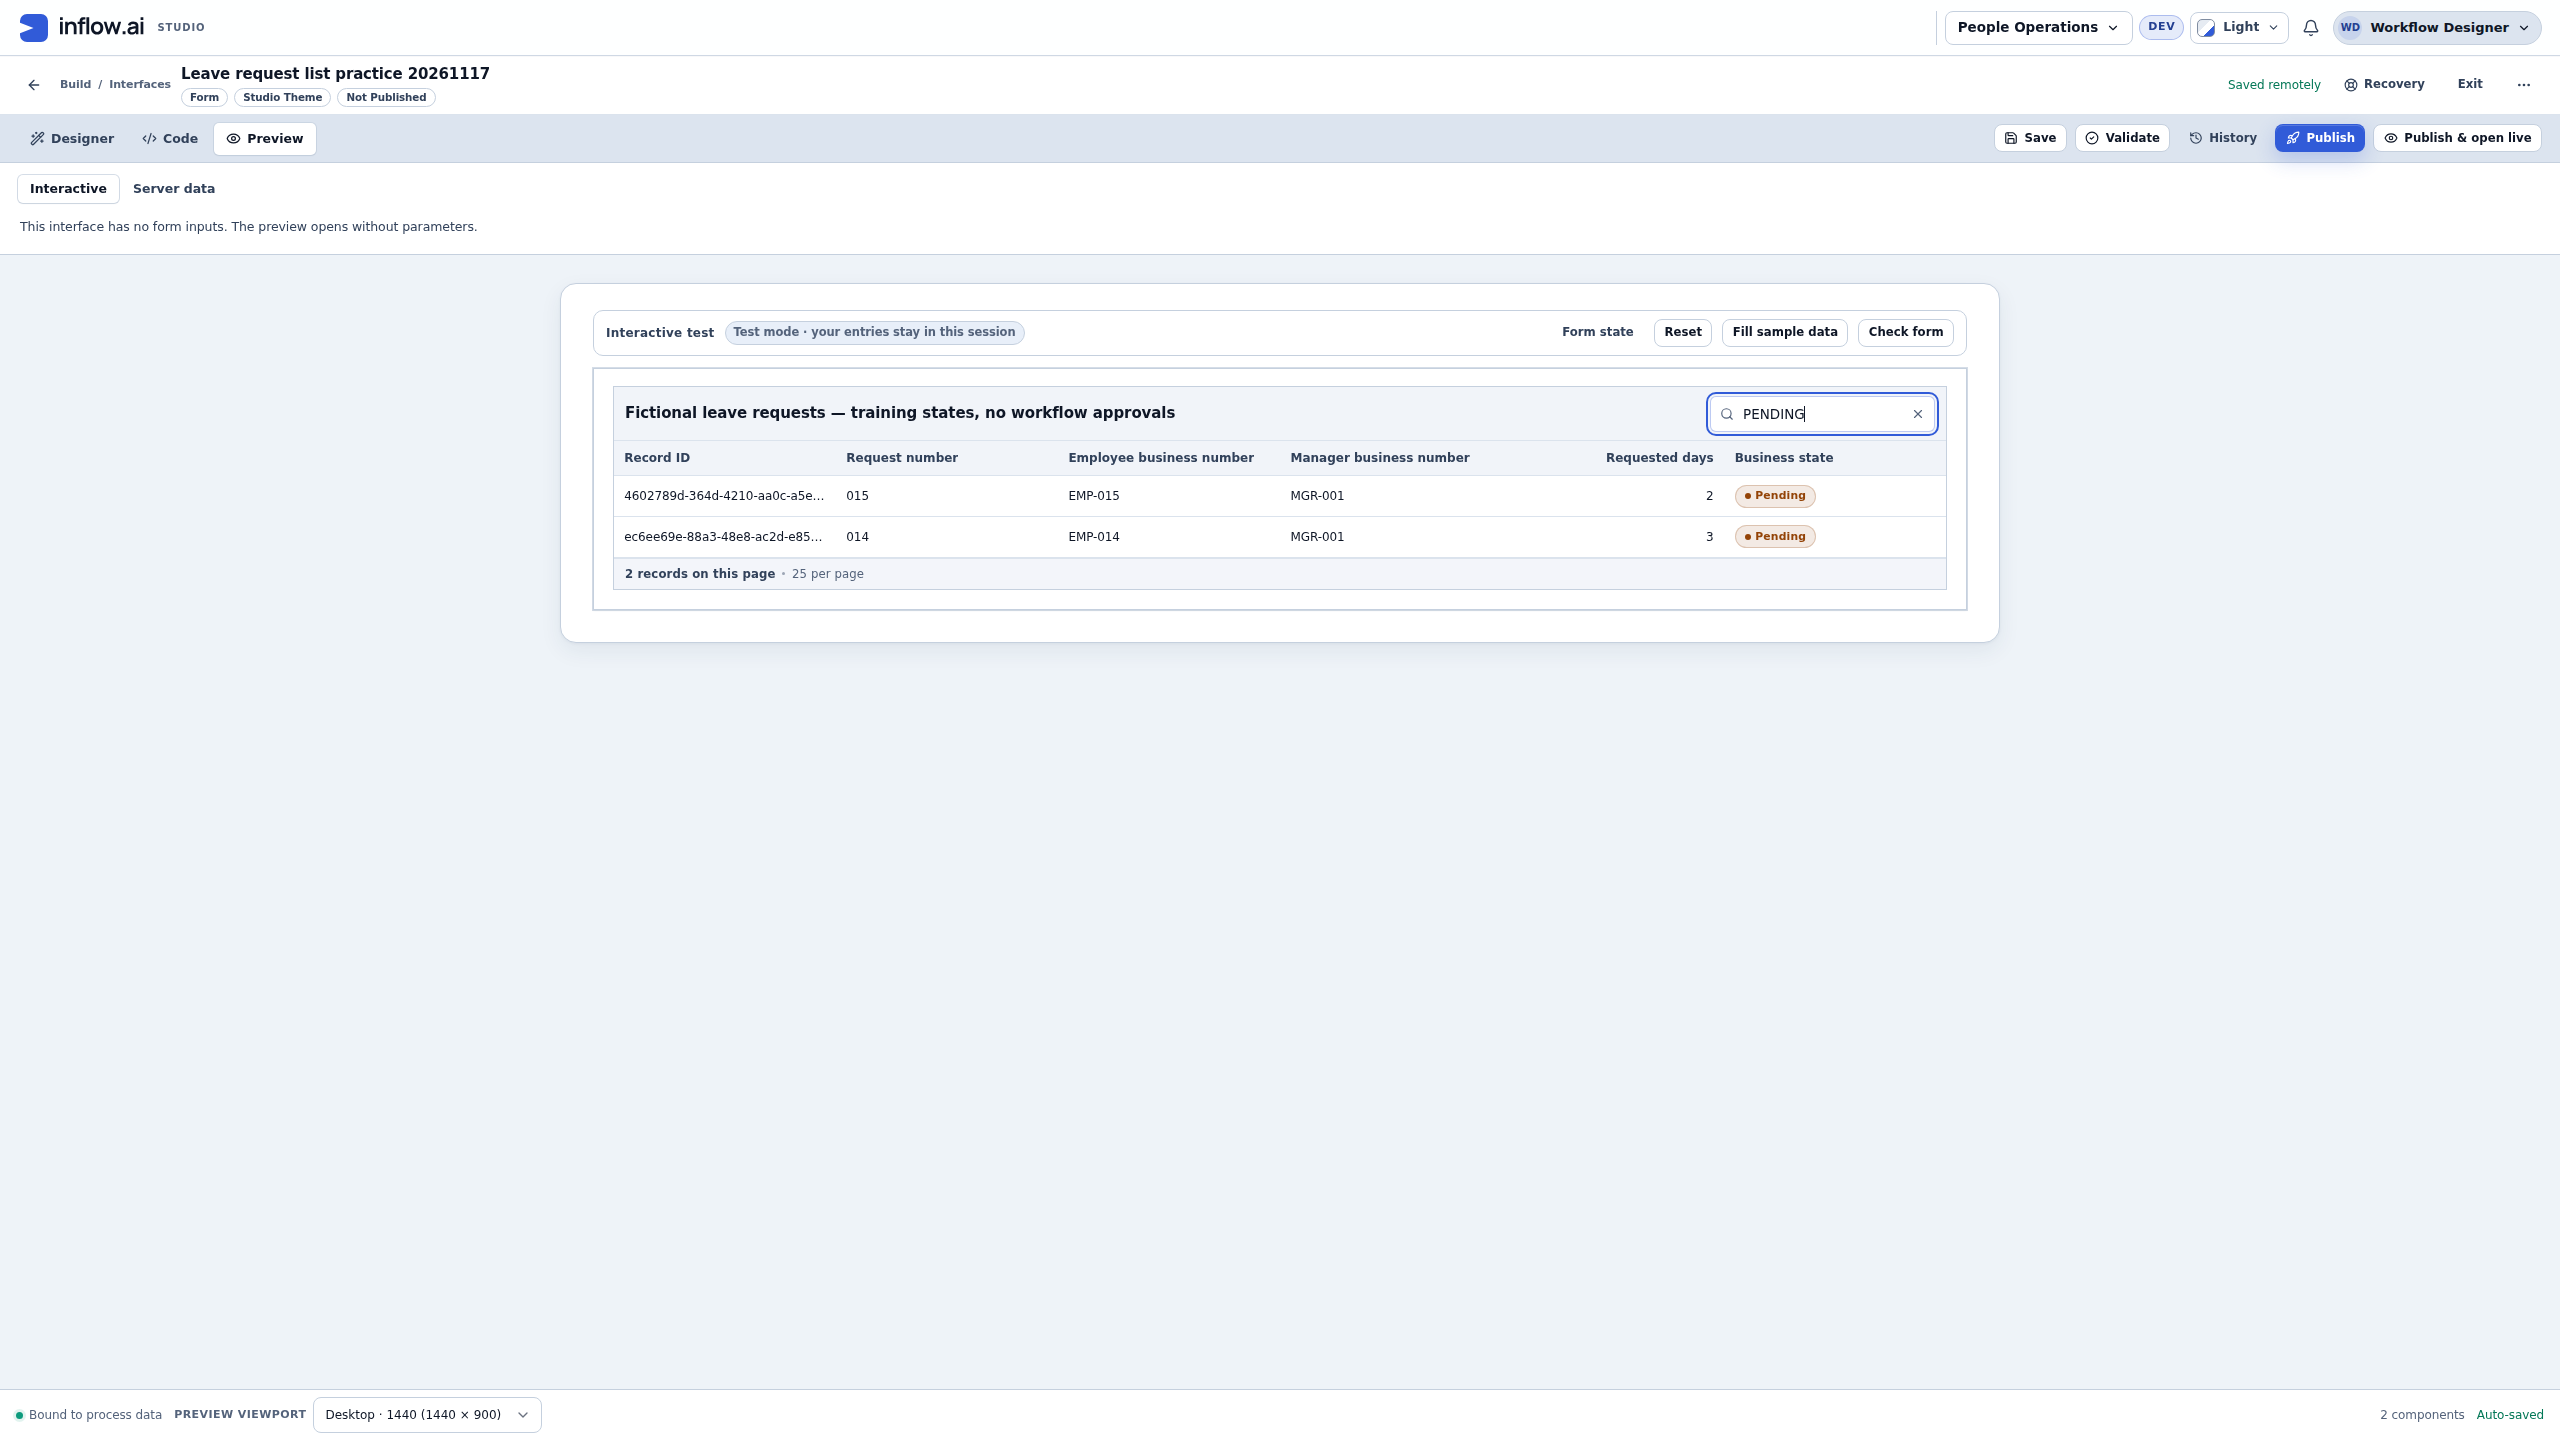
- Enter PENDING in Search records and wait for the changed result.
- Confirm that 014 and 015 remain, with 3 and 2 days, and that 016 is absent.
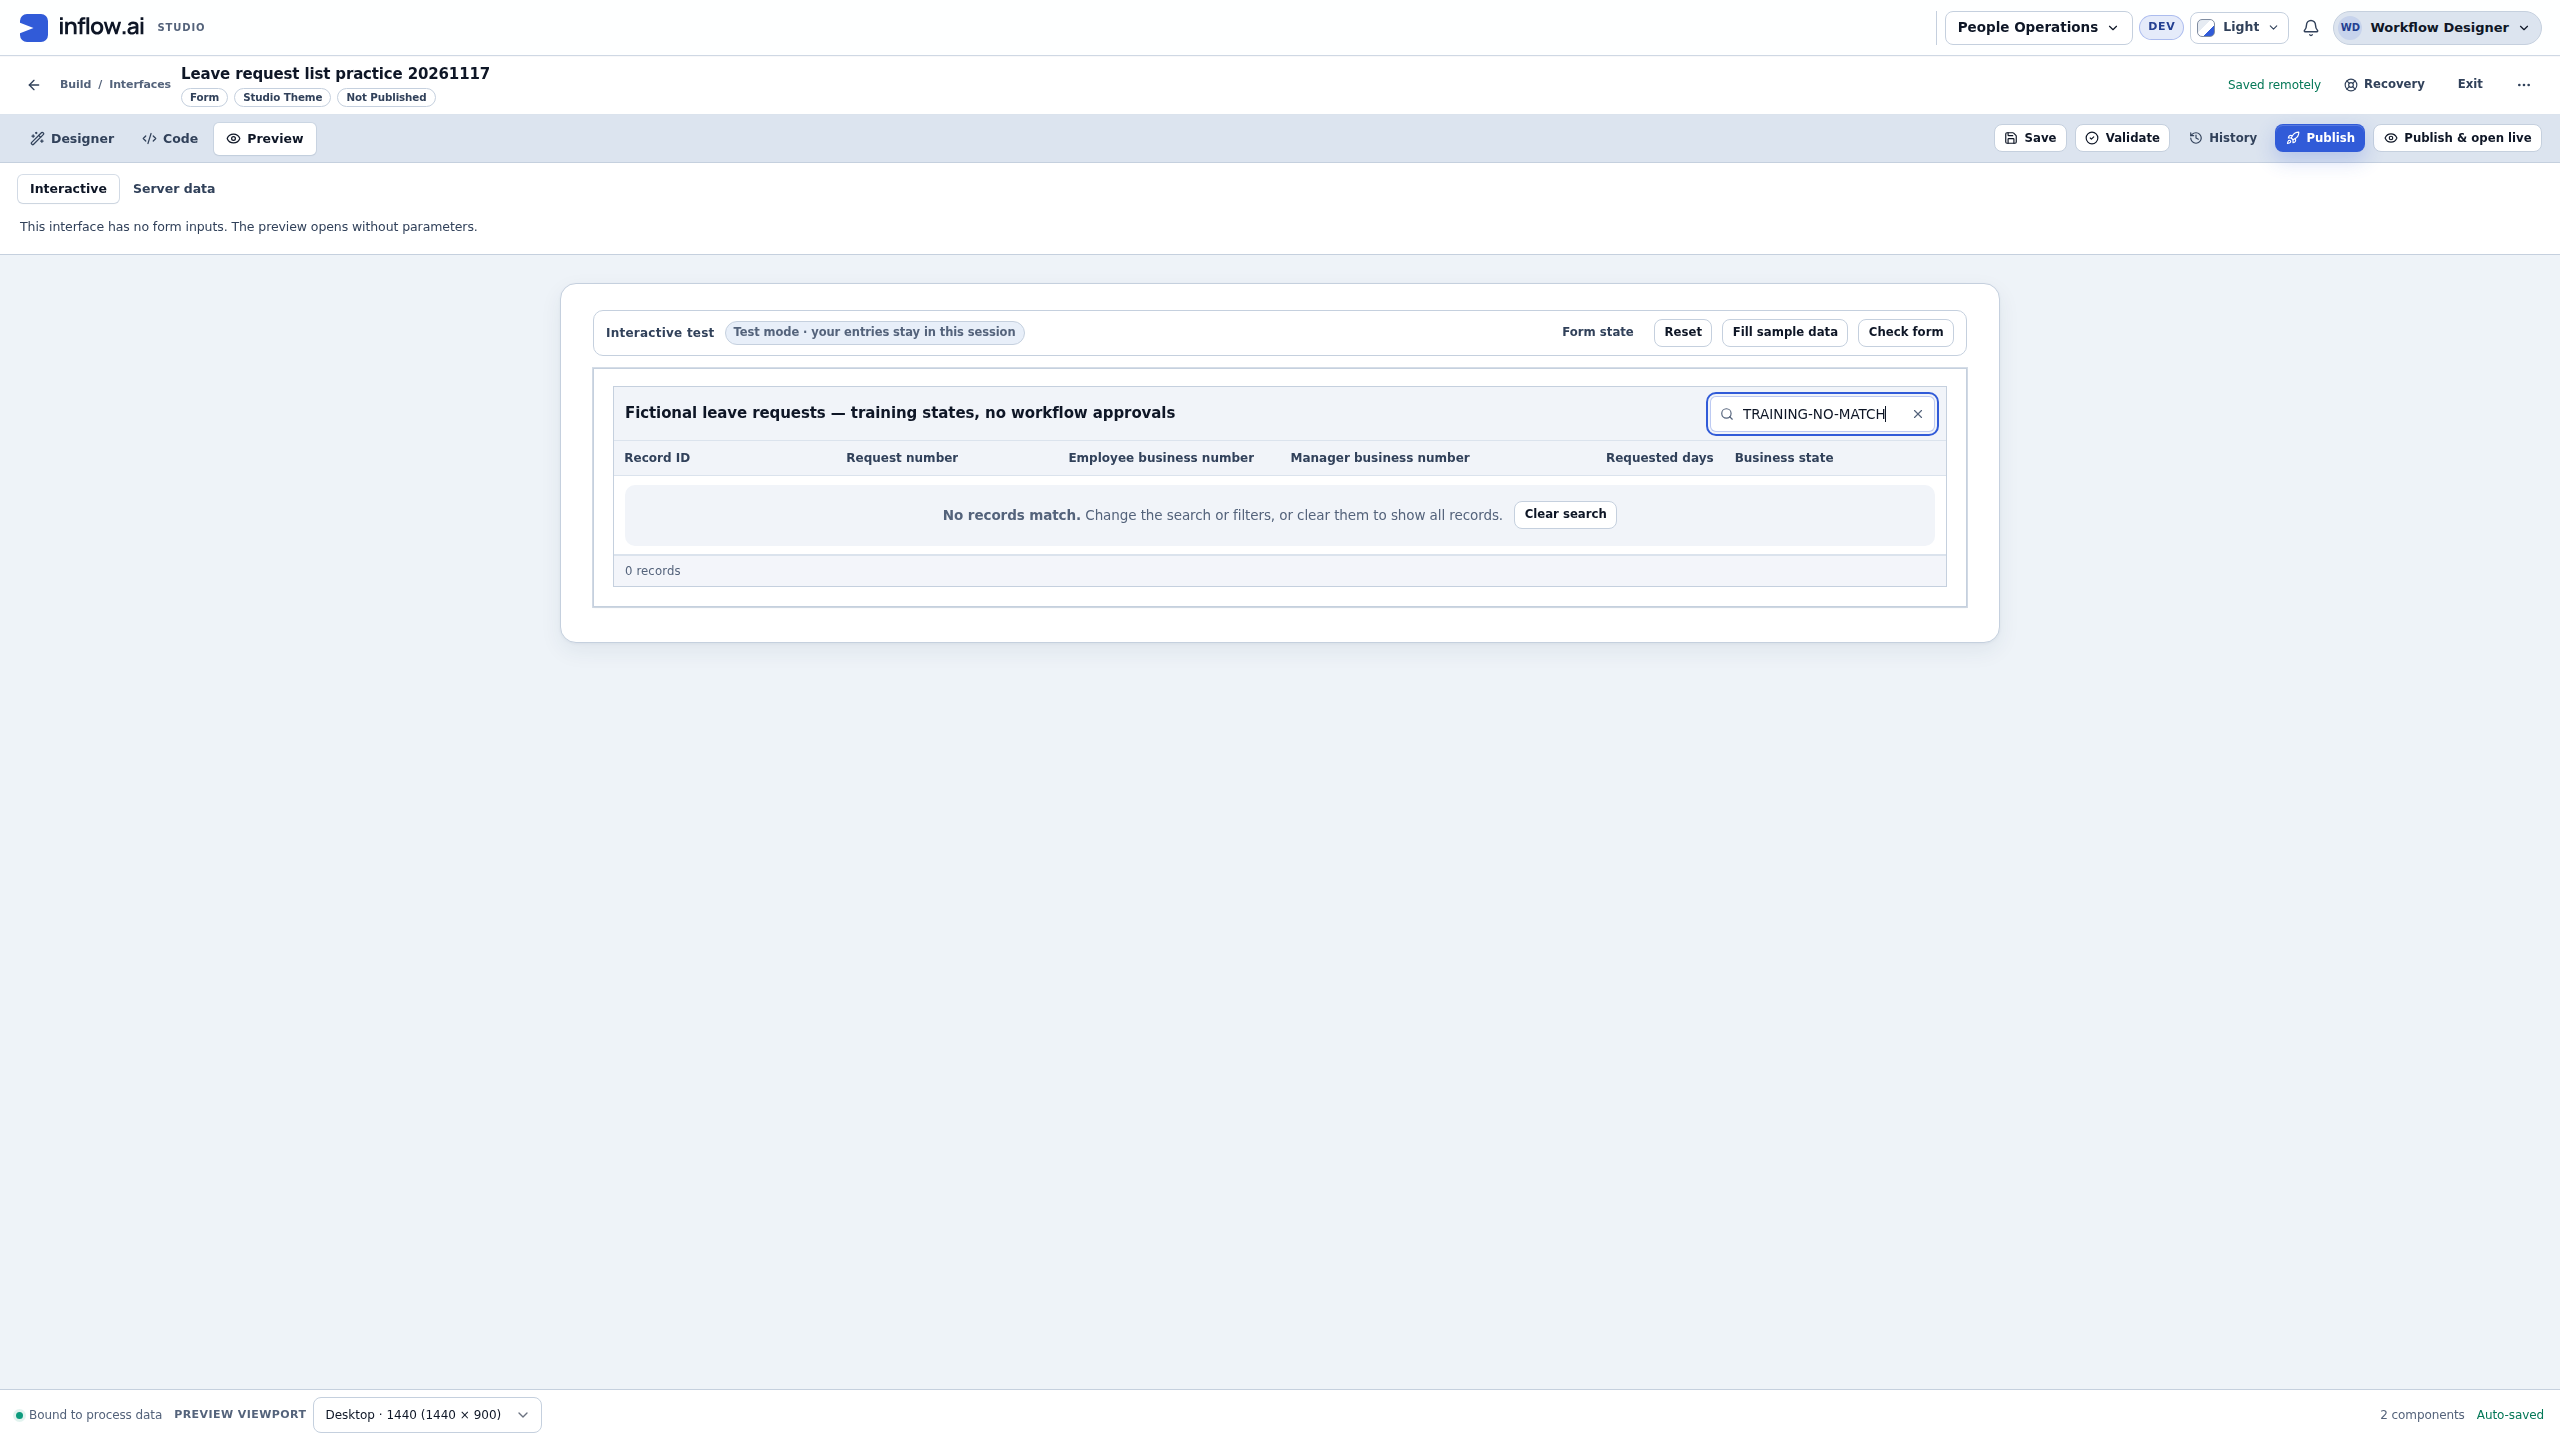
- Enter TRAINING-NO-MATCH. Read the completed No records match explanation.
- Choose the normal Clear search action. Confirm that all three original rows return. Do not create replacement requests to fill a search result.
- Choose Request number sorting and check ascending order after the rows finish loading. The captured result was 014, 015, 016. A sort indicator alone is not the settled result.
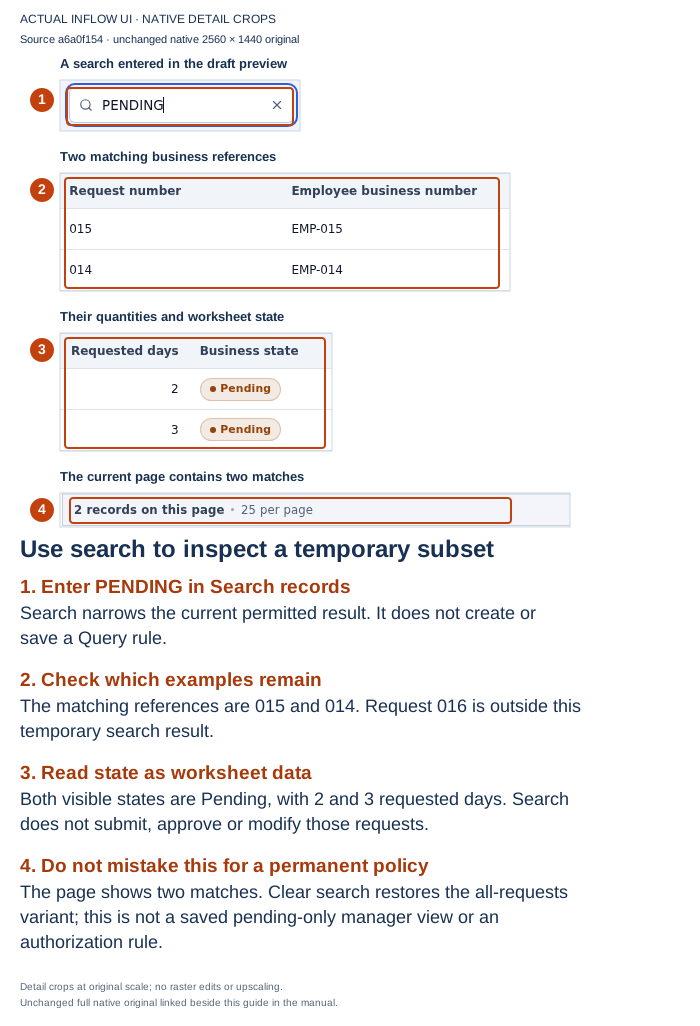
The full search original shows two matches in this permitted author preview. No Query rule or permanent source condition was saved by entering the term.
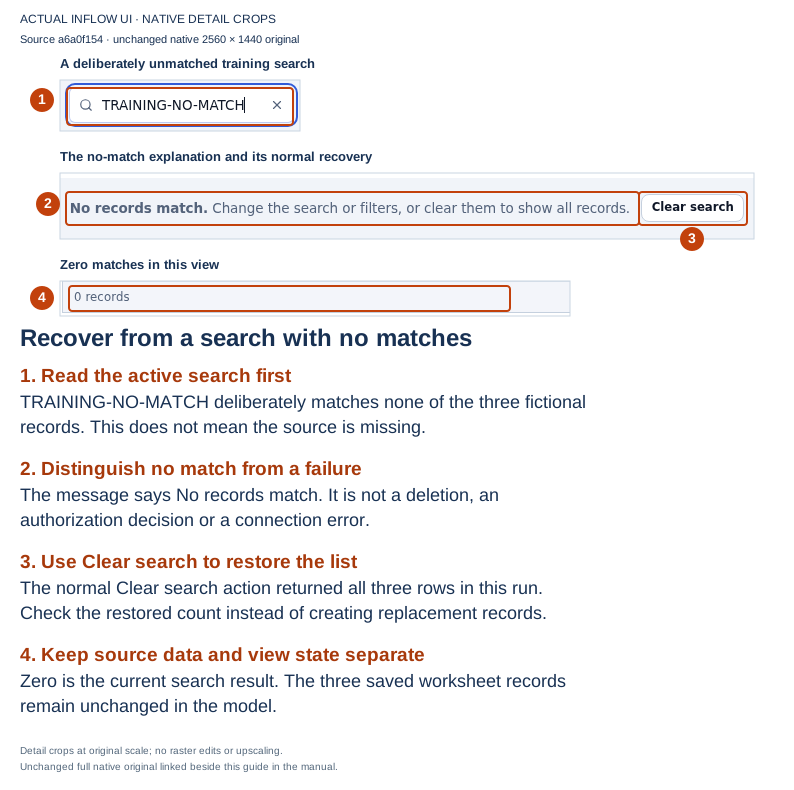
The full no-match original is unchanged. Clearing the search restored the three unchanged records. Zero here is a successful narrowed result, not a deletion, a failed connection or proof of denied access.
What you have built: a saved, unpublished all-requests list with a working direct-model connection, six fields, temporary search and a checked ascending sort. You have not yet built or released the permanent pending-only application. Filter-editor behavior, descending sort, several-page navigation and phone layout were not exercised in this capture; use the grid lesson for those separately planned checks.
Step 5 — Prepare the permanent pending-only question
Before changing the working source, agree which requirement the application owner wants. An all-requests page with a search box is useful, but labeling it Pending leave requests without a saved condition would mislead its users. Keep the current practice title until the pending-only behavior is intentionally configured and checked.
- Look for an existing published Pending leave requests Query with answer shape Records, the intended source and the fixed PENDING condition. Reuse the matching version; create or change a Query only as part of that separate approved exercise.
- Start with the Query Builder lesson and the agreed projection. A record collection can feed a compatible list; Count is a number and Single record is one item. Do not connect either of those shapes to a grid expecting many records.
- Review the actual connection surface. The dedicated Connect query rule path is for a compatible published Query that needs no inputs. When a rule needs inputs, Use a rule result supplies explicit input mappings. Do not select the unavailable Rule results placeholder in the general source chooser illustrated above.
- Before replacing the working connection, compare its record identity, fields, available interactions and intended user behavior with the Query result. A changed projection can remove columns the old grid depended on.
- Use that route's normal preview and review, then save the intended draft. Confirm both pending examples match and the approved comparison example does not. A different viewer's permitted result can still be smaller.
- Publish the deliberately changed page only through its normal review/release procedure. Do not change an intake or task Form merely because this list has changed.
This pending-only Query connection is a follow-on stage. It was not created, run, substituted or released during the illustrated direct-model exercise. An unavailable adapter must be reported as such; do not change platform wiring or broaden permissions to make a tutorial appear complete.
Example — Sara wants a number as well
Sara later asks, “How many pending requests are there?” A page showing two rows is not automatically a count of every matching record, particularly when a larger result is paged.
Keep the Records query feeding the list unchanged. Reuse a separate matching Pending leave count Query, or prepare one intentionally with the same source and pending condition and answer shape Count. For a user entitled to both pending worksheet rows, the expected number is 2. Check that numeric answer separately and use a receiving control/connection that supports it. Do not republish the list's Records query as Count or treat a visible page size as the business total. No count Query was executed in this illustrated run.
Step 6 — Finish the application and ordinary-user checks
The current practice Form remains unpublished. When its intended source and business behavior have been reviewed, finish the release and audience work separately:
- Validate and publish the intended page through its supported release flow. Keep its version and purpose clear.
- Bind that published page into the intended App Shell using the supported page configuration. An unpublished draft is not a released application page.
- Complete the identity/application-access setup in the staged tutorial order. Use approved ordinary training users; do not create broad grants or switch identities simply to reproduce the author's result.
- Sign in through the ordinary supported route as the intended viewer. Check the page, permitted rows and fields, no-match behavior and any already configured allowed record destination. Author preview is not a substitute for that session.
- Complete a manager decision only through the workflow's actual task Form and permitted submit action. A selected table row or status badge does not complete that task.
App Shell page binding, screen publication and captured workflow/task references have separate version behavior. Updating this list does not prove an existing task changed its Form. Ordinary employee/manager access, App Shell release and actual approval remain unproved by the screenshots here.
Common mistakes and next steps
| Observation | Next check |
|---|---|
| All three worksheet rows appear | The direct-model all-requests view is working; it is not a saved pending-only Query |
| PENDING search shows two | Check the two references; the search is temporary and does not grant access |
| No records match | Read the active narrowing and use Clear search before diagnosing missing source data |
| Source cannot load | Investigate that load failure; do not display it as zero pending work |
| Query is absent from one chooser | Distinguish its catalog adapter from the separate supported Query connection paths |
| Several fields are marked key | Retain required choices; distinguish chooser identity candidates from the model's actual system key |
| Ordinary viewer sees fewer rows | Review that viewer's intended access, business condition and source; do not broaden access to match Nadia |
| Approved appears in the training row | It is a worksheet state entered directly, not proof of manager action |
Continue with workflow and manager tasks. The optional technical page walkthrough is for developers who need the underlying contracts.