
Tutorial: from the starter ZIP to a published control
This tutorial takes you from the starter project, downloaded from Inflow Studio's developer kit, to a control that people use in a published Inflow form. You will:
- get the starter ZIP, check it, unpack it and install it;
- run it in the local playground;
- debug it in VS Code;
- change the control and prove the change with tests;
- package and validate an archive;
- have an administrator install it;
- place it on a form, bind it to form data so it can write back, and publish;
- use it in the published form.
Apart from downloading the starter, which an Inflow administrator does in Studio, steps 1 to 5 run on your own machine with no Inflow server, no Java and no account. Steps 6 to 8 need an Inflow server. The tutorial uses the Region picker (starter) control throughout. When you have finished, read the developer guide and the dynamic properties guide to build your own.
Every local command in steps 1 to 5 was run, exactly as written, in a clean folder outside the Inflow repository, on
the exact starter ZIP that Studio's developer kit then served (starter 1.0.0, SDK 1.1.0, test kit 1.0.0, packaging tool
1.0.0). The outputs shown are from that run. The developer kit now serves starter 1.0.4
(interface-control-starter-1.0.4.zip: SDK 1.1.3, test kit 1.0.2, packaging tool 1.0.2; SCRUM-5056, SCRUM-5075,
SCRUM-5076): since 1.0.0 only READMEs, documentation comments, versions, a playground fix and the packaging tool's
check of property defaults changed, so every command is the same and the outputs differ only in the version and in the
archive SHA-256 values. Hashes in your run also differ once you change the control.
The server steps (6 to 8) were then run in Inflow Studio through the browser, as a reader does them, with the package from step 4 (the Central change), an unset Local and the optional automation. Where that run differed from what you will see, the step says so.
What you need
On your machine (steps 1 to 5)
- The starter ZIP and its SHA-256, from an administrator of the Inflow server you will install on (see step 1).
sha256sumandunzip, or their equivalents on your system.- Node.js 22.22.0 or newer, with npm. Check with
node --version. - Network access to the public npm registry, for React, Vite, Vitest and the other public packages. The Inflow SDK,
test kit and packaging tool are not downloaded: they ship inside the starter as
vendor/*.tgzfiles. - Optional: VS Code and Chrome, for the debugger steps. Any TypeScript editor can open the project.
- You do not need a JDK, Maven, Docker or a copy of the Inflow repository. Those are only for a mixed package with a Java half (see Mixed packages).
On the Inflow server (steps 6 to 8)
- A person with plugin administration rights (Authorization → Plugins). There is no server-wide plugin switch to turn on first: an upload that passes its checks is live at once. See Operate interface-control plugins.
- A person who may edit an interface (form) in the designer.
- A person who may open the published form, with a normal sign-in. Anyone who can open the interface can use its
installed controls; the control needs no grant of its own. An administrator gives that right in one of two ways
(details in the designer manual, Who may open a published interface):
- Application access, for ordinary people. Publish an App Shell application whose page references the published form (a page bound to it) or carries copies of its components. Then, in the workspace's Security area, choose Application access → Manage application access, choose the person's group and the application, and review and Apply access (see Let people use an application). The person needs no workspace membership and no Studio role. Apply grants the targets the review lists: the App Shell and, for a referenced form, the form itself, so its own live link opens for them too; copied components grant nothing on the original form.
- Workspace access, for people who also work in Studio. Opening the form's own live link needs a role that may
view interfaces (
SCREEN_VIEW; on a standard installation only the Designer and administrator roles, which also allow building) and effective Viewer access to the form, normally inherited from workspace membership. A winning None grant still refuses (the most specific grant wins; workspace administrators keep recovery access); platform administrators have access without membership. Membership or an object grant without such a role answers with the neutral Not available; the Task Worker and Application user roles do not carrySCREEN_VIEW. - For those application users, the server offers the control only when it can check everything the control's
settings depend on: fixed values; Data bindings to a form Local or Input; expressions that read form Locals
and Inputs, governed constants, or rules named literally (
rule('key')); and choices from an expression, from a Local or Input, or from stored records (Data → Records, with filters taken from Locals or Inputs, read with the person's own access). Every Local or Input those settings use must itself be checkable: a computed Local, a Local whose default is a formula, a Local of an unsupported type (such as a Record Local) or an undeclared Input is left out for application users, and so is every control that depends on it. This tutorial's settings (a Value heading and a Region bound to the plain Enum Locallocals:region) qualify. A property bound directly to stored data (data.…,record.…), or an expression that reads another kind of state directly (such as process variables), also leaves the control out for application users only: its place shows a small Not available badge. See Application users in the designer manual. - A rule that such an expression calls is recorded when you publish and must be part of the application's reviewed access: an administrator reviews the App Shell's access for the group, the review lists the rule (integration, AI and record rules are marked because they run whenever the page renders or a value changes), and Apply grants it. Until then, and whenever the rule or its version changes, application users get the neutral Not available answer and the rule is not run. Write the key literally; a computed key cannot be reviewed.
- A request that carries only a development proxy actor header, without a real sign-in, is refused with
ACCESS_POLICY_UNAVAILABLE. The same code also means the server could not evaluate its runtime access policy; if you are signed in normally and still see it, ask an operator to check the server.
1. Get the starter, check it and install it
Download it from Studio
The starter comes from the Inflow server you will install your control on, so its SDK always matches that server. It is not published on npm or anywhere else.
- A platform administrator opens Inflow Studio, Authorization → Plugins, and scrolls to the Developer kit section. It lists the certified sample projects this Inflow build carries: the UI-only starter, the Mixed sample (UI and Java) and, when the build includes it, the Google Maps sample. Each row shows the version, the full SHA-256 with a Copy button, and Download.
- They choose Download on UI-only starter. The browser saves
interface-control-starter-1.0.4.zip. Studio downloads only the bytes whose SHA-256 it shows, and records the download in the audit log. - They give you the ZIP and the SHA-256 shown in Studio, the SHA-256 preferably through a separate channel.
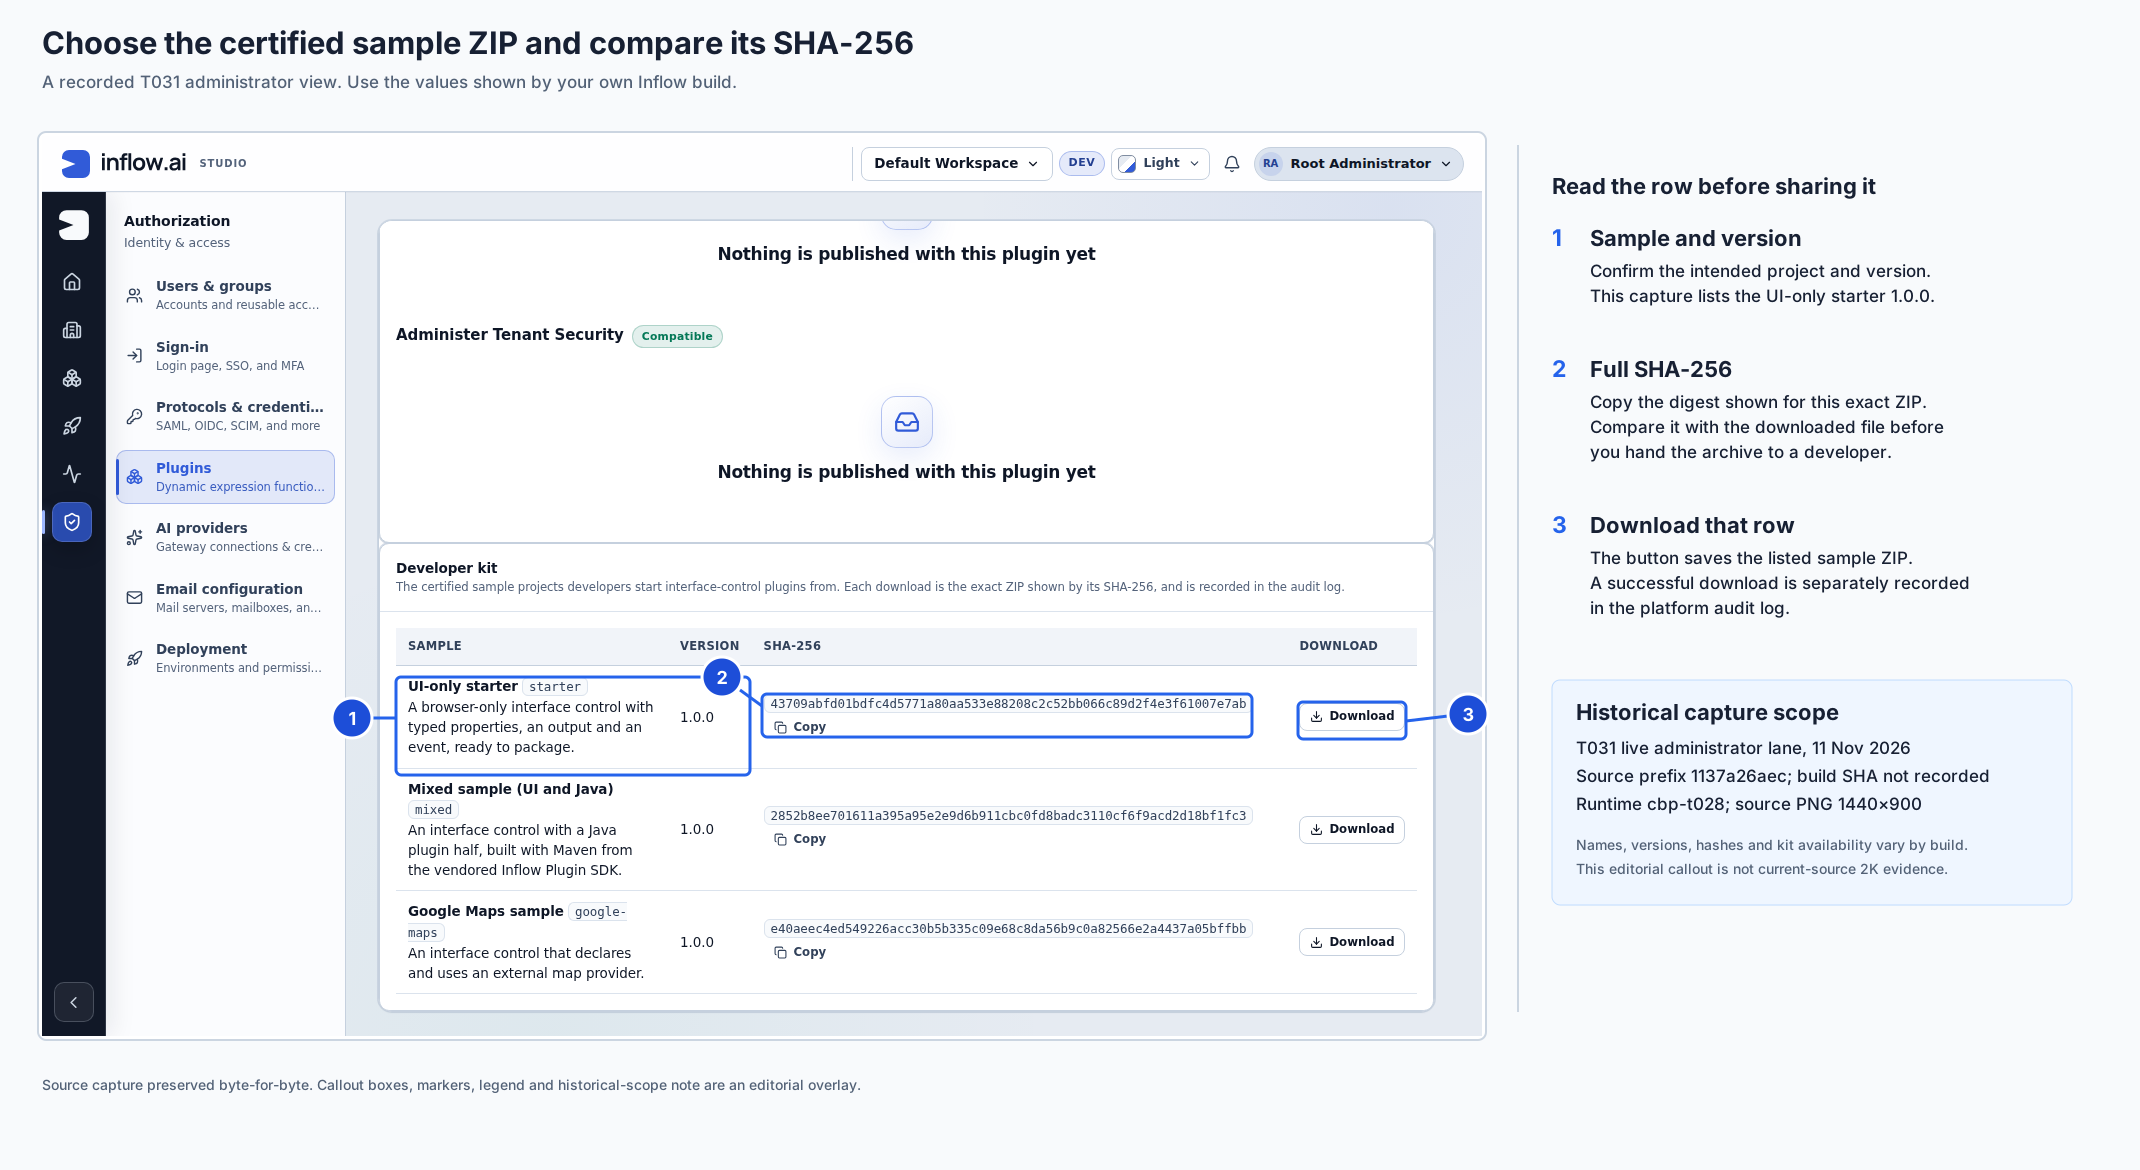
How to read this capture: 1 is the UI-only starter and its version; 2 is the build-specific digest to compare with the saved ZIP; 3 downloads that row. The captured values are examples only. Current-source consultant screenshot acceptance remains separate; this historical image is not 2K evidence.
If you are not an administrator yourself, ask one. How administrators use this section, and what Not included in this build means, is in Give developers the certified samples.
The ZIP contains one folder, interface-control-starter/, with 28 files: the control source, tests, playground, VS Code
settings, lockfile, licence, notices and, under vendor/, the three Inflow packages (the SDK, the test kit and the
packaging tool). Do not take a starter from another server or release: the vendored SDK must match the host (see
Versions).
Check the SHA-256, unpack and install
Make a new, empty folder outside any repository or other project, and put the ZIP in it. In a terminal in that folder, compute the ZIP's SHA-256:
sha256sum interface-control-starter-1.0.4.zip
In PowerShell, use Get-FileHash interface-control-starter-1.0.4.zip (it prints the hash in capitals). The hash must
equal the SHA-256 shown in Studio, apart from letter case. For the release this tutorial was run on it is:
fcec3775c246c93c451e2838817608216b56860dea851ed38350ca47b277e7d1 interface-control-starter-1.0.4.zip
If your hash differs from the one shown in Studio, do not unpack the file: download it again. (A newer Inflow build can carry a newer starter with a different SHA-256; what counts is the value your Studio shows.)
Then unpack it and install exactly what the lockfile lists:
unzip interface-control-starter-1.0.4.zip
cd interface-control-starter
npm ci
npm ci installs @inflowai/control-sdk, @inflowai/control-test-kit and @inflowai/control-tools from
vendor/ (they are file: development dependencies in package.json), and everything else from the npm registry.
If it reports an integrity error for a vendor/ file, the ZIP is damaged or was edited: get a fresh copy.
npm ci also prints an npm audit summary (in this run, "4 vulnerabilities (1 moderate, 1 high, 2 critical)"). These
advisories are for development tools only (Vite, Vitest and their helpers, used by the playground and tests); none
is in the runtime dependencies your control bundles, React and React DOM (npm audit --omit=dev reports "found 0
vulnerabilities"). Do not run
npm audit fix --force: it moves the project to new major versions that this starter was not certified with.
Maintainers only. The ZIPs in the developer kit are built and certified from the Inflow repository by the developer-kit step (see "Building Distributable Artifacts" in the repository README). External developers never need to build them.
Check that everything works before you change anything:
npm test
npm run typecheck
Expected output (abridged):
 Test Files  3 passed (3)
      Tests  14 passed (14)

generated types match plugin.json
npm test also prints messages on stderr that are expected and do not fail the run:
Error: Could not parse CSS stylesheet, many times (29 in this run), followed by the stylesheet. That is jsdom, the simulated browser the tests run in, failing to parse the scoped stylesheet the simulated host builds from the control's styles.- React development warnings from the playground test that remounts the control while it renders:
flushSync was called from inside a lifecycle method…andAttempted to synchronously unmount a root while React was already rendering…(three times each in this run).
Any other error is not expected. A run succeeds only when the command exits with status 0 and reports no failed test files, failed tests or unhandled errors.
Open the folder in VS Code (File → Open Folder…). It recommends the Vitest extension (.vscode/extensions.json).
2. Run the playground
npm run dev
  VITE v6.4.3  ready in 110 ms

  ➜  Local:   http://localhost:5199/
Open http://localhost:5199/. The playground mounts the same control module that Inflow loads, under the test kit's simulated host. Use its panels to:
- Mode: Preview (the default) or Runtime (simulated host);
- each property's Source: Literal, Expression (simulated, precomputed results) or, for the region, Binding (form data), a binding to a local form value. The designer calls these Value, Expression and Data;
- the region's Choices (dynamic option list): none (the declared members), ready, loading, empty or error;
- Theme (light or dark), Direction (left to right or right to left) and Width.
The Host calls (event inspector) list shows every call the control makes to its host, with the host's answer. In
preview mode a click is refused as suppressed, as on the designer's canvas. In runtime mode with the region bound, a click is
accepted and changes the playground's local form value. The playground makes no request to any other server: its
data is simulated locally. Its content security policy limits scripts, styles, images and fonts to its own origin, but
allows WebSocket connections (connect-src 'self' ws:) so that Vite's hot reload works. It is a development page, not
a security boundary.
Hot reload: when you save a file in src/, the playground disposes the mounted control and mounts the new code. The
playground's settings and local form value survive; a full page reload resets them to playground/fixtures.ts.
3. Debug in VS Code
The starter ships two launch configurations in .vscode/launch.json.
Playground in Chrome
- Keep
npm run devrunning. - Open
src/ExampleControl.tsxand set a breakpoint on line 71,const result = host.setOutput('region', choice.value);, insidechoose. - In the Run and Debug view, start Playground in Chrome (start
npm run devfirst). - In the playground, set Mode to Runtime (simulated host) and the region's Source to Binding (form data), then click East.
The debugger stops in choose, in your TypeScript source (the build emits source maps). choice.value is "east".
Continue, and the inspector shows setOutput("region", "east") → accepted.
Debug the tests
Start Debug the tests. It runs npm test -- --no-file-parallelism under the Node debugger, so breakpoints in
src/ and tests/ stop. You can run the same command without the debugger:
npm test -- --no-file-parallelism
4. Change the control
You will add a fifth region, Central. The steps are the ones you follow for any change to what a control declares.
4.1 Change the declaration
plugin.json is the control's reviewed declaration. Add central to the region's members in all three places that
declare them (the property, the output and the event field), and give it a label:
             "key": "region",
             "label": "Region",
             "description": "The chosen region. Bind it to form data to let people change it.",
-            "valueType": { "kind": "ENUM", "enumValues": ["north", "south", "east", "west"], "nullable": true },
+            "valueType": { "kind": "ENUM", "enumValues": ["north", "south", "east", "west", "central"], "nullable": true },
             "sourceModes": ["LITERAL", "EXPRESSION", "BINDING"],
             "dynamicOptions": ["EXPRESSION"],
-            "memberLabels": { "north": "North", "south": "South", "east": "East", "west": "West" }
+            "memberLabels": { "north": "North", "south": "South", "east": "East", "west": "West", "central": "Central" }
@@
             "key": "region",
             "label": "Chosen region",
-            "valueType": { "kind": "ENUM", "enumValues": ["north", "south", "east", "west"], "nullable": true },
+            "valueType": { "kind": "ENUM", "enumValues": ["north", "south", "east", "west", "central"], "nullable": true },
             "property": "region"
@@
             "key": "regionConfirmed",
             "label": "Region confirmed",
             "description": "A person confirmed a region (Enter or double-click).",
-            "payload": [{ "name": "region", "valueType": { "kind": "ENUM", "enumValues": ["north", "south", "east", "west"] } }]
+            "payload": [{ "name": "region", "valueType": { "kind": "ENUM", "enumValues": ["north", "south", "east", "west", "central"] } }]
Run the tests now, before anything else:
npm test
   × the starter contract > keeps the generated types identical to plugin.json
      Tests  1 failed | 13 passed (14)
The TypeScript types in src/generated/controlTypes.ts are generated from plugin.json, and they are now stale.
npm run typecheck and npm run build refuse to run on stale types too
(src/generated/controlTypes.ts is stale: run npm run types). Regenerate them:
npm run types
wrote src/generated/controlTypes.ts
Never edit the generated file by hand. From now on TypeScript checks your code against the new declaration: for
example, host.setOutput('region', 'central') now type-checks, and 'centre' would not.
4.2 Update the tests, and add one for the new behaviour
npm test
   × the starter region picker > shows the declared members, the heading, and the selected region
   × the starter region picker > returns to the declared members when the dynamic list is removed (the playground's "None")
   × the starter region picker > lets a person make the first choice for an unset binding (review r2802)
   × the starter contract > passes every conformance check (under the mocked host)
      Tests  4 failed | 10 passed (14)
These tests expect exactly four regions. The conformance failure is its list-alternative check: the accessible list
must name every member, so it now expects five. Update the expectations:
- In
tests/ExampleControl.test.tsxandtests/contract.test.ts, replace every['North', 'South', 'East', 'West']with['North', 'South', 'East', 'West', 'Central'](two places in the first file, one in the second). - In
tests/ExampleControl.test.tsx, in "returns to the declared members…", change[['North', null], ['South', null], ['East', null], ['West', null]]to[['North', null], ['South', null], ['East', null], ['West', null], ['Central', null]].
Then add a test for the new behaviour, before the test "lets a person make the first choice for an unset binding":
  it('offers Central and writes it to the bound property', async () => {
    const harness = await mount();
    const central = choices(harness).find((c) => c.textContent === 'Central')!;
    harness.interact(central);
    central.click();
    expect(harness.calls.filter((c) => c.service === 'setOutput').map((c) => [c.args, c.result?.accepted])).toEqual([[['region', 'central'], true]]);
  });
mount() (at the top of the file) mounts the control in runtime mode with its region bound to form data
(locals:region), as an author will configure it. harness.interact(central) records a person's interaction first.
Without it the host would refuse an event, and a test that clicks without it does not represent a person (see
Only genuine input).
npm test
npm run typecheck
 Test Files  3 passed (3)
      Tests  15 passed (15)

generated types match plugin.json
The conformance check (runConformance in tests/contract.test.ts) passing again means the control still meets the
host contract under the mocked host: every mode, every property state, no effects without a person, clean disposal,
theme and right to left, focus kept on update, no network without provider admission, and the accessible list.
It is a mocked boundary. It does not prove the control works on a server; steps 6 to 8 do.
Look at the change in the playground (npm run dev): with the choices set to none, Central appears after
West. The playground's own settings are separate from the control: to offer Central in its Literal value list,
also add 'central' to REGIONS in playground/App.tsx. Leave OPTION_LISTS in playground/fixtures.ts as it
is: the tests reuse it as the four-item Ready list and expect exactly those items.
4.3 Make the package yours
The starter's identity is starter-region-controls 1.0.4 by "Example Org". Before you give a package to an
administrator, give it your own identity. A server holds each plugin id once: uploading a new version of an
installed UI-only plugin upgrades it at once (the earlier version stays for publications that pin it), but the same
version with other content is refused, and a later upload of the starter's own id would upgrade whatever another team
installed under it:
- In
plugin.json, setid(lowercase letters, digits and hyphens),versionandprovider. For example"id": "acme-region-controls","version": "1.1.0","provider": "Acme Field Services". - In
package.json, change the archive name in thepackageandvalidatescripts to match:package/acme-region-controls-1.1.0.zip. - Change
LICENSEandREADME.mdto your own terms and text. They are copied into the archive.
You can keep the control's controlKey, or change it. If you change it, run npm run types: the module's
controlKey comes from the generated declaration, and the packaging tool refuses a module whose key differs from the
declaration (PLUGIN_PACKAGE_ABI … (key-mismatch)).
The rest of this tutorial uses the starter's own names (starter-region-controls-1.0.4.zip). Use yours if you made
this change.
5. Package and validate
npm run package
This builds dist/control.js (one self-contained ES module: your code, React and the SDK), then runs
inflow-control package. The packaging tool checks the declaration with the host's admission rules, checks the module's
lifecycle ABI and controlKey, refuses unresolved imports, checks that every shipped dependency comes from the public
registry with a licence and is listed in THIRD-PARTY-NOTICES.md, scans for credentials and private paths, adds the
assets list with each file's SHA-256 and size, and writes a deterministic archive.
✓ built in 676ms
UI_ONLY package starter-region-controls@1.0.4
archive  …/interface-control-starter/package/starter-region-controls-1.0.4.zip
sha256   71f2e374ba0fd4be56aee556025ed6abfbb9143e1071be6ac64ec8af44a033d6
asset    a361701d790dd1e6b79a7b262ed2d18b430eba2d2502f4ff6a2290f4c17a8373  229  assets/control-icon.svg
asset    d5f58b8d8726a680cb3ac63115c58310b245ecbbd5d3e62453d189cd5a9b0e4b  325257  control.js
asset    19d20fbb4b7d64311ef4fed869a0084980c3e8db52d8affedbe4646839bdc99f  969097  control.js.map
These are the values recorded on starter 1.0.0 after exactly the step 4 changes above (Central, with the starter's own
identity); on 1.0.4 the archive SHA-256 differs because the version and the shipped README changed. The archive is
deterministic: the same sources give the same SHA-256. The unchanged starter 1.0.4 packages to
92f925d3cc16ec2dc80ce901179d8bbcb6d2da293b013fe126327e695847434d. Any other change, including your own identity
from step 4.3, gives a different SHA-256.
npm run validate
valid UI_ONLY package starter-region-controls@1.0.4
validate re-checks the exact archive file with the same rules the server applies at upload. A pass means the archive
is structurally admissible. It is not a review or a trust decision.
Send the administrator the archive and, through a separate channel, its sha256 line. The administrator compares it before uploading, because the upload itself makes the control live. Do not unpack, edit or re-zip
the archive after validating it: any change alters its digest.
If package or validate refuses, the first word of the message is a stable code. See
Troubleshooting.
6. Install the control (administrator)
These are the administrator's steps. They are described in full in Operate interface-control plugins.
-
Compute the SHA-256 of
starter-region-controls-1.0.4.zipon your own machine and compare it with thesha256the developer sent. Uploading is the trust decision: there is no later approval step. -
Open Authorization → Plugins and drop the archive on Upload a plugin, or choose Choose file and select it (at most 5 MB).
A server holds each plugin id once. If
starter-region-controlsis already installed there (for example because someone has run this tutorial on that server before), the same version with different content is refused ("This version is already installed or kept for earlier publications. Publish a new version.") and nothing changes, while a new version upgrades the installed plugin at once and keeps the earlier version for its publications. Give the package your own identity (step 4.3), package and validate it again, and upload that archive instead. The tutorial's own server run did exactly that, withacme-region-controls-1.1.0.zip. -
Studio says "file was uploaded and is now active." The row shows Active and UI-only, and its Fingerprint (shortened, for example
6c76f81ad741...8209d240; Copy copies all of it). Compare it once more with the developer'ssha256. -
Choose Details to see what the package contains: Interface controls (1): Region picker (starter), the Trusted browser code callout and, because this package declares no provider, "This package calls no external service." Details is read-only.
Uploading is the trust decision. The control's JavaScript runs in people's browsers with their access as soon as the upload succeeds: the control host is a typed contract, not a sandbox. To stop it, choose Disable or Uninstall.
7. Place, bind and publish (interface author)
The designer steps are described in full in Use installed custom controls in the interface designer.
-
Open a form you may edit in the designer, on the Designer view. (A new one: Build → Interfaces, New form.)
-
Declare where the chosen region is stored: select Form in the Outline, open the Locals tab of the panel on the right, choose + Add Local Variable, and set Name
region, Type Enum, Cardinality Single. Leave Default value empty. -
In the Toolbox, search for
Regionand find Installed controls → Region picker (starter). Point at it: the tooltip shows the provider and version (with step 4.3's identity: "Acme Field Services · v1.1.0 · Contract v1 · SDK ^1.1.0"). If the server has more than one package with a control of that name (for example the starter and your ownacme-region-controls), they are listed separately with the same name; use the tooltip to pick yours. Click it to add it to the form. -
Select it and open Properties:
- Heading: Value, for example
Choose a delivery region. - Region: choose Data and enter
locals:region.
Binding is what makes the control writable. A control can write back only to a property bound with Data to a declared, non-computed Local or Input of the same type. If Region is set by Value (for example
North) or by Expression, the control shows the value but every click is refused, and the form never changes. - Heading: Value, for example
-
Optionally, connect the control's event to an automation, and make its result visible:
- On the Locals tab, add a second Local: Name
confirmedRegion, Type Text, Cardinality Single. - Add a Text input from the Toolbox. Under Data Binding, set Store value in to the
confirmedRegionLocal, so you can see what the automation writes. - Select the Region picker, open the Automations tab and choose Add automation. Choose Region confirmed, then Add step to automation, and pick Set a field.
- In Field, choose the
confirmedRegionLocal. A new step starts with a placeholder target that this form does not declare, so this choice is required. In Value, enter=event.region.
The control sends Region confirmed when a person presses Enter on a region or double-clicks it. A single click only selects.
- On the Locals tab, add a second Local: Name
-
Save, and try it in Preview: choosing a region changes the
regionLocal; pressing Enter on a region also fills the Text input with its value (for examplewest) if you did item 5. Preview never saves anything. -
Publish. A Publication review dialog opens; choose Publish in it. The next dialog shows Published interface v1, the link to the live form, Copy link and Open live. Publication records the exact control version and archive digest (the pin) in the published version.
On the design canvas, a property set from Data has no value, because the canvas has no running form: the host delivers it
as unavailable, and the Region picker shows its regions with none selected (SCRUM-5073). Use Preview to see the bound
value.
8. Use it
Open the published form, signed in as a person who may open it (see What you need). The steps are the same for an application user on the App Shell page that carries the form's components: this tutorial's settings are ones the server offers to them.
- The heading reads Choose a delivery region, and nothing is selected yet (the Local has no default).
- Click South: the control proposes the edit, the host writes it into the form's draft through the binding, and South becomes selected. The form's normal save, cancel, validation and dirty state apply. The control saves nothing itself.
- Press ArrowDown to move to the next region and Enter to choose and confirm it. Focus stays on the region. If you did item 5 of step 7, the Text input now shows the confirmed region.
In the tutorial's server run, at 1440×900, 768×1024 and 390×844: nothing was selected at first; a click on
South selected South; ArrowDown moved focus to East and Enter selected and confirmed it, with focus
still on East; and the Text input showed east. The page made no request to any other site.
Next steps
- Developer guide: package structure, the manifest, the lifecycle, theming, accessibility, testing, packaging and versions, providers, mixed packages and troubleshooting.
- Dynamic properties: value types, source modes, dynamic choices, bindings, outputs and events.
- SDK and manifest reference: every field, type and limit.
- The advanced worked example, the Service visits map sample (the Google Maps sample in the same developer
kit; check its SHA-256 the same way): a record-list property, a real provider (Google Maps) loaded only when an
administrator admits it, a browser key as a component property, and an offline mode. Its record list can come from a
form data list (at most 200 rows) or from a published query rule through an expression (
rule('…'), up to 1,000 records): a published MANY QUERY rule's typed record list feeds the property directly. For App Shell application users the rule must be in the application's reviewed access (see the designer manual, Application users). - To publish a new version later, change
versioninplugin.json(and the archive name inpackage.json), package it, and ask the administrator to upgrade (see Versions and upgrades).